Preparing for a wedding consists of many important moments: finding a place for the celebration, choosing a host, trying on wedding dresses. Invitation cards play an important role, because this is the first thing that guests will see. The modern wedding industry provides a huge selection of cards for every taste, but these days you won’t surprise anyone. Invitations made by yourself look much more interesting. The same applies to envelopes for money, which will be an excellent addition to the main gift for newlyweds. How to make envelopes with your own hands will be discussed in this article.
Beautiful envelope for a holiday invitation
Making wedding accessories is a troublesome, but quite entertaining task, if you decide to do everything yourself rather than buy ready-made invitations, I will be happy to help you with this. I offer a master class on creating an invitation envelope that you can use not only for a wedding, but also for any other celebration.
To make a stylish wedding envelope you need to prepare:
- standard white envelope without markings or inscriptions;
- fabric glue;
- a square piece of fabric of the desired shade;
- ribbons;
- designer paper;
- pencil;
- ruler;
- scissors;
- iron.
Step-by-step production
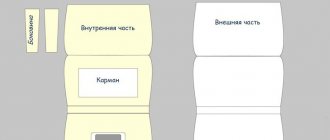
First you need to make the inside of the envelope, it will be made of fabric. You shouldn’t be surprised by this choice; in the end, the result will definitely exceed even your wildest expectations.
Fold the fabric in the shape of an envelope, mark the center on the back side with a pencil, drawing a thin line. Fold all the ends of the flap towards the center, creating a full-fledged model of the future packaging.
Carefully trim off the excess material with scissors, fold all the ends and carefully go over the crease lines with a heated iron. Iron the fabric a couple of times, so it will better hold the given shape.
Connect all the edges of the blank with fabric glue, wait until it dries and place the invitation to the celebration inside. Additionally, you can tie the envelope with a thin ribbon - it looks cute and original.
When the inside is completely done, it's time to work on the outside. From colored paper, cut out a piece whose shape completely matches the shape of the paper envelope lid, but is slightly smaller in size. Now take PVA glue and carefully glue this part inside. Look at the photo and do everything exactly the same.
Place the decorated smaller fabric envelope along with the invitation to the celebration in a decorated paper package. At this point, the work is finished, you can start sending invitations to the recipients, I’m sure they will be very surprised to see such unusual and beautiful envelopes.
Scrapbooking envelope with ribbon
Using the step-by-step instructions with photos below, you can quickly and easily make a beautiful wedding envelope from scratch.
- Print out the envelope template.
- Cut it out and transfer it to thick paper or cardboard.
- Cut the workpiece along the contour.
- Make deep grooves on the inside of the workpiece corresponding to the dotted lines of the template. This can be done with a needle and ruler.
- Fold each edge of the future envelope towards the center along the line of the grooves.
- Gently press down the edges with a wooden ruler to avoid opening.
- Place money or an invitation into the received envelope and close all sides one by one.
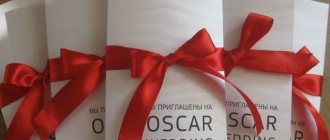
- Take a 1 m long ribbon and tie it around the envelope.
- Tie the ribbon into a beautiful bow.
- Cut off the edges of the ribbon that are too long, and singe the cut so that it does not crumble.
What to choose?
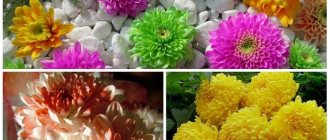
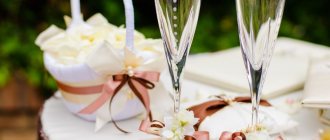
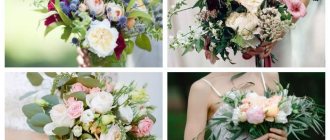
The surroundings of the packaging should match the event, elegant, openwork, with wishes of happiness and love.
Wedding envelope with initials
Traditionally, newlyweds put banknotes, concert tickets or travel vouchers in envelopes. Wishes in the form of inscriptions are no less important. The initials or names of the newlyweds , wishes, comic advice on how to dispose of the contents are quite appropriate.
An envelope with money is presented, accompanied by a piquant speech
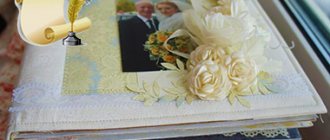
Openwork, covered with lace, colored satin, decorated with ribbons, beads, birds, hearts - you can create an envelope for a wedding yourself. A clever idea, a little imagination and skill will help you create a wonderful gift attribute. Perhaps handmade wedding envelopes will be kept in the couple’s wedding album for decades, as a memory of the joyful day and the relatives who presented them.
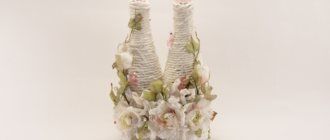
Ornate edges, wavy outlines, convex decorations will emphasize the romanticism of the event. Preference should be given to a pastel palette : blue, pink, cream, white and beige.
Unusual options
In addition to traditional paper and cardboard options, there are others. For example, wooden envelope boxes . The photo shows a model made by laser cutting of thin plywood and laser engraving on it:
Here, too, there is laser cutting, but not on plywood, but on sawn veneer made of natural wood with a colored backing :
A box using the scrapbooking technique successfully replaces an envelope (left). And another option (on the right) is a folding envelope box , also using the scrapbooking technique.
It’s not an envelope at all, but it looks funny and intriguing - everyone will be wondering if there is money inside, or if they are used only as a “wrapper”:
Another unusual “not an envelope” option:
How to do it yourself?
The basis of the product is usually thick cardboard or paper . You shouldn’t use so-called “beer” cardboard (rigid sheets 1-4 mm thick), the stationery version is enough.
It can be glossy, matte, embossed, patterned sheets . All the necessary parts of the base are usually placed on an A4 sheet (regular writing paper or printer paper).
This is interesting: DIY bracelets for bridesmaids
Printable Templates
This is the simplest and most budget option for those who want to be original, but want to spend a lot. It requires only high-quality paper (preferably for photo printing, glossy or matte) and a printer with full-color printing capabilities. Below are several ready-made templates with marking lines already applied - for folds.
This is interesting: Read everything you need to know if you decide to organize a bride price here .
After printing, the envelope is processed: using a ruler and a blunt, hard object (for example, a knitting needle with rounded tips or a table knife), they “pass” the fold lines on the reverse (clean) side and make slits, if necessary. Cut along the contour, fold and glue the sides.
Below, we have made a selection of universal templates . These templates can be printed on a color or black and white printer and assembled yourself along the contours:
Advice! If you want an envelope with a beautiful design, buy single-sided designer paper and print one of these templates on the white side and have a beautiful design on the back.
Scrapbooking technique
Those who choose this option should be prepared for more difficult work. The base is also a template for the envelope .
One of the schemes for performing the work is shown in the illustration below.
Procedure:
- The blank of the future envelope is cut out of thick cardboard according to the desired template. The corners can be rounded using a special corner hole punch or simply carefully trimmed with scissors. Fold lines are drawn from the inside along a ruler with a blunt, hard object. If there are side folds, you can immediately tuck them in and glue them.
- From special paper for scrapbooking or just beautiful paper (even original wallpaper and magazine, newspaper pages, napkins), cut out parts that repeat parts of the blank for the envelope . The size of these parts should be such that there is a free margin along the edge of the workpiece (reduce the contour by stepping back 2...5 mm from the edge).
- Glue satin, grosgrain, lace or velvet ribbon to the workpiece . It is better to immediately treat the edges of the tape thermally (burn them over gas or a candle, a match) so that the tape does not unravel or fray.
- Glue decorative paper pieces onto the base on top of the tape..
The decor can be anything - half-beads with or without adhesive (in this case you will have to glue them yourself), rhinestones (adhesive is best), lace, ribbons. It is only important to maintain moderation and make the decor as flat as possible , otherwise the envelope will be awkward to handle.
Important : it is advisable that the sides of the envelope are sealed , there are folds or there is an additional pocket for money inside, otherwise the bills may fall out.