What could be a more elegant event than a wedding? The scale is comparable to Cinderella's ball. This is why the bride's dress is important! Especially if she wants to sew it with her own hands.
Every bride wants to be special and look 100%. The wedding dress directly determines the impression the bride will make on those around her and on her lover. If you want to take a very individual approach to choosing a wedding dress, then you can try sewing the dress yourself. This is not an easy task, but it is exciting; with the right approach, the result will bring a lot of positive emotions, and the wedding day will be remembered for a lifetime as the most wonderful moment.
Sew it yourself
Undoubtedly, a wedding dress requires a much more responsible approach than any other outfit. And for obvious reasons: not only is this an outfit for a special occasion, but this outfit will be the center of attention of all those present. But first of all, the dress should please the bride herself.
It is worth approaching tailoring with all seriousness. Each step of the sewing algorithm requires a lot of attention.
The algorithm of action is, in principle, the same as when sewing any other dress:
- Taking measurements.
- Choice of style.
- Choice of fabric.
- Construction of a pattern.
- Cut out the material.
- The process of sewing a dress.
- Trying on and correcting flaws.
Now in more detail about each stage. For an example of sewing a wedding dress, let’s take a style with a tight bodice and a full skirt.
Color, materials and accessories
White is considered the traditional color for a wedding dress, but you shouldn’t force yourself into rigid limits.
Variations of white and beige colors are suitable for brides:
- Ivory;
- ivory;
- lactic;
- coffee with milk;
- the color of melted chocolate ice cream.
If any bright color unconditionally suits you, feel free to sew yourself a dress of that exact shade.
The choice of material directly depends on the style and style of your outfit.
Frequently used ones include:
- natural, artificial silk;
- chiffon, georgette;
- lace, guipure;
- tulle, tulle;
- satin, satin;
- knitwear, supplex;
- taffeta;
- cotton, linen in various proportions.
Taking measurements
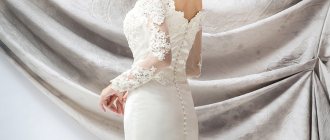
Very rarely, wedding dresses are made in oversized styles. For the most part, these are dresses with an emphasis on the waist, emphasizing the bust and curves of the shoulders. It is these silhouettes that express the bride’s femininity, fragility and tenderness. For these reasons, taking measurements of the bride must be approached very carefully.
Since the example is a style with a tight bodice and a fluffy skirt, for the bodice you will need measurements of the waist circumference, chest circumference and front length. Moreover, if the bodice has sleeves, you will need to measure the length of the sleeve and the length of the armhole.
It should also be noted that bust circumference will be required if the bodice is sleeveless and rests on the bust. For the skirt, you will need to measure its expected length from the waist line.
Let's start sewing
Well, the time has come to sew your own wedding dress. One of the models has a tight-fitting bodice and a very full skirt. For it you will need a basic blouse pattern - you can create it using a special computer program. As for the rest, we choose the following materials:
- light supplex for the top;
- tulle, tulle or guipure for a skirt;
- wide elastic band:
- bra to match the supplex or cup;
- accessories;
- sewing supplies.
For a skirt, tulle is preferable because it can be cut in all directions and does not require overcasting. But as for sewing accessories, a knitting needle, as well as a foot for elastic materials, can be a very useful thing.
Operating procedure:
- We transfer the pattern to supplex - with small allowances.
- We cut out the details of the top - there should be 4 of them, that is, the entire back and front and two sleeves, if you decide to make them from the same fabric.
- We sweep away the darts.
- We sew them together with long stitches.
- Sew the shoulder and side seams using shorter stitches.
- Let’s try on what we get – the bodice should fit the figure beautifully, and most likely it will.
- We baste the underside of the cups.
- Let's try it on.
- Sew them tightly.
- Mark the neckline on the model.
- We hem it (or better yet, sew a matching elastic band along the edge on the wrong side).
- We sew in the sleeves - in this case you definitely won’t have to bother with the fit.
- We sew the sleeves into the armholes.
Skirt
The easiest way to cut a skirt for a wedding dress with your own hands is from tulle - it can be cut by folding it in several layers. An excellent option is sun or semi-sun. You can spread the fabric in several layers so that the entire skirt fits and there are no seams. But this does not always work out, and looking for the middle is not particularly convenient. Therefore we do this:
- Fold the material in half.
- Find the middle of the fold.
- We draw a semicircle from this point (you must first find its radius by dividing the waist circumference by 6.28).
- With the center at the same mark, draw another circle, adding the length of the skirt itself to the radius.
- We cut the remaining layers in the same way - or simply chop them together and cut them according to the part that already exists. There can be 4-5 layers, or even more, and nothing prevents you from making them of different lengths, the top one being the shortest.
Sew a skirt
To assemble the skirt of a fluffy wedding dress, you don’t need much effort:
- Place all the layers as they will be on the finished dress.
- Sweep them along the notch.
- Cut a piece of wide elastic of the same color.
- Sew the elastic into a ring.
- Baste it at several reference points to the notch.
- Stitch, pulling lightly.
Assembling a lush wedding dress
So, the answer to the question of how to sew a fluffy wedding dress has almost been received. There is very little left to do - sew the bodice to the skirt, and this is a matter of technique:
- Just like you did when assembling the skirt, baste the bodice to the elastic in several places.
- Sew the bodice.
This wedding dress can be made from other materials - for example, the top can be made from plain satin. But in this case, you will have to sew in a zipper, and some difficulties may arise with the fit of the sleeve.
Choice of style
Despite the fact that a style with a tight bodice and a fluffy skirt from the waist was chosen as a sample, even within this framework you can come up with many variations of the dress. The main experiments take place in the bodice area. It may be sleeveless, in which case you will need a corset underneath. With sleeves, the field of experiment becomes wider - the sleeve can be long, three-quarters, or there can be thin straps. The neckline can be made (if the bodice has a sleeve) straight to the waist, boat or simply semicircular.
There are fewer experiments with a skirt - you can vary its length and fluffiness, the number of skirts and their length.
First steps
There are a lot of models of wedding dresses on the Internet, magazines, and catalogs. And the first thing to begin tailoring is the choice of style. Of course, you don’t need to sew the most fashionable outfit, and not the one that looks beautiful on the cover, but the one that suits you personally: it removes flaws and emphasizes your advantages.
Where to look?
- To simplify the selection of a style, special programs will help, using which you can virtually try on yourself, or rather on your photo, the outfit you like and evaluate how well it “fits”.
- You can browse websites, catalogs, and magazines on this topic.
- It is better to seek advice from professionals. Going to a bridal salon is one such option. You should definitely take your mother or a sincere friend with good taste for company. Unlike a virtual fitting in a wedding salon, you will be able to test in practice the convenience of a particular model and the comfortable feeling in it. At the same time, you will have a good opportunity to take a closer look at the materials and their textures.
It’s very good to combine both options for searching for a dress style: programs and salon. Be sure to try on several types of dresses of the same model and, if possible, take photos.
Subtleties of choosing a style
Let's look at some nuances regarding choosing an outfit:
If you have beautiful, lush breasts, it is better not to focus attention on them on this day. Therefore, put the dress with a deep neckline aside
Large lace and lush frills are also not suitable for you. This also applies to a bustier dress made of satin, organza or silk. But on a bride with graceful small breasts, a bustier dress and dresses of an asymmetrical cut or Greek style will look perfect. The missing volume in the neckline area will be added by draperies, embroidery or ruffles. If you have curvy hips. Here, turn your attention to the chest or neck. The neckline of the dress can be round, V-shaped, the top of the dress can be embroidered, decorated with lace or unusual drapery. You can choose an off-shoulder outfit. A bride with an apple figure will be adorned with a wedding dress in the new look style. This style will emphasize all the advantages, namely the legs and hips, but you need to choose a dress that is less fluffy and not tight. A good solution would be to choose a high-waisted model in the Greek style or a straight wedding dress. The mermaid model is very suitable for a bride with an hourglass figure; A tall girl in a fluffy dress will look like a real princess.
Choice of fabric and accessories
Shops that specialize in fabrics for wedding dresses will provide you with a wide selection of fabrics, colors and textures. For example, organza, satin, satin, all kinds of ribbons, mesh, decorative elements, etc.
If you are new to sewing, it is better to opt for simple fabrics that do not require sewing skills. Also, when purchasing, you should clarify the possibility of combining different materials. For example, for satin with a shiny surface, the ideal companion fabric would be a matte material that will reduce its shine. Lace is suitable for any type of fabric. Using it, you can give your outfit a strict or playful look.
If you have found a pattern with a description of the work and the necessary materials, you can choose the fabric to your taste, choosing exactly the color and material that will be comfortable and best suits you.
Search for a pattern
The chosen model or the one invented must be transferred to paper. Before this, measurements are taken. To do this, ask your loved ones or friends, or use the services of a seamstress.
The pattern can be found on the Internet on paid and free pages, or by entering the dimensions into the appropriate programs, you can search in magazines or use the services of a seamstress or model it yourself.
The main thing is that the construction of the pattern must correspond to your dimensions, be accurate and correctly constructed.
The step-by-step process of sewing a wedding dress is presented in the following pictures. It is not difficult to sew such a dress.
Constructing a pattern
A simple option would be to transfer the finished pattern from a magazine onto a large thick sheet of paper using carbon paper; you can take old unnecessary wallpaper. Make a pattern.
If you were unable to find the desired model and working with the drawings does not cause difficulties, then you should start working by constructing a basic pattern. By the way, you can ask around for a ready-made version of it in sewing stores or look for it in the same magazines and websites.
The basic pattern drawing starts with a basic grid. Then, according to the formulas, dots are applied and connected by segments, forming the neckline, shoulder bevel, main darts, armhole, waist and length of the dress.
Fabric selection
Choosing a fabric is as responsible as choosing a husband. It is necessary to carefully analyze which elements of the dress require what density of fabric, what fabric a sewing machine can “chew” at home, and how the chosen fabric will fit the chosen style.
The bodice and skirt can be made from different fabrics. Fabrics can be combined in both the bodice and the skirt. For example, the petticoats and overskirt of a dress will obviously not be made from the same material. The ideal material for a petticoat is tulle. You can play with the number of petticoats to adjust the fullness. The overskirt can be made of satin, lace, chiffon, silk.
We sew a simple beautiful outfit step by step
I suggest moving on to the lesson, which will help you understand the next question, “how to sew a dress with your own hands” (for beginners, patterns and a step-by-step description of the entire process).
Straight black sheath dress for girls
I would like to note that the most rated, so to speak, classic cocktail dress is a semi-fitting robe (with a pencil skirt at the bottom). It is suitable for any occasion. During the day you can wear it to the office, and by adding a wide belt, you can go to a party after work.
Material is preferably black, but you can choose checkered or velvet. But remember that velvet will make a more formal option. Stylists advise having a removable element (basque or stylish collar) that will help refresh the look. The basque can be sewn separately from the same material, so no one will dare to reproach you for walking around with a removable basque, and buy the collar at a jewelry store.
In general, a little black dress must be in every woman’s wardrobe, and if you have not yet become the owner of such a designer creation, urgently drop everything and start creating it.
Reinforce the facing with thermal fabric. Place on the neckline of the dress face to face. Sweep, grind. Unscrew the facing to the wrong side of the sheath dress, sweep clean, and iron.
Hem the sleeves of the sheath dress. Hem the bottom of the sheath dress.
So, how to sew a sheath dress with your own hands (patterns for beginners).
Baste and stitch the darts. Iron them towards the middle. On the back, sweep the darts, stitch, and iron to the middle of the back.
Baste and stitch the side seams. Sew a hidden zipper along the back. Cut out a facing for the neckline and armhole 3 cm wide. Hem the bottom of the product.
Constructing a pattern
The skirt pattern is a half-sun or sun pattern. It all depends on the choice of style. To create a pattern for a circle skirt, you need to construct a semicircle, the length of which will be equal to the semicircle of the waist. Then, from the ends of the semicircle, draw horizontal lines equal to the length of the skirt, connecting their ends with a semicircle. Half-sun is a semi-circle with a length equal to the waist circumference, and then - according to the same algorithm as the circle skirt.
The approach to patterning the top of the dress is much more complex. A corset is often needed under the bodice. Sewing it with your own hands is very difficult, which is why we will focus on the pattern of the bodice itself, while the easiest way (and cheaper) to purchase a corset is ready-made. But still, instead of a corset, you can construct a corsage - for this, metal rods covered with plastic, as well as bones, are sewn into the bodice of the dress. This approach will make sewing somewhat easier, since you will not have to create a separate corset, but still there are many difficulties associated with the corsage.
When the question of sewing a bodice arose, many pattern options open up. How you can do it:
- Find a suitable strapless bodice pattern online/in a sewing magazine.
- Use an old dress of a suitable style (tear it into components and make patterns from them.
- Use a blouse pattern of the desired style, fitting the chest and waist, and then cut off the upper part (the part above the bodice, straps) using the patterns.
DIY wedding dress: master class and description with photos and video tutorials
Making a wedding dress with your own hands is easier than it seems at first glance.
After all, it’s all about stereotypes - when you hear the phrase wedding dress, a picture of a magnificent princess dress, in which most brides look like a pencil stuck into a head of cabbage, immediately comes to mind.
And not all girls dream of looking exactly like this on their wedding day. And although fluffy dresses are still popular, several other models of wedding dresses are confidently coming into fashion - see photos.
Colors and materials
Light shades are considered traditional for a wedding dress, mainly white, of course. White is a classic, but, unfortunately, it doesn’t suit everyone.
However, shades such as ivory, champagne, cream, as well as soft shades of turquoise, lilac and pink look no worse, and sometimes even better, on brides.
Of course, the choice of color is a matter of individual approach, and what is good for a brunette is strictly contraindicated for a blonde. In short, don’t be afraid to experiment and look not only at white fabrics.
Therefore, it is better to pay attention to such material as crepe. There are many varieties of it, and it goes well with lace, guipure and other finishing materials.
In addition, it practically does not wrinkle, but at the same time it is quite shape-resistant. For wedding dresses, smooth crepe is usually used.
This material is equally suitable for sewing wedding dresses for both summer and winter.
Unless you are a professional seamstress with many years of experience and specialization in wedding dresses, it is better not to stop at multi-layered draperies, lush flounces and a heap of skirts.
There are several universal styles that will suit almost any figure. A sheath dress will fit perfectly on both a curvaceous figure and a fragile one.
And thanks to high fashion designers, this style of dress is considered one of the most popular this year.
A-line is another lifesaver style, suitable for almost all body types, and also very fashionable this year.
Greek style is no less popular style among brides, and deservedly so. Simplicity and grace give regal bearing and grace to the owner of such a dress, and the relative simplicity of tailoring makes this model especially seductive.
Patterns that will help you decide what difficulties of self-tailoring you are ready for.
And if you don’t sew, then knit
Wedding dresses knitted or crocheted are no less popular. For this, again, we should thank the designers of wedding dresses, who, apparently, were also tired of the lush piles of fabrics and remembered other options. Such wedding dresses can be very different - both quite traditional models and extravagant ones.
For the boho wedding style that is fashionable this season, a knitted dress is perfect. However, for those who prefer simplicity and grace, there is a lot that is attractive in these dresses. If the wedding takes place during the hot season, then one of the excellent options is a knitted dress.
Several diagrams with descriptions to understand how beautiful and simple a wedding dress can be.
A simple A-line silhouette, made using mixed techniques - both knitting and crocheting. To work, you will need 650-700 grams of white yarn, preferably 100% cotton, straight knitting needles No. 4 and hook No. 3. The bodice is knitted in garter stitch, as well as patterns with openwork stripes and tucks. You will need a hook to knit rapports.
A hook provides more opportunities for openwork motifs than knitting needles, which is only beneficial when creating a wedding dress. Most versions of such dresses suggest knitting a considerable number of different motifs, which are laid out on a finished lining.
Then these motifs are connected with a mesh, and the result is a very delicate and openwork wedding dress. This approach is good because, having them and the same fragments, you can go through the options for their combinations until you find the one that you like the most.
There are other options.
In this dress, an openwork floral motif runs along the very bottom of the dress, and the main part is knitted tightly. A similar floral motif adorns the sleeves, and an openwork stripe runs down the waist. The yarn consumption for such a dress is 500 grams, and the hook will be number 2.
Video master classes will provide more clarity than a simple description.
Sewing a dress
When sewing, you need to remember the characteristics of the selected fabric - the sewing machine will need to be properly adjusted and suitable threads selected. All bias binding, overstitching and fittings must be sewn as neatly as possible, the seams should not separate.
The sequence of actions when sewing an outfit can be determined independently; the only important thing is that the last step will be connecting the skirt and bodice with a built-in bodice - the bodice will need to be sewn into the skirt.
As for the skirt, you need to decide whether the petticoats are sewn to the overskirt or worn separately from the outfit.
Since the style given as an example does not require any special cutting details from the skirt, and there are no unnecessary artificial draperies on it, the process of sewing a skirt is a complete relaxation compared to a bodice. When sewing a bodice, it is important that all seams are thin, strong and even, so that the silhouette does not get lost. Even more important is to strictly follow the chosen pattern. First, the back and front of the dress are sewn separately, then a hidden zipper is built in and the front and back are sewn together.
Where to begin?
Before you start making a wedding dress, you need to choose a style, decide on the material and find a pattern. How the final version will look depends on the right choice. An ideal figure is the dream of all girls, but not everyone can boast of it. Therefore, the dress should emphasize the advantages and hide the disadvantages.
Remember that the bride herself should attract attention, not her dress. If you decide to sew your wedding dress yourself, choose a style that is not difficult to make, but one that will make you unique and sophisticated
A simpler dress will be easier to sew and will emphasize impeccable taste. Programs where you can virtually try on the style of dress you like, expert advice (you can contact a professional cutter), various websites, sewing and design magazines, and catalogs will help you in your search. You can combine all methods.
Attaching a veil to loose hair
Particularly difficult is attaching a veil to loose hair - bobby pins and a comb are very unreliable in such a situation. Some brides, afraid of being left without a veil at the most crucial moment, even refuse this hairstyle.
Let's reveal a little secret: at the place where the veil is attached, braid a thin horizontal braid and hook bobby pins or a comb to it. Now the wedding accessory will not come loose.
Procedure:
- Do the styling. To avoid electrification, you can spray your hair with an antiseptic.
– Choose where to attach the veil on your head (usually the crown area is preferred). At this point, separate a small amount of hair and braid it along the head.
– Insert pins into the place where the veil is assembled (the top). There must be at least six of them. If the veil was sold with a comb, go to the next point.
– Attach the veil to the braid and decorate it.
If during the wedding you need to remove the veil and be without it for some time, do not forget to disguise the braid with hair in front of it.
Some veil models are not suitable for this hairstyle: those consisting of several layers, heavy, with heavy accessories.
Decorating the product
You can decorate the product with accessories, which are selected in the same store or salon where the fabric was purchased. You should give preference only to high-quality fittings. In recent years, when decorating, they often use:
- White or colored lacing;
- Embroidering the corset with rhinestones or crystals;
- Decoration of the back with bows, which can be combined with lacing;
- Decorating the chest or waist with flowers;
- Sewing pearls, beads and beads;
- Hanging chains;
- Embroidering appliqués and patterns in the form of flowers;
- Decoration of the product with lace.
You might be interested in Simple patterns for a robe dress with buttons: sewing order
Dress "Doll"
In conclusion, we can say that sewing a beautiful wedding dress is a task that only an experienced craftsman can do. If a person is new to this business, then you should buy ready-made patterns in a studio or find them on the Internet. Further steps are easier to perform, since they involve cutting and sewing individual parts together.
Half couture
At one of the shows, Elie Saab presented a red chiffon dress with the illusion of nudity.
The cut of the model is quite complex, so we will consider the sewing stages in detail.
To work you need:
- lining fabric to match the skin tone;
- Chantilly lace;
- chiffon:
- lightning.
Constructing a pattern
Please note that there are 2 options for creating an evening dress pattern with your own hands:
- draw on graph paper and then cut out;
- use the RedCafe program.
The program has a convenient function that divides lines by color, so you can see the location of all the lines.
Cutting out the lining
The modeling stage is over, let's start working with the fabric.
- Print out the pattern and fold it into a single piece, matching the corners.
- Then transfer the pattern to the lining fabric and trace the lines with soap or a piece of chalk. You can use a disappearing marker.
Sew darts and side seams on a machine without backtack and with a wide stitch width. This basting is necessary to check the desired fit of the bodice on the mannequin.
Working with lace
Cut out the lace fabric according to the pattern of the lining fabric. Fasten it on the sides and sew the darts, after cutting off the excess lace along all the cuts.
Sew the darts at the waist and press them towards the center. Make sure that they are not visible on the lace from the front side.
Stitching raised lines
At this stage, the sequence of stitching the embossed binding is important. The pattern should be beautiful, without overlapping lines. To understand which line will come first, make a sample. For contour lines, use knit bias tape. It is shine-free and easy to work with.
Processing slices
Use knitted tape to trim the edges of the armhole and neckline. Finish the neckline, which turns into a slit on the back, with tape stitched into a spread.
Cut out your skirts
The half-sun skirt consists of a thick lining and transparent chiffon.
First you need to calculate the radius of the waist circumference (From). The radius formula will help you with this: R = (Otx2) / (2x3.14).
Make the bottom radius the desired width.
Working with large cuts has its own characteristics:
- Make sure there are no defects, stains, or stitches on the fabric;
- Try to buy the material in stock, so you won’t overpay.
- Keep in mind that chiffon with natural threads can shrink, so carry out a damp-heat treatment on a sample of the material.
Get rid of the edge. After making a cut, tear it off along the bottom and top edges of the fabric.
To assemble the skirt along the waist line, lay 2 lines 1 cm apart and carefully pull to the desired width. It is better to take reinforced threads, they are resistant to strong tension.
Sew a lined chiffon skirt. Process the cuts using an overlocker. Attach the resulting hem to the bodice of the dress on the mannequin. Correct any discrepancies if necessary.
Next, cut out the belt. Its finished width should be 3 cm.
Sew the zipper into the middle seam of the skirt.
At the final stage, connect all the parts. Sew the belt to the skirt with frills along the bottom edge, and then to the top of the dress.
What to wear with?
As with any other wedding dress, you need to choose the right accessories for a knitted dress.
Veil
This most popular wedding accessory will decorate any bride. For a knitted dress, it is recommended to choose a classic veil made of tulle or other light fabric. A lace model in this case will make the image heavier.
When choosing a veil model, you should consider the style of the dress. Models with full skirts look good when paired with a multi-layered full veil. It is better to complement a straight or figure-fitting dress with a light veil without additional decor.
The length of the veil may vary. As a rule, a long veil is worn with a long dress and vice versa. But there are exceptions to this rule. For example, if a dress has a spectacular cutout on the back, then you should not cover it with a veil
Shoes
It is best to wear classic shoes with a crocheted lace wedding dress without additional decor. Most styles require heels. However, if the bride chose an empire style outfit or decided to wear a knitted sundress in a rustic style, then stiletto heeled pumps would be inappropriate. These outfits require shoes with a round toe and a small square heel or ballet flats. Sandals go great with a beach style dress.
Gloves
You can wear gloves with a sleeveless dress. If the dress is completely lace, then it is better to choose gloves with a smooth texture - made of satin or taffeta. But for a combined dress, in which individual elements are made of crocheted lace, openwork gloves that repeat the lace pattern on the dress are perfect.
Decorations
If the bride chose a knitted wedding dress, then jewelry will need to be used in minimal quantities. The shine of metal and stones should not overshadow the delicate beauty of crocheted lace.
For a model with a neckline, you can wear a thin chain with a small pendant or an elegant necklace. But if the bodice is decorated with rhinestones and sequins, then it is better not to wear anything on the neck, limiting yourself to long earrings.
Educational videos for fashionistas and needlewomen
On YouTube, beginning needlewomen can find a huge number of video tutorials that show in detail the entire process of sewing things. For example, a series of lessons from the master Olga Nikishicheva fell in love with the viewers of Channel One, and we can watch them and get inspired. And there are a lot of such good masters, so feel free to choose the one you like.
Simple long dress for plus size ladies at home
For a woman with curvaceous figures, floor-length dresses should be tailored individually to her figure, because such a chic lady should be decorated with no less chic outfits.
Ladies often prefer the bat model, but stylists advise choosing “tulip”, “case” or “pencil”.
https://www.youtube.com/watch?v=QVlQj0yWGZs&list=PLSglabjZeV0V3jce8tp0550tOnhdfPZSz
Beautiful jersey with three-quarter sleeves
A knitted garment is very easy to sew, as it does not require undercuts. With a cowl collar and fringe, you can create a boho-style outfit.
For pregnant women with high waist
Expectant mothers have a lot of free time during pregnancy, which allows them to create, create, create.