Various wedding decorations are an integral element of any ceremony. But their cost is often quite high.
Fortunately, creating wedding hair decorations with your own hands is not as difficult as it seems: you just need to purchase the necessary materials and carefully follow the technology for creating the item. The quality of such decorative elements will be at a high level, and various master classes with a detailed description of the process will greatly simplify and speed up the work.
DIY headband and hairpin for the bride
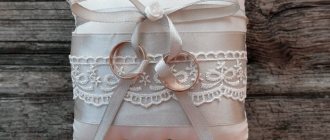
Using delicate lace, you can create with your own hands beautiful and delicate accessories for the bride: a headband and a hairpin. Choose the decoration option that best fits your wedding look and start making it!
Materials and tools:
- lace applique and ivory ribbon (for headband);
- lace applique, two hairpins, felt (for hairpin);
- scissors;
- glue.
Time: 20 minutes (for each accessory).
Step-by-step instruction:
- To make the headband, glue the lace applique to the ribbon and let the glue dry for about 10 minutes. Then trim the edges of the ribbon into a “V” shape for a neat, elegant look. There you have it, a delicate hair bandage!
Here are a couple more examples of ribbon-based hair decorations that you can easily make for a wedding with your own hands by purchasing everything you need at your local fabric and accessories store. In addition, on our website you can find another master class on how to make a hair clip for the bride’s hair with your own hands.
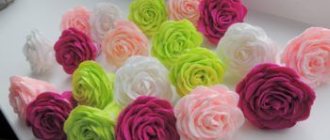
Tsumami-kanzashi
This unusual phrase came to us from Japan. It can be translated as a hairpin or hair clip. This technique is based on origami, but folds fabric rather than paper.
Squares made of silk, crepe satin, organza or nylon are suitable for this decoration. Squares measuring 4x4 cm are cut from the selected material. The edges should be burned on a candle so that the fabric does not “crumble”.
The instructions on how to make a decoration in the Tsumami-kanzashi style are as follows. To form the simplest petal, the square is folded into a triangle, and the resulting triangle is folded one more time to form a smaller triangle, and one more time. Then, holding the triangle by the right angle, the remaining ends are connected with glue or thread.The lower corner of the petal is cut off with scissors. Having made a certain number of petals, they are collected into an inflorescence. For work, it is practical to use tweezers or tweezers.
It is customary to decorate hairpins or combs with these flowers. There are many more techniques for creating petals of different shapes, which, with due diligence, can be learned.
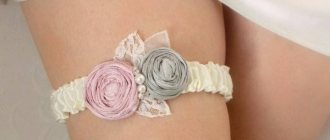
Hair chain
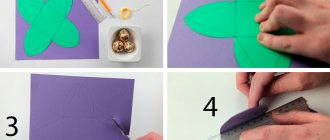
Do you want something more original than a veil or hairpin? Then pay attention to the hair chain, which will allow you to create a spectacular and unusual wedding look. The main thing is that such an accessory will fit perfectly into a fashionable boho or vintage style!
Materials and tools:
- chain with pearls and stones;
- applique embroidered with stones and pearls;
- two studs;
- glue.
Time: 30 minutes.
Step-by-step instruction:
- Cut out a leaf from the applique and glue a pin to it at an angle. Do the same with the other leaf (in a mirror image).
Decorating hairpins
A variety of hairstyles play an important role in the life of a girl of any age. There are a large number of fantastic hair accessories available in stores. But you can't always find exactly what you need. Then your hard work and diligence comes to the rescue. After all, you can make any jewelry (hairpin, elastic band, etc.) yourself, you just need to master the basic skills. Today we would like to invite you to make hairpins in blue tones from satin ribbon using the kanzashi technique. To make hairpins using the kanzashi technique, we will need the following materials: - Transparent glue gun. -Satin ribbon in a blue shade (2 cm wide). -Green satin ribbon (4cm wide). -Standard size hairpins (without any decorations). - Beads or seed beads. -White cardboard. -Candle. -Matches. -Scissors (sharp). -Tweezers. -Coin. Let's start making hairpins using this technique. First you need to take a blue ribbon 2 centimeters wide.
Using sharp scissors, cut it into rectangles 4 centimeters by 2 centimeters. Then we light a candle and burn the edges of the tape so that it does not start to fray while working.
Take one rectangle.
We roll it up as shown in the pictures. It is best to perform all movements using tweezers, so the parts will turn out smoother.
Then fold the ribbon in half.
And then in half again. Next, we burn the ends with fire and press them against each other. When heated, the tape melts and sticks together.
As a result, we get a petal like this.
For the first tier we need ten such petals. It’s best to make them in advance so that you don’t have to be distracted by making them during gluing.
The next step is to make a support for the flower. For this we need a fifty-kopeck coin. We trace it on cardboard and cut it out. This size of cardboard is the most optimal for support - it is neither large nor small.
Next, take a pin and thread it into the cardboard and secure it with a transparent glue gun.
On top of the stud, in order to hide all fastening interference, we glue a green satin ribbon.
Let's start gluing the lower tier of the flower. We drip glue onto the base and attach one petal on top. We arrange the petals so that the second tier can fit in. Glue the petals in a circle, pressing them tightly to the base.
Then we attach the second tier. For the second tier you will need smaller petals. They will be 2 centimeters by 3 centimeters. We will need five of them.
We attach them in the same way as the first tier, only we drip the glue not onto the cardboard, but onto the petals of the first tier.
To decorate the flower, we also attach a bead or large beads to the middle using a transparent glue gun.
These are the studs we got. You have learned how to decorate hairpins using the kanzashi technique. A little practice in this matter and you will be able to quickly and efficiently make any decoration. You can use them to create beautiful and interesting hairstyles, they will decorate them and give them elegance.
Comb: 3 ideas for an accessory
A sophisticated and elegant accessory for a newlywed is a comb, which can be decorated with various materials, creating with your own hands from the simplest thing a unique and spectacular decoration for the bride’s hair.
Comb with lace
A gentle and romantic version of the comb can be made using lace - a favorite material of many girls, from which many accessories for the bride are made.
Materials and tools:
- plastic hair comb;
- lace;
- needle and thread in the color of the lace;
- PVA glue;
- wax paper.
Time: 30 minutes.
Step-by-step instruction:
- Thin the glue with water so that it is not so thick. Dip the lace into the glue, take it out after a couple of seconds and let the rest of the glue drip off. Place the lace on the wax paper and wait until it is completely dry.
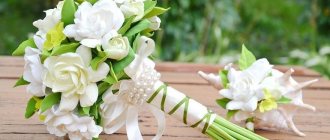
Comb with flowers
A popular option for decorations for the bride’s hair are fresh or textile flowers. There are many ideas for such accessories: you can make a flower for the bride’s hair with your own hands or decorate an ordinary comb with delicate buds yourself, as in this master class!
Materials and tools:
- crest;
- flowers and greenery to your taste;
- floral wire;
- floral tape;
- scissors.
Time: 30 minutes.
Step-by-step instruction:
- Cut the stems of the flowers, leaving 1-2 cm from the bud. String the inflorescences onto the wire, pulling it through the base of the bud. Wrap the ends of the wire around the stem to keep it secure.
Tip: attach tulle to such a comb using wire or thread, and you will get a spectacular and original veil that you cannot buy in any salon!
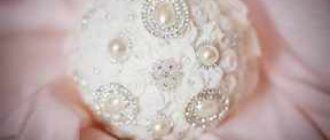
Comb with brooches and pearls
If your wedding look lacks shine, then a comb decorated with brooches and pearls would be an excellent option. They look impressive and luxurious, and making this decoration for the bride’s hairstyle with your own hands is quite easy!
How to choose the right decoration
The bride’s primary task is not just to make a beautiful hair decoration, but to choose the right shape, color, and size in accordance with the wedding style.
Half wreath of large pearls and beads
The hair decoration must certainly match the color of the bride's dress. Unless, of course, the wedding dress involves several colors, for example, white and lilac. But you need to be careful with similar shades. A white flower will only suit a snow-white dress, but with a champagne-colored dress, it will already stand out from the overall picture.
Making a crown
Harmony comes first. You really want to wear a tiara. But it won’t suit a wedding in a country or eco style. Just like delicate orchids don’t fit into a vintage style, and veils don’t fit into a beach wedding.
Vintage, shabby chic and retro welcome hats, veils, antique brooches and hairpins, feathers, dried flowers.
Indian tika can be appropriate not only for an Indian wedding. She can easily decorate the bride’s head at a wedding in a classic or romantic style.
Indian teak will decorate the bride's hair and complement the look
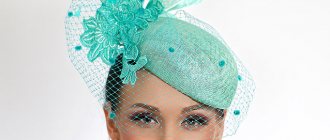
Ribbons, bows, tiaras, lace, hairpins with rhinestones, hoops and flowers are suitable for a delicate wedding in the Tiffany or Provence style. This style is dominated by turquoise and lavender colors.
One large flower is suitable for seasonal weddings: romantic spring or bright autumn. Also for weddings in rustic, eco and boho style.
DIY veil with a flower
While small roses are very suitable for a Victorian wedding. Where there can also be pearls and precious stones in the hair.
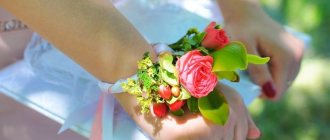
Hair for a wedding in boho and bohemian chic style can be decorated with lush wreaths, headbands or large lace braid, massive flowers.
Hair ornaments
[Show slideshow]
DIY hair clips for a wedding – master class
Creating a unique image of a bride in an insufficiently original dress requires the use of various accessories. These include jewelry, which has become an excellent alternative to a veil for modern newlyweds.
We are talking about a variety of decorative elements that complement a girl’s hairstyle. Wedding hair clips help to add elegance to your hairstyle and emphasize the features of the chosen style. Those that were made by hand are especially attractive. The future bride puts her soul into her product, shows imagination, and reveals some aspects of her character.
Mesh
It appears as a cobweb that hangs from the top of the head along with the hair. This product serves as an assistant when creating difficult hairstyles, as the hair underneath becomes more flexible.
In order to give a special shape to your hair, you just need to place your hair in a net and give it the shape you like. Tip: the length of the mesh must be at least 35 cm for the intended hairstyle to hold.
How to make wedding hair clips with your own hands - tips
To ensure that a hand-made wedding hairpin does not look like those sold in specialized salons and stores, girls should listen to the advice of experienced craftsmen who make accessories for wedding celebrations. There is no need to look for rare and expensive materials. It is important to be able to use what is always at hand and create something extraordinary with effort and imagination.
The starting materials for making such an important accessory can be taken:
- Natural flowers;
- silk or satin, from which you can make the petals of a bud or a lush flower;
- tulle or organza to decorate the base;
- beads;
- rhinestones;
- bugles;
- thin and thick wire to give the product the desired shape.
What kind of material the craftswoman will choose depends on what type of hairpin will serve as decoration for the bride’s hairstyle. A feature that distinguishes hairpins designed to complement a wedding look is the ability to securely fix carefully styled hair.
The following will help you achieve the desired effect:
- wooden and metal studs;
- headbands;
- diadem;
- clamps;
- automatic hairpins;
- combs;
- "crocodiles".
Before you start work, you need to make a sketch of the future accessory, think over the method of fixation, and choose the most suitable material to create a small masterpiece.
If there are fresh flowers in the bride’s hair, then you will certainly need invisible clips, but imagination, fabric and wire will help you achieve originality.
The girl herself will come up with unusual exotic and even fantastic flowers, which will become a real decoration for her wedding hairstyle.
You can make flower petals that retain their original shape and attractiveness for a long time from satin, light but elastic leaves from tulle, dew drops resemble small rhinestones glued to flower petals.
A piece of cotton wool with rhinestones or small glass beads is attached to a long thin wire, giving it its final shape using ordinary PVA glue.
This is necessary so that sparks sparkle in the hair around the hairpin, like tiny stars.
Making rubber bands
The easiest way to decorate a regular elastic band is to sew a cover for it, for example from velvet or crepe-satin. To do this, you can take a piece of fabric 15-20 cm long and about 10 cm wide. First, fold the fabric with the right side inward and sew it along the short side so that you get a ring.
Then we fold the resulting ring and stitch along the long side, but not all the way, but leave about 2 cm. Turn the resulting cover inside out and thread the elastic through. Carefully sew up the remaining hole.
Master class on making feather hairpins for the bride
Having chosen the shape and type of hairpin, and prepared a sketch of the future decoration of the wedding hairstyle, you can begin to create. The craftswoman needs to prepare:
- From 10 to 20 metal pins.
- Thin wire.
- Beads.
- Glue gun (if the accessory is additionally decorated with rhinestones and glass beads).
Thin steel wire is divided into pieces of different lengths using scissors or wire cutters. One bead is strung on each piece of wire, and the ends of the metal thread are twisted into a rope. The remaining wire pieces are folded in half so that when twisting the free ends, a loop is formed. The hairpin will look more voluminous if the wire with a loop in the middle is longer.
After applying a drop of hot glue from a gun to the loop, apply glass beads or large rhinestones to it.
Flowers or any unusual compositions are made from beads, adding wire threads to them as a sparkling element, on the loops of which sparkling rhinestones are attached.
The advantage of decorating wedding hairstyles, which are created using a large number of metal pins decorated with a wide variety of decorative elements, is that they can be fixed at any point in the hairstyle, creating a unique composition.
A large bead is attached to the top of the pin by wrapping the wire around the rounded end. Next to it, metal threads with glass beads, rhinestones and other decorative elements are fixed in a chaotic (or chosen by the craftswoman) order.
The composition on all heels may be the same or very different from one another. What the decoration on the finished hairstyle will look like depends on the wishes of the bride, the styling features, and the style of the dress.
In this master class you will see how you can make a beautiful hairpin for a bride’s wedding hairstyle yourself:
Making wedding hairpins with your own hands is not so difficult, the main thing is to carefully consider the way to fix them on your hair, choose the right material and choose the right shape for the future decoration. Modern brides are attracted to hairstyles with loose curls or openwork braids. The easiest way to decorate them is with a tiara, but hairpins made of hairpins and beads of different sizes will make their styling unique. What materials make homemade hairpins look more attractive? What is the best way to mount decorative elements? Is it worth making artificial flowers with your own hands or is it easier to buy ready-made ones? How many hairpins will be needed to decorate a wedding hairstyle with an openwork braid? Future brides are interested in the opinions of not only experienced stylists and hairdressers. Those who have already celebrated their family's birthday can share their impressions and experiences.
Stylist
Tiaras give the girl innocence and the image of a queen. When choosing a tiara, you need to choose matching earrings and a necklace. Ksenia Potapova
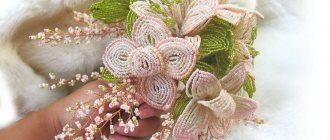
Lily flower
To weave a lily flower from beads you will need: white beads, golden beads, 3mm thick wire.
The flower consists of 6 petals and a stamen. We put 20 beads on a 40 cm long wire and make 4 full arcs around it, i.e. first 15 beads, twist the wire, adding beads each time.
You should get a beautiful petal. Thus we make 6 pieces.
For the center, cut a wire 30 cm long. For the center, we need to make 5 stamens, at the top of each we attach a golden bead.
We thread a large bead onto the wire, fold it in half and put beads on the two wires (a different color is possible). The number of beads should not exceed 18 pcs.
Then we take the rod, screw three petals onto it and secure the stamens, then add the petals again. Our lily is ready. You can add leaves to it, made in the same way as petals, only we reduce the amount of beads.
Recommendation! The finished flower can be attached either to a hairpin or to a comb, which will look original in the bride’s hairstyle.
Hairpin for short curls
The most popular DIY wedding hair accessories are flower clips. We will need: beads of two colors (depending on the color of the dress) and fishing line.
We cut off and thread 26 beads onto it, closing the ring of the fishing line. We make 4 such blanks. Make the fifth petal a little larger.
We make the next row in the petal a mosaic. We thread two beads onto the fishing line, then thread them through one into the petal and tighten. So you need to weave 11 pieces.
Next, we make the row with a mosaic, only in a different color.
We should get a petal inside with one color, outside with another. Thus, we make 5 petals.
The next step is to connect the petals to each other using fishing line. All 5 parts must be collected into a single flower. The center of the middle can be decorated as desired. The finished flower can be attached either to a hairpin or to a bobby pin with glue.
Tiara
You will need: thick jewelry wire, pliers, glue, golden cord or rope, decorative figures (we have stars and moons), tongs, golden spray paint.
Master Class
- Prepare a piece of wire the size of your head. It is worth noting that the tiara is not a closed decoration.
- Give a round shape to the jewelry wire.
- Wrap the ends of the wire with a golden cord, secure with glue and leave the strings at the desired length.
- Paint the decorative figures with golden spray paint and leave to dry.
- Lay out the figures around the circumference of the future tiara.
- Glue the decorative figures onto the wire using strong glue and pliers. It is worth noting that it is better to place the parts at the same distance from each other.
- Leave to dry.
The precious tiara is ready!
Wreath made of red beads
For a beaded wreath, you need to make a ring to fit the circumference from thick soft wire. Cut 25-30 pieces of thin wire, 10-12 cm long. String the beads into pieces of several pieces and prepare from them twigs and flowers on long legs. Then use the prepared branches to braid the rim of the wire like weaving a wreath and secure it.
Carefully wrap the gaps between the legs on the headband with a satin ribbon, which can be tied into a bow, or trimmed and neatly sewn.