Making flowers from polymer clay is currently not only a special type of handicraft and an opportunity to decorate the interior with beautiful and timeless plants, but also a way to earn good money from selling them, because handmade things do not go out of fashion and are always highly valued. Polymer clay flowers are used in hair decorations, jewelry, to enliven the interior and even in wedding bouquets. In this article we will take a detailed look at a master class on how to make a beautiful bouquet quickly and step by step from purchased or homemade polymer clay, even if you have never done this before.
Polymer clay is a very plastic material, similar in structure to ordinary plasticine, and accordingly, the principle of working with it is the same as with ordinary plasticine. There are baked polymer clay, which hardens at high temperatures (at home, you can use a regular oven for this) and self-hardening, which dries at room temperature. Baked clay is used mainly for making jewelry, hair headbands, and decorating handbags. Self-hardening clay is perfect for making flowers of a given shape.
The success of any process, including creative ones, depends on the degree of preparation of the workplace and the necessary tools. Modeling products from polymer clay is no exception in this case, and before you start working with it, you need to prepare a workplace and acquire some tools.
The working surface must be flat and smooth without scratches, chips or other irregularities. A plastic modeling board, tiles or plexiglass are ideal for these purposes.
There are quite a lot of tools for modeling with polymer clay, but at the initial stage there is no point in buying them all. In order to get started, a few of them are enough, namely: a stationery knife with replaceable blades; stacks - for making some drawings on blanks and sculpting small parts; an acrylic rolling pin, which is very convenient for rolling out pieces of clay; several molds and stamps to form some parts.
The best master class for beginners
To work, you will need a small set of tools, which can be purchased at craft stores along with molds for sculpting from polymer clay. So let's get started.
- First, wash your hands with soap, because the raw material absorbs all contaminants, which will later appear on polymer clay bouquets.
- A work surface, not a tabletop or computer desk, but a flat board - wood, plastic, glass. Whichever is convenient for you.
- Take the necessary part of the raw materials for the craft, because it will need to be painted. Excess does not last long and will have to be thrown away.
- Sprinkle the clay with talcum powder to prevent it from sticking to your hands.
- To obtain color, acrylic paint of the desired shade is added.
Note! If you can’t buy polymer material for creativity, try making the composition yourself.
To do this, mix 1 teaspoon of flour, starch, and office glue until a homogeneous consistency. Increase the proportions depending on the size of the future craft. You can try making it from ordinary clay, but this one requires more time and careful preparation of the starting material.
Recommendations from experts
Tips that should not be neglected:
- Before sculpting, the clay is kneaded.
- The work surface and hands must be clean.
- Hair is pulled back or tucked under a scarf or other head covering.
- Talc is applied to the clay.
- It is necessary to calculate the required volume of clay for the product, since the clay will become unusable after a short period of time.
- If it dries out, add a little hand cream to the clay.
- Due to its fragility, care is required when handling finished clay products.
- To increase shelf life, place a damp cloth in a container with clay.
Tips for Beginners
What is good about sculpting flowers from polymer clay?
The element didn’t work out, they crumpled it, kneaded it and made it again. Pliable material in the hands of a master demonstrates its best properties. While the parts are being molded, the rest of the raw material mass is placed in cling film so that it does not lose its elasticity. If it still dries out, add any hand cream. The consistency is restored. Crafts made from colorless material are painted not only with acrylic, but also with oil, and painted with pastels. In the process of work, you will need any object that will need to be used to roll out the clay in order to then mold the flowers. Prepare a small stationery knife, toothpicks, skewers, and sushi chopsticks. All this will definitely be useful for shaping the relief of the craft.
Fortune Teller
According to the old Slavic tradition, the girl had to keep not only the wedding dress, but also the bouquet in the family, after drying it. Tamara Solntseva
This composition will be symbolic for the wedding. The bride does not have to bother with the herbarium; just put the accessory in a decorative vase.
Interesting! Another interesting option to make a realistic bridal bouquet without fresh flowers is to use fabric when creating it.
A beginner's first job making flowers
We described the initial stage, now step-by-step instructions for making the first figure.
- Sprinkle the clay mass with talcum powder, knead it, separate a part, and make a sausage with a diameter of 5 mm. Cut it into 4 pieces, roll each into a ball. From each round piece we form a leaf.
- We take a wire 50 mm long and attach a round ball to the top. This will be the core and stem.
- Use tweezers to secure the petals around the round center. If you bend them slightly back, you get the effect of an unopened bud.
So your first little miracle was born!
Chandani and her brand ChaNoJa
She lives in Switzerland, works for a transport company, and makes jewelry in her free time. Chandani also loves to travel.
She has traveled to Southeast Asia, the Middle East, the United States, Canada, Ghana and Costa Rica, exploring different cultures and customs that have broadened her worldview.
The brand “ChaNoJa” is named after three masters - Chandani - Norbert - Yael. Chandani's enthusiasm was so infectious that her friends joined her.
❝My life was exciting and adventurous in many ways, but something was missing: creative expression! In 2013, I learned about polymer clay, was inspired by the works of artists and decided to try it myself. I realized that creating clay jewelry is my calling... My art is created from my soul and my heart, not from my head. Beauty lies in “imperfections that are perfect,” as in nature. I feel like my talent is a gift from the Universe!❞
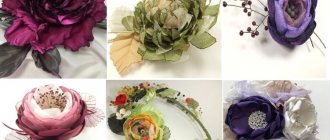
Polymer clay flowers: application possibilities
Small flowers are used as decor for crystal glasses and decoration of the interior of the hall for special occasions. Just make a bouquet and put it in a vase in the room. At a distance it is indistinguishable from living plants. Clay flowers are used in everyday life.
Young people are happy to wear rings, rings, and earrings with edgings made from such original decor. Bags, backpacks, belts for dresses, trousers and shorts are decorated with decor. Women are also not ignored. Flowers made of polymer clay are attached to a purse, to a car keychain, like a brooch to a cocktail dress.
Note!
Wood burning for beginners: tips and secrets for burning pictures
- Plasticineography - interesting options for creating pictures from plasticine on cardboard for children
- DIY scrapbooking for beginners: what it is and how to do it. What you need to create a beautiful album or notebook (photo + video)
Making an orchid
After acquiring the necessary experience, beautiful flower ideas will arise in the imagination of needlewomen, and making an orchid from clay will not seem too difficult.
What kind of flowers can be made from self-hardening clay?
Calla lilies earrings
Roll out two different, but color-matched round pieces of mass into long sausages. We wrap the darker shade in a spiral around the light one. We roll everything together into a ball, which turns out to be two-colored. We repeat the procedure, roll it into a sausage, add another one on top in a spiral. Roll it into a ball.
This is necessary to achieve a beautiful variety of colors. Use a knife to cut the ball into halves. From each we sculpt an elongated petal, like calla lilies. One edge is pinched, the other is wrapped into a funnel. In the lower part, use a toothpick to make a hole for inserting earring fittings. Beads or beads strung on a toothpick are used as the core.
Rose medallion
You can make your own flowers from polymer clay in a more complex version. All types of work begin the same way. We form a sausage, roll it into balls and make petals of different sizes. The smallest one will be the core.
We roll it up, then gradually wrap the rest around the resulting structure. This is how you get a rose. The raw materials are pre-painted in the desired color. The craft is attached to a chain like a medallion.
Orchid
This is a complex manufacturing technology that requires the purchase of molds. Molds for creating three-dimensional elements will make orchid buds more realistic.
Note!
- How to make a craft with your own hands: what you can do with your own hands at home
- DIY foam crafts: snowman, Christmas tree, sculptures, original figures with instructions (photo + video)
- Papier mache from egg trays, boxes, cassettes: the best ideas on what can be made from egg packaging
Roll out a small part of the raw material into a round and flat pancake using a sushi stick, making a protrusion in the middle. We make a template from cardboard in the form of a round cross and cut out the blank using a small sharp knife. Using a stack - a craft tool, carefully bend the ends inward.
We place this core on the wire, coat the tip with glue, and paint it. For the petals, roll out the base into rectangles, place them on molds and form a texture. We string the petals onto a wire with a core. A bouquet or garland is made from such elements.
Lily making process
Instructions with description for beginners:
Roll out the clay thinly. Use a toothpick or needle to mark 3 large and 3 small petals.
Cut out the marked petals. Draw veins on them. Product elements must be given time to dry.
Wildflowers bracelet
We make a forget-me-not by rolling out a droplet with a round head and making 5 cuts on it. This is the middle in the form of a five-pointed star. We straighten these petals and flatten them with a stack or knitting needle. Glue a bead onto the wire and pierce the middle of the resulting flower. The bracelet blank is wrapped with such elements.
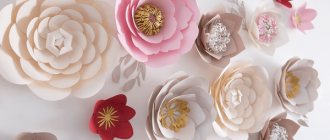
What are soft plastic flowers
There is a type of polymer clay, crafts from which are baked after completion. They turn out to be more saturated in color in the mass, with the effect of stone, metal, with the addition of luminous and shiny elements that appear in the dark.
Baking must be done in the oven. Microwave ovens are not used. What is the point of the procedure? Flowers made of plastic do not break or break. If someone drops or touches the composition, it is easily restored.
Note!
- DIY vase: step-by-step photo instructions, master class for a beautiful and unusual craft
- Paintings from buttons, panels, appliques and compositions with your own hands: how to make flowers, a butterfly, a fish or a tree craft from buttons
- Flowers made of wool (85 photos) - how to felt a flower from felt or a wool brooch. Step-by-step instructions for beginners
What will you need?
- be sure to find a work surface. It should be smooth, even;
- knife. You can also have a blade on hand for more delicate work;
- small stationery rolling pin. The preferred material is acrylic;
- molds for figures;
- stacks;
- polymer clay;
- brushes for painting the resulting product;
- accessories for decoration.
The baking process requires care and skill.
A little overexposure and all the work was in vain. The figures are placed on a metal baking sheet and covered with baking paper. To prevent the loss of products, you can install them in earthenware. The temperature is set according to the instructions of the raw material manufacturer. It can be +110 or +130 degrees.
Thin models are kept in the oven for up to 8 minutes. Products with walls up to 25 mm thick are left for 20 minutes. You cannot bake crafts with food. After use, the oven is thoroughly washed.
Making your own clay
Required materials:
- 1 teaspoon of flour.
- 1 teaspoon cornstarch.
- 1 teaspoon of glue.
- Baby oil.
Preparation procedure:
- Mix the above ingredients thoroughly.
- Add a few drops of oil to prevent clay from sticking.
Christmas tree decoration - clock
Take a beige clay mass and roll out a pancake on a board. This creates a convex watch base. Use a toothpick to squeeze out the hands and numbers of the dial. We make a hole in the upper part and insert a wire on which the watch will be held.
Bake for 30 minutes in the oven at a temperature of +110. Let it cool. We use acrylic paint to decorate the dial, which we marked with a toothpick. We stretch beautiful ribbons through the wire. The Christmas tree toy is ready!
Stages of creating a peony
- Add a little red clay to the white clay and mix together using stretching movements.
- Divide the resulting mass into 12 pieces of 1.5 cm and 20 pieces of approximately 1 cm.
- Form teardrop-shaped elements from the resulting pieces. Pinch the thickened tip and smear it over your palm, and then, using a stroking motion, make a concave petal with a small stem.
- Glue the petals in pairs - large with large, small with small, moving one of the two to the side.
- Fan together the smaller pieces so that the concave side is on the inside.
- Form the center of the peony by twisting the resulting fan in a spiral.
- Glue the remaining large petals around the central part with the convex side inward.
Creating leaves
- Mix green and white clay. Once you have a light green color, add a little more green, but do not mix them together completely. This will give you a veined texture.
- Make a drop, press it to the surface of a special acrylic mold to obtain a sheet.
Making buds
- The pink clay remaining when creating the flowers is mixed with red, but not mixed completely. Roll the resulting plastic into a ball with a diameter of approximately 2 cm.
- Three or four small cakes are made from green plastic that was not used for leaves, and then they are glued over the bud so that they look like sepals.
Each piece is glued to floral wire and left to dry completely for 24 hours.
Assembling the boutonniere
- Wrap the wire elements with tape. To make it fit better, stretch it before use. Using regular tape, connect the pieces together. There is no need to make the stem too long. Leave no more than eight centimeters, cut off the excess with pliers.
- Tape is also used for wrapping the base under the boutonniere. Wrap the ribbon around the stems and secure the end with a pin. The final touch will be a bow made from ribbon.
Forming a bouquet
If you are creating a full-fledged flower arrangement, there is no need to use tape. The wire in the bouquet will be almost invisible.
- To get a beautiful bouquet, connect several flowers using tape. Once it is formed, add leaves to the composition.
- Mark how tall the bouquet should be, cut off the excess stem into pieces. Reliability of fixation can be achieved with pins, which are used to pin each turn made.
- The resulting luxurious bouquet of peonies is decorated with a bow.
Use of polymer clay flowers
Fashioned crafts are stored for a long time, do not fade in the sun, and do not lose their original shade. If you wear items with products, thrifting is a good idea, just like with other jewelry. Rain water, snow, low temperatures do not affect the quality. The products are durable and resistant to adverse climatic conditions. They don't melt in the sun.
With them you can travel to hot countries without fear of temperatures of +50 degrees. It is advisable to wear gloves when going out into the cold if you have jewelry on your hands and wear them all the time. But nothing will happen to the bride’s wedding hairstyle if soft plastic is used in it. For everyday wear, hairpins, earrings, and bracelets do not come off when glued with PVC glue.Did you like our recommendations? We will be glad if the ranks of masters making flowers from polymer clay increase. Buy the required composition of the material or mix it at home yourself. In any case, success awaits you if you get down to business with desire and diligence.
What you need to work with homemade clay
- Glass or plastic cutting board, tile or ceramic tile;
- Small knife.
- Acrylic roller or rolling pin for rolling out the mass;
- Confectionery syringe with attachments for making decorative parts of your products;
- Molds for figures (cutters);
- Various stacks;
- Varnish for finished products. Be careful when choosing, as some varnishes do not dry and continue to stick;
- Brushes;
- Toothpick or awl;
- Accessories;
- Napkins.
Attention! Do all work with gloves!
Flowers made of polymer clay: photo of crafts
Please repost
0