Fabric flower arrangements are common at weddings as an alternative to short-lived live plants. But the scope of application of such “floristry” is constantly expanding. Today, a beautiful bouquet of satin ribbons, made by yourself, is valued higher than a traditional flower arrangement. This is an independent gift, and not an addition to it, an exclusive handmade item that can decorate the interior, become an elegant accessory for photo shoots and simply lift your spirits.
Cornflower
Materials and accessories
To make a flower you need to take:
- satin ribbon of two colors, width 5 mm;
- a piece of felt to match the color of the ribbons;
- rhinestones to decorate the middle;
- lighter;
- scissors;
- glue.
Description
Cut pieces 12 cm long from dark satin ribbon.
Cut pieces 8 cm long from light ribbon. Prepare a sufficient number of pieces. We have 44 dark and 20 light blanks.
To form petals, we fold the pieces of tape in pairs with their right sides facing each other, trim the corner and singe the edge. We unfold the petals to the sides.
We fold them over and glue them together. In total we get 22 dark petals and 10 light ones. Cut out the round center of the flower from felt.
Glue dark petals around the circumference.
Calculate the diameter so that it accommodates an integer number of petals.
Glue the second one on top of the first tier, arranging the petals in a checkerboard pattern.
We make the next tier from light ribbons, observing a checkerboard arrangement.
Glue rhinestones in the middle.
Aster
To make an aster you will need the following supplies:
- pieces of satin ribbon 2.5×5 cm;
- tweezers;
- scissors,
- fire;
- glue gun;
- several circles of felt.
For a medium-sized flower, 30-40 petals are needed. It all depends on the desired number of layers and the diameter of the aster. The petal is made in two stages.
- Stage 1 . A strip of satin is folded in half lengthwise and clamped with tweezers. The edge is cut at an acute angle and sealed with fire.
- Stage 2 . From the opposite edge, the strip is folded like an envelope, clamped with tweezers and fixed with fire.
Petals are glued onto the felt circle along the very edge. The next layer is glued closer to the center. The petals are placed visually between the petals of the first layer. The same is done with all layers. The number of petals in each subsequent level decreases. The finished flower is decorated with a bead core. You can also combine the colors of the petals.
Snowdrops for the rim
Materials and accessories
To work you need to prepare:
- white satin ribbon – width 5 cm, length 2 m;
- green satin ribbon – width 2.5 cm, length 1.5 m;
- green satin ribbon – width 5-6 mm, length 2 m;
- white plastic rim – width at least 10 mm;
- ready-made yellow stamens – 3 pcs. on a flower;
- felt that matches the tone of the green satin ribbons (needed if the width of the headband is less than 10 mm) - 2 by 7 cm;
- heat gun and rods;
- lighter (can be replaced with a candle);
- needle, scissors.
Description
We cut at least 30 squares of 5 by 5 cm from white tape. We singe the edges of the cuts.
Then we sew the square with white thread using basting stitches - see photo. The thread should remain on the wrong side. Temporarily we put aside the part.
We put three stamens into a bundle, which we bend in half. We twist the lower end into a spiral and fix it with hot glue.
Place the stamens in the prepared square in the center and tighten the thread.
We make several turns of the thread around the base of the flower, tightening the thread tightly. To secure, make a few stitches and cut the thread.
Using this technology we make several more flowers. Now let's start making leaves. From green tape 25 mm wide, cut into pieces 4-5 cm long.
Fold each of them in half and cut out the leaves. We process the edges with fire. We make small folds at the base of the leaves, fixing them with fire. The next step will be decorating the headband. Cut two 1 cm pieces from a narrow (5 mm) green ribbon. Glue them to the edges of the corner.
Fix the tip of the tape with glue. We wrap the entire rim, making overlapping turns with the tape. You can place flowers along the length of the rim in any order, if desired. First we glue the leaf at a distance of 8 cm from the edge of the rim, then the first flower.
We hide the lower part of the flower under the leaves. To do this, glue 2 more leaves.
We glue the next two flowers on the sides of the first, trying to do it as tightly as possible. This way we fill the entire area on the rim intended for flowers. If your rim width is less than 10 mm, cut out an oval (length 12 cm) from felt and glue it to the rim. Next we proceed according to the description given above.
Master class 5. Poinsettia with leaves
It's time to tell you how to make poinsettias from ribbons, which can be used to decorate anything, for example, an autumn wreath as in the photo below.
What you will need:
- Ribbon 4-6 cm wide in red, cream or any other desired shade;
- Green ribbon (for leaves) 2-3 cm wide;
- Scissors;
- A needle and thread to match the ribbon for the petals or thin copper wire (jewelry);
- Beads;
- Hot glue.
How to make a poinsettia from ribbons:
Step 1. Cut three pieces of equal length from the ribbon. How long should the segments be? It depends on what size flower you need. If you want to make a flower with a diameter of 12 cm, then the segments should be exactly this length.
Step 2. Give the resulting rectangles a diamond shape. You can do this in the following way: stack the pieces on top of each other, fold the stack in half, then give the resulting square a triangle shape by cutting off the excess on the sides. Voila, you've got diamonds!
Step 3. Pinch each diamond in the middle and tie the folds with thread (you can do a couple of stitches) or jewelry wire.
Step 4. Place all three pieces next to each other, then tie them with thread or jewelry wire to create a flower. Adjust the petals if necessary.
Step 5. Glue several stamen beads into the center of the flower.
Step 6. Now let's work on the leaves. Cut two lengths of 6-9 cm from the green ribbon (the length of the pieces should be approximately three times the width of your green ribbon). Place one of the rectangles on the table, wrong side up. Bend its right side downwards along the bias so that the workpiece takes on an L-shape (see photo). Now fold your letter G in half to create a house-shaped piece with a roof. Gather the bottom of the “house” with a couple of stitches or glue.
Step 7. Now the leaves can be glued/sewn to the back of the poinsettia, to a felt round base (if you have one) or directly to a decorative object (headband, pillow, etc.).
Volumetric curl flower
Materials and accessories
We will need:
- satin ribbon – width 25 mm;
- satin ribbon of the same color for the base - width 4 cm;
- finished bead center (optional);
- glue gun;
- thread, needle, scissors.
Description
We prepare pieces from the tape, as shown in the photo. Place the ribbon face down.
We turn the right end at a right angle. Fold the left edge in half. Fold the left edge down. We wrap the right edge into the middle and seal the edge with fire. This is how we prepare all the petals.
Now you can start assembling. From a wide ribbon we cut out a circle with a diameter of 4 cm. We glue the first row of petals onto it.
Then the second row.
Glue the third row on top. For the fourth row, we glue the petals separately. Once connected, glue them into the center of the flower. You can decorate the center of the flower by gluing the finished center. The second option is to make another, fifth row of eight petals. We roll them up.
It turns out something like a slightly blossoming bud.
Glue it to the center of the flower.
Necessary materials
The necessary materials for making such bouquets are:
- Satin ribbons. These are mainly single-sided tapes with a width of 2.5; 4 and 5 cm. But if necessary, you can use double-sided tapes.
- Textile. Flowers can be made from satin, silk and chiffon, and other fabrics can be used as needed, including cotton, organza, crepe de Chine, etc.
- Lace. Diverse! And nylon, and stretch, and even linen.
- Artificial pearls, rhinestones, glass beads, half beads, beads, buttons with rhinestones.
- Of course, brooches! Here your imagination is limited only by your choice! You can use brooches with white, yellow, and bronze metal, with transparent or colored rhinestones, with pearls and plastic, small and large. There are plenty of options.
- Foam balls with a diameter of 12-15-20 cm.
- Wooden or plastic tubes with a diameter of 2.5-3 cm.
- Various sewing supplies such as needles, threads, pins, scissors, dry soap or chalk.
- Glue . Only hot melt adhesive is suitable for polystyrene foam. You can use glue in thin sticks with a diameter of 7-8 mm and a glue gun - or take thicker sticks, 12 mm wide, and a corresponding gun. The only difference will be in the volume of glue squeezed out at a time. The larger the gun, the more glue. But you can get used to any pistol.
In addition, you need pliers, a lighter, a knife, a saw and other tools.
Dahlia
Materials and accessories
To make this delicate flower you will need:
- satin ribbon – width 25 mm or 50 mm;
- a little filler for the core;
- lighter or candle;
- thread, needle, scissors.
Description
Cut out petals in three sizes:
- 2.5 by 7 cm (40 pcs.);
- 2.5 by 5.5 cm (20 pcs.);
- 2.5 by 4 cm (30 pcs.).
For the core, cut out a circle with a diameter of about 4 cm. Melt the edges of the petals. Then we make veins on them.
To do this, place the petal in a linen towel folded in several layers. We heat the knife on a gas stove to a temperature so that it does not burn through the fabric, but leaves a clear mark on it. We draw veins in this way. On the round core we sew a seam along the edge. Fill the core with filler and tighten the thread. We fold the lower group of petals inward and solder them with fire.
Let's start assembling. We sew the smallest petals around the core, gathering them at the bottom. In this case, the front side of the petals should be turned outward. The core should be voluminous. Leave 8 small petals.
Now we will sew these remaining petals to the core, but with the front side inward. With the same arrangement (right side inward) we sew the middle petals. For greater naturalism, we sew small bunches from large petals. Then we distribute them at equal intervals around the circumference of the entire flower and sew them on.
Ranunculus
To make a ranunculus you will need a standard kit:
- scissors;
- candles;
- tweezers;
- satin ribbon of different widths;
- glue gun;
- beads.
To make the petals, you need pieces of satin:
- 2×2 cm – 18 pcs.;
- 2.5×2.5 cm – 18 pcs.;
- 3×3 cm – 14 pcs.;
- 3.5×3.5 cm – 24 pcs.
You need to cut out round petals from them, like a peony, trim the base, melt it over the fire, fold the base like an accordion, hold it with tweezers and secure it with fire. The core of the ranunculus is made from a 5x5 cm piece of satin, into which a wad of cotton wool is sewn. It turns out to be a ball on which the petals will be attached.
Assembling the flower must begin with the smallest petals, pasting them over the stamen ball. Thus, you get a very beautiful flower that will suit any decoration as a decoration.
Peony
Materials and accessories
We will need:
- satin ribbons – width 50 mm;
- a small piece of felt;
- threads to match the color of the ribbons;
- ready-made stamens or beads;
- glue gun;
- needle, scissors;
- hair elastic or brooch pin.
Step-by-step master class
Let's draw a petal pattern, taking into account that we are limited to a ribbon width of 5 cm. At the widest point, the petal has the maximum possible length of 5 cm, at the narrowest - 2.5 cm.
Fold a sheet of paper in half and cut out a full petal with symmetrical sides.
We trace the contours of the part on the tape and cut it out. We cut out the required number of petals - 6 pcs. To speed up the process, you can fold the tape in four layers (no longer recommended, otherwise we will get uneven edges of the parts). Please note that we cut off the top edge of the tape and leave the bottom edge for ease of assembly.
Tip: when cutting out, you should not connect the layers of ribbon with pins - they damage the surface of the satin. For fixation, it is better to use office clips.
We reduce the pattern around the perimeter by 5 mm and repeat the procedure. Then we reduce the pattern again and cut out the petals. In total we will have three tiers of petals.
Melt the edges of the petals. If you have never done such an operation before, practice on an unnecessary flap. By assessing how quickly the fabric melts and how close to the flame you need to bring the edge of the fabric, you can carefully process the edges of the petals.
Holding the edge of the fabric tightly, melt the opposite side and pull the satin in different directions. As a result, the satin will become wavy. Please note that everything needs to be done quickly, otherwise the cooled satin will become brittle. To give the petal a beautiful shape, hold it over the fire. It is convenient to do this with tweezers. When exposed to temperature, the fabric will bend, creating natural curves. The final stage of creating a peony will be assembly. It can be performed in two ways: sequentially in a circle or alternately in a checkerboard pattern.
In both options, we sew the petals together with the seam forward with the needle. Having finished forming the first row, we insert the stamens into the center and secure the base of the flower by sewing the petals and tails of the stamens with several stitches.
We place the remaining petals in a circle, securing them at the base. For leaves, cut 10 cm of green ribbon. Fold the corners to the center and stitch along the bottom edge. We tighten the thread. We sew the edges of the leaf from the wrong side with a hidden seam. We cut out the base of our composition from felt. Glue leaves on it. Then glue the flower.
When the glue dries, glue a pin or elastic band onto the felt base.
Bell
When making a bell, the following materials are needed:
- pieces of satin ribbon 5x5 cm - 5 pieces;
- fire;
- tweezers;
- scissors;
- stamens – 1 bunch;
- glue gun
Bell petals are ordinary sharp petals, with the seam turned inward. One stamen is glued to each petal at the base. Then you need to glue their sides together, forming the flower itself.
The leaves of the bell are made in the same way as the petals, only the ribbon must be smaller in width. They should be secured with a glue gun under the flower so that they stick out slightly.
Simple ribbon flower
Materials and accessories
For production you will need:
- ribbon in two colors – width 25 mm;
- small beads, finished center;
- a small piece of felt for the base;
- glue;
- needle, scissors, thread.
Description
From the ribbon of the first color, cut pieces equal to twice the length of the petal. Fold them in half.
We prepare the same number of pieces from the ribbon of the second color. We wrap the blanks in pairs, as shown in the photo.
We glue or melt the edges, connecting them. Glue a bead onto each petal.
Cut out a small circle from felt. We place the petals in one or two tiers.
Kanzashi
The word came to us from Japan and means “stuck in the hair.” We are talking about long hairpins or hairpins decorated with decorative elements.
In Russia, “kanzashi” are hairpins decorated with satin or silk flowers. The technique requires perseverance and even, to some extent, talent.
Some kanzashi hairpins can look like a real work of art. By the way, a good idea for business. Production and sale of exclusive hair jewelry.
apple blossom
Materials and accessories
To work you will need:
- ribbon in two colors – width 25 mm;
- ready-made stamens and core;
- glue, needle, thread;
- headband (if flowers are made for it).
Description
Cut the ribbon into pieces 7 cm long.
Fold, matching ends A and B.
We sew each petal. In this case, insert the needle so that a depression is formed in the center. We string all the petals sequentially and tighten the thread slightly. We straighten all the elements so that they are pulled together evenly.
We decorate the flower by gluing the stamens and core. You can make a second tier of petals of a different color.
Chrysanthemum
The difficulty level of production is for beginners, suitable for children.
Prepare 15-20 pcs. cut rectangles from ribbon (piece length at least 5 cm). Roll each one lengthwise, heat seal one edge, seal the other edge and gather a little with thread. Prepare a round felt base.
Use glue to secure the resulting petals, with the gathered side, to the base, so that you get a round ball. The flower is ready! By the way, the petals can be made multi-colored.
Wreath of satin flowers
Materials and accessories
We will need:
- ribbon in several shades - yellow, orange, golden, light brown, milky, green;
- threads to match;
- ready-made stamens or beads for decoration;
- glue;
- the finished circle is the basis for the wreath;
- lighter;
- needles, scissors.
How to make flowers from satin ribbons with your own hands
We cut out petals from the ribbon in the form of an elongated parallelogram. For each flower you need three of these parts.
We squeeze the sides along a short diagonal. This is conveniently done using plumber's pliers or round nose pliers. We assemble a flower from three parts by placing stamens in the center or simply sewing beads on.
In this way we make flowers of different sizes from different colors of satin ribbon.
We cut out leaves from green ribbon and chop off one edge - see photo. Fix with glue.
Wrap the circle tightly with milky ribbon. We perform the turns with a slight overlap.
We fix the ends of the tape with glue.
We place and glue flowers and leaves on the surface of the wreath, creating a beautiful composition.
Narcissus
To make one daffodil you need:
- scissors;
- fire;
- tweezers;
- glue;
- 5 squares of white satin ribbon 5x5 cm;
- 3 yellow squares 4x4 cm.
The petal is made like this:
- A square of white satin is folded diagonally twice. Sharp corners must be folded like an accordion into 1 row on each side, then clamped with tweezers, cut off the excess and soldered with fire. You should get a petal with two folds inside.
- The upper edge of the petal is clamped in the middle with tweezers and melted with fire. It has a slightly pointed shape.
The stamen is made in a similar way, only the upper edge is not pointed.
Assembling a flower involves sequential gluing of all elements. The resulting daffodil is practically indistinguishable from the real thing.
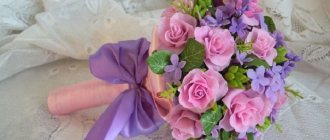
Bouquet of roses
Materials and accessories
For production you will need:
- satin ribbons of cream and green color: width 5-7 cm;
- felt or thick fabric;
- foam round base;
- holder;
- beads for decoration;
- needle, thread, scissors.
Description
From felt or thick fabric, cut out a circle with a diameter of 6-10 cm. Mark and cut out a sector on it - approximately 30 degrees. We connect the ends of the circle, forming a conical frame of the future flower. We place a satin ribbon on the top of the cone, tucking its cuts inward. We sew the tape along the edge, fixing it on the cone.
We begin to form the petals of the bud by wrapping the cone with ribbon. At the same time, after every quarter turn (more often), we bend the tape, as shown in the photo. We fix the lower corners with glue. For the bouquet we use a foam base in the shape of a ball and a holder.
We wrap the holder with green tape. We fix the foam base. We glue the finished buds onto the base and decorate them with beads.
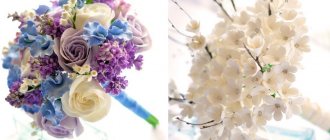
How to make a wedding bouquet
Sequence of work:
- Take a foam ball with a diameter of 20 cm.
- Using a sharp knife (not very short, about 15 centimeters), cut the ball in half.
- Take a handle for a bouquet 20 cm long, 3 cm in diameter.
- On the flat part of half the ball, mark the center with a pen and from it in all directions we set aside half the diameter of the future handle of the bouquet.
- Using scissors or any other thin pointed object, make a depression in half of the ball, about 4-5 cm.
- The recess should be narrow, exactly the diameter of the bouquet handle. You can try on the handle.
- Pour liquid hot melt glue into the recess. We try to get the glue onto the walls of the recess and onto its bottom.
- Lubricate one side of the bouquet handle with hot glue.
- Insert the handle with the lubricated side into the recess in the ball until it stops. This must be done quickly, because hot melt glue dries quickly.
- Apply glue to the joint between the bouquet handle and the foam.
As a result, we get such a unique porta bouquet - the basis for our future bouquet!
Now let's start decorating the base:
- Take the fabric (in this case silk) and cut a piece 6 cm wide and 80-90 cm long. Then cut out a 6 x 6 cm square.
- Glue the square to the back of the handle with the front side facing out.
- And then we glue all sides of the square to the handle.
- We take a long piece, glue two corners on one side with the right side of the fabric facing out. Glue the cut to the handle with the fold towards the edge. Next, carefully apply glue to the handle along the edge.
- We glue the cut to the handle along the edge with the fold towards the edge of the handle; this must be done quickly, because the glue hardens quickly. You can’t apply glue close to the edge, because when you glue a piece, the glue can come out, and when it dries, it turns white, and it won’t turn out very neatly.
- Next, apply glue to the handle (or to the cut from the side of the handle, as convenient) and glue the cut in a spiral to the handle, overlapping so that the double edge of the cut is covered by the folded edge. And so we wrap the handle with a cut to the end, to the junction with the foam, cut off the excess and glue the fabric along the entire diameter.
- Next, we take another piece of fabric 11-12 cm wide, 65 cm long for our ball with a diameter of 20 cm, i.e. the width of the cut should exceed the radius of the foam ball, and the length should exceed its diameter.
- We sew this section in a circle with the right side out, the seam inward.
- We stretch the stitched section onto our foam half and glue it along the edge.
- We gather the other edge around the handle of the bouquet. We get a draped bouquet handle. It is not decorated yet, but you can already start decorating the top part of the bouquet.
- For the bouquet we take various flowers, brooches and other decorations. We cut off the stems of all the roses and treat the ribbon on the cut with a lighter, grease the inside of the flower with glue.
- Next, we begin to cover the entire foam with flowers. It is best to glue from the top. You can first pin the flowers to the foam with pins and decide where the brooches will be located. (Usually flowers are glued joint-to-joint or overlapping, the main thing is that the foam is not visible.)
- We glue it so that the brooches slightly overlap the flowers or are under them. We try to maintain color balance, evenly distributing flowers and brooches of different shapes on the bouquet.
- You can lay out flowers and brooches in some pattern or follow the color order. Let your imagination take flight.
- In this way we fill the entire half of the ball to the very edge.
- Then we glue the flowers close to the edge or even go a little beyond it, then it seems that the flowers seem to be hanging from the edges of the bouquet.
- After we have glued all the flowers and large brooches and covered all the foam with them, we add half-beads, rhinestones and any other decorations to the almost finished bouquet.
- And at the very end we decorate the handle of the bouquet.
A wedding bouquet of satin ribbons and brooches is ready!
Tips and advice:
- A luxurious bouquet made by your own hands can be presented as a gift. Of course, it will cause admiration: those around you always admire the extraordinary bouquet. Don't forget this when you make it, pay a lot of attention to detail.
- Hot-melt adhesive has an unpleasant feature - it can “reach” for the gun and leave thin sticky white cobwebs, which are very visible on colored fabrics, and are generally noticeable.
- Do not apply too much glue, otherwise it may stick out beyond the borders of the brooch, and since it will turn white when hardening, the bouquet will look untidy.
- The foam should not be visible. If suddenly you have a gap, it is better to cover it with decoration or a small flower. Carefully drape the bouquet skirt. If you were unable to do this carefully, then the flaws can be hidden behind lace and ribbons.
- For a bouquet with a diameter of 20 cm, use sticks with a diameter of 3 cm, for the rest - 2.5 cm, so that the porta bouquets look harmonious. Of course, small bouquets of flowers and brooches require significantly less material and are made faster, so it is better to start with smaller bouquets.
- The color scheme is limited only by your imagination and taste! Sometimes masters try to stick to classic combinations, but in fact, absolutely any combination can look stylish, it all depends on the shades. Try to avoid colors that are too bright and instead opt for deep, rich colors.
- Well, the last thing: do not skimp on materials, since it depends on them how beautiful the bouquet will look.
0 Comments
Daisies
Materials and accessories
To make such simple but cute daisies you will need:
- narrow tape;
- glue;
- button;
- thread, needle, scissors.
Description
Cut pieces of ribbon twice as long as the diameter of the finished flower. For one flower you need 6-8 blanks.
Apply a small amount of glue to the center of each tape. We fold the free ends to the center and glue them. We collect a lush flower from several petals. We fix them with glue or a few stitches. We decorate the center with a button. If desired, the button can be covered with a satin ribbon.
Tips from needlewomen
Those who are interested in this type of needlework as kanzashi already have their own tricks and little secrets. If a craftswoman takes up work for the first time, then she should definitely listen to the following recommendations:
- for roses, it is advisable to choose a satin ribbon with a width of 2.5-5 cm; the wider it is, the longer the piece required;
- before starting work, always prepare the tools, it is advisable that the thread is threaded into the needle in advance, and it is also better to use a candle to singe the edges, then your hands will be freer;
- if you need to quickly cut equilateral pieces, you can make a stencil of suitable width, wind it (the number of skeins should not be more than 5) and cut the edges at the folds.
Using a stencil you can get many identical pieces in a few seconds
Subtleties of needlework
Before you start making floral masterpieces, you should decide for what purpose and what type of flower you need. After this, you need to prepare your tools, supplies and begin the creative process.
Recommendation: use ribbons of different widths - this will allow you to create more diverse flowers for a lush bouquet.
So, to make decorative flowers you will need the following materials:
- satin ribbons (narrow, medium, wide - up to 5 cm). Choose a color based on the purpose of the craft - it will be a gift or an accessory for a wedding. For gift items, bright colors such as red or orange are preferred. For an older woman, it is better to choose a muted color - burgundy; for a young lady, pastel shades - pearl, pink, milky. When it comes to accessories for a wedding celebration, stick to the classics - make a flower arrangement in white-blue or white-pink tones;
- scissors;
- threads (choose them to match);
- needles;
- glue (it is important that its tip is pointed);
- lighter - for burning the edges of silk ribbons so that they do not fray;
- tweezers - for safe burning of tape edges;
- elements to complement the composition - hairpins, wrapping paper, beads, baskets;
- wire - for securing parts.
Recommendation: instead of a lighter, you can use a burning candle to burn the ribbon edges.
If you plan to make floral hair decorations, you will need a hair clip or hoop; If you want to create an ikebana or basket filled with flowers, prepare wickerwork with foam to insert flowers fixed on wire.
Artificial flowers can be used to decorate photo frames or gift items.
Design experts recommend using thin willow branches when creating decorations for outfits: they are much prettier than paper spirals.
Lilac
Twist a thin ribbon into a spiral to form a circle with a diameter of 2-3 cm. Fasten it in the middle into four petals, and glue a bead to the center. This is a flower. You need to make 60-70 of these.
Cut out hearts and leaves from green satin. Secure them to the wire from below. In the upper part, form a lilac brush from the flowers.
This way you can make several branches. You will get a real bouquet of satin flowers.
How to form a complex petal with a fold
In order to form an oblong petal with a fold in the center , prepare a square of the required size (most often the side of the square is 5 cm) (photo 23).
Make a diagonal fold (photo 24) and bend the corners to get a square half the size, cut the bottom half exactly diagonally (photo 25).
Next, squeeze the side parts and glue them together to get an oblong complex petal with a fold (photo 26).