Any holiday is a sea of positive emotions. I want everything around me to be beautiful! So why not turn even a banal bottle of champagne into a work of art? And even the owners of the house who invited you to visit will appreciate this.
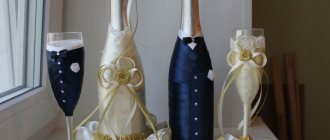
In addition, stylish champagne with unusual decor will be the highlight of the wedding. You can contact the craftsmen and order a design. But it’s much more interesting to decorate the wedding champagne with your own hands. Everything is very simple!
What you need for decoration
So where to start? You should choose accessories for decoration based on the size, shape and presence of inscriptions on the “experimental”. First, treat the bottle with alcohol or nail polish remover.
Afterwards you will need acrylic paints, napkins with beautiful patterns and various ribbons, beads, even cereals will do. Stock up on PVA glue in advance. To fix the work, you need acrylic varnish.
Decorating champagne with candy flowers. Decorating champagne with corrugated paper
Champagne and sweets are a classic “gentleman’s set”, a gift that is suitable for both men and women. Unfortunately, this gift is considered unoriginal and will not surprise anyone. A completely different effect will be if you donate sweets not in a box, but make them with beautiful flowers, and decorate a bottle of champagne with these flowers. To decorate a bottle with candies you will need:
- champagne
- candies
- corrugated paper
- foil
- colored paper tape
- tape tape
- double sided tape
- wire of different thicknesses
Details for a candy flower.
Petals made of corrugated paper.
Candy rose.
Making sepals.
Ready rose with stem.
Decorating the bottle with corrugated paper.
- The first step is to cut out blanks for flower petals from corrugated paper. These will be rectangles 9 cm long and 5 cm high. The corners of the rectangles are rounded.
- Wrap the candy in petals, up to 7 pieces. for one flower.
- The flower stem is made from thicker wire. A loop is made at the end of the wire, with which the leg will be attached to the candy.
- The petals are tied to the stem with thin wire. The wire is masked with tape.
- The flower petals are carefully bent so that their shape is natural.
- To make candy flowers realistic, you need to make sepals for them. They are also cut out of corrugated paper.
- The sepals are attached to the flowers, first wrapped with wire, and then with tape.
- Several flowers are made and then woven into a wreath. Flowers can be of different colors and different sizes (with different candies), then the wreath will turn out even more beautiful.
- The bottle itself is wrapped in corrugated paper, the edges of the paper are sealed with tape, and on top, where the neck begins to narrow, it is wrapped with colored paper tape.
- Using tape, attach a candy wreath to the bottle.
Champagne with candy flowers.
Interesting ideas for decorating champagne with candy compositions can be seen in the photo. These can be not only bouquets, but also suits, baskets, wreaths and even entire ships.
Champagne with candy poppies.
Beautiful decoration of a bottle of champagne with candy flowers.
Champagne in the form of a lady in a cloak and skirt made of flowers and sweets.
Ships made of champagne and sweets.
Decor of bottles with salt
You will need fine salt and crayons (you can use paints) of different colors. Salt is repainted in a certain color using crayons. In this way a mixture of different colors is obtained. Next, salt is poured into the bottle one by one.
It is important not to move the bottle or allow the colors to mix. It turns out to be a rainbow-colored piece of the room’s interior.
Safety precautions
Before you decorate a bottle of champagne with your own hands, you should definitely familiarize yourself with safety precautions. After all, if handled incorrectly, champagne can explode, causing dangerous injuries with fragments.
For the first experience, it is advisable to completely abandon the rather capricious champagne. It is better to start decorating experiments with safer bottles of non-sparkling drinks - since decorating bottles of cognac or wine is easier (the likelihood of being injured during the work is lower). Such drinks are not under high pressure and will not explode when decorated.
If it is necessary to design a bottle of champagne, then you need to follow a number of mandatory rules:
- Before starting work, you need to carefully inspect the workpiece . The slightest cracks, chips, uneven color of the bottle (glass thickness) indicate that it is not suitable for decoration;
- avoid sudden temperature changes . You cannot start working with a bottle recently removed from the refrigerator or brought from a cold street;
- Do not heat champagne while working (use a hairdryer to dry individual layers of paint, use a heat gun, etc.);
- Do not shake the contents of the bottle. Movements during operation should be moderately smooth and uniform; a sharp shake can lead to spontaneous opening of the plug.
It is worth noting that even strict adherence to all the rules does not guarantee one hundred percent safety, but only reduces the risk of injury to a minimum.
At the same time, decorating champagne with your own hands is an exciting and fascinating process; for many, such decoration becomes an original and interesting hobby.
Eggshell decor
The shell is often used in decoration; it creates irregularities and adds sophistication to a seemingly ordinary shell. You can glue it with PVA glue, but you shouldn’t be sorry, otherwise the whole picture will deteriorate and the shells will fall off. It is better to use hot glue or construction adhesive. Unusual shimmers are created with a brush and pearlescent paint.
We make decor from paper and Christmas tree decorations
Christmas tree decorations - balls, beads, tinsel - for the New Year can be seen not only on the festive tree. Collect all the toys on a thin, strong wire and wrap it around the neck of the champagne.
It is worth adding to the New Year's composition to the balls:
- cones;
- berries;
- bows;
- pine, fir branches (natural or artificial);
- gold ribbons;
- thematic pictures.
Corrugated (crumpled) paper is a soft, plastic material. You can literally wrap it around champagne, then smooth it out with your hands. The combination of red and gold is reminiscent of Santa Claus's rich fur coat. If you add gold buttons and a hat with a pompom, the similarity will be complete. Additional decor will be bows, tiny balls and bells.
Unusual items at work
A metal pendant will create an interesting pattern. After dipping the pendant in paint, lay out a spiral on the bottle. Then they slowly pull out the iron and get a pattern that resembles a tree. You can do this twice, for example, white and pink, and then draw tree branches, draw a bullfinch or another bird.
They use old wires, electrical tape, and broken balloons. All this is decorated. Mini-pictures are made from wire, electrical tape is used as recycled material, and bottles are covered with rubber from balls, creating amazing surfaces.
Note!
- DIY furniture decor - 145 photos of exclusive and modern design ideas
- DIY pot decor step by step: simple decorations and decor options for pots made from different materials
The main feature here is the acrylic coating. This must be done carefully, fixing with varnish. Then the works will become beautiful, regardless of what they are made of.
Dressing up a bottle of sparkling wine in different clothes
You can make a funny New Year's character out of a container with a drink. Make a hat from an old sock, cut an even strip from an unnecessary T-shirt with a suitable print, attach a fringe - the scarf is ready.
A great way to add a new flavor to the holiday is to decorate bottles in the shape of Santa Claus' reindeer. Make horns from fluffy pipe cleaners for children's crafts. Eyes can also be purchased ready-made, or drawn on paper and cut out. A red nose for a deer can be made from a pompom or a large button.
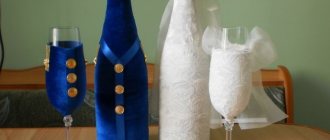
Decoration with ribbons and beads
Apply acrylic paints (with a sponge or brush) to the prepared glass and wait until dry. Bows, flowers, etc. are made from ribbons. Beads are painted and glued. If you want to add an antique look, you should paint the entire beaded bottle a dark color and make an accent with white, silver or gold.
Another way is to wrap ribbons around the bottle and sprinkle beads on the glued areas. You can teach your child how to decorate bottles with ribbons; it’s a simple and quick way that doesn’t require much effort.
Types of bottle decoration
Photos of decorating bottles of champagne for a wedding can be seen on many websites on the Internet. Today, ribbons, lace, natural and artificial flowers, paints, and beads are used for this purpose.
Professionals work using the decoupage technique, offer painting, engraving, use polymer clay and even sew national costumes, which they then “dress” bottles of champagne with. There is a decoration for any wedding.
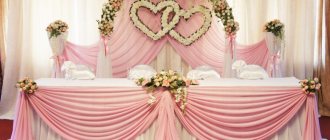
The main requirement is that the design of the bottle must correspond to the style of the holiday and be combined with the dishes and interior. For example, luxurious gold engraving is not very appropriate for a Japanese-style wedding.
If the bride and groom have an unusual hobby, you can design a champagne bottle based on their hobby. For example, at a biker wedding, a bottle in a leather jacket and with motorcycle glasses will look great. Or if the couple loves to travel, you can decorate the bottle with images of landmarks from different countries.
Cereals on a bottle
Are you used to storing cereals in containers, but what about storing them outside? For example, peas are glued onto hot glue using a stencil (it can be a shell, a spiral, or clear lines).
Then they tear up napkins and glue them, creating unevenness. All this is covered with acrylic paints and the process is completed with acrylic varnish. This is important, if you do not varnish, after a while the paint will fade and the grain will begin to fall off.
Removable felt cover
The original decoration is reusable felt covers in the shape of Father Frost and the Snow Maiden.
Felt covers for champagne bottles
Take:
- a bottle of champagne;
- paper;
- bias tape in red and blue colors (sold at any sewing store);
- silver ribbon;
- glue;
- sushi stick;
- a little padding polyester or cotton wool;
- needle, thread;
- wide red satin ribbon;
- decor (white beads, lace, sparkles).
Making a cover
Draw 2 rectangles on a sheet of paper, one with sides 14 and 30 cm, the second - 8 and 30 cm. Cut them out. Attach the wider one to the bottle, glue the ends of the part so that the resulting pipe can be easily removed. Now glue the second rectangle at an angle, cutting off the excess parts. You need to act carefully. Try to make the part even: all small folds and irregularities will be visible on the finished product.
Felt case in the shape of Santa Claus
When the glue dries, start decorating the case. Apply silver tape to the top of the paper piece and cut enough to make a full turn. Place the tape on the paper. If it is wide, then one strip is enough; a narrow one will have to be glued in 2-3 rows.
Christmas bottle covers
Take bias tape and cover the entire cover with it, all the way to the bottom. Proceed in the same way as when gluing tape.
Christmas bottle covers
Take the lace, attach it at the junction of the trim and the ribbon - you will get a collar. Do not rush to cut off the lace by wrapping it around the bottle: use it to disguise the junction of the trim. You can also trim the bottom of the cover with lace.
Satin champagne case
Try removing and putting the cover on the bottle again - is it easy? If no difficulties arise, then everything was done correctly.
Staff
Start making the staff: take a stick, coat it with glue, and then wrap it with red bias tape. Decorate with silver ribbon, securing the ends with hot glue gun.
A bag with presents
Take a wide satin ribbon and cut a small strip. Fold it in half and sew it together using a sewing machine or needle and thread. You need to leave 2-3 cm unstitched on each side. Turn the finished bag right side out and put a piece of cotton wool or padding polyester in it.
New Year felt and wool decoration for bottles
Cut a small strip of narrow silver ribbon and tie a bag. If desired, you can decorate the bow with a bead.
A cap
Cut a strip of paper slightly longer than the circumference of a champagne cork. Glue the ends of the part. Attach it to the paper and draw a circle. Cut it out and glue it to the cylinder.
Knitted bottle covers
When the glue dries, decorate the workpiece by covering it with a wide red ribbon or bias tape. Secure the tape with hot glue.
"Clothing" for New Year's bottles
Decorate the bottom of the hat with lace or sew sequins in the shape of snowflakes onto the hat.
New Year's apron for a bottle of champagne
Assembly
Christmas Bottle Decor
Attach the bag to the staff, and then glue the entire structure to the case.
A bottle of champagne decorated with Christmas tree decorations
Make a cover in the shape of the Snow Maiden, just use blue bias tape rather than red.
Champagne bottles decorated for the New Year
Gift for a friend for the New Year
Giving a decorated bottle is a good move if you don’t want to spend money on gifts. Last year you drank champagne together, and this year the bottle pleases with its beauty on the shelf. The bottle needs to be painted with acrylic paints.
The necessary parts are cut out from the napkins (or carefully torn off with your hands): Santa, Christmas tree, etc. Glue the parts cut from the napkin using PVA glue with a brush (you can add a little water if the glue is thick). The finished decoration of a champagne bottle will evoke positive feelings in a friend.
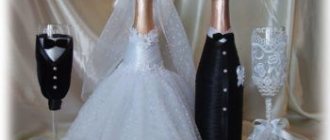
How to decorate a bottle of champagne with your own hands
You will need:
- satin ribbon (1 chocolate color, 1 white color; length 2m, width 3cm)
- white satin ribbon (length 60cm, width 6cm)
- fabric for base
1.
First you need to cut out a dress, focusing on the size of the bottle.
2.
You need to make shuttlecocks from satin ribbons. To do this, sew a stitch along the edge and pull it together to create ruffles.
3.
Sew ruffles onto the skirt.
4.
The first row should consist of the widest strip that needs to be stitched.
5.
From the center of the waist line you need to draw an isosceles triangle (see picture).
6.
Sew white ribbons, 3cm wide, around the perimeter of the triangle.
* In order for everything to work out neatly, you should secure the product with pins, and only then start grinding.
7. Cover the edges of the triangle with a frill made from chocolate-colored satin ribbon.
8.
Next, drape the skirt with chocolate ribbons as shown in the picture.
9.
Use wide white tape (6cm) to cover the gaps in the drapery. On top of this ribbon also apply a narrow chocolate ribbon (3cm) and stitch.
* If you pull the end of the thread, you will be able to tighten the ribbon and distribute the folds beautifully and neatly.
* With this detail you can hide undraped areas.
10. Prepare a satin ribbon (6cm) and sew it onto the bodice of the dress. You can add sequins for beauty and sew on ties.
11.
At the bottom you can decorate the dress with white ribbon bows.
Decor of bottles with inscriptions
The question immediately arises: what and how to make inscriptions from? The same fantasy still helps out. Cut the napkins along the entire length, 2 cm wide, using a wet towel, twist them into a spiral and put the inscription on the bottle. Other options are beads, matches, threads. Instead of a regular, boring postcard, use a bottle and “write” a congratulation on it.
After the work has been done, the decor of the bottle with the inscription “New Year” and a gadget in the form of a miniature bottle (which can be made from putty), a Santa doll or a spruce twig will really surprise you.
Leg-split
This method of decorating a bottle for March 8th is suitable for bright personalities who cannot tolerate routine and banality.
This decor looks fresh and bold. The coarse thread contrasts sharply with the spring festival, making this decoration method unique.
Both thick and thin twine (almost a thread) look beautiful. Such a rope can cover the entire surface of the bottle, and only part of the container. In case of partial wrapping, you must first remove the label from the bottle.
To dilute the severity of the twine, the wrapped surface can be decorated with flowers or delicate lace.
Decorated containers can be stored after using the contents, using them as an element of interior decor.
Vase made from a decorated bottle
An ordinary photo of the decor of a dead bottle is not impressive, but an unusual vase with fresh flowers is. And the whole secret is that the bottle is a vase. The main thing is to find a bottle with a wide neck.
If you don’t like ordinary vases from the store, then start decorating yourself. What inspires you? Maybe you won’t have any ideas, but once you start working, the process will begin and inspiration will appear, the main thing is to start.
If you are a seasoned designer, but have run out of ideas for a long time, take a closer look at ordinary pasta. They really do hide a secret. Come up with your own ornaments and don’t be afraid to make mistakes. Masters look for old things no one needs, trinkets, and find such uses for them, why are you worse?
Now you can not only give your master classes, but also record a video of decorating bottles.
Candy - how to use
Decorating champagne with candies is another fashion trend. Moreover, it can be used not only for a wedding, but also on the occasion of a birthday. All you need to do is first wrap the bottle with a satin ribbon and glue chocolates to it.
You can experiment with shades and shapes or make a composition from one type of goodies. This work does not take much time and even beginners can do it. Now you know how to decorate champagne for a wedding with your own hands and you can choose the design that you like the most!
Photos of bottle decor
Champagne pineapple decoration
A bottle of champagne can be transformed into an exotic pineapple. Needed:
- champagne
- Ferrero or other candies in golden wrappers
- green corrugated paper
- yellow or golden tissue paper
- thin canvas thread
- glue gun
- scissors
Decoration of champagne in the form of a pineapple.
- Squares are cut out of yellow or golden colored tissue paper. Candies are glued into the center of these squares. The edges of the paper are folded.
- The bottle is covered with candies in paper. Place the candies on the glue tightly to each other. But not in lines, but as if in a checkerboard pattern.
- Pineapple leaves are cut out of green corrugated paper and placed on the neck of the bottle.
- Where the neck begins to narrow, wrap the bottle with canvas tape.
Decoration steps
- Initially, we lower the champagne into warm water to soak and get rid of the factory stickers (leaves the top label covering the neck);
- Degrease the glass with an alcohol solution;
- We cover the silver label with masking tape, then proceed to cover the glass with white acrylic paint, apply several layers, first drying each layer. Cover with varnish. Dry;
- We take a napkin with a plot selected in advance for New Year's decoupage. We separate the lower layers, select the necessary fragments, cut off the excess (if we use scissors, it is more difficult to hide the edges). Gently moisten the napkin and apply it to the prepared glass, gradually smoothing out the wrinkles (it will be easier to work with a damp brush from the middle to each edge). Afterwards we fix the drawing with PVA glue. Dry;
- At the last stage, we apply paint to the intended places. You can make an ornament, create shadows, etc. Accessorize the item with a beautiful bow.
Decoupage of New Year's bottles is a huge space for the most unusual achievements for creativity. Even a model made using the same technique looks absolutely unique. Decorating champagne according to your wishes is very simple.
Using fabric as the main material will give it a special relief. To create an ornament in 3D format, modeling paste is suitable. With the help of small parts, rhinestones and beads, we can assemble a fabulous design. Glitters will add magic and a winter mood to the image.
Note!
How to make a snowman with your own hands from cotton wool for a window, for a kindergarten, from scrap materials
- How to make a snowman from plastic cups: step-by-step photo/video instructions + master class
- DIY wedding decorations, crafts and accessories: photos of original wedding decor
Beginners can take advantage of video master classes presented on the Internet. They describe each work technique in detail, step by step, advise the most suitable tools and materials, tell the specifics of handling them, reveal secrets and share opportunities.
You can create a festive mood using decoupage of a champagne bottle any day. To surprise and delight loved ones with eccentric ideas and gifts, you don’t need to wait for a certain moment. A light, sparkling drink that is preferred by all generations will always come in handy, but the quality of the drink depends only on personal preferences.
Other champagne decor options
Read: Living room in country style - 100 photos of beautiful design ideas
Let's discuss this article together:
Click to cancel reply.
Painting silver and creating texture
Dot painting of dishes and using stripes
To transform these bottles you will need:
- A bottle with colored glass and a bottle of unusual shape;
- Adhesive tape or paper;
- Spray silver paint;
- Volumetric paints for design;
- Gloves;
- Newspaper/fabric that you don’t mind getting dirty.
Step 1
Take a bottle with colored glass and remove the label from it. We glue tape or paper onto the bottle the way your imagination wants. Be sure to run your finger over the glued part to remove any air bubbles.
Step-by-step technique for creating stripes on a bottle
Step 2
Lay down newspaper/cloth and wear gloves. Apply 2 coats of paint and let dry. Carefully remove the paper or tape;
Take your time to avoid jagged edges.
Apply volumetric paint, then apply 2 coats of paint
- We take an unusually shaped bottle and remove the label from it.
- dotted volumetric paints to the bottle Let it dry.
- Apply 2 coats of paint to the bottle and let dry.
TIP: Volumetric paint can be replaced with any thick glue, such as “liquid nails”
Using the same technology, you can make letters of the newlyweds on a bottle: first we apply adhesive paper in the shape of the letter, paint it and remove it after drying.
Making letters on a wedding bottle
You can use the same method to make vases from a bottle: photos and Master classes in this article
Required Tools
What subjects or additional elements will be required in decoupage on champagne depends only on the author, but initially the use of a certain set of devices is implied:
- Acrylic paints (you can use white paint and colors);
- Brushes (can be flat synthetic);
- Decoupage glue or classic PVA;
- Three types of acrylic varnish (transparent, transfer, finishing) and primer;
- Sponges (sponges) for applying paint;
- Degreaser (special type for each surface). For glass, in principle, any will do;
- Gloves, scissors, knives;
- A towel that absorbs moisture well;
- Detergent.
For additional decoration, you can use glitter, spray paint, crystal paste and many different additions according to your creative idea.
Design options
Classic (straight)
Suitable for beginners. In this format, you can easily and quickly learn how to glue selected paper pictures (napkins, cardboard, photographs) onto a prepared base. As a result, you achieve complete coverage of space;
Reverse (illustration inside)
Used for clear glass. The element is glued with a pattern to the glass, decorated with a background accordingly, thereby creating a window behind which the intended content can be seen;
Artistic (smoky)
To perform in this format requires some experience in using color (shading, stretching, shadows). Paint with halftones and shadows is applied around the selected image, the result is a non-standard picture on glass;
3D volume – living design
To work, you can use fabric, relief paste, beads, ribbons, flowers, branches and many different little things. By connecting the elements in the planned sequence, you get the expected unique three-dimensional pattern.
Decopatch is considered a type of decoupage. The principle is to cover the required area with small pieces of paper. This way the entire product is covered, creating the appearance of an antique cracked painting.
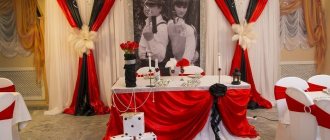
Decoration using photographs of young people
Photos of a loving couple add a special charm to wedding sparkling wine. Bottles acquire individuality and become a truly memorable gift. The photograph for this type of decor is delicate, romantic, and proportionate to the bottle.
The subtle point in this technique is to glue the photo so smoothly and carefully that there are no bubbles, creases or folds left. To do this, the image must be made on fairly thin paper. When using an inkjet printer, photo ink that does not leak when in contact with water is desirable. A color laser printer will give the ideal result. If it is not available, you can contact the printing house.
The photograph is placed instead of a label in the lower third of the bottle. It can be framed with a heart, accompanied by a wish inscription, or made the center of a flower collage. The date of the wedding, the location of the wedding, the names of the newlyweds, and the time of the wedding will be relevant.
Shiny case
A beautiful and convenient case can be made from paper with glitter in half an hour. To create the packaging you will need:
- cardboard with silver glitter;
- scissors;
- pencil;
- ruler;
- glue.
Make the decoration step by step:
- Measure the height of the bottle and mark the back of the cardboard with a pencil. Measure the diameter of the bottle with a thread, add 5 cm on both sides and draw the base of the triangle on the paper.
- Draw a triangle, round the edges at the bottom and cut with scissors.
- Fold the resulting figure into a cone.
- Cut a hole at the top so that the cork on the neck of the champagne can easily pass through it. Try the figure on the bottle.
- Glue the joints of the cone with a slight overlap.
- Trace the bottom of the bottle onto cardboard and cut out the bottom of the case. Glue the bottom to the cone.
- Lubricate the bottom of the case with a thin layer of glue and sprinkle with dry glitter. Place the case on the bottle.
- Tie a silver ribbon bow around the neck.
The elegant case for champagne is ready.
Glitter Champagne Case: Pixabay
Decoupage style
The design technique is very popular and is actively developing today. You can use many techniques to decoupage bottles with your own hands. Most often, work is performed in the style of:
- Shabby chic or shabby style - the effect of an antique item. Specially created abrasions, the appearance of many years of use, which are enhanced with ribbons, images and other decor in a retro style;
- The richness and color of the Victorian era periodically appear in the decor of bottles (the use of rich red, blue or green shades, gilding);
- Provence style is gentle and elegant, pleasing to the eye and will be a wonderful gift for lovely ladies;
- Minimalism is often represented in the deco-patch technique; they are well suited for the festive table of a youth group.