Any wedding accessory is an important part of the celebration. Therefore, the couple begins to choose them long before the event itself. Jewelry should fit perfectly not only with the image of the bride, but also with the groom. As you know, the main accessory for a man is a boutonniere.
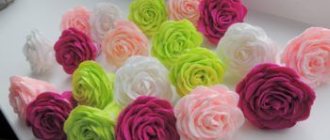
In the modern world, this decoration can be made not only from fresh flowers, but also from many other materials. Recently, foamiran boutonnieres have become popular. The main advantage of such an accessory is that it retains its original appearance for a long time.
What and how can you make it yourself?
Nowadays you can get any materials for creativity. So why not create a beautiful boutonniere out of them? Moreover, there are many options for crafts. Some of them are easy to perform, others require skill. But if you decide to make them yourself, then you will definitely need step-by-step instructions.
From foamiran
Foamiran is a decorative foam material that can be easily changed in shape. It is sold in the form of colored sheets. It is a type of suede, only more elastic. It makes amazingly beautiful crafts. Especially good are flowers and plants that are almost indistinguishable from natural buds.
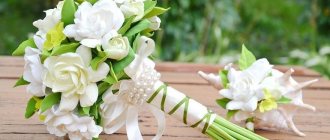
How to make boutonnieres for groomsmen from foamiran? You will need: iron, scissors, 2 sheets of foamiran (white and green), toothpick, foil, acrylic paints (ochre, white and carmine), paper stencils, brush, stamens, lace, hot melt glue, hairpin.
Make a stencil from cardboard or paper in the shape of a five-leaf flower.
Cut out 3 flowers using a stencil from a white sheet of foamiran.
Paint the blanks with acrylic paints with a brush.
Make a small ball of foil in the center of one piece. Glue it. Poke everything with a toothpick. Fold one petal around the center.
Using a heated iron, touch the remaining petals. Form them into a beautiful shape, and then glue them one by one to the bud.
Then put on the other two blanks. Use an iron to form beautiful curves, and then put them on a toothpick, gluing them in the right places.
Now take care of the sheets. From a small piece of green foamiran, cut out 4 oblong triangles.
Cut the leaves around the perimeter.
Then heat with an iron and stretch the sheets, giving them a voluminous shape.
Remove the toothpick from the flower. Glue the leaves to the back side.
Attach decorative stamens to the flower.
Attach the hairpin to the flower on the back side, securing it with an additional piece of fabric with glue.
If necessary, create more flowers. Connect them with an elastic band and clips.
From tapes
Ribbon boutonnieres for groomsmen are becoming increasingly popular. Create the shape of the flowers according to your taste, and choose the color to suit your wedding style.
You will need: 3 satin ribbons (white 2.5x75 cm and 2.5x30 cm; pink 2.5 cmx2 m), scissors, needle, thread, lighter, polymer glue, glue gun, additional decor, accessories for the base.
- Fold the pink ribbon in half, right side out.
- Roll it from the ends into a roll, forming a bud. Constantly stick the result with a glue gun.
- Secure the ends with glue.
- Cut off the excess part and burn it with a lighter.
- Cut the long white ribbon into several unequal pieces.
- Form flowers from each one in the same way as from the pink ribbon.
- Fold the second white ribbon into a bow.
- Secure the middle with thread.
- Cut off the long pieces and then singe them.
- Glue the roses to each other.
- Also attach a bow at the bottom of the composition.
- Add any decor using polymer glue.
- Attach lace to the back of the boutonniere if desired.
- Finally, glue the base to the flowers.
Boutonniere on hand for graduation, master
In this master class we will make a graduation boutonniere from foamiran with our own hands.
To create it you will need:
- red and white foamiran;
- scissors;
- wire for beads;
- pearl beads;
- glue gun;
- awl;
- iron;
- red lace or ribbon;
- white and red stamens.
First we print the template. You can adjust the size of the petals yourself. The only thing is that there will be 2 flowers in the boutonniere, so we print one template with a total length of two petals of 10 cm, and one slightly smaller template - 8 cm.
First, we outline a large template on red foamiran. Then we cut out the strip in width and fold it into several layers. Cut out the petals along the contour. For a red flower we will prepare 6 blanks, and for a white flower only 3 double petals.
We will process the petals one at a time using a heated iron until about. We apply one petal, then quickly fold it into an accordion and, rubbing it between our fingers, twist it. This way we created deep folds that will give the petals relief.
We straighten the petal, starting from the middle. Use your thumbs to make an indentation. The petals are voluminous and realistic.
The stamens need to be put in a bouquet. We take an arbitrary number of pieces and glue their ends together.
Since we have double petals, it will be easier and faster for us to assemble the flowers.
We do not completely cut the gap between the petals and fasten the petals opposite each other one at a time. A whole bud is already forming.
We attach two more rows of petals in the same way, placing them between each other. Then we cut off the stem from the stamens close to the petals and immediately attach them with glue. We simply glue the remaining rows of petals to the center of the bud from below.
We collect a small flower in the same way, only we cut off the stem of the stamens after the second row of petals.
From the wire we form a twig with beads of different diameters. We just wind them up in a chaotic order.
To cover the back side of the buds and place them somewhere, we will make leaves. We cut out leaves from red foamiran by eye, 3 pieces of 6 cm each. We make cuts along the edge and process it in the same way as we did with the petals.
We connect the flowers, supporting them with each other. Between them we glue a branch of wire with beads to the bottom.
We cover all the unsightly places with leaves so that they peek out a little from under the flowers.
We attach red lace or a ribbon 40 cm long so that you can tie a boutonniere on your hand.
This is how easy it is to make a foamiran boutonniere with your own hands.
Author: Antonina Mazur
lady-master.ru
What is foamiran?
Foamiran is a decorative material that can easily be given any shape.
You can actually find it in the store in the form of ordinary colored sheets. Foamiran is classified as one of the varieties of suede. It makes beautiful fakes and boutonnieres. Working with such material is not difficult at all. All you need is to prepare materials that will serve as assistants in the process of creating a boutonniere.
Another advantage of foamiran is that even a beginner in this matter can work with it.
Popular colors of boutonnieres
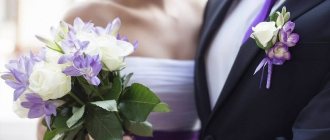
To always stay on trend, it is best to use classic white, pink and beige flowers for boutonnieres. However, this is only if such shades predominate in the bride’s outfit and accessories. For example, turquoise boutonnieres , which will successfully match the satin belt on the bride’s dress of the same tone or the flowers in the bouquet.
Turquoise boutonnieres
Don’t forget about boutonnieres for the groom and his friends - all decorations should be ordered or created in the same style . Consult your future husband; his opinion is also very important when choosing a color scheme.
Boutonniere for the groom
A boutonniere is an accessory that everyone associates with a wedding. In addition, this decoration will become a cute souvenir for the bridesmaids and groomsmen.
You can take a great idea for creating boutonnieres with your own hands from the following video:
History of the accessory
This accessory came to us from France and is translated into Russian as “flower in the buttonhole.” It was first worn in the 19th century during the French Revolution as a symbol of determination. Then it was a live red carnation. And in its present form, the boutonniere began to be worn at the beginning of the 20th century, as part of a men's dandy suit. But over time, it was left only for festive occasions. At the wedding, this detail became a reflection of the bride’s bouquet, in a miniature version.
Options
Previously, only fresh flowers were used for boutonnieres, but now the situation has changed. Most of the options can be kept as memories from your holiday. There are several types:
- From fresh flowers. The classic detail is usually made up of the same flowers that are used in the bouquet. It is enough to choose just one or three buds and a little greenery, which are fastened into a buttonhole. Roses, wildflowers, anemones, peonies and any other variations look beautiful.
- Made from artificial flowers. Some species cannot be distinguished from real plants. It all depends on the choice of material from which the products are made.
- Unusual boutonnieres. They may look completely unexpected. It all depends on your imagination. For example, from satin ribbons, in the form of a composition of watches and mechanisms in the steampunk style or some kind of figure. This option should emphasize some of the man’s interests, things that are significant to him.
Foamiran boutonnieres and material properties
To make buds with your own hands, you should use foamiran.
It has such wonderful properties as:
- Elasticity;
- Strength;
- Elasticity.
Foamiran is sold in the form of thin sheets. Its pieces can be given absolutely any shape if you warm it up a little. The material has a porous structure due to the fact that it is made by foaming.
Foamiran is a very elastic and resilient material, so a boutonniere made from it will turn out to be elegant and durable
Products made from foamiran can be washed, so you don’t have to worry if they get dirty.
In addition, it is almost impossible to tear the material, since it has great strength.
When purchasing a canvas, you should pay attention to such features as:
- Density;
- Form;
- Porosity.
On the territory of Russia you can find mainly Iranian and Chinese foamiran, each of which is of good quality, however, experienced needlewomen prefer to choose Iranian material, since it has great subtlety and ductility. The thickness of the sheets is sold in 1 mm and 2 mm. As for the shades of the canvas, the choice is very large, which allows you to create a wide variety of crafts and decorations in rich and bright colors.
Boutonniere for the groom from foamiran: master class on how to create it yourself
First you need to learn how to deal with this material. Therefore, it is recommended to practice for several days and only then start creating the final version of the accessory.
Most plants are made using the same method.
The first step will be to create a template that will allow you to make blanks. And from them you can collect roses, peonies or tulips.
Next you need to create a boutonniere design. To do this, you should make a sketch of the composition.
DIY foamiran boutonniere.
The process of creating it will look like this:
- You need to prepare plant templates from cardboard. It will have six petals.
- The cardboard blanks must be attached to the foamiran and a part of the flower must be cut out from it.
- Each petal should be curved to give it a natural appearance.
- The role of the leg will be played by a piece of wire. But the core will need to be made from the tip of the stem.
- Now you need to pierce all the petals with an awl and thread a wire through them. Then you need to apply glue to the loop and squeeze the leaves.
- Similar manipulations should be done with all workpieces.
This is interesting: Choosing the right flower boutonnieres for the groom
As a result, you will get a small flower. If desired, you can make several of these plants. Then just collect all the flowers in a bouquet and wrap it with ribbon. Thus, you can make absolutely any type of plant.
What looks is it suitable for?
In a modern look, the boutonniere looks appropriate with almost all variations, as it is made from various materials and colors.
- A tuxedo flower is the most classic and strict option. A white or beige accessory looks impressive on black clothes.
- A classic suit with a jacket can always be complemented with a bright small detail. The main thing is that it matches the bride’s bouquet.
- For an outdoor wedding, people often don’t wear a jacket, but leave only a vest. And in this case, the flower boutonniere looks as harmonious and stylish as possible.
- The freest option is to hook a bright piece onto suspenders or a shirt. An original and easy way to decorate a men's outfit.
Attention! Perhaps your look would be better suited not to a boutonniere, but a butterfly. She can look very fashionable too.
Summary
The fashion for the “flower in the buttonhole” as a holiday decoration has not gone away for several decades. Types, colors, materials change, but the meaning remains the same - this is one of the most important accessories for men at a wedding. It will help complete the groomsmen's look and add color to the suit. This detail will also emphasize the chosen style of the wedding if it matches its color.
Show your imagination and add special decorative solutions to your boutonniere that will only be available at your celebration. A DIY boutonniere for the groomsmen will be especially valuable, because you put your soul into it!
admin 115
Previous article
Traditions of the East - wedding ceremony in Turkey
Next article
Necessary tools for work
It is easier to work with decorative foam sheets with special tools. You will also need to follow some rules and stock up on stencils and templates. To create various elements in the form of flower stems, petals, leaves, you will need the following materials and equipment:
- Colored crayons, paints. Used for tinting and adding naturalness to various prefabricated elements. Dry, oil pastels are more often used;
- Tape. The main purpose is to process stems, decorate twigs and legs. Thanks to the adhesive base, when stretched, it is perfectly fixed on wire, wooden sticks, and plastic;
- Flock powder. Using a special powder, a velvety effect is created. It is useful in the manufacture of velvety sheets and anthers on stamens;
- Heating elements. To prepare the material for work, to thin it, use an iron, candle fire, burners, and your own hands;
- Scissors. Regular stationery or tailor's cutting tools will do. Small nail scissors are useful for cutting out small details. Sometimes edge processing is carried out with figured products;
- Molds. With the help of such devices, the workpiece is given the natural texture of living plants. Realistic casts are cast from plastic, giving them a deep, rough, rough surface;
- Shaped hole punches. They will be indispensable when working with small parts. They are used to make small flowers, leaves, and various decorations;
- Bulki. They help create deep petals, like those of peony plants and bush roses. The balls are perfectly smooth and come in different sizes;
- Floral wire. This is a special wire wrapped in paper. It varies in thickness, color and length;
- Glue. To collect voluminous bouquets or create crafts from many parts, you will need strong glue and a hot gun.
Material selection
Original wedding decorations for the groom, bridesmaid and guests can be made with your own hands from various materials. To make a choice, it is worth considering the most popular ones.
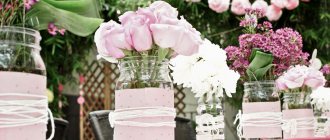
Flowers
As a rule, the choice stops at fresh flowers. In this case, the accessory is complemented by other decorative elements:
- leaves and plants;
- berries;
- ribbons;
- beads;
- scraps of fabric;
- decorative wire and mesh.
When creating wedding boutonnieres with your own hands, the first step is to decide on the type of plant:
- rose. It is considered a classic option, symbolizing sincere, tender feelings. For men, wedding boutonnieres are usually created using small buds;
- freesia. Quite a bright, attention-grabbing flower. It will look great on the groom's suit. This boutonniere would also be suitable for the bride’s hand;
- peony. A delicate, extraordinary flower that is associated with spiritual purity and restraint. Typically, it is used for women's accessories;
- iris. Symbolizes courage and for this reason is used in making jewelry for men;
- tulip. It is best to make an accessory using an unopened or only slightly blossomed bud. A green leaf would be an excellent addition;
- orchid. Associated with grace and luxury. It is not surprising that such flowers are often used at wedding celebrations. As a rule, decor is not used when using orchids.
Calla lilies are also suitable for creating boutonnieres. These are delicate, graceful flowers that are ideal for a traditional celebration using discreet shades. You can also resort to using artificial flowers.
Foamiran
It is a foam material ideal for creating various decorative elements. It is quite often used in needlework. In its structure, foamiran is similar to a sponge. That is why it is easily given the desired shape.
Before using this material, it must be warmed up. When exposed to high temperatures, it begins to stretch easily. When foamiran cools, it retains its created shape.
The material has many advantages, is inexpensive and that is why it is widely used in creating wedding decor. It is ideal for small size accessories.
Ribbons
You can make your own wedding decorations using satin ribbons. This can be an independent composition, but it is often complemented with flowers. The material is inexpensive and easy to work with. It is quite simple to create an original accessory from it.
As a rule, such boutonnieres are preferred in winter, when flowers can quickly lose their original appearance under the influence of low temperatures. Before starting the basic manipulations, in this case you just need to think through the original design and select a suitable palette of shades.
Mesh and organza
Using these materials it is possible to create incredibly beautiful wedding decorations. As a rule, artificial flowers are created from them. The composition is complemented by ribbons and other decorative elements.
It won’t be difficult to make several buds from organza and mesh. To do this, you just need to cut out circles of various diameters and burn the edges. After this, all that remains is to place these blanks one on top of the other and secure the resulting structure with a regular pin or beads.
Silk
When using silk, this fabric is the main material. It is from this that most of the overall composition is made. True, when working with it you need to be as careful as possible and have certain skills. There is a risk of accidental damage.
Flowers made from silk look incredibly delicate and elegant. To achieve contrast, nets, ribbons and other decor are additionally used. Boutonnieres made in pastel shades are incredibly beautiful. They are perfect for a bridesmaid.
Polymer clay
This material is used not only for the manufacture of miniature accessories. It is increasingly used for bouquets. Flowers made from polymer clay look natural; if the work is done correctly, it is quite difficult to distinguish them from natural ones. In addition, such an attribute will last a long time. It is perfect for those who suffer from pollen allergies.
Extraordinary solutions
Feathers, buttons, pine cones and even ears of wheat can be used to make such accessories. You just need to follow these simple recommendations:
- the decoration must correspond to the chosen theme of the celebration;
- shades are selected to match the clothing;
- original ideas should reflect the tastes and interests of the person for whom the attribute is intended.
Craftswomen who are not afraid of experiments manage to create products from very unusual materials. For example, from sweets. In this case, you should only make sure that the extraordinary decoration does not leave stains on the outfit.
An easy way to create a rose for beginners
A charming flower can be created in many ways. Beginning craftsmen can form a rose from several individual petals or prepared petal parts. The second method is simpler. The next master class will be devoted to exactly this method of collecting flowers.
To work you will need pink or red foamiran and a small green piece for the leaves. You also need a set of standard tools and several suitable paper templates. We prepare patterns for the petals - we cut out three different circles from paper, divide them into five parts, and form a rounded petal from each sector.
We apply the templates to the foamiran and outline the contours with a toothpick. Cut out one piece of each size. If desired, the edges of the petals can be tinted. Heat the iron and apply the pieces one at a time, using stretching movements to create a bulge, and curl the edges in the opposite direction.
We make a bud from several petals. Roll a ball out of food foil, put it on a toothpick and begin gluing the petals. We put the smallest petal part on a stick and glue it at the base. Now we fix the petals to the central bud in a checkerboard pattern. When one row is completed, we proceed to the next detail and proceed by analogy with the previous petals.
Step-by-step master class
Having decided on the materials from which the boutonniere will be made, you can begin to work. But without proper experience, a self-made product may not be accurate enough. The master class will help solve this problem. There are many original ways to create a boutonniere with your own hands on the Internet. Before you get started, you need to prepare the following tools:
- the material from which the accessory will be created;
- pins for fixing decorative elements and attaching boutonnieres to clothes;
- scissors or pruning shears;
- floral wire;
- wire cutters
The list of required equipment can be supplemented depending on the accessory being manufactured.
Creative for the groom and witness
As a creative boutonniere, the groom and his witness can use a composition of ribbon, twine and additional decorative elements that match the theme of the wedding. This accessory option will be inexpensive, but will look laconic and elegant on a formal suit. To assemble this boutonniere for the groom with your own hands, you need to follow the following sequence of actions:
- Take two ribbons and cut them at the edges in the shape of a V, their total length should be approximately 8-10 cm.
- Gather the ribbons together and fold them in half, tie them with twine, wrapping the base several times.
- Add other decorative elements to the decoration as desired.
Finally, use a pin to secure the decoration to the clothing. It is recommended to check how the boutonniere looks on the clothing after the groom has put on the suit. When stretched, the appearance of the accessory may change.
For feather guests
An excellent option for making a boutonniere for guests would be to use decorative or natural feathers of different colors. To create a decoration, you must adhere to the following algorithm of actions:
- Gather all the feathers into a bun, forming a neat bouquet.
- Add other decorative elements (ribbons, beads, mesh) to the overall composition.
- Securely tie the base of the accessory with a ribbon of a suitable color and secure it with glue or a pin.
At the end, you need to fix the wedding attribute on the clothes. This accessory is easy to assemble and very inexpensive. The materials can be purchased at any craft store.
Roses for the bridesmaids
Even inexperienced needlewomen can make flower boutonnieres for bridesmaids with their own hands:
- Stretch the floral wire through the base of the bud and position it so that even parts of the edges remain on both sides.
- The wire must be pressed to the stem and wrapped with a ribbon of a suitable color.
- Add leaves or other elements to the bud, which are pressed against the stem and wrapped with fabric tape.
- After completing the composition, you need to cut off most of the length of the stem and leave 1-3 cm.
Finally, you need to secure the ribbon with a pin on the back of the accessory and use it to attach the decoration to the outfit.
Traditionally, a boutonniere is an accessory that consists of one bud; this option is made for the bridesmaid. The classic attribute is made from roses of a delicate shade.
How to properly decorate the stem of a boutonniere
Leg length may vary. It all depends on the size of the flower. If it is small, then the leg should be short. For voluminous flowers, a long stem is created. It is formatted as follows:
- A small wire is being prepared. It should not be too thick; its length is determined individually.
- A ribbon is cut out of green foamiran. It should be 1 cm wide and 12 cm long.
- Glue is applied to the ribbon on one side. You don't need to apply too much of it, otherwise it will smear and stain the tape.
- The ribbon is wrapped around a wire. The side with glue is adjacent to the wire.
- Excess ribbon is carefully cut off.
- The ribbon should reach the very base of the flower so that the wire is not visible. The result is a neat green stem.
- The resulting stem is glued to the base of the flower to create a whole flower.
Green beads are attached to the stem of the boutonniere as decoration; you can add a little sparkle if desired.
Creating a boutonniere from foamiran is quite simple if you follow the instructions. A boutonniere made from this material is spectacular and elegant. This detail can complete a festive look and makes it sophisticated.
How to make a base for a boutonniere
If you want to make boutonnieres in the form of a brooch, but you don’t have a special fixing base at hand, you can create it yourself. For this you will need:
- pliers;
- floral wire;
- a pin that will act as a base;
- scissors;
- ruler for precise measurements;
- tape.
The procedure for creating a base for a boutonniere for a wedding:
- Cut a piece of floral wire that will be equal to twice the length of the pin, bend it in the center, and spread 1 centimeter from the ends to the sides.
- Secure the wire to the pin using tape.
- Strengthen the resulting structure with another layer of floral wire, which is attached to the tape.
On the prepared base, you can create a boutonniere of any size and from various materials; thanks to the rigid design, the decoration will adhere securely to clothing.
How to make a hairpin with a rose from foamiran
Hair decoration can be made small, barely noticeable, or bulky, accentuated. Often hairpins are made specifically for a specific celebration. You will need to prepare scarlet foam material, golden braid, two green and light green nylon ribbons, a hair elastic, and the necessary tools.
First of all, cut out the petals according to the template. We prepare 6 large, 12 medium, 10 small. Now we glue a 14 cm long braid to a piece of 9x10 cm foil and roll the rustling material into a ball. We attach the petals one by one to the base - first the smallest ones, then the middle ones, moving them slightly one after the other. We make leaves and sepals from green foamiran. We pierce the workpiece in the center and put it on the braid. We collect two bows from ribbons, attach a flower to them and tie them with braid. We attach a hairpin or elastic band to the reverse side.
Lush peony rose
To make the flower even more expressive, use foamiran for the petals in 2-3 different close shades. Cut out all the blanks from the diagram - in the same quantity and proportions. The form does not have to be perfect - this will only add realism.
It is convenient to warm up small petals and form them with a regular loop or any other similar tool. For larger ones, a ball of suitable diameter or a larger loop is suitable. But it is better to form the sepals and large petals by hand, carefully twisting and stretching. Take 4 pieces of wire and make a loop on each for the middle. Glue 3 small petals onto each, then 4 more larger petals. Gradually move the next 3 petals down so that the blanks look like in the photo.
Twist the parts together in pairs and connect them together into one large volumetric middle. Start gluing all the large petals from the bottom, so that each next one overlaps the previous one by at least a third, and at the very end add a sepal. Correct the shape of the middle using a toothpick or any other thin tool.
Tea roses for decoration
Small foamiran roses are ideal for decorating wreaths, hoops and hairpins. Choose foamiran of one or more adjacent shades and cut a lot of small round petals about 1.5 cm in size. You will need from 6 to 10 pieces for one flower - so count the number in advance.
Place each petal on the sole of the iron for a couple of seconds and immediately curl it. Then you need to straighten them and shape them with your fingers: bend them a little in the middle and stretch the edges. For the frame you will need a thin wire with a loop at the end - according to the number of flowers.
Begin to tightly wrap each wire with petals in a spiral and form buds. Glue each next circle less tightly and bend the edges manually, with a toothpick or tweezers. If necessary, you can then add small leaves and sepals.
Foamiran jewelry: boutonniere “Marshmallow Dreams”
Let's talk about happiness. What is happiness for you? What does a person need to feel happy?
I’m not talking about global things now: love, health, well-being. Every day, some routine little things bring joy and lift your spirits. For some it is hot, tasty, aromatic coffee in the early chilly morning. For some, it is the opportunity to communicate with family and the shining eyes of a pet, full of devotion and love. Some people just need a good night's sleep to be completely happy. For a man, comfort and the opportunity to eat deliciously are important. And a woman feels happy when she is beautiful and surrounded by beautiful objects. Even a small detail can lift your mood and add sparkle to your eyes. What could be more beautiful than a happy woman?!
Today we are making wonderful jewelry from foamiran. These will be jewelry on a stiletto heel and a boutonniere, but the fasteners can be changed, and the boutonniere will turn into a hair clip or brooch.
Foamiran (foam) is a surprisingly plastic and pliable material. It is also called revelur. Receiving the warmth of human hands, it gives magical images and some amazing realism.
To work you will need:
- two pieces of foamiran in white and green shades;
- acrylic paints (white, ocher, carmine);
- brush;
- iron;
- lace and stamens for decoration;
- scissors;
- a piece of food foil and a toothpick;
- two stencils of five-leaf flowers in a size convenient for you (you can draw it yourself or find a ready-made stencil on the Internet).
So, at the preparatory stage you need white foamiran and a stencil. The sheet of revelour must be cut into strips and squares of the size required for the stencil, and the blanks must be cut out exactly according to the stencil using small scissors.
We tint the blanks for the future flower with a brush using light movements from the center to the edges.
We form a small drop or ball from foil, string it onto a toothpick and glue the first tier from the bottom. With one petal we kind of bend (glue) the foil droplet. Glue the next petals at the bottom, overlapping the previous petal. Next, we apply each petal to the iron for a few seconds and very quickly use our fingertips to model the shape of the petal, after which we glue it to the already formed bud.
We continue to work with the next tiers in a similar way. We glue the blank at the bottom, heat it with an iron and model the shape of the petal. For each flower you need three blanks.
For the cup, take a small strip of green fom and cut it into four parts.
We cut each wedge on both sides in several places.
Heat with an iron.
Very quickly stretch and twist with a spiral.
And glue it to the flower with hot glue. For each flower you will need 4-5 parts.
Let's add stamens for beauty.
We string it onto a pin and glue it. It is worth noting here that the junction with the pin should be additionally reinforced with satin ribbon or cotton fabric.
For a boutonniere you need three flowers. We connect and try on how the flowers will look compositionally together.
And this is what the rose will look like if the tinting is done not from the center to the edges, but, on the contrary, from the edge to the center. However, in this case, it is worth remembering that you need to paint not only the edge, but also the place where the foamiran was cut, otherwise the work will look sloppy.
This is what the boutonniere clip looks like. Two parts: a metal plate with a fastener at the bottom.
We attach a piece of elastic inside the fastener and snap the clip into place.
To model the base of the decoration, take a small piece of foamiran onto which we glue the leaves. By the way, leaves can be made using molds and weiners or just using your hands. To do this, you need to cut out the shape of a leaf from the revelour fabric, make notches with small scissors on both sides. Heat with an iron, and while the material is still warm, use stretching and twisting to form the final sheet shape. If you draw veins on the sheet before heating (with a stack or an orange stick), the sheet will look more naturalistic.
Let's put together the decoration. We attach the roses to the base the way they will look on the finished boutonniere, glue them with hot glue if everything is satisfactory. In between add lace and stamens.
If you replace the boutonniere fittings with a clip, you get a hairpin. The accessories can be changed at your discretion. This can be a wooden blank for a hairpin, an automatic hairpin or a hair clip.
Peony from individual petals, master class
Peony is a flower of noble origin , since in the distant past in the countries of the East only important people grew this plant on their plots. Now peony is found in almost all countries, and its popularity is only growing. From satin ribbons you can create an excellent artificial imitation with your own hands, very similar to the original itself. To do this you will need:
- Satin ribbon of a certain shade, 5-6 cm wide.
- Thin threads matching the color of the ribbon.
- Needle.
- Sharp scissors.
- Glue gun.
- Wire and pin.
- Sequins or small yellow beads.
- Paper for creating a pattern.
- Candle and matches.
To create a peony from satin ribbons with your own hands, you must first create a pattern of petals. To do this, on a piece of paper you will need to draw a blank five centimeters high or a little less in the shape of a wide heart with the tip cut off on the straight side, the base should be about 25 mm.
Using this pattern, you need to cut out six identical petals, then reduce the workpiece by five mm, and cut out the next six parts, and then repeat the action again. As a result, we should have eighteen petals in three groups of different sizes.
Let's light a candle and burn each petal in turn on all sides over its fire. To do this, we slowly take the workpiece with our own hands and bring one edge to the flame, and when it is scorched, we immediately stretch it in all directions.
This is done so that the petal becomes wavy, similar to a real petal . When all the edges are finished and stretched, place the workpiece over the fire for a short time, holding it with tweezers so that it takes the desired shape.
In order not to spoil the cut out petals, let’s practice before working on the remaining extra piece of satin.
Then you need to make stamens, for this you need to cut a couple of pieces of wire about 5-6 cm long. You need to squeeze a drop of glue onto one end of each piece using a gun, then dip our stamen in glitter or small beads and create an even drop. When the stamen is dry, you can further decorate it with clear nail polish to achieve a glossy surface.
The final step is to assemble the peony from satin ribbons together; to do this, we sew six large petals together at the base with our “needle forward” seam, leaving a hole in the middle for the stamens.
When the base is created, you need to put the holes created by the stamens inside and strengthen the structure. Then, still stitching it, from the wrong side. After this, all that remains is to sew on all the remaining petals, starting with the middle ones and ending with the small parts. Now we have finished our master class , don’t be afraid to make crafts from foamiran, the guests at the wedding will really like them. Even though the flowers are artificial, they will look as if they were alive.
Where is the best place to attach a boutonniere?
If you order such an accessory from a specialist, he will think about this issue in advance. Most often, each piece of jewelry has a special fastener or pin at the back.
The newlywed should attach his boutonniere next to his heart. This suggests that he is faithful to only one woman, his bride.
If we talk about how and where it is better to attach the accessory to the couple’s friends, then there are a lot of options. Men can arrange the decoration in the same way as the groom.
But bridesmaids have more options. You can use an accessory that fits on your hand or attach it to your clothing.
How to choose jewelry for the groom
Any detail of the image of the groom or guests should be harmoniously combined with the color scheme of the celebration. The same requirement applies to boutonnieres. The easiest option would be to purchase an accessory of the same type as the bride’s bouquet.
But do not forget that the decorations cannot be the same. The same flower can be used in the boutonniere, but the design method should be slightly different.
A good option would be boutonnieres and a bride's bouquet made of foamiran . You can make them yourself or order them from a specialist. Moreover, this accessory option is perfect for both guests and the groom.
Useful tips
Foamiran is used in many areas. Each time, needlewomen try to expand the range of its capabilities by carrying out additional manipulations with multi-colored sheets. When working with this material, you must follow a number of simple rules - they will help you create a high-quality product:
- Application of paints. Despite the rich color palette, sometimes there is a need for an additional shade. It is best to use pastel, acrylic paints. Foamiran can be painted with gouache, watercolors, crayons, and glitter. It should be remembered that after changing the color, the craft becomes disposable. It is impossible to wash it from dust - the colors will run.
- Connecting parts. You cannot secure a foamiran product with regular PVA or an adhesive pencil. For this purpose, they purchase a “Moment”, a special pistol.
- Glue drying. The bonded parts must be given time to dry. After using the glue, you should leave the product for approximately 24 hours. Only then continue working.
- A similar option for fastening appliqués is to sew them together with a needle and thread. Neat stitches are in no way inferior in strength to glue.
Craft ideas
Wedding boutonnieres made of foamiran:
Boutonniere made of foamiran for the hand of girlfriends
Wedding bouquets from foamiran, wedding
Master class: boutonniere with garden carnation from foamiran
Boutonniere for hand made of famiaran Good IDEA