From a wedding story
The bride's headdress at a wedding has changed with each generation. Modern fashion has removed all restrictions and allowed the bride to choose what she will decorate her head with during her wedding. Many people refuse to cover their heads with fabric, preferring to decorate their hair with wreaths or tiaras. But most newlyweds still prefer to wear a white fluffy cloud of a veil, which will emphasize the lightness and purity of the image.
When deciding how to sew a veil with your own hands for a wedding, you must first choose the right style. To do this, take into account the style of the wedding dress and the purpose of using the attribute.
Styles
Veil length
The length of the bride's headdress can be of the following types:
- Above the shoulder. This style is suitable for painting in the registry office and a modest celebration of the occasion.
- Up to the shoulder. An attribute of similar length is manufactured in single-layer and two-layer types.
- Up to the elbow. Most often it is sewn in two layers and complemented with a veil.
- To your fingertips. This style of veil can be used in combination with any style of wedding dress.
- Wedding. This headdress differs from other styles in its rich finishing and decoration. Suitable only for elegant long dresses. They dress it for the wedding ceremony.
The length of the wedding attribute may vary
Important! The amount of material directly depends on the length of the product. For a veil at shoulder level you will need up to 60 centimeters of fabric, at elbow level - 80 centimeters, for the entire length of the arm - 1 meter 10 centimeters. If you plan to sew a wedding bedspread with a train, you need to buy 2 meters of tulle.
You might be interested in How to choose your own needle for a sewing machine
Choosing a style for a veil
Depending on the style of the wedding dress, as well as the form of the wedding celebration, the style of the headdress is selected.
Decoration length gradation:
- A veil above the shoulders is typical for youth parties or modest painting in the registry office. Often this is just part of a wedding hairstyle. It can only represent a veil over the face.
- Up to the shoulders . It can be single-layer or double-layer.
- Up to the elbow. Two layers with a veil, very common in recent seasons.
- To your fingertips. Suitable for any style of dress.
- Wedding (Cathedral). It suggests a long elegant dress, richly decorated, the finishing elements often repeat those of the dress.
What should it be
A traditional long and fluffy veil is an attribute of a wedding. For a bachelorette party, a frivolous short and bright model is more suitable .
Since the event is usually held actively, often in a club or in the fresh air, the gathered girls have a logical desire to stand out from the crowd and at the same time not complicate the outfit with uncomfortable accessories .
Therefore, the veil for a bachelorette party is made light, short , and not too fluffy. To attach to hair or a headdress (hat, baseball cap), hairpins, clips, hoops, small combs or bobby pins are used.
Additionally : look for more ideas for a bright and memorable evening in our large “Bachelorette Party” .
When choosing an accessory, you need to consider:
- a clear difference between the bride and the bridesmaids . The difference may be in the color of the veil, its length and/or shape, and decorations. Often, before the wedding, girls choose a model made of white tulle, organza or chiffon, supplying their friends with colored ones - red, green, blue;
- method of attaching the product to the head . For short haircuts of bachelorette party participants, it is better to choose hoops or hats/baseball caps; for long hair, hairpins and bobby pins, combs are suitable; in the hairstyle, it is more convenient to fasten the veil with hairpins or a comb (for example, in the style of a Spanish mantilla);
- correspondence of the style and color of the product to the bridesmaids’ outfits and the location of the bachelorette party.
Important : the ban on wearing a veil before or after the wedding (for married women) is a common superstition. If you follow them, then the bachelorette party should become a mourning of an unmarried life, farewell to girlfriends, tears and sad songs. A bachelorette party in a European-American style and a veil for it are intended for those who do not believe in omens . Therefore, the answer to the question of whether a married woman can wear a veil at her friends’ party is “of course yes” and have fun until you drop.
Short haircut with bangs and tiara
A short haircut, as usual, is not very variable - it does not give as much room for imagination as long curls.
That is why all kinds of accessories, decorations and additions are so helpful for owners of short haircuts.
If length allows, curl your hair using a curling iron or roller.
Graceful curls will be an excellent base for a crown or tiara.
It is the lush curls that look elegant and harmonize best with accessories like a tiara.
Short hair can be curled using wooden bobbins, then you will get incredible volume.
A tiara will help tame curls, but if the accessory is difficult to fix, pin the parietal strands with bobby pins back or on the sides.
It’s easier to attach the main decoration to this base.
Hairstyles for short hair with a tiara and bangs are very simple step by step: separate the bangs, form a hairstyle from the main body of hair, secure the tiara, and then arrange the bangs to your taste:
If the tiara runs strictly along the border of the bangs and the main body of the hair, the styling looks most harmonious.
If you have a pixie haircut with long bangs from the very top of your head, you can use a tiara to press the bangs to your forehead, thereby fixing them and enhancing the hairstyle as a whole.
Deciding on the style
The veil is that attribute of the bride’s image that creates mystery, purity and lightness. Snow-white light fabric covers the head and rests on the shoulders, charming and delighting.
Before you start making your own, you need to decide on the purpose and style. Perhaps a girl needs a veil for a bachelorette party. In this case, the patterns and sewing technology will be different (complex patterns and expensive fabrics will not be needed here).
How to make a veil with your own hands for a wedding? First of all, you need to purchase a dress (so that the finished accessory looks good and matches well).
- With a full skirt, the veil should be equally voluminous, but short, with a minimum of additional decorations.
- For a mermaid dress, long fabric that flows in light waves is suitable.
- For simple silhouettes - a delicate veil.
Veil for a bachelorette party
A bridal shower veil differs from a wedding veil in that it does not have to be white. Modern girls prefer bright colors. To make this attribute, classic materials such as tulle, tulle, guipure, silk or lace are used.
You may be interested in this: Creating a pattern and sewing a face mask
Veil for a bachelorette party
To make a headdress for a bachelorette party, geometric shapes such as a rectangle or rhombus are used. The work is carried out according to the same step-by-step plan as for the wedding attribute. Silk ribbons, rhinestones, beads, and flowers are used for decoration. Finally, there is nothing else left to do but sew the veil to the chosen mount.
Jewelry styles
Large selection for every taste:
- Fantasy . Often from several panels, with corners, ribbons, frills.
- Classic . Doesn't cover the head. It is usually attached to the bottom of the hairstyle. The veil is worn only at the beginning of the celebration.
- Wedding . The head is completely covered. Complemented with flowers, hairpins, and a tiara.
- Wedding veil-veil (mantilla). Inspired by oriental or Spanish motifs. It is a thin transparent blanket, fixed with several invisible ones.
- Veil with head decoration frame . Sometimes a complex hairstyle is not meant; there is a frame made of beads, seed beads, flowers, which practically covers the head, and the bedspread is attached to it.
Options for decorating a wedding veil with a headband
The decor of a wedding veil with a headband should echo the decorative elements of the bride's dress. For example, if the newlywed’s outfit is embroidered with rhinestones or pearls, then they should also be present on the hair accessory made of light, transparent material. Decorative elements can be placed on fabric or a hoop. A beautifully decorated accessory will add a special charm and sophistication to the bride’s image.
Flowers
A bride wearing a veil on a hoop decorated with flowers will look original and incredibly romantic. This accessory will give the girl a special femininity. The hoop can be decorated with white flowers to match the dress. If the bride's outfit contains elements of bright colors, the decor of the headband is selected in the same palette. The combination of the dress's palette and veil elements will help create a harmonious, complete image of the bride.
Pearls and rhinestones
A veil decorated with rhinestones looks beautiful and emphasizes the bright image of the bride. The radiance of the stones will surround the newlywed with a brilliant halo. A girl wearing such an accessory will become a beautiful queen on her happy wedding day. A newlywed whose head is covered with light fabric with rhinestones will look beautiful and impressive in photographs. A headband decorated with pearls or rhinestones will emphasize the girl’s excellent taste and originality. This decorative element will add special elegance to the bride's image.
Satin ribbons and lace
A veil on a hoop with trim along the edge of the fabric will look original. Wavy edges will look especially impressive. They are made by sewing fishing line and satin ribbon along the edge of transparent material. An accessory made of thin, transparent fabric can be decorated with lace. An outfit trimmed with beads and sequins will look harmonious with it.
Choice of fabric and trim
Fabrics used for sewing wedding veils are divided into two groups - hard, holding their shape well, and soft - flowing, cascading . We choose the type of material depending on the cut of your dress.
Most often used:
- Tulle is a special fine mesh. It can be hard and soft, smooth and decorated.
- Guipure.
- Veil.
- Tulle.
- Organza.
- Lace.
Advice! If you can’t decide on a fabric for a long time and still don’t have the right one, pay attention to curtain stores. Some types of drapes made from thin white fabric may work well. A large number of translucent lace or mesh veils and tulles are now produced.
Design and color
The wedding attribute is sewn from white fabrics, choosing the style to your liking.
- Fantasy. It is made from several layers of fabric, decorated at the edges with ribbon or frills. The bottom edge may be oval or angled.
- Classical. This is a bunch of collected lightweight material that is attached to the bottom of the hairstyle. Most often, such an attribute does not have additional decorations. The veil covers the bride's face only during the formal part of the holiday.
- Wedding. Since a girl must enter church only with her head covered, the veil must meet this requirement. The hair is completely covered with fabric, complemented by rich accessories in the form of a wreath, tiara, and hairpins.
- Mantilla. Lovers of Spanish or oriental style will appreciate this piece of jewelry, made of thin white material. Fixed on the hair using bobby pins.
- Veil attached to head decorations. A similar wedding crown is made from beads, flowers and seed beads. Before fixing it on the bride's head, a veil is sewn to it.
Mounting options
You can secure a veil to your hair in different ways, among which the most popular are:
- Hairpins.
- Invisible.
- Automatic hair clip.
Hairpins and bobby pins
This type of fastening is suitable for light wedding attributes that are attached to the hair collected in the hairstyle. To keep the veil securely on your hair, it is recommended to bend one leg towards the top.
Fixing the veil with hairpins
Automatic hairpin
This fastening is recommended for use on hair collected in a hairstyle. The veil should be small and light. The metal fastener is masked with a bow made from silk ribbon, beads or flowers.
Attaching a veil using an automatic hairpin
It is easy to cut out and sew a veil with your own hands; even a girl who does not have sewing skills can cope with this task. Moreover, such an attribute will be original and unique. The image of the bride will be remembered for a long time.
Preparation
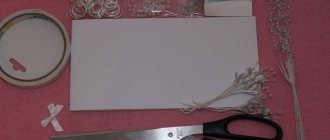
To make this beautiful wedding item, you need to choose tulle, organza or tulle. You also need scissors, thread, a hairpin that will attach the veil to the hair, rhinestones, satin ribbon, beads, lace fabric and preferably a sewing machine to speed up the process. All these things will not be difficult to find.
So, first you need to mentally imagine the future finished veil. You can sketch a picture to help you navigate better. Length is important here. Typically, a veil is made so that it reaches the shoulders, elbows, fingers, or reaches the floor in a beautiful train. These are 60, 75–80, 110 and more than 2 meters, respectively.
Now you need to decide on its splendor. If the veil will cover the bride's face until she kisses the groom, then it should not be multi-layered. Otherwise, the bride’s face will not be visible at all in the photographs from the ceremony. But the veil that reaches shoulder level and beyond can be made as fluffy as your heart desires.
Next, you need to decide on the processing of the edge of the veil. This can be done using satin fabric trim, lace, and rhinestone braid. You also need to decide in advance on the decoration of the veil. After all, all the decor should match the dress. Everything should look harmonious.
Attaching a short veil to your hair
A short veil looks very flirty, bold, but at the same time elegant. This is an excellent choice for very young brides - petite, fragile and slender. Such products are harmoniously combined with laconic straight-cut dresses, including short ones.
Since a short veil is practically weightless, securing it in your hair will not be difficult. To do this, it is enough to use one or two pins, which must be used to pierce the fabric at the attachment point and fix them in the hairstyle. If you don’t want to make a torn hole in the veil, the pins can be sewn on unnoticed with white thread.
Retro-style veils, which are now fashionable, are secured with bobby pins or decorative pins decorated with flowers or feathers.
An original and unusual way to secure a short veil is with a hairpin or tiara. Sparkling jewelry looks very stylish on smooth dark hairstyles.
Taking measurements
Having resolved the issues described above, you can begin to take measurements and cut the selected material. An oval or rectangle is suitable as a pattern. They also use a square.
You need to find out the length by measuring the distance from your head to the intended end of the veil. After measuring, you should double the result obtained.
As for the width, it will depend on the thickness of the veil, but there is a minimum value: the width should be at least 180 centimeters.
How to make a veil from tulle or mesh
Traditionally, in order to make a veil, translucent lightweight materials such as chiffon, tulle, organza, mesh, and lace are chosen. The leader among them is tulle, which can be hard and soft. Choose the degree of hardness of this matter depending on what you want to see as a result. For a multi-tiered flowing veil, it is better to give preference to soft tulle, and for a single-tiered veil that holds its shape well, it is better to give preference to hard tulle.
In most cases, the veil is attached to a hairpin or comb. It looks very beautiful if this item is decorated, for example, with fabric or fresh flowers. You can decorate the veil itself at your discretion: put a satin ribbon or braid with scallops along the bottom. Embroidery on tulle with threads, beads, and glass beads looks very airy, gentle and fabulous. This type of decor may take a lot of time, but the result is worth it
Necessary materials
To make a veil with your own hands you will need:
- threads in the color of the fabric;
- tulle 135 cm long, 150 cm wide;
- tape measure;
- scissors;
- sewing machine;
- comb;
- decorative elements for decoration.
Stages of creation
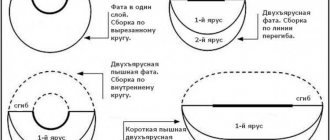
- To make a veil, cut the length of the tulle into three sections of 60, 45 and 30 cm.
- We sew three layers of tulle together so that the longest is at the bottom and the shortest is at the top.
- We assemble the sewn parts.
- We tie the ends of the thread and cut off the excess.
- Use scissors to trim the edge of the veil from the gather side.
- We sew a comb to the assembly.
- To disguise the hairpin on top, we decorate the veil with bows, appliqués, and flowers.
Materials and tools
Recommendations and notes on choosing fabric:
- Tulle produced in the European Union and America is better suited for children's clothing. This fabric is soft, pleasant to the body and does not flare up when hit by a spark. The material of the same name, produced in China, is usually rougher than the European one and does not meet international fire safety requirements. When exposed to flame, it instantly bursts into flames.
- Stiff tulle has scratchy seams and edges, so a dress made from it must have a petticoat, otherwise the tights will tear or the legs will be scratched. The underskirt can be made from knitted fabric, thick satin, or from the same fabric from which the bodice is made.
- For a long skirt, buy soft material, it will fall beautifully. Hard tulle is more suitable for a tutu. If in doubt, choose a material with medium hardness. It will make a fluffy bottom that will neither puff up nor fall down.
- It is easier to form a multi-layered or long hem from a wide cut. A narrow cut - this is usually how stiff tulle is sold - use it on a very short tutu skirt.
- Soft tulle needs to be purchased with a reserve. Hard ones have less consumption.
- In addition to tulle and material for the petticoat, you will need fabric for the top. When choosing fabric, consider whether a tight-fitting or slightly loose top looks good with a tutu.
How to sew a long veil from tulle or organza
Before you start creating a veil from organza or tulle, think about how it should look and drape: apply a piece of fabric to your head and choose the option you like best. It is advisable to trim the edges of the veil. You can use embroidery, bias tape, fishing line that will create a wavy edge, lace, braid or scallops for this purpose.
Necessary materials
To make a veil, you need the following materials:
- organza 1 m long, 2 m wide;
- threads in the color of the fabric;
- organza for the flower;
- pearl beads;
- scissors;
- satin bias tape;
- sewing machine;
- needle.
Stages of creation
- To make a veil, take a rectangle of organza.
- Fold the fabric in half along the line.
- Fold it in half crosswise again.
What will you need for work?
In order to make your own wedding veil, you will need the following:
- very light tulle fabric, in the quantity required for a specific look; as a rule, sewing a veil takes from a meter to three meters of material at its maximum width;
- satin or silk narrow ribbon - at least three to five meters, it is better to take it with a reserve;
- scissors;
- needles and threads, sewing machine;
- hair comb.
As for the color of fabric, ribbon and thread, then, of course, the vast majority of brides choose a white tone. But white is not the only shade suitable for creating a classic bridal look.
When choosing a material, you should pay attention to other light colors that look like white. For example, ivory or pearls. The best option for making the right choice is a kind of “trying on” of the fabric. That is, you need to take a piece of tulle and, placing it on your face, look in the mirror.
How to decorate a veil with your own hands?
You can add a variety of decor to your veil at any stage of its creation. The main thing is that the jewelry emphasizes the beauty and harmonizes with the image of the bride. When choosing accessories, keep in mind that the holes in the beads should easily allow a needle to pass through. Satin ribbon and lace must be attached to the edge so that they do not weigh down the veil - such decor will perfectly hide the raw edge of the material.
Lace or satin ribbon
An elegant veil decorated with lace looks very delicate. The tradition of covering the bride's head began with a lace version, so now it is a classic that will never become outdated. A veil with lace will decorate any wedding attire. Also, a win-win decor option and complement to the dress would be an accessory that is trimmed with a satin ribbon along the edge. You can choose it to match the color of the veil or play with contrast, only the color should echo the decor of the bride’s outfit. When decorating, you should follow these rules:
- an original veil, the edge of which is processed with fishing line, matches the dress if its edges are also wavy;
- if you sew an accessory with a thin thread, then the same thread should also appear on the outfit;
- a veil without edging goes well with dresses with a full skirt and a richly embroidered corset;
- if there is lace on the veil, then it should be in harmony with the lace on the dress;
- Bead embroidery is used on the veil, if the bride’s attire also contains such decor.
Beads or rhinestones
A veil decorated with beads or rhinestones adds solemnity to the image, puts emphasis on the newlywed’s face, and adds a bright twist. If you decide to make such an accent, then you should no longer overload the image with accessories - add as much jewelry as possible. A veil with rhinestones and beads does not look trivial, because you can decorate it in a variety of ways. It is recommended not to completely decorate the accessory with sparkling stones, but to embroider the middle or add decor around the edge. The decoration with beads on the sides looks interesting.
Stage four: trying on and decorating
The veil is almost ready, all that remains is to decorate the edges of the tulle fabric and, if desired, decorate the upper part of the product.
But, before proceeding to the final stage of work, the veil must be tried on. This is necessary not only to make sure that the accessory looks good, but also to understand how convenient the comb is for the bride. The girl will have to spend quite a lot of time in the veil, so comfort is extremely important.
If the fitting was successful, the edges of the veil should be trimmed with ribbon edging. This work is simple, but requires great care. If you are not sure that you will be able to stitch the edging evenly without first fixing it, then the tape, of course, needs to be basted.
The veil is ready. If desired, its upper part can be supplemented with decorative elements. But, if at the celebration the veil will fall from under the curls of the hair, then, of course, no additional decor is required.
Found a violation? Report content
Beautiful ideas
If you don’t know how to sew a veil with your own hands for a wedding, but this is important for you, then a photo will help you. Of course, the picture will not teach you how to do this, but you will see how the pattern should lie on the fabric and how much you need to retreat from the edge so that the veil on the headband does not come apart. Nowadays it is very fashionable for the bride to have a short veil. A short veil can be decorated with lace and fluffy. Finding out how to sew lace to tulle is not difficult, and it will look very beautiful.
3) We begin finishing the edges.
Any ribbon or braid will do here. The most elegant option is to use white decorative cord. But before sewing it to the main fabric, it’s worth practicing on scraps. It only looks like everything is very easy and everyone can do it the first time, but in practice it turns out that this requires sewing experience. Finally, you must finish the edge neatly.
Often the veil is made with two layers. First of all, it is a beautiful appearance. But it's also about convenience. The bride can cover her face by simply throwing the top layer forward. We will make just such a veil. To do this, make a short stitch in the middle of the fold, which will make the edges softer. They will begin to fall in waves. It is clear that the bottom layer should be much longer than the top.
The comb is attached to the area where the tissue is collected. The tulle is sewn precisely to the front side of the comb. The teeth should point up. This is the most convenient and correct way to do it.
Stylish ideas
An ordinary DIY wedding veil is a classic. If you want your DIY tulle veil to look stylish, then you need to use your imagination. For example, if you have a dress with patterns of red, turquoise, blue or another color, then run lace of the same shade along the bottom of the veil.
Veil material name
The latest trends in wedding fashion remove almost any restrictions and give brides complete freedom of choice. Some brides depart from wedding traditions and prefer to decorate their heads with a wreath of flowers or a tiara instead of a veil. But we know that nothing will add such charm and charm to the newlywed as a light white cloud behind her.
If you want to make your image truly memorable and original, you can make your own veil for the bride. We assure you that it is much easier than it seems, and pleasant emotions and efforts will add magic and uniqueness to the product.
Unusual ideas
Before you learn how to make a veil with your own hands from tulle, you still need to learn a few things. All unusual ideas require some knowledge of the basics of cutting. The World Wide Web and a veil pattern with dimensions, which you will find on specialized websites, will help you with this.