If your loved ones are planning a wedding, you often want to do something special for them, present your gift in an interesting and bright way so that it will be remembered for many years. Do-it-yourself surprises are becoming especially popular, since the soul is put into the process, and the result is individual and unique. For example, a ship made of candy for a wedding is a very successful present.
The newlyweds will certainly appreciate such a gift, which stands out from the background of banal cards and envelopes. In addition, wedding ships made of candies in the photo look stylish and unusual.
What are holiday desserts for?
Pre-wedding preparation is not the most difficult stage for newlyweds. In practice, it turns out to be much more difficult to survive the day of celebration itself, filled with events and bustle. By the end of the evening, the bride and groom are exhausted, but despite this, they maintain a positive attitude so as not to upset the guests. At such moments, any surprise from loved ones is perceived as doubly pleasant, so relatives and friends try to once again cheer up the newlyweds.
A wedding dessert prepared as an addition to the main gift is one of these little things. Most often, this surprise is made from sweets that the bride and groom are partial to, or from beautifully decorated sweets.
If you do everything carefully and with soul, then with minimal financial costs you can surprise everyone present at the celebration.
Typically, such a mini-gift is made in accordance with the wedding style chosen by the bride and groom. The presented dessert takes its place of honor on the table with sweets or gifts and emphasizes the overall theme of the event. That is why you need to wait until the newlyweds send an invitation, and only then start making a gift dessert. This is done in order not to make a mistake with the style, while remaining aware of the couple’s plans.
A sweet addition to the main gift will delight the bride and groom not only at the banquet itself, but also for a long time after it. Most newlyweds strive to keep the maximum number of “trophies” from their wedding that will not let them forget pleasant moments. An originally designed dessert often fits into the interior of a family nest, and takes pride of place next to other trinkets.
Such a gift is given when congratulating the newlyweds, and it is advisable to connect the words with the theme. To prevent the newlyweds from seeing the surprise ahead of time, it can be removed in advance to the kitchen of the establishment, having agreed with the administration. Some people prefer another option - they ask friends to bring a gift at the appointed time.
Interesting! Read about what to give for a bachelorette party. And here is information on how to calculate the weight of a wedding cake.
Materials and tools for creating a gift ship
- Expanded polystyrene (I needed two pieces 35x16 cm and one 16x10 cm)
- Crepe paper (blue and silver, you can use other colors)
- Mesh or other fairly rigid fabric (1×1.5 m)
- Braid width 1 cm and 3 cm (each about 5 m)
- Twisted cord (about 6 m)
- Wooden skewers
- Glue (cosmofen)
- Scissors, breadboard knife
- Double sided tape
- Candies of different shapes to suit your taste (I needed: domes - 6 pcs, coins - 10-20 pcs, square "Chocolate Night" - 11 pcs, Roshen chocolates - 1 pack)
- Gift bottle
Leading
If you are planning to give a ship made of candy for your wedding, it is better to choose your congratulations in advance. You can compose a text yourself, simply wishing the newlyweds something from the heart. Alexei
To create a wedding ship from candies with your own hands you will need.
- penoplex (Styrex) for the base - sold in construction stores, a little like foam plastic, but denser;
- corrugated paper and organza for decorating the deck;
- fabric or floral mesh for sails;
- rope, thin colored lace, decorative mesh or satin ribbons to decorate the side;
- any decorative elements - miniature anchors, steering wheels, lifebuoys, sailor figures, etc.;
- wooden skewers, toothpicks and safety pins for fastening parts;
- golden beads of two sizes and thin wire for decorative racks;
- tools - scissors, pencil, paper, ruler, glue gun, sandpaper.
To begin with, a template is drawn on a white sheet - a rectangle measuring about 21x14 cm and a triangle adjacent to it along the wide part, about 13 cm high. Half-ellipses are adjacent to its sides so that the transition from the deck to the bow is smooth. The size of the sides may vary depending on the desired result.
The finished template is traced on polystyrene foam and the workpiece is cut out; for this it is better to use a regular kitchen knife with teeth.
If the edges are uneven, this is not a problem, they will be corrected later. Small pieces are cut diagonally from the top to the bottom as the ship tapers towards the bottom.
Start from the stern, moving towards the bow. Then another part for the aft part is cut out in the form of a 10x14 cm rectangle; straight cuts are made along the long part, on one side at a smaller angle than on the other. This is the captain's bridge. The last part is cut out according to the template of the bow of the ship, with the narrow part being about 2 cm thick, and then a smooth narrowing is made, and the wide part is about 7 mm.
All three elements are sanded with sandpaper and glued together. If desired, the resulting base can be covered with corrugated paper and braid , as in the photo below, but usually the penoplex is completely hidden under the decor.
The deck is decorated with organza and roses made of corrugated paper, inside of which you can place sweets. They can be placed in an abstract order along the deck itself, secured with pins.
The side of the ship is decorated with any desired details. It can be painted with acrylic in the manner of wooden boards, covered with corrugated paper or organza. On one side there is a figurine of an anchor. You can also place round candies on the side of the ship, like cannon barrels.
The next step is to make sails from floral mesh. Usually they make two or three masts, and in the lower part the sail coincides in width with the ship, and at the top it narrows slightly. Using a sewing machine, you can attach thin satin ribbons to the mesh, and also sew the workpieces in three places horizontally. This will give the impression that the sails are being pulled by the wind. Wooden skewers are threaded through the middle, and the resulting masts are secured to the base.
One skewer is also attached to the continuation of the bow. After this, a decorative cord or braid is tied around it and all the masts. Toothpicks are stuck along the perimeter of the captain's bridge, then they are additionally secured with glue.
Large golden beads are glued to the upper part, and small ones are strung on wire and secured in such a way that the thread sags slightly between the resulting posts. The result is a decorative fence. If desired, you can make a steering wheel from foam plastic and toothpicks and further decorate the ship to your taste.
This gift is suitable for a classic wedding that does not have any theme. The idea of a ship can be linked to the journey of a family ship on the waves of love. As for stylized weddings, a sailing dessert will suit a nautical or pirate celebration.
How to make a ship out of wood
We will need:
A sheet of paper, a pencil, a linden or birch board, a jigsaw, a hatchet, a chisel, roll sticks, toothpicks, fabric for sails, PVA glue, Moment glue, a file, a sanding disc
So let's get started:
- From paper we cut out a rectangle 18 by 6 cm in the shape of a ship (like a top view).
- We trace this blank on a wooden board approximately 2 cm wide.
- We cut out two such parts with a regular or jigsaw.
- We sand one side of each part.
- We glue them together with PVA glue, fasten them with rubber bands for additional fixation, go through the seam with glue, and put a weight on top.
- While the glue dries we will make the mast and other small parts.
- We take a board 15 cm long, about 1 cm wide, plan it with a knife, giving it the shape of a cylinder, and file it. This will be the mast. We make 3 of them.
- We retreat 3-4 cm from the bow of the ship and draw a line from the lower blank to the upper corner of the upper blank, it looks like an upturned bow of the ship.
- We saw off the excess material along this line, first on one side, then on the other.
- At the bottom of the boat we draw two lines along the length, departing from the edges by 2.5 cm.
- Along these lines we cut off the excess material with a hatchet, thereby giving the bow of the ship a suitable shape.
- We sharpen the hatchet harder, removing excess material.
- We measure 4 cm from the stern of the ship, draw a line to the seam and saw.
- The ship's hull is ready, sand it on all sides.
- At the top of the workpiece, where the deck is supposed to be located, draw a rectangle.
- Take a chisel and make a recess along the lines of the rectangle.
- We make three holes on top of the ship.
- We take 3 masts. You can use chopsticks for eating rolls and sushi as an alternative to homemade masts made from a plank.
- We glue 4 toothpicks to each mast for a moment of glue.
- We fix the masts to the ship's hull using PVA glue.
- We cut out the sails from fabric (coarse fabric, such as burlap, will look great if you plan to paint the ship dark and varnish) and glue it onto PVA.
- We paint the ship with acrylic paints. Paint with light colors first, then dark ones. You don’t have to paint it, but coat it with a special wood varnish. It will be even more impressive.
The sailboat is ready. You won’t be ashamed to give it as a gift or leave it at home as an interior decoration.
Words of congratulations
The resulting original gift requires a solemn speech, otherwise it will no longer look so grandiose. If there are problems with oratory, it is better to write the text on the card in advance and read it out during the congratulations. In prose it might look like this:
“Dear (names of the newlyweds)! We sincerely congratulate you on your wedding day and present you with this ship, made with love with our own hands. Sail on it sweetly and smoothly on the sea of love to your personal island of family happiness. Ignore the cries of envious seagulls, but always be attentive to the weather in the house - try to avoid storms and storms. Don't forget to take turns at the helm and stay focused on understanding and caring. Happy holiday to you!”
Interesting!
The meaning and symbolism of the color of the bouquet
If you have decided on a white or pastel shade, then find out what to do with bright buds, for example, red ones. This color symbolizes the explosive character of the guest, joy for the young and a whole storm of emotions. Delicate pink shades express love and emphasize the beginning of a relationship. What do other wedding bouquets from guests mean? The predominant green palette - hope for a beautiful and bright future, blue - reminds of fidelity. Perhaps that is why many newlyweds choose a marine theme for their wedding event.
Many people associate their favorite sunny shade with quarrels and breakups. Most likely, this is why it is not customary to give a flower arrangement with this color for a wedding, although it all depends on the theme of the holiday. If this is a Russian folk style, then daisies with yellow cores will be an excellent decoration not only for the table, but also for the bride’s attire, in the form of a wreath on her head. This color also symbolizes intelligence, and you need to choose it carefully so as not to disappoint the recipient.
Even in the old days, newlyweds were given branches of lilac, oak, and birch, because it was believed that they brought happiness and helped create comfort in a new nest. Lilies of the valley and violets are flowers that symbolize purity of thoughts, romance, and tenderness. But representatives of Eastern countries prefer to include lilies in wedding bouquets. In their opinion, this flower contributes to the prosperity and well-being of those to whom it was given.
Useful video: master class
Below is a tutorial on how to make a wedding candy ship using thin polystyrene foam. You will need to cut several identical blanks. Corrugated paper is used for decoration, and the sails are made of organza and braid.
If you have the opportunity to please your loved ones on their wedding day, then you should definitely take advantage of it. Making a wedding ship out of candy is not as difficult as it seems at first glance, and it’s even easier to order such a masterpiece from a master. The resulting gift will leave a pleasant impression not only in the hearts of the bride and groom, but also in the memory.
admin 115
Previous article
Plus size bride: 2022 wedding dresses for plus size people and tips for choosing them
Next article
ParaPhrases for craftswomen
- 01.02.2018 01.02.2018
Materials:
- candies and chocolate medals
- penoplex (body)
- cardboard
- paper
- Extensions for fiberglass fishing rods (masts)
- paper or polysilk (for sides)
- corrugated paper for candy decoration
- decorative cord
- decorative braid
- organza (for sails)
- metallized fabric tape
- hot glue
- glue stick
- double sided tape
Manufacturing
Cut out the base for the ship from foam plastic of the required size.
All sails must first be cut out of paper in order to do a preliminary fitting, since the sails are cut out by eye, starting from the dimensions of the base.
The sails consist of three rectangles. Start cutting from the bottom, it is the same width as the ship. Each subsequent one is narrower than the previous one by 2-4 cm (it all depends on the scale of the ship).
This ship has a lower sail of A4 size sheet, and a slightly larger one on the middle mast.
For masts, use fiberglass rod extensions (they can be cut to size if necessary).
To prevent flaws from being visible on the sides of the ship, they need to be lined with cardboard.
Using regular pins, attach the cardboard and cut it to size, making sure to mark the right and left sides so you know which side is front and back.
Try on ship clothes before wrapping them in decorative material.
Cover the cardboard for the sides of the ship with polysilic or paper to match, and if desired, cover it with mesh.
It is better to glue polysilk with a glue stick; it does not spoil the film and allows you to change its position if necessary.
Decorate the top and bottom of the base using the same principle with crepe paper.
Carefully glue all the details of the “clothes” with hot glue. Close the seams with decorative cord, also using a glue gun. Then close all seams with twisted cord.
Cut out the sails using paper templates.
Cover all sails with metallized fabric tape on both sides along the contour. This way the sails will receive additional rigidity and will not sag.
If you use a stiffer fabric for the sails and their size is smaller, then the tape can be glued only on one side or not at all.
Iron the sails through wet gauze. Due to this, the glue is distributed more evenly, and the sails take on a neater appearance.
After ironing, the sails can be slightly bent in the desired direction, pulling their edge between your fingers.
Until they are attached to the masts, store the sails on a roller so that their shape becomes round.
Glue the sails together exactly as they will be positioned on the mast.
Then heat up a nail or awl and make holes in the right places.
It is in them that the mast will be inserted.
Decorate the masts and yards with matching paper.
“String” the sails onto the masts and glue the yards so that the sails keep their shape.
Don't forget about the bow triangular sail, or maybe even several.
Prepare the ship's sweet filling. Use crepe paper to decorate the candies in the shape of flowers.
To make it even more beautiful, decorate the sweet decor on the sides with twisted cord to match the ship.
Glue the medals with double-sided tape, as the glue on the foil does not stick very well.
Glue a piece of paper onto the tape, and then use hot glue to place the medal in the desired place.
Paper rook
Beginning craftsmen will be delighted with the idea of creating a boat out of paper, because they will require a minimum amount of materials and following the instructions. So, to make a ship you will need an A4 sheet.
To create a paper ship, you need to take a sheet of paper and fold it in half, as in the photo.
Then you should fold the top corners towards the center.
A strip of paper at the resulting angle must be folded upward, then turn over the base of the future ship and do the same.
The free corners formed when the strips are folded upward should be folded inward on both sides in turn.
The sides of the resulting workpiece need to be bent towards each other to form a rhombus.
Now the workpiece should be positioned with separate corners down. You should bend them upward on each side in turn.
The result is a triangle that needs to be turned over and the opposite sides folded.
Finally, you need to grab the corners of the resulting triangle and pull. The ship is ready to sail. Raise the anchors!
In order for the boat to withstand all possible storms, you can make it out of cardboard: the product will be stronger, but you will also have to put in more effort when folding it.
However, there is another option for making a paper boat, which is suitable for novice shipbuilders. There are many layout diagrams that can be used to assemble any vessel: from a Viking boat to a modern cruiser. To create your own masterpiece, you will need to print the diagram, cut out the parts, and then glue them together, focusing on the image of the finished product.
Related article: The most effective descalers in an enamel kettle
The resulting boat can be given as a gift as a finished product, or you can stick it on gift wrapping, a box of chocolates or a bottle to please the recipient.
For a more detailed acquaintance with the technique of making a ship from paper, it is worth watching a video that shows in detail the process of creating the product.
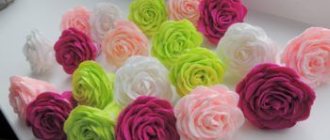
DIY candy bouquet for beginners
Any person will like such a surprise, especially girls or women. You can even just come to visit with such beauty. And the one for whom such a thing was intended will only be happy. I suggest that at the very beginning we disassemble the craft in the form of a bouquet of flowers in its simplest form.
As is probably tradition, most of us love to give roses, but I want to suggest that you first learn how to make snowdrops. They look very cute and gentle, and if suddenly you don’t know what to please your loved ones, then here’s an idea for you. It will fit perfectly if it’s spring and you really want warmth and the first flowers. It will also be a nice gift for Teacher’s or Educator’s Day, as well as for September 1st.
Moreover, you can take absolutely any box of chocolates, or a bag of sweets, etc., and put your creation on top. In general, look below and you will understand everything yourself.
We will need:
- chocolate candies, preferably nuts (almonds or hazelnuts) in chocolate
- a box of any chocolates, such as Raffaello or cookies
- Floral crepe paper: green, light green and white
- green tape
- flexible wire
- threads
- scotch
- scissors
- yardstick
- hot glue gun
1. In order to build 5 flowers, you will need strips: from white crepe paper 5 strips, width - 2 cm, length - 50 cm, from light green - 5 rectangles 5cmx4cm, from green - 2 strips 50 cm long, and width - 2 cm.
2. Now load the gun with the rod and wait until it is ready for use. Glue each candy, or rather the tip of the candy wrapper, onto the wire, as shown in the picture below.
3. From the rectangles that you made in the amount of 5 pieces, carefully frame them with your hands and make a wavy edge. Squeeze a little, as if you were making an accordion.
4. Now you need to make a deepening.
5. The flower leaves will be white, so take the white strips and get started. Using a ruler, divide into three segments, that is, at a distance of 16.5 cm. Cut. Now twist each resulting strip in this way, as shown in the photo, around its axis by 360 degrees.
6. After rolling, fold each piece in half to form a petal. Make a small indentation.
7. Thus we have come to the final stage of work. Take the wire with the candy and hide it in light green crepe paper. To prevent the paper from falling off, secure it with threads. Then apply white petals and also tie with thread.
8. The result should be something like this. Everything worked out? Well done! Move on.
9. Here’s a top view to make it more clear to you what we’re talking about.
10. Carefully trim all excess with scissors at 45 degrees.
11. Now we decorate the wire and add leaves. To do this, divide the green strips (you have two of them) into four pieces each. As a result, there will be 8 blanks. Trim each piece so that it reminds you of a leaf. Take a look below and see how the job needs to be done. After that, also bend the leaves a little, then you will see why.
12. Now, to hide all the threads and wire, wrap the sepal and stem with adhesive tape.
13. A little lower after the sepals, take a previously prepared green leaf and fix it. There's another one a little lower.
14. Well, this is the amazing result that will await you at the exit. You can decorate with beads and tie a bow. Place the bouquet on the box, dripping it in one place with a glue gun so that the flowers do not fall, and give it to the one you love so much.
Or you can design it differently, add more toys and put such a miracle in a vase or basket.
If you are going on a romantic date or wedding. Then it will be possible to make a more expensive and rich bouquet.
We will need:
- Ferrero Rocher candies or other round shaped candies
- mesh fabric or other light and airy fabric, such as organza
The entire manufacturing process is outlined below in pictures.
Stages:
How to give money in a beautiful and original way
his ideas on how to beautifully give money for a birthday or any other holiday. You can also add to our collection of ideas :).
People used to buy things, wrap them up in pretty, ribbon-wrapped packages, and hand them to the person. Nowadays, many people prefer to give (and receive gifts) cash or gift certificates. And they also need to be presented beautifully.
Let's start with the first, when it is better to give a cash gift .
It is customary to give cash gifts on various holidays, from Birthdays to New Years. But it is not recommended to give such gifts to everyone. For example, if a person came to the birthday party of a small child who was only five years old. It’s better not to give him money, his parents will simply take it. You need to start giving cash gifts to people only when they are at least ten years old, then their parents can explain to them that they need to save money and not spend it on small things like candy.
For the New Year, it is also undesirable for everyone to give a monetary gift, because on this holiday people usually expect something more festive, sincere and romantic.
You should not give money to rich people, since they have enough of it; it is better to buy some original and useful thing in the household, or make it yourself (then it will be an exclusive gift).
And the last rule: you need to give it to those people who will spend this money usefully. These are, in principle, the basic rules for who and when it is better to give money.
Cash gift for birthday
With a little creativity and humor, the boring presentation of an envelope with money to the birthday boy can be turned into a bright and unforgettable event.
To do this, you need to use one of the effective ideas below:
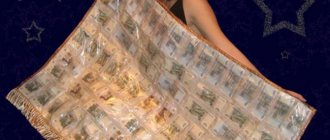
You can make a money cake in another way: roll the bills into a tube and place them together in a circle, tying each prepared layer with a beautiful ribbon. You will need a lot of banknotes to make such a cake.
Cash gift for anniversary
Therefore, the options for beautifully presenting cash gifts are as follows:
Money tree as a gift . The main methods for making a money tree:
Various decor
When all the necessary ingredients have been collected, we begin to compose the bouquet:
- Cut citrus fruits to make the composition more impressive;
- We string small berries onto skewers, and large ones onto bamboo sticks;
- Place the largest fruits (pomegranate and grapefruit) in the middle.
- We place the smaller ones on the sides;
- We decorate with green leaves, twigs, flowers;
- Secure with tape;
- Pack in a box, basket or foil;
- Decorate with ribbon.
We urgently give a fruit bouquet collected with our own hands so as not to succumb to the temptation of eating it before the celebration!
It will take a little practice for each composition to become a piece of art that will be a pleasure to give as a gift.
– Present under glass
You can present cash gifts for a wedding in another, no less interesting way - in a frame, for this you will need a photo frame. You need to hand it over with the words: “Now you have this glass, breaking it, you will instantly solve your material problems and regain happiness.”
We wanted to give you a painting,
But we thought - what if there really is? Then there were arguments about the car... And there were countless proposals!
We decided that we’ve had enough questions, We’re already tired of thinking, And we simply give this money, So that you can choose everything for yourself!
Paper rook
Beginning craftsmen will be delighted with the idea of creating a boat out of paper, because they will require a minimum amount of materials and following the instructions. So, to make a ship you will need an A4 sheet.
To create a paper ship, you need to take a sheet of paper and fold it in half, as in the photo.
Then you should fold the top corners towards the center.
A strip of paper at the resulting angle must be folded upward, then turn over the base of the future ship and do the same.
The free corners formed when the strips are folded upward should be folded inward on both sides in turn.
The sides of the resulting workpiece need to be bent towards each other to form a rhombus.
Now the workpiece should be positioned with separate corners down. You should bend them upward on each side in turn.
The result is a triangle that needs to be turned over and the opposite sides folded.
Finally, you need to grab the corners of the resulting triangle and pull. The ship is ready to sail. Raise the anchors!
In order for the boat to withstand all possible storms, you can make it out of cardboard: the product will be stronger, but you will also have to put in more effort when folding it.
However, there is another option for making a paper boat, which is suitable for novice shipbuilders. There are many layout diagrams that can be used to assemble any vessel: from a Viking boat to a modern cruiser. To create your own masterpiece, you will need to print the diagram, cut out the parts, and then glue them together, focusing on the image of the finished product.
Article on the topic: Aquatypia: drawing technique, master class with photos and videos
The resulting boat can be given as a gift as a finished product, or you can stick it on gift wrapping, a box of chocolates or a bottle to please the recipient.
For a more detailed acquaintance with the technique of making a ship from paper, it is worth watching a video that shows in detail the process of creating the product.
And it's quite simple to do. For work we will need:
— A basket or any other vessel that you want to give, for example, an elongated crystal vase;
— Candies in any bright wrappers;
— Net for sails;
- Skewers or toothpicks;
— Braid for decoration;
— Shiny and transparent film;
Let's get to work. Let's cut the foam to the shape of our basket. It is into this that we will insert skewers with candies attached to them. Place it on the bottom of the basket.
We roll up bags from transparent and colored film. We secured the ends of the film with narrow strips of tape to prevent the bags from opening. We insert sweets inside the bags.
The sweets should look like truffles, that is, with wrappers twisted on one side. Firstly, it is more convenient to insert them inside the bags, and secondly, they look good. We insert a skewer into the bag of candy with the sharp end facing outward to make it easier to secure it in the foam. We gather the open part of the film cone around a skewer and tie it with a bright red bow.
We attach the candies in multi-colored bright packaging to the skewers on the back side using tape.
We begin to fill the basket with the prepared material. We insert the skewers with candies along the contour, and then move to the center of the basket.
Now let's start making sails. To work we will need:
— red ribbon for flags;
Let's cut out the flags and secure them with a stapler on skewers.
We mark and cut a white mesh with a total size of 54 x 15 cm as follows: for the first mast we cut strips 6 and 8 cm long along the long side, for the second - 4, 7, 11 cm, for the third - 4, 6, 8 cm.
We string the sails onto skewers.
We use skewers 20 cm long, so we had to add 2 skewers (the second and third), securing them with tape.
We put the sails in place and decorate the composition with gold braid. The sailboat is ready and looking forward to sailing.
But hasten to say that such a gift is not at all suitable for girls. By changing the color from blue and blue to pink or red, you can recreate a composition with scarlet sails - a symbol of a beautiful woman's dream.
Alcohol and candy are one of the simplest gifts, but there is a way to turn commonplace items into an original present. In the next tutorial I will show you how to create an unusual gift ship using a few pieces of polystyrene foam and crepe paper.
How to give newlyweds money in the bank and what to say
The original presentation of banknotes is to roll them into a jar, like cucumbers. Making such a present is very simple. Even a schoolboy can do it.
Banknotes of the same denomination look more impressive.
All design elements depend on your imagination.
Options for inscriptions on a gift jar with money:
It is better to present such a gift with congratulations. Below are several options for an accompanying speech for presenting money at the bank.
Magic jar! Looks like a pickle. But vegetables and berry jam are not stored in it. It contains different reserves, long-term storage. If you don't open it right away, but be patient.
I give you a jar, a jar of abundance. And I want to wish you Money and an idyll.
Our harvest today is not edible at all. But the gift turned out to be simply incomparable.
It is permissible to throw some small change into the money jar, as well as packages with wishes.
– Money in the bank
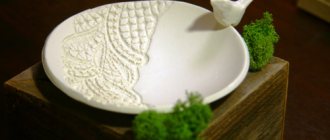
Various gifts are given at weddings, but there are very few funny presents. If the newlyweds have a good sense of humor, prepare money for them in the bank. It's best to do everything yourself. The procedure is very simple:
- Roll each bill into a tube, then tie a thread around the banknote and tie it.
- Place everything in a jar, you can add large coins.
- Now cover the jar with a beautiful piece of fabric with embossed edges and tie it with a rope. You can decorate such a surprise with an original label with a cut out heart. It seems that this is the most original option among the many ideas that involve a cash gift.
- Finally, decorate the jar with a cabbage sticker. When presenting a jar, in addition to the banal “congratulations,” you can recite a beautiful poem. Give it special significance with a solemn intonation.
We invite you to choose any of the wishes below.
I give you a jar!
It is for storing anything, or maybe jam!
Let it come in handy in your household. And it won’t break, And it won’t get dusty!
Please accept this gift. It’s so modest. It’s just a jar, But it’s with soul!
Of course, money doesn't buy happiness!
And no one knows what it is... But if you have money in your hands, then this “tone” raises your tone!
This gift is perfect
And it is universal for everyone, take money as a gift and buy whatever you want.
Or save it carefully And multiply them a hundredfold, Or maybe even 1000 times, We will be happy only for you!
What should a money ship look like according to Feng Shui?
When choosing a mascot, you do not need to give preference to models of warships or boats. You should buy a sailing ship - a real symbol of Feng Shui. Please note that military paraphernalia is not a favorable talisman. It is advisable that the money boat you choose be assembled without nails.
The material that goes into making a Feng Shui souvenir is extremely important. It should bring powerful positive energy to your home. Ideally, a money sailboat should be metal, if possible gold. You can cover your ship with gold. As an option, the talisman can be made of wood, since this natural material has positive energy. However, let us remember that metal is the most effective.
Tags
Money gift cash gift designs Money umbrella gift money notes are attached. Money gift option money notes are inserted. filled with bills to the top. small bills and beautiful bills along banknotes. banknotes. one bill. real banknotes banknotes from gift bills roll up bills in a tube Money is usually considered money in DIY handicrafts.under with your own hands with your own hands with your own hands for with your own hands from your own hands with your own hands from your own hands in
deckmaststepwrap skewersglue twinereaddeck
What is a ship of wealth in Feng Shui philosophy?
According to Feng Shui, a sailboat is a kind of talisman that brings financial well-being to all those who install it in their home.
A ship with sails made of banknotes has become a symbol that bestows success in the financial sector, thanks to the legends of ancient seafaring merchants. Sailors were some of the richest and most successful people of the time. Perhaps this is why the sails of such a talisman ship are a kind of magnet for good luck and prosperity.
To become a truly rich person, it is not enough just to acquire a beautiful attribute. In addition to the fact that according to Feng Shui, a money ship should be filled with various natural expensive stones, it is necessary to choose the right direction in the room where the “magnet” for money will be installed.
Cash gift for wedding
We offer interesting options for decorating a cash gift for a wedding:
Such a chic handmade gift, containing a piece of your heart and sincere words of congratulations, will definitely please the newlyweds and will be turned over for a long time, awakening memories of a happy wedding day.
Money is conserved in the bank only to ensure that the family budget remains intact and inviolable for as long as possible. A label must be printed on the jar. Variants of the name of the “product” inside: “Dried greens”, “Cauliflower”. The label can describe storage conditions and opening conditions, as well as the date of manufacture (of course, this is the wedding date).
There are two options here: either change money into small bills and compact them into the jar to the brim, or put large beautiful bills along the walls of the jar and fill the middle, for example, with a soft toy.
For a gift, choose a long, beautiful umbrella; banknotes are carefully attached to its spokes on beautiful ribbons. The intrigue of such a gift is that while the umbrella is closed, you will not guess what the secret is.
In any case, such an original gift will not leave anyone indifferent and will make the newlyweds laugh.