The bride is always the most important person at her wedding, so creating an image should be taken very seriously. Particular attention should be paid to the newlywed's hairstyle, because this part of the image is one of the main ones. When choosing a hairstyle and accessory for it, you need to think through the entire look in advance, since the bride’s hairstyle, dress and makeup should complement each other.
Such beauty doesn't even need a crown.
In the old days, the bride's head was decorated with a veil. Modern brides can do without it, choosing all sorts of other accessories. A wedding wreath gives tenderness and is a symbol of love and fidelity.
The headband adds femininity and elegance. It will look original on both long and short hair.
If the wedding is in the summer, then it is better to decorate your hair with butterflies, flowers and dragonflies made of beads. The choice depends on the style and hairstyle of the bride. This is an original and spectacular decoration.
Important! Correctly selected accessories will make the bride stunning and irresistible. You can read more about important wedding attributes here.
So how to make your own wedding hair decorations?
bunny ears
You will need: thick fluffy white and pink wire, glue gun, headband, white mesh fabric, scissors, wire cutters.
Master Class
- Cut the fluffy wire and form teardrop-shaped blanks for the ears, as shown in the photo.
- Form the bunny ears.
- Glue the white soft wire onto the rim.
- Glue on the ears.
- Glue white mesh into the inner ears.
- Make a bow out of white mesh and secure it in the center with fuzzy wire.
- Glue the bow to the side of the headband.
Soft wire bunny ears are ready! This creative head decoration is perfect for a children's party or a themed photo shoot.
Bead options
The most popular wedding hairstyles are braids. They are different: a spikelet, a braid with a bun, a side braid, a crown braid. For such hairstyles, you can also use short hair, increasing it with artificial strands. This hairstyle can be decorated with a tiara, a wreath of beads, various hairpins and much more.
Wreath
To make a wreath of beads you will need: satin ribbon, beads, thick and thin wire, scissors. We thread a bead onto a thin wire to the middle. Fold the wire in half and cut it so that the ends of the wire are 10 cm.
Thus we make several preparations. Next, we make a ring from thick wire with a diameter around the head and weave beads on the wire like a wreath around the resulting ring. To cover parts of the wire, we wrap everything in between with satin ribbon. You will get an original wreath with your own hands, which will be an original decoration.
Automatic hairpin using Kanzashi technique
You will need: a 10 cm long automatic hairpin, red, white and green satin ribbons, scissors, a glue gun, green felt, a ruler, a soldering iron, a thread with a needle, a silver cord, white half-beads, 3 decorative small flowers.
Master Class
- Prepare 6 pieces of green tape measuring 2.5x10cm.
- Fold a piece of green tape in half, then run the heated soldering iron diagonally to form 2 right triangles. Unfold the halves, glue or sew them together to form a sheet, as shown in the photo instructions. Make all the leaves this way.
- Prepare 24 red pieces measuring 4x4cm.
- Model sharp petals from 24 red squares measuring 4x4cm in this way: bend the square diagonally, then in half, glue the corners or secure with fire or a soldering iron.
- Connect 8 petals in a circle, sew or glue to form a flower. Make 3 red flowers in total.
- Glue a decorative flower and white half-beads to the center of each flower.
- Prepare 9 pieces of red ribbon measuring 5x5cm and 9 pieces of white ribbon measuring 4x4cm.
- Fold the square of white and red tape diagonally, then in half, join them together, placing the white piece on top of the red one and glue the corners. Form 9 red and white petals in this way.
- Connect 9 petals in a circle, sew or glue to form a flower.
- Glue a smaller red flower onto the red and white flower.
- Prepare 2 pieces of white ribbon measuring 5x5cm and 2 pieces of red ribbon measuring 4x4cm. Fold the square of white and red tape diagonally, then in half, join them together, placing the red piece on top of the white one and glue the corners. Form 2 white and red blanks.
- Prepare a strip of green felt measuring 11x2.5cm.
- Glue the hairpin onto the felt strip and secure it by gluing a felt square in the center.
- Glue green sheets on the felt around the circumference so that there are no gaps.
- Form 3 loops of silver cord and glue them as shown in the image.
- Glue a large flower in the center and small ones on the sides.
- Glue 2 white and red blanks from step 11 at the bottom of the large flower.
The automatic hairpin using the Kanzashi technique is ready! It is wonderfully suitable for a female representative of any age.
I recommend watching this video!
DIY festive kanzashi hairpins from Yuliana M
Stylist
Tiaras give the girl innocence and the image of a queen. When choosing a tiara, you need to choose matching earrings and a necklace. Ksenia Potapova
Lily flower
To weave a lily flower from beads you will need: white beads, golden beads, 3mm thick wire.
The flower consists of 6 petals and a stamen. We put 20 beads on a 40 cm long wire and make 4 full arcs around it, i.e. first 15 beads, twist the wire, adding beads each time.
You should get a beautiful petal. Thus we make 6 pieces.
For the center, cut a wire 30 cm long. For the center, we need to make 5 stamens, at the top of each we attach a golden bead.
We thread a large bead onto the wire, fold it in half and put beads on the two wires (a different color is possible). The number of beads should not exceed 18 pcs.
Then we take the rod, screw three petals onto it and secure the stamens, then add the petals again. Our lily is ready. You can add leaves to it, made in the same way as petals, only we reduce the amount of beads.
Recommendation! The finished flower can be attached either to a hairpin or to a comb, which will look original in the bride’s hairstyle.
Hairpin for short curls
The most popular DIY wedding hair accessories are flower clips. We will need: beads of two colors (depending on the color of the dress) and fishing line.
We cut off and thread 26 beads onto it, closing the ring of the fishing line. We make 4 such blanks. Make the fifth petal a little larger.
We make the next row in the petal a mosaic. We thread two beads onto the fishing line, then thread them through one into the petal and tighten. So you need to weave 11 pieces.
Next, we make the row with a mosaic, only in a different color.
We should get a petal inside with one color, outside with another. Thus, we make 5 petals.
The next step is to connect the petals to each other using fishing line. All 5 parts must be collected into a single flower. The center of the middle can be decorated as desired. The finished flower can be attached either to a hairpin or to a bobby pin with glue.
Hair clips “Cat ears”
You will need: 2 metal pins, thick white felt, shiny pink foamiran, Crystal moment glue, second glue, scissors, wooden skewer, ear templates.
Master Class
- Draw two sizes of cat ears on cardstock, then cut out the ear templates.
- Transfer the larger ear template onto white felt and cut out 2 blanks.
- Using a skewer, trace the template of the smaller eyelet on the back of the foamiran and cut out 2 blanks.
- Glue the glitter ear to the felt eye with Moment.
- Glue the ears to the hairpins with instant glue.
The “Cat Ears” hairpins are ready! I recommend watching this video!
DIY ♥ Mickey Mouse ears ♥ Cat ears ♥ Bunny ears ♥ DIY
Interesting video: making an accessory yourself
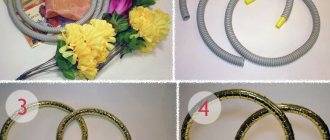
You will need: a metal base for the headband, scissors, satin ribbon, 4mm thick gamma wire, 12, 8 and 6mm beads, drop-shaped beads of two sizes and small transparent beads at your discretion. Cut 20 cm from a coil of wire, fold it in half and thread the first transparent bead. We pushed it to the middle of the wire and twisted it a little to secure it.
Next, we pass a drop-shaped bead to the transparent bead, immediately through two pieces of wire. Next we thread the bead at 12mm, 8mm and 6mm. The result was the first blank. In exactly the same way we make 6 more blanks. But in each subsequent workpiece, we reduce one bead in the set. At the very end you should get one bead. We will fix the resulting pattern in the center of the rim.
Interesting! If you like beaded accessories, follow this link to see other jewelry options.
We take our first piece, separate the edges of the wire and place it in the middle of the rim. We stretch it so that the beads do not dangle and wrap the rim with the remaining wire, pressing it tightly against each other. Next, take the next piece, step back a little and wind it in the same way. The outermost one comes with one bead. To prevent the wire from sliding along the rim, you can fix it with glue.
We decorate the traces of assembly of the tiara with a satin ribbon. Apply glue to the edge of the tape from the wrong side, secure it at the very beginning of the rim and begin winding. In this way we tightly wrap our entire base. All traces of the wire should be hidden under the ribbon. Wrap it to the end and secure the edge of the tape with glue. The tiara is ready.
Amurchik
You will need: a headband, a glue gun, soft golden wire, red felt, a felt-tip pen, a sheet of paper.
Master Class
- Trace the rim with a felt-tip pen on a piece of paper.
- Draw an arrow with a heart-shaped end.
- Cut out 2 hearts from red felt.
- Prepare pieces of soft wire for the arrow.
- Attach the back of the arrow to the rim as shown in the image.
- Glue the hearts on both sides of the soft wire and attach to the headband.
Amurchik is ready!
Different variants
If the bride has a high hairstyle, then a tiara is best. Tiara - an original decoration suitable for any girl, of any age. How to make a wedding hair decoration in the form of a tiara?
Wire comb with beautiful pearls for a bun
To make it you will need: natural pearls with a diameter of 7mm, glass beads 4mm in different shades, some beads, rhinestones, wire with a diameter of 4mm, round nose pliers, wire cutters.
Cut a 100cm piece of wire and fold it in half. We string a pearl on it and twist it 1.5 - 2 cm. Then we string the second one and also twist it. Closer to the middle, you can add bugles, rhinestones or beads of a different color. In the middle you can make several flowers in the same way. It all depends on your mood and imagination. We attach the finished decoration to the comb using wire, pressing tightly, and can be fixed with glue.
You can decorate the headband in the same way, adding leaves, flowers or satin ribbons according to your imagination.
Dragonfly on stiletto heels
You will need: 1mm thick wire, beads, nail polish, scissors. Cut the wire 30 cm long and twist the dragonfly. We put beads on the ends of the wire and twist the antennae. Using nail polish, we make the body of the dragonfly, stretching the polish with a thin film between the wire. Let it dry.
According to your taste, you can decorate with small beads, gluing them with glue along the rim of the wire. The finished product can be secured to a bobby pin or pin.
Daisies
Wedding hair decorations for the bride can be in the form of beaded daisies. You will need 65 cm long wire and a knitting needle. We wind the wire around the knitting needle, leaving the ends 3 cm long. You should get 55 spirals. Remove from the knitting needle and stretch to 15 cm. We roll the workpiece in the form of a chamomile petal, and twist the ends together. This way we make 8 petals.
Then we take white threads and make a turn from the middle down, then wrap it from the bottom up. Having reached the end, we draw the thread down along the surface and wrap it around the ends of the wire. Thus, we make all the petals.
You can also make a few green leaves. For the middle, we make an 8 cm spiral and wrap it with yellow thread, starting from the middle. Next is a cross.
We collect the finished petals and the center, tightly wrapping them together with threads. We fix the ends of the threads with glue.
Advice! You can attach the finished flower to any hairpin or bobby pin. You can make several of these flowers with different sizes.
Beautiful twig
Wedding hair decorations made of wire are very popular. To create an original decoration you will need: a sheet of paper, a pencil, 5mm thick wire, 5 multi-colored beads. 8mm thick and 28 pcs. pearls from 8 to 12 mm, pliers, wire cutters, round nose pliers. How to make wedding hair decorations - photos and instructions below.
First, we draw a branch of your choice, 26 cm long. To make it beautiful, you need to constantly check the sketch.
We do not cut the wire so that our branch does not fall apart. We take the wire in the spool and begin to string a bead onto it. When they are all put on, we move them 50 cm, this will be our center of the branch. Take the first bead and twist it at a distance of 2 cm until the bead is tightly attracted. At a distance of 1.5 cm, twist the second bead until they come together. We do these movements with all the beads.
At the end of the finished branch, we cut off the rest of the wire and tuck them in with round nose pliers so as not to get scratched. The finished twig can be attached to a comb, to a bobby pin, or worn as a tiara. In all cases, you will look original. You can show your imagination and use beads in the form of leaves and flowers.
Headband with ribbons and beads - master class
A hairband is not only a decoration, it is also practical. This product will help remove unruly curls from your face and securely fix your hairstyle.
The hoop can be made from plastic, rubber or metal. For a wedding, an excellent solution would be to create a headband decorated with fresh or artificial flowers.
Making decorations using beads, pearls, satin ribbons, rhinestones, pearls and various bows is not particularly difficult, so even a beginner in needlework can cope with such work.
First you need to prepare all the necessary materials.
To create a wedding headband you will need:
- Directly a hoop made of plastic or other material. It is better to use wide specimens.
- Guipure ribbon about 5 mm wide.
- Adhesive substance. The best choice would be a clear solution.
- Lace ribbon approximately 12 mm wide.
- Small beads.
- Scissors and needle with threads.
After preparing all the necessary components, you can proceed to work.
The process of decorating a headband for a wedding ceremony consists of the following steps:
- Small pieces of lace are cut off and attached to the corners of the product using glue. The lace needs to look attractive and natural.
- Using a clamp, a strip of lace fabric is secured to one edge of the hoop and gradually wound around the product.
- Excess material is cut off; you will need to leave the ends about 10 mm long. They are folded onto the back of the product and attached with glue.
- Then, using a guipure ribbon, a voluminous braid is woven. 1 m of fabric is cut, a certain section is set aside, from which a flower will be created in the future. The remaining 3 m are processed in a certain order. First, tie a bow, then you will need to pull either end of the fabric to open the side. A loop created from the end of the ribbon is threaded into the loose loops, and then the second end of the fabric is tightened. Then you need to create a loop on the other side and thread it into the previous one. This procedure will help you create a braid based on the length of the hoop.
- After which you will need to weave a similar braid from the remaining material 1 m long. To create a flower from the formed braid, you need to sew it along the edge with a basting stitch and tighten the thread. Then the ends of the fabric are cut and a bead is glued in the middle of the flower.
- The ribbon braid is attached to the hoop on top of the lace fabric. After which you will need to wait for the glue to dry completely, this can take up to half an hour.
- Beads are put on a thread. It is recommended to use ready-made beads made from medium-sized artificial pearls. The thread with beads is attached to the product in the middle of the braid using glue.
- A hand-made flower is sewn or glued onto a selected area of fabric.
This headband would be a great solution for a wedding. It will not only fix the hairstyle, but will also complement the magical image of the bride. Such decorative decorations make a pleasant impression on guests.
Tips for use
If the source material is too hard and does not bend at all, it must be softened by heating it over a stove. At the same time, be sure to work with gloves, otherwise you can easily seriously injure your hands.
Wires with a diameter of 1 mm, 0.6 mm and 0.2 mm are most often used in jewelry.
It is best to use wire with a diameter of 1 mm in order to better fill the gap between the beads, if used.
In addition, the thicker the wire, the longer it will last. And if the wire is thin and the decoration has beads, then the accessory will not last long, because the wire, when moving freely inside the beads, will rub against their edges and eventually become too thin and simply break.
The lighting should be good; you should not work in the dark or twilight.
Combs as an addition to your hairstyle
A hair comb can be either a purely practical addition to a hairstyle, fixing the style, or serve as an independent decoration.
The modern wedding industry provides a wide selection of such accessories, decorated with various elements: prints, flowers, bows, rhinestones or pearls. You can often find combs with a veil attached to them.
Beautiful wedding hairstyles 2022 with veil
A veil is a trendy hair accessory that:
- Pairs perfectly with Greek shell and boho style;
- Looks great with loose curls, the main thing is not to let it overshadow your hairstyle;
- With large accessories you can look like a queen.
Bright decoration
You will need: artificial flower, metal hairpin, green felt, glue gun, scissors and pliers.
Master Class
- Cut off the bud of an artificial flower.
- Cut out a small rectangle from green felt.
- Clamp the felt rectangle into a bobby pin.
- Apply hot glue to the front of the bobby pin and the felt part.
- Glue the bud and wait for it to dry.
The bright hair decoration is ready! Such a flower will definitely not go unnoticed. This decoration is perfect for a photo shoot and theme party.
I recommend watching this video!
Elastic band for a bun made of glitter foamiran / DIY Tsvoric
Headdress for the bride
The traditional headdress of the bridegroom is the veil. However, modern girls prefer hats, veils, scarves or wreaths. You can complement your wedding look with any type of decor.
Wedding hats
Hats are an excellent replacement for the traditional veil. They can be wide-brimmed, tablet-shaped, with or without a veil. It is important to choose this accessory correctly. It should match the dress, height and age, and emphasize the shape of the face. So, wide-brimmed hats with a veil are suitable for girls with round faces, and flat hats for narrow-faced girls. Curvy brides should avoid small hats; miniature ones should prefer hats with small brims.
Wedding veils
This detail is designed to slightly cover the face; the veil goes well with a fluffy or short dress, a wedding trouser suit, or a vintage wedding dress. Gives mystery, emphasizes aristocracy. The mesh is attached with a hairpin or comb. Best suited to smoothly collected curls.
Diadem
Wreaths are created using hoops and rims on which flowers are attached. Live ones are used, but artificial ones are preferable. Modern technologies for making flowers make it possible to create them life-like. For this purpose, various materials are used - satin, silk, openwork fabrics. Flower arrangements are decorated with rhinestones, pearls, and beads.
Veil
When using a veil, you should remember that it must match the dress in material and length. There are several options for such products: shell, classic and others. Each one has a different length, cut, and fastening. The veil goes well with a veil; you can decorate it with stones or secure it with a diadem or tiara.
Bridal scarf
This headdress is used by real coquettes. The scarf can be tied on the head in different ways. Some prefer to create the image of a pirate girl, while others prefer to create the image of a romantic prude. In fact, a scarf, like a veil, is tied and attached to the head independently or with the help of hairpins or invisible pins.