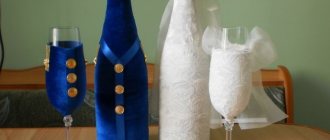
Another master class on how to decorate champagne for a wedding with your own hands. Bottles decorated with ribbons - “Bride and Groom”. The master class was prepared for you by Alena Glazkova.
A wedding is a significant event in the life of young people. They want to capture the day of celebration in their memory. According to custom, bottles of champagne are left for the bride and groom until their first year of marriage. Of course, you want the bottles to stand for a reason, but to be designed in an original way. I offer you an accessible master class in which you can easily decorate champagne bottles with your own hands. The materials that will be needed for decoration can be purchased at sewing and handicraft stores.
The design of the bottles can be combined with the outfits of the bride and groom, while maintaining the same color scheme and model.
Materials for production:
- satin ribbon 4 cm wide, white,
- satin ribbon 0.6 cm wide, white,
- dark blue bias tape,
- scissors,
- metal ruler,
- simple pencil,
- glue “Moment Crystal”,
- white guipure fabric,
- white stretch guipure,
- white half beads,
- glue rhinestones,
- two bottles of champagne.
Groom
Let's start with the groom. He needs to make a “shirt” with a collar. Therefore, we measure the required length of the white wide tape from the bottle. Fold the ribbon in half so that one edge is lower than the other, and fasten with needles.
Using an iron, we smooth the stripe and the “collar” of the shirt.
We attach the “collar” to the bottle with glue.
Using a metal ruler, mark the center and draw a line with a pencil.
We glue a wide white ribbon under the collar, securing the ends of the ribbon in the center.
Using dark blue bias tape, we “tie” a tie and put it on the shirt.
Cut off the “tail” from the tie.
Now let's start attaching the bias tape. We measure the tape to the required length, cut it with scissors and glue it to the bottle.
Using the line as a guide, glue the bias tape.
We reach the flat part of the bottle and secure the “side” in order to lower it down in the future.
We wrap the bottle in a circular motion to the bottom, periodically securing the tape with glue.
We lower the “side” and glue it.
We imitate buttons by gluing white half-beads to the “side”.
“The Groom” is ready, now let’s move on to the “Bride.”
Champagne bottles decorated using the wonderful decoupage technique
Those who are not familiar with the decoupage technique should not be afraid to try something new. This is not an unexplored path, but a well-trodden path by many, with accessible explanations and clear examples.
Use a primer for the base
Any Handmade-oriented store offers a large selection of New Year-themed napkins
If you don’t have a napkin on hand, you can print any design on a printer
There are many different materials to help with this technique that will help turn the bottle into true beauty.
Related article:
Decoupage for beginners: step by step from a photo of a bottle to furniture decor. This decor is especially popular when creating items in a vintage style. In the article we will look at detailed photo instructions for decoupage: furniture, on glass from napkins, on a box.
What is useful at work?
We’ll prepare all the materials right away so that we don’t have to look for them later—the work will be exciting, so we won’t spoil it with unnecessary distractions.
We need the bottle itself, alcohol, a heat gun, a New Year's napkin, a blank file, acrylic varnish, white acrylic paint, a palette knife, a wide sponge, a comfortable flat brush, wood putty and a little patience.
Everything you need is purchased in craft stores, putty can be found in construction departments, and palette knives are also sold in art stores.
Manufacturing instructions
We invite you to learn how to make decoupage of champagne for the New Year from the master class.
| Illustration | Description of action |
| Place the bottle in warm water for a couple of minutes until the label gets wet. We don't need her. Wipe the bottle with alcohol to degrease the surface. Apply a layer of primer to the dry base with a sponge. | |
| We wrap the bottle with a napkin to find out what size we need. We simply tear off the excess carefully with our fingers, no scissors! A break must be made along each edge. | |
| Place the file under the napkin. Apply acrylic varnish to it with a brush, carefully spreading it in an even layer over the back surface. | |
| We take our time and hold the file when we lower it onto the bottle. | |
| We slowly remove the file, simultaneously straightening the napkin under it with a brush. You can't touch it with your hands! | |
| Let's walk around the bottle a little with a hairdryer running on low power. | |
| We apply wood putty with a palette knife (if you don’t have one, you can get by with an ice cream stick). Texture is added with a sponge. You can also apply putty on the bottom in the form of snow. | |
| Apply hot glue in the form of smudges from the top and to the end of the neck. Cover the glue with white acrylic paint. |
Bride
Mark the center of the champagne bottle, measure out a narrow white satin ribbon and glue it to the bottle at an angle of 45 degrees.
Thus, we decorate the “corset” with white thin ribbon.
We cover the rest of the bottle in a circle with a wide white satin ribbon.
Glue stretch guipure on top of the satin ribbon.
We cut out elements of flowers and leaves from guipure fabric.
We glue the cut out elements to the bottle.
We glue a ribbon to the top of the bottle and decorate it with half beads.
We glue half beads and rhinestones to the cut out elements.
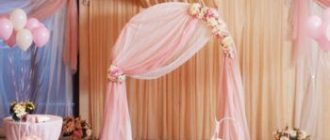
You can add an additional decoration to the “bride” - a veil.
How to sew holiday covers
Velvet wedding champagne vestments look especially expensive. Any container decorated in this way will turn into a center of attention. The simplicity of the pattern, along with the availability of materials and tools, are among the advantages of this decoration.
Required:
- two pieces of velvet white and black;
- threads to match the fabric;
- cardboard or pattern paper;
- pencil, scissors;
- beads, lace, organza.
Stages of sewing covers:
- Place the paper on the bottle and take measurements with a pencil;
- Draw the pattern on paper, cut it out with seam allowances;
- Along the contour, the pattern is applied to the fabric. The case for the “bride’s” bottle is cut out on white velvet, and for the “groom’s” champagne - on black.
- The material is cut out according to patterns, sewn along the contour from the wrong side, and turned inside out.
- They put the prepared outfits on the bottles.
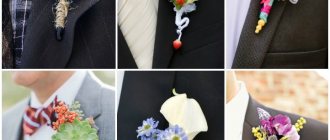
- Champagne for the “bride” is decorated with an organza veil and lace and beads are attached with a glue gun.
- The “groom’s” bottle is decorated with beads and ribbons.
Velvet can be used to decorate newlyweds' glasses, money chests and bouquets of flowers. Velvet covers are then used repeatedly; they will come in handy at other important events.
Uniting bow
From a wide satin ribbon we make two bows, one slightly larger than the other, sew them together and glue a dark blue bias tape to the middle, decorating it with rhinestones.
Glue a thin white satin ribbon to the dark blue bias tape. The ribbon should be longer than the bias tape, 10 cm on each side.
We tie a white satin ribbon into a knot and glue a bow to it.
We put a bow on the necks, as in the photo.
Bottles of champagne, decorated with your own hands for the wedding, “Bride and Groom” are ready. You can make exactly the same ones or come up with your own versions of holiday outfits. We wish you creative success!
You can decorate glasses for newlyweds in the same way:
Wrap the newlyweds' glasses with ribbons and decorate with beads, rhinestones, flowers:
For more ideas on preparing for a wedding celebration, see the “WEDDING” section .
Types of decor for wedding bottles
This lovely holiday accessory can be made using any craft technique. The most commonly used materials are satin ribbons, artificial flowers, fabric, lace and stained glass paints. Based on the materials used, decor is divided into the following types:
- decoupage;
- engraving;
- glass painting;
- decoration with bows, feathers, beads;
- decoration with natural flowers and leaves;
- making flowers from metal plates, polymer clay and textiles;
- making wedding or national costumes.
The main requirement for decor is that it must correspond to the level of solemnity, be in harmony with the dishes, the decoration of the hall, and the outfits of the newlyweds. Pompous gold engraving is inappropriate for a wedding in Provence style. Intricate roses, pendants, and lace will fit perfectly into a sophisticated ceremony in aristocratic decoration.
Real masterpieces are obtained by using allusions to a profession or hobby during marriage. A bottle entwined with rope, miniature anchors and steering wheels will suit a sailor groom, and the bride’s passion for travel can be emphasized with tiny images of famous landmarks.
More wedding ideas
Wedding bottles:
Champagne “green apple”:
Decoration of glasses and bottles:
Painted wedding glasses:
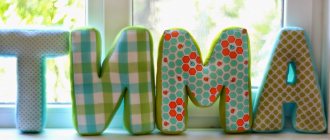
Clothespin "Bride and Groom"
Glasses with roses:
Ring basket:
Ring pad
Another cushion for rings:
Wedding sieve:
Wedding garter
Wedding invitations
Bonbonnieres for guests
In order not to forget the page address and share with friends, add to your social networks: Do you want to know news about competitions or master classes?
Tags: Wedding, Bottle decoration
Attention! It is better to write urgent questions in the comments on the website (form at the bottom of the page) or, better yet, directly by email. There are no notifications about comments from the VKontakte form! This form is more for feedback. 
Discussion: 9 comments
- Lizaveta Koroleva:
May 14, 2015 at 6:46 pmWhat wonderful outfits! I would even leave these as a souvenir) My friend and I also decorated bottles for the wedding, but the bottles themselves gave us an idea for inspiration - they took Lev Golitsyn’s coronation - there is a black and red bottle, pleasant, rich colors. The black one was decorated with a matte red bow and beautiful beads, and the red one was decorated with white ribbons (a little like what they did here in the master class). It turned out very elegant and unusual