The original veil goes perfectly with almost any outfit. It looks especially impressive together with elegant dresses that are made of high-quality fabric with lace trim.
In addition, with such an accessory it is much easier to create a charming retro look where vintage style prevails.
Of course, you can purchase a veil at a specialized store, but it is best to make this accessory yourself.
Short description
Everyone knows that fashion trends repeat themselves periodically, and veils and veils have returned to women's wardrobes. Although until recently they were remembered only on special occasions, such as graduation, wedding or anniversary, you can add a bit of sophistication and vintage charm to your appearance without waiting for any occasion. Moreover, making a veil with your own hands is not difficult.
Despite the French origin of the word “VOILE,” the birthplace of this ladies’ accessory is considered to be the Middle East, where all girls were required to wrap themselves in a thick veil from head to toe in order to protect their beauty from prying eyes. Everything was very practical, no romantic overtones. Moreover, in France, the veil could be found not only in women's, but even men's wardrobes.
Chicago style feathers
This type of decoration is suitable for a themed wedding in the style of “Chicago”, “The Great Gatsby”. Feathers were a common decorative element in women's wardrobes in the 30s of the last century. A bride in a veil with feathers, beads, crystals, and sequins will match the style of the ladies of that time. Photos in this theme turn out to be extravagant and colorful.
Editor's choice: Wedding dresses in the style of the 60s: description and photos
When using rich vignette decor, it is important not to overdo it. One lush feather attached to a medium-length mesh will be enough.
Benefits of using veil headbands
In modern fashion, there are several main types of such accessories. Stylists identify the two most popular styles - English and French. For the first option, a characteristic feature is that the lower edge of the veil is located near the eye line.
But French veils are more fashionable and popular. The head accessory goes down almost to the end of the chin.
Stylists note the originality of the Russian style with side veil fastening. The disadvantage of this detail is that the bride’s hairstyle is practically invisible.
Special attention should be paid to the numerous advantages of the veil:
- The accessory performs a protective function on a sunny day and in damp weather.
- The type and complexity of the hairstyle under the head accessory does not matter.
- The accessory is very compact in size, so it simply cannot ruin your hairstyle.
- If desired, you can use a veil to disguise minor defects on the face.
- The veil goes well with different outfits at different times of the day.
Large flowers
Flowers are a traditional wedding decoration. The founders of weddings not only decorate the hall, arches for painting, and wedding processions with them. The images of brides often also echo the floral motifs of the celebration. Beautiful larger buds attached to the veil beautifully frame the girl’s festive hairstyle and make her face more delicate and girlish.
For those who prefer discreet, minimalistic accessories, stylists recommend paying attention to veils with small floral scatterings.
Master class on creating an elegant model
Recently, sophisticated hats and headbands with a veil, as well as romantic wedding veils, have become increasingly popular and in demand. This is due to the fact that modern girls want to diversify their usual look with retro accessories in order to feel like a real fashionista from old films. An excellent option in this case is to make a hat with a veil yourself. Master classes contain detailed descriptions that greatly simplify the entire work process.
Kanzashi hats - unique hair bands
What types of hair clips are usually on sale? Most often, these are elastic bands, clips, scallops, decorated with flowers or even whole bouquets. In this lesson we will talk about how to make unique hairpins in the form of hats with your own hands. Today, this item of women's wardrobe has practically sunk into oblivion, if we talk about extravagant hats, which were previously worn for beauty to complement a fashionable outfit. But still, small hats look very cute, so craftsmen are trying to somehow unobtrusively reproduce them and make beautiful accessories. Headbands or elastic bands decorated with such bright details are allowed.
If you like the charming hats shown in the photo, then you can make them yourself from a minimum of materials. To do this, we provide step-by-step instructions. These elastic bands are intended for girls of school age; you can consider them as a bright summer option.
Romantic accessory on a hoop
This version of the head accessory is suitable even for those who have decided to take up needlework for the first time. You can make a veil on a headband with your own hands thanks to professional diagrams that describe each stage. The main thing is to acquire the necessary material and great desire.
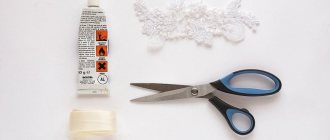
To make such an elegant and discreet veil, you must have:
- Glue.
- Hair hoop or headband.
- An ordinary candle.
- Decorative jewelry (flowers, beads, feathers, rhinestones, sequins, ribbons).
- A small piece of fabric (60x45).
- Pins.
- Satin ribbon (70 cm).
Stages of work:
- Using neat stitches, you need to slightly gather the upper edge of the veil (the craftswoman should focus on the length of the hoop used). Once again we sew the previously processed edge with a sewing stitch to securely fix all the folds.
- Now you need to take a satin ribbon and glue it to the rim along the center line. The width of the tape used should be sufficient to wrap the entire hoop. It is important not to overdo it with the application of glue, which is why it is better to make point movements.
- We fix the processed edge of the veil with pins to the hoop, departing 4 cm from its ends. During such manipulations, excess veil will appear, which must be wrapped in two symmetrical folds.
- After making sure that the fabric is distributed as evenly as possible, we baste it to the hoop and remove all the pins. Be sure to connect everything and glue the edges of the satin ribbon (the headband itself and the edge of the veil must remain inside). For reliability, a hoop decorated with ribbon can be stitched with regular threads.
- The veil for the special event is almost ready. All that remains is to decide on the necessary decorations. Natural or artificial flowers are best suited here.
You will need:
- Any tape for rigidity (usually crossbar is used for hats);
- fabric for the hat (velvet, satin, felt, etc.);
- fabric for the bow (can be contrasting);
- mesh (for veil);
- padding polyester for lining;
- threads, needle, scissors, pins;
- glue;
- hoop, comb or hairpins for attaching the hat
The basis will be crossbar tape, which is used to strengthen the seams.
Twist a ring out of it, the circumference is 50cm. Ribs are made from 20 cm strips. You can attach the tape with glue or hand stitches. This base is sheathed with one or several layers of padding polyester, which will create the necessary volume.
The workpiece is draped with satin fabric (a denser fabric is applied in one layer). The edges are hidden under the hat. After this, the lining is sewn to the wrong side. To do this, cut a circle of fabric with a radius of 15 cm.
For a veil, cut out a circle of the required size from transparent fabric. If the fabric is soft, it is better to make the circle larger to drape the veil vertically.
The veil is attached to the back of the hat, decorating the junction with a bow or other decorative details. To achieve a beautiful drape, try on the hat, securing the fabric with pins.
Secure the desired option with threads. Attach the finished hat to a hoop, comb or hairpin.
Some interesting models for inspiration:
Source: https://cpykami.ru/velikolepnuyu-shlyapku-s-vualyu/
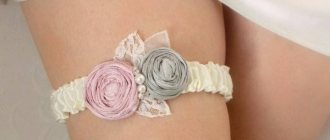
A classic product for special occasions
An original hand-made veil will definitely diversify the look of both a very young and an adult fashionista. This model goes well with classic evening dresses, elegant blouses and formal trouser suits. That is why you can safely start making the accessory.
Necessary materials:
- Metal rim.
- Sharp scissors.
- Sewing pins.
- Glue.
- Veil (25x40 cm). It is worth noting that the splendor of the future veil depends on the length of this material.
- 50 cm satin ribbon.
- Decorative elements for finishing the accessory.
In order for the final result of the work done to exceed all expectations, you must adhere to the following sequence of actions:
- Initially, we iron the veil and remove all creases. It is best in this case to use a warm (not hot) iron. Only after this can you trim off the excess edges of the veil.
- Using a regular white thread, you need to gather one edge of the veil.
- It's time to prepare the headband. Using a satin ribbon, you need to cover it on both sides so that in the end it acquires a more neat and elegant look.
- We pin the veil onto the headband using sewing pins. It is best to start at a distance of 3 centimeters from the edge. Initially we pin along the edges, and only then we reach the middle. Don't be afraid that the length of the veil will be longer than the headband itself. Thanks to this, it will be possible to lay two volumetric folds at once.
- We attach the veil to the headband.
- Using a satin ribbon, you need to hide the place where the veil is attached. Do not forget that the thread must be carefully removed. The edges of the tape are carefully trimmed and fixed with glue.
- Pre-prepared decorations must be attached to the accessory using glue. In this case, you can show all your imagination.
At this point, the making of a feminine veil can be considered complete. All that remains is to choose a good outfit and you can safely go to a special event.
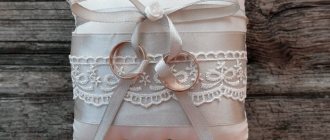
DIY veil. Jewelry for the bride
Wedding portal Articles DIY accessories Jewelry for the bride
The classic version of the veil is becoming a thing of the past, giving way to more interesting accessories. One of these is the veil, which adds femininity and elegance to the bride’s image.
This stylish attribute can be purchased in a store or wedding salon, or you can make it yourself. To do this you will need a minimum of materials and a little patience and imagination. The Svadebka.ws portal presents to your attention a simple master class with which you can create an elegant veil that will become the highlight of your wedding look.
Materials and tools:
- tulle of different types;
- crest;
- flower applique;
- glue;
- scissors.
Time : 30 minutes.
Detailed instructions:
Cut 2 pieces of tulle measuring 14*14 cm.
Trim the two sharp edges into the square, making a semicircle.
Glue the sharp corners of the tulle to the ends of the comb.
Then apply glue to the middle of the comb and glue the center of the tulle.
Glue the entire tulle to the comb in the same way.
It should turn out like this!
Apply glue to the flower applique.
Glue the applique to the comb.
The veil is ready!
Application options
Based on such a simple material as tulle, you can create a wide variety of veils. It is enough just to apply a little imagination regarding their decoration.
As decorative elements, you can use both the proposed floral appliqués and beads, rhinestones, Swarovski stones, feathers, etc. The main thing is that the decoration you create fits perfectly into your wedding look.
Then on your wedding day you will look simply perfect, the portal www.svadebka.ws is sure!
Articles in section (162)
The main accessory of a bride's wedding look is the veil. But the newlywed can also wear this element to the pre-wedding party, making her image more original and thematic. Moreover, you can easily make a veil for a bachelorette party yourself!
It’s hard to imagine a wedding hairstyle without some interesting accessory that makes it original and impressive. Can't find anything suitable in stores and salons? You can make your own hair decoration for the bride!
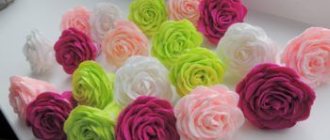
The principle of making a wedding flower
Many needlewomen often make a flower from a veil with their own hands. This trend is due to the fact that each stage can be controlled by the craftswoman herself, and this is very convenient when creating an exclusive accessory. But in order for everything planned to work out the first time, you need to prepare the following devices:
- Needles with wide ears.
- Threads in neutral shades.
- A small hairpin.
- Sharp scissors.
- Glue.
- White satin ribbon.
- High-quality fabric for making flowers.
- Crest.
- Cardboard flower template.
- Mesh veil (47x60).
Stage three: securing the comb
The veil is held on the bride's head by a hair comb. Of course, the tulle product must be secured to the comb, and the comb itself should not be noticeable. As a rule, to make veils, hair accessories are used that match the color of the fabric. But this is not a good solution in every case. For example, if the bride has dark and not particularly thick hair or short-cropped hair, a white comb will be visible under a thin tulle, just like a transparent silicone one, but a black one will not.
Lost weight: what Sofia Tarasova sacrificed for the sake of “VIA Gra” (new photos)
"Dad is offended." Agata Muceniece about her relationship with Priluchny after the divorce
“We are still friends”: Derevianko commented on the breakup with his wife
You need to do the following:
- trim the edge of the tulle above the gather, if necessary;
- attach a hair comb to the assembled part of the veil so that the edges of the accessory and the product touch, and the teeth are directed downward;
- sew the comb to the veil by hand.
The comb is sewn on very simply; the stitch should run obliquely, so that the thread presses the upper edge of the hair accessory to the fabric.
The money tree pleases with lush flowering: my secret is in caring for the leaves
Rare shot: Viktoria Isakova showed her grown-up daughter from Yuri Moroz (new photo)
It’s good to wash often: myths about shampoo and hair care that only harm
Stylish option for little girls
A young fashionista always wants to be like her mother. That is why a large hat or voluminous evening hairstyle will simply be inappropriate, but a compact head accessory will fit perfectly. To make a veil for a girl with your own hands, you need to prepare the following materials:
- A small hairpin or a plain headband.
- Big needle.
- A small piece of veil (25x25 centimeters).
- White threads.
- Original items for decoration (flowers, beads, sequins, lace, feathers, beads).
- Glue.
At the preliminary stage of work, the veil must be ironed at a low temperature. This is done in order to smooth out all existing creases, otherwise an uneven fold may eventually form. Using a regular needle, the mesh veil is collected along one side of the rectangle into a neat bun.
During this procedure, you must ensure that the fabric is not too tight. You can try to form neat small folds, and only then grab them with white thread, stitching one place several times. This will help achieve good strength in the folded areas.
Using high-quality glue, the resulting workpiece is fixed to the headband or hairpin. The glue must be applied exactly to the attachment point, avoiding getting the chemical on your hands or other parts of the body. Decoration depends only on the imagination and skill of the needlewoman. You can glue a voluminous flower to match the veil. A lace bow neatly decorated with a bead or pearl will look very gentle.
Wooden souvenirs
Wood will be an excellent material for creating cute souvenirs. It is distinguished by its natural beauty, regal fragrance, warmth of texture, and ease of processing.
Of course, to get smooth surfaces you will have to ask an adult man for help, although modern electric jigsaws will help a woman cut wood into even pieces.
Spili
Saw cuts are thin circles from a tree trunk; they can have completely different sizes, depending on what part they were cut from.
The simplest but most cozy souvenirs will be all kinds of frames made from such circles. Frames can be designed:
- photographs and paintings;
- mirrors;
- kitchen coasters for hot dishes or for utensils;
- home key holders.
All this will just require cutting the wood into circles of equal height, varnishing them, and gluing them onto a prepared base.
For people who have artistic talent, it will be quite easy to make unusual Christmas tree decorations by simply painting a piece of wood.
With a little experience, you can make entire panels by gluing the cuts together with edges.
Branches
Tree branches are suitable for creating unusual:
- candlesticks;
- vases;
- lampshades;
- hot trays;
- screen for batteries.
Charming baskets are woven from soft branches or vines. They can be presented to lovers of embroidery and knitting, they are suitable as a gift for gardeners or lovers of picnics in nature, and the tiny baskets will become wonderful candy dishes.
Boards
Small boards will help you make the most unusual shelves or cutting utensils for cooking. And to give the souvenir an unusual look, the surface can be decorated using the decoupage technique: applying a finished picture to the surface. Such decoration will definitely become a completely unusual gift, and a varied selection of pictures will help make it suitable for any event.
History of charm
If you need to add some mystery to your image, a veil will help you. The veil is one of the most stylish and delicate accessories in a woman's wardrobe.
A veil is a women's headdress made of the finest fabric, mesh or lace. The peculiarity of the veil is that it partially or completely hides the face. At the very beginning, the veil was created purely for practical reasons. It was designed to hide the face of its owner from prying eyes.
After the unusual headdress gained recognition in Europe, it was used to mark social status and belonging to certain high circles.
Also, special importance was attached to the color of the veil. Thus, white color indicated the innocence and purity of its owner, and black became a symbol of mourning and grief.
The popularity of veils among the fair sex rose and fell, but they still managed to reach the present day, having undergone great changes. And yet the main component of veils has remained unchanged. This is the thinnest veil, designed to add elegance and mystery to the image.
Unfortunately, these days the veil is not very common among the masses, so it is not always easy to find it in stores and salons. But there is always a way out. Making a veil with your own hands is not as difficult a task as it might seem at first glance.
First of all, you should decide on the style of the veil. It depends, of course, on the event and place. Wedding or official reception, anniversary or party with friends - the choice of color and style of the veil will depend on this. An important point is who the accessory is being created for: a girl, a girl or a young woman, depending on this, you can create a brighter and more original or, on the contrary, an elegant and discreet veil. Another aspect that you should decide on before starting work is how to attach the veil. There are three most common options - on a hairpin, on a headband or on a ribbon.
Useful conclusions
To ensure that the bride’s image is complete, original and stylish, stylists recommend adhering to a number of simple rules.
- The length affects the size of the mesh (the longer, the smaller the mesh).
- For brides with dark skin, a model that is not burdened with an abundance of jewelry is suitable.
- Girls with fair skin need to choose bright hats.
- If the veil has changed or lost its shape, use hairspray. Lightly spray the accessory and secure it to your hair.
What are the advantages of veils?
A wedding hat with a veil is small in size and does not harm the hairstyle, and the right accessory hides or softens facial features. The veil is a universal option that looks stylish with both a trouser suit and a cocktail dress.
Remember that an unusual decoration will not look advantageous and harmonious with every style. You need to choose a veil based on the theme of the celebration, the style of the dress and the shape of your face. Only if you follow all the recommendations will an exquisite hat become a profitable and successful addition to your image.
History of charm
If you need to add some mystery to your image, a veil will help you. The veil is one of the most stylish and delicate accessories in a woman's wardrobe.
A veil is a women's headdress made of the finest fabric, mesh or lace. The peculiarity of the veil is that it partially or completely hides the face. At the very beginning, the veil was created purely for practical reasons. It was designed to hide the face of its owner from prying eyes.
After the unusual headdress gained recognition in Europe, it was used to mark social status and belonging to certain high circles.
Also, special importance was attached to the color of the veil. Thus, white color indicated the innocence and purity of its owner, and black became a symbol of mourning and grief.
The popularity of veils among the fair sex rose and fell, but they still managed to reach the present day, having undergone great changes. And yet the main component of veils has remained unchanged. This is the thinnest veil, designed to add elegance and mystery to the image.
Unfortunately, these days the veil is not very common among the masses, so it is not always easy to find it in stores and salons. But there is always a way out. Making a veil with your own hands is not as difficult a task as it might seem at first glance.
Related article: Takori hat: knitting pattern with English rib with photos and videos
First of all, you should decide on the style of the veil. It depends, of course, on the event and place. Wedding or official reception, anniversary or party with friends - the choice of color and style of the veil will depend on this. An important point is who the accessory is being created for: a girl, a girl or a young woman, depending on this, you can create a brighter and more original or, on the contrary, an elegant and discreet veil. Another aspect that you should decide on before starting work is how to attach the veil. There are three most common options - on a hairpin, on a headband or on a ribbon.
It all depends on the volume
As you can see, there is nothing complicated in making hats; it is quite possible to do it yourself. Any of the above methods will help in this matter. The main criterion is the size of the head of the object for which the future product is intended. It could be:
- a hat on a bottle of champagne;
- children's;
- cowboy;
- for a doll;
- like Dunno;
- sombrero and many other types.
The decorative elements and materials used to make a hat mainly depend on availability, capabilities and preferences.
If you are not lazy, experiment and strive for the desired result, you will create beautiful, neat crafts, and you may even enjoy this activity.
Suitable stylistic design
Trying to move away from deep-rooted traditions, more and more brides are giving preference to original solutions when creating a wedding look. So, dresses are being replaced by suits or shortened sundresses, and veils are being replaced by elegant veils. What type of celebration would this look be suitable for?
- Fashionable vintage. For such a wedding, the optimal veil is made in the English style - a mesh of medium length (covers the eye line) is attached to the hat. A short veil decorated with stones will also look beneficial.
- Glamor. Distinctive features are gloss and luxury, a combination of delicate tones with an abundance of sparkles, silver or gold. To create a harmonious image, the hat is decorated with pearls, feathers, and beads.
- Romantic style. For light and dreamy natures, an elongated lace veil is suitable, which is attached to the headband, completely covering the face.
- Thematic options. For a gangster wedding, a lace short dress and a stylish hat instead of a veil are optimal. For a celebration that follows the plot of your favorite movie, veils are the optimal solution.