Many people who are getting married want to create the most beautiful holiday possible, so they try to decorate any element that is present at the celebration. Of course, the bride and groom do not ignore the wedding procession, which requires special attention in the selection of details.
Most often, rings are mounted on the hood of the car, indicating that newlyweds are driving there. But, if the newlyweds want more romance, then they choose images of hearts as a symbol of love between them. Making a heart for a car for a wedding with your own hands is quite simple, and there are several ways to do this.
How to make a heart on a car for a wedding with your own hands - 2 master classes
Many people who are getting married want to create the most beautiful holiday possible, so they try to decorate any element that is present at the celebration.
Of course, the bride and groom do not ignore the wedding procession, which requires special attention in the selection of details. Most often, rings are mounted on the hood of the car, indicating that newlyweds are driving there. But, if the newlyweds want more romance, then they choose images of hearts as a symbol of love between them. Making a heart for a car for a wedding with your own hands is quite simple, and there are several ways to do this.
Burning Heart
According to tradition, a wedding event often ends with some beautiful spectacle. For example, I release Chinese lanterns into the sky, or set off fireworks. The most original couples choose a fiery heart to conclude the holiday.
Burning hearts accompanied by romantic music will impress any guests and will definitely be remembered for a long time. And a photographer can capture a young couple in a fiery frame.
Such entertainment does not cost exorbitant amounts of money; the price starts from about one and a half thousand rubles. It all depends on what size the figure will be and how long it will burn. Before you order such a fire show, you should make sure that there is a safe area near the banquet hall or restaurant where the wedding will take place. Since to use a figure made of fire there are certain requirements for fire safety regulations.
What a fiery heart looks like is shown in the photo.
How to make a wedding heart from roses for a car with your own hands - instructions
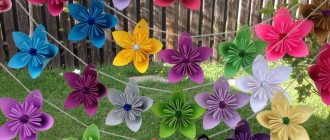
When newlyweds have a desire to make a wedding heart for a car, but there is no opportunity to spend a large amount of money on it, then they can make it themselves. The easiest way to decorate a wedding car with your own hands is a heart made of paper napkins. This material easily takes the desired shape and can be found in the most incredible colors. You can even create a colorful symbol of lovers.
Materials for creation:
The first step in creating a car decoration is to decide what size it will be. After this, a heart is drawn on the cardboard and cut out using a dummy knife. If you use a construction tool, the edges will be rougher and more uneven.
This must be taken into account in advance and the workpiece must be made 3–5 mm larger than required.
When using a non-specialized device, you need to ensure the accuracy of the cut.
The second stage will be cutting out a straight strip, which is 1-2 cm larger than the perimeter of the heart. The width of such a workpiece should be 50–60 mm. This segment will allow you to make a convex heart.
After the cardboard is cut, a straight line is drawn along its entire length. You must ensure that the mark is exactly in the center of the part. When the line is ready, it is gently pressed with scissors or the back of a kitchen knife, which is done to make bending the cardboard easier.
The strip must be bent along its entire length. After this, apply it to the heart, where it begins to move away from its perimeter, you need to make an incision. For greater accuracy, mark the bend with a pencil, after which it is cut. They do the same until the circuit is closed. The steeper the curves, the more often you will have to cut the cardboard, but it is important to maintain a 1-1.5 cm gap.
On the top curves of the heart it can be difficult to get the cut ends to fit properly, so you can make small triangular cuts to help the cardstock fold better.
After the strip is ready, double-sided tape is glued to the base along its edges. To do this, you will need several segments, the number of which depends on how round the sides of the heart are. After this, they begin to glue the sidewall, freeing one piece of tape from the protective tape. It is better to do the work from a sharp edge, then you can be sure that no mistake has occurred and one side will not be longer than the other.
Once the base is ready, you can start creating flowers. To do this, take 2-3 folded napkins, apply a circle to them and carefully outline it. You can do this immediately over the entire surface of the paper.
When the mugs are ready, you need to connect the napkins together. To do this, take a stapler and fasten the paper with 2 crossed paper clips. Then they do the same in other circles. The finished circles are cut along the contour using scissors, and then each piece of paper is folded towards the center, giving them light wavy edges.
The last stage of creating a decoration for the car is to paste the side walls. This must be done so that the cardboard base is not visible. This decoration is well suited for spring and summer holidays, but it is not recommended for use in late autumn and winter.
The paper does not tolerate high humidity or precipitation at all and will gradually become soggy, turning the decor into a colored mush.
Paper heart using origami technique
The origami technique has not lost its popularity for many years in a row. You probably made crafts using the origami technique as a child. These were a variety of frogs, swans and dogs. More patient children made complex crafts that aroused admiration from classmates and adults. Why not try it again? Try to make interesting and beautiful hearts. All you need are red sheets of paper.
Place a red piece of paper in front of you. Then you need to bend it diagonally. Now in front of you lies a square, which has a narrow stripe at the bottom. Turn the sheet back towards you again
Then carefully bend the strip at the bottom in half. Now turn the paper over again
Make a horizontal fold on the part of the workpiece that is on top. In this case, the fold should pass through the middle of the diagonals. The upper edge of the strip, which is located below, must be pulled towards the folded edge. And again we turn the future decoration over. Carefully unfold the “square” that is on top. As a result, you will get one fold horizontally and two diagonally. You can begin to form the upper “square”. You form a triangle. The lower corners of the triangle on the right and left need to be folded towards the top. Bend the part of the figure on the left towards the middle, and then repeat the same steps with the right part. You will see that you have a “house”. Take the workpiece and bend it in half vertically. Then turn the future heart over.
Fold the two corners that ended up from the bottom up towards the middle. Your workpiece will have an acute corner that will be at the bottom. Fold down the corner that is on top.
Fold the corners that remain on top. One of them should be on the left, and the second on the right. Tuck the corners into your pockets. So you have made a beautiful heart. The heart is suitable for decorating many things.
Master class on making 2 wedding hearts from flowers for a wedding car
When you have enough funds, or weather conditions do not allow you to use a paper option for decorating wedding cars, you can create hearts from artificial flowers. They look more impressive, especially if you pick up large buds.
First of all, hearts are drawn on a sheet of foam plastic with a marker, which can be either contoured or monolithic.
The base for creating hearts is quite heavy, and it is necessary to increase the number of fasteners.
Two hearts connected to each other are cut out along the drawn lines, after which a polyethylene foam backing is applied to them and the contours of the workpiece are drawn along it.
It is necessary to hide the foam, especially if it is colored, so glue is applied to it and a satin ribbon is applied. The same is done on all inner edges.
To prevent the fabric from warping, it can be secured with tailor's pins while the glue dries.
To do this, you need 1 pin per 10–15 cm. This method will greatly facilitate the work of hiding the foam. When the tape is completely dry, remove the pins and move on to connecting the flower buds and stems.
The stems must be cut so that their length matches the width of the foam. It will be even better if they are 2–3 mm shorter. Once the sticks are cut, they are attached to the flower heads of both shades.
One heart is made completely white, and the other is made blue. They begin to stick from the top edge; the inflorescences should be of such a size that they slightly overlap each other.
After we have finished working with the blue color, we begin to install the white buds.
Once all the decorations are placed on the base, you need to decide how the hearts will be attached to the machine. After we know exactly how the decor will stay on the car, clamps are carefully put on it, connecting the foam base and the rope (tape).
In this video - another version of a heart for a car with your own hands:
The final step to prevent damage to the car's paint due to stems poking through the foam or clamps is to apply a layer of polyethylene foam backing.
When the glue has dried, the decoration is ready and can be installed on a car, additionally decorated with tulle sheets.
Decorating a wedding car with symbols of marriage or love is quite popular among newlyweds. After all, the motorcade will often appear in photographs taken in the city, so it is important that it corresponds to the holiday. What colors would you choose for the hearts on your wedding car?
Source
Decorating a wedding car with ribbons and balloons
Decorating a wedding car with balloons and ribbons is not a tricky task, the main thing is to show your imagination. Usually, in order for the decor to look harmonious, experts recommend using no more than three colors.
The decoration can be simple, in the form of a garland located along the entire length of the car, but in this case you should take care that the balls and ribbons are well secured, otherwise they may get lost along the way.
Also, do not give up entire compositions in the form of hearts and flowers. For those who approach the celebration with humor, they may like balloon figures in the form of a bride and groom seated on the hood or roof of a car.
IMPORTANT TO KNOW: Wedding surprise from friends: unusual ideas and practical tips
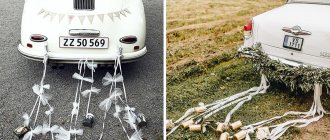
How to make a ribbon for a wedding car with your own hands - master class
Often newlyweds do not want to spend money on wedding decorations for their cars, because such decorations will only be needed once, and then they will gather dust.
Now this is no longer such a difficulty for newlyweds, because you can rent ribbon harnesses - wedding agencies have quite a wide choice. The only drawback is that this decoration has been at many weddings, and even if the appearance remains good, it certainly cannot be called unique.
Therefore, if the bride, groom or event organizers want to get an inexpensive but exclusive decoration for the wedding procession, then you can create it with your own hands. To make decorative elements from ribbons, you need to know what kind of car the newlyweds will drive. After all, the size of the hood and body varies from model to model.
If the exact parameters are not known, then you will have to make extra ribbons, and cut off the excess on the day of decoration.
First, you need to attach an elastic band to the main ribbon, which will hold the decoration on the hood, as in the photo.
To do this, apply 1–2 cm of stretch to the end of the fabric and pass it back and forth with a sewing machine several times.
On the decorative tape you need to mark the middle. To do this, fold it in half, and if possible, carefully draw it with a pen.
A decorative ribbon is placed on the fastener, which will run along the entire length of the decoration, and it is also sewn on.
When all the preparatory stages are ready, the waves begin to form.
To do this, retreat 3 cm from the edge and pinch the main fabric. It should rise above the surface by about 1–2 cm. After this, lay the top towards you and smooth the decorative tape on top. Now you can sew.
To form the next wave, it is necessary that the length from the top of the previous one to the bottom of the next one be the same length as the height of the wave. Then the whole tape will turn out uniform and beautiful.
Continue folding and sewing until you reach the middle of the decorative tape. There you need to change the folding order and bend the waves away from you.
After this, they continue to sew further until 3-4 cm remains until the end of the tape, into which it is necessary to attach an elastic band and fasten the entire structure.
It is important that there is the correct indentation in the middle. It must be doubled so that there is one regular piece of empty space on each side up to the mark.
When the entire ribbon is stitched, the last elastic band is tied in the middle, which will secure the decoration to the radiator. Sometimes bows, flowers or figurines are installed in this place, for which more powerful fasteners are needed, made of silk ties 2 cm wide.
Once everything is stitched and tied, the tape can be installed on the hood. It will diverge from the radiator grill towards the side mirrors.
If you want to make the ribbon multi-colored, then the same actions are performed with pieces of fabric pre-sewn together.
Manufacturing stages
First, you need to make a heart-shaped base from wire 3.5 meters long. Connect the ends of the wire and secure with transparent tape. Try to make the frame even, otherwise you will end up with a crooked decoration.
Editor's choice: Beaded wedding jewelry. Options, tips, photos.
Then you should inflate the balloons and tie their tails together. Then inflate two more balloons and tie them together. Now twist these two pairs together. You should end up with clusters of four balls. To make a heart, you will need to make 40 of these clusters.
Once the balloons are inflated and secured, you need to start stringing them onto the heart shape base. All this is done until a beautiful fiery heart is obtained.
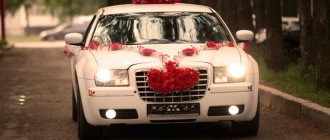
Decoration of the hood of the newlyweds' car
The hood of the newlyweds' car is usually covered with organza or tulle and/or decorated with various flowers and bows. This article provides information on how to make a composition in the form of two hearts.
Required material:
2. Their thickness should be 8 centimeters. Using the first template, we cut out two more shapes from hearts. All three combinations of cardboard must be placed on top of each other and rewound with tape and a satin ribbon on top of it. Moreover, each turn of the latter must be secured with glue so that the edges do not diverge and the cardboard is not visible.
3. Such a composition must also be secured with tape. This will require four pieces of two meters each. Their edges must be scorched with matches or a lighter.
KNOWLEDGE BASE: Decoupage of a champagne bottle for a wedding
4. From ribbons of two colors you need to make so many roses or bows so that they cover the entire surface of the hearts. It is expected that small and large will differ in color.
5. It’s not difficult to make flowers to decorate the composition. To do this, you need to take a meter-long piece of tape and also scorch the edges with fire. Insert a thread into the needle that matches the color of the ribbon.
6. Place a running stitch along one long edge of the satin, and then pull both ends of the thread. The ribbon transforms into a rose. The thread must be tied, but not cut off. It will serve as an attachment to the hearts. Also, each flower for insurance must be planted on glue.
7. The decoration is ready, all that remains is to attach it to the hood.
Interesting ideas
How and with what to decorate a wedding car is only a matter of your imagination and your skill. At the same time, it is not at all necessary to spend a lot of money on decor. The car of the bride and groom looks very cute and attractive, decorated with playful sunflowers framed by green branches and a regular floral mesh. The hood is impressive, on which two hearts and the inscription “LOVE” are laid out from white daisies and red gerberas. And the huge rose made of tulle and organza on the radiator of the wedding car will certainly make all the guests gasp and passers-by look around.
For a themed wedding, you can decorate cars and buses with any items that correspond to your intended idea, these could be:
And one last piece of advice: don’t forget that the car will also be in the frame in many photos, so don’t neglect its decoration. If you want everything to be flawless and beautiful, then spare no time and effort on high-quality car decoration. If you feel that you can’t cope, don’t skimp and turn to specialists.
We also read Presidium at a wedding for newlyweds - how to decorate it in an original and tasteful way
General Tips
When choosing decor, it is important to remember a few general rules regarding wedding cars:
- The bride and groom's car should preferably be white or black.
- Guest cars can be of any color, but in the column it is better to have white, black and silver models first, followed by brighter shades.
- It is better to use jewelry of no more than two or three colors; a more colorful range will look tacky and tasteless.
- All elements must not obscure the driver's view.
- If cars are rented, then you need to clarify whether they can be decorated and with what. It is advisable not to choose too adhesive decor so as not to leave marks.
- The style of the entire tuple must be the same.
Photo of a simple and beautiful DIY wedding car decoration
What can you use for decoration to simply and tastefully decorate a car for a wedding with your own hands:
- ribbons made of any material;
- fabrics: chiffon, tulle, organza;
- flowers: fresh or artificial;
- Balloons;
- figurines and figures, plush toys;
- paper decorations: pompoms, posters, appliques;
- comic numbers with inscriptions and drawings.
Decorating a car with your own hands for a wedding is a significant saving on the budget of young people, especially if you rent a car. Plus - this is an opportunity to show imagination and creativity, achieving exactly the result you want.
Decorations made of light fabric and ribbon
The use of lightweight fabrics in car decoration is also quite popular. Typically, tulle or other weightless and translucent materials are used for decoration.
Bows look the most impressive, but when choosing such decoration you should take into account their size. For example, small jewelry looks best in a few pieces. But massive and voluminous bows prefer solitude.
Often fabrics also play the role of voluminous ribbons; they are decorated with ribbons of contrasting colors, which makes the decoration very unusual and original.
IMPORTANT TO KNOW: A wedding preparation plan that will help save nerves and time
Decorations for guests' cars
Guests' cars are usually decorated more modestly. To do this, you also need to stock up on satin ribbon.
Each car can be decorated with three ribbons. Their length should be with a margin, since the sizes of the hood are different.
Prepare three pieces two meters long, and then tie an elastic band to the ends. It will serve as a fastener. You can choose completely different colors, or in the same color scheme.
If you have time and desire, you can also make decorations for pens using the method described above.
As you can see, making decorations from ribbons for wedding cars is not so difficult, especially if you have helpers. You just need to have a little free time and desire.
What will you need?
To make a heart from napkins, in addition to the material, you will need some other things. This:
- scissors;
- pencil;
- glue stick, PVA glue or hot glue gun;
- stapler;
- wire;
- colored insulating or special decorative tape;
- satin ribbon;
- colored napkins, paper, cardboard.
To make a heart, paper napkins of a beautiful shade are suitable. All these accessories play an important role in the process of making a decorative heart. But for any one method all items are not needed. For example, to make a three-dimensional heart from napkins, you do not need to use a glue gun or a stapler.
Every girl will like such a gift as a decorative heart. There are many options. Choose multi-colored napkins, select the desired texture, density, pattern, design. Buy colored cardboard. Make a heart of any size. Such variability will satisfy the needs of the most capricious birthday boy.
The heart can be made of any size and design.
Let's consider the methods of making decorative hearts, generously provided to us by specialists in the field of design craftsmanship.
How to decorate a car for a wedding with ribbons with your own hands?
A master class on wedding car decoration will help everyone who wants to do it themselves, guided by their own taste, the general theme of the wedding, and its color scheme.
Photo of ribbon for a car for a DIY wedding
How many meters of tape do you need for a wedding car??
In order to calculate the footage that is needed, the length of the car hood should be multiplied by 1.5-2, depending on the mounting method. Then one end of the tape is folded in half, and an elastic band is sewn to it. When you put the tape on the hood, the elastic is hidden inside, and the other end of the tape is tucked under
and sewn to the other end of the elastic. As a result, everyone sees only the feed. Everything is very simple.
You can decorate your car like this:
Today, newlyweds are offered a wide variety of wedding decorative elements and attributes, many of which are made carelessly and inaccurately, but their prices are “off the charts.”
Many people recklessly buy them, without even thinking that all these accessories for the celebration can be created with their own hands.
Long ribbons of various colors are the most popular detail for decorating wedding cars. To laconicly decorate a car, simply attach several beautiful ribbons to its hood.
Long ribbons of various colors for a wedding car
Still, it’s better to make your own ribbons more original and unusual. For example, fix them not parallel to each other, but arrange them so that they have the shape of a rhombus, square, triangle
. And to make the decoration from them even more unusual, it is decorated with flowers or bows. To make the picture look organic, flowers are attached to ribbons in advance, so that the finished decoration can then be attached to the car.
To sew a ribbon on a wedding car,
you will need very little:
To create such a ribbon for a wedding car, you need to buy garlands made of artificial
flowers and a few of the same roses. This decor has a V-shape, with the length of each strip being 1.7 m. First, four strips of tulle are measured (length 3.5 m, width 20 cm). The stripes are sewn one by one in the center, making folds. Each fold is ironed. The two strips are sewn together. The result is a ribbon 3.4 meters long with folds. Then a wide satin ribbon 3.8 m long is placed centrally along the folded ribbon and stitched three times: along the edges and in the center. To make it more convenient to attach the tapes to the hood, leave 20 cm of tape at the edges. The strip is folded in half, a corner is formed and stitched.
Photo of ribbon sewn onto a wedding car
Two 40 cm long ribbons are sewn onto the corner of the resulting sketch - they will then be tied to the car grille.
They start making decorations. Fold a green ribbon 3.4 m long in half. The garland with roses is divided into an even number of particles. They are strung on a green ribbon and sewn to tulle. The same is repeated with the second garland
- with daisies. It is divided into equal particles and, sewn to tulle, they fill the intervals between the roses in the first garland.
When sewing flowers, they are raised so that the inflorescences cover the gaps. If desired, the decorations are decorated with roses, which will close the gaps between the flowers sewn to the tulle.
In this form, the tape is already ready for use. For greater effect, a ready-made flower arrangement, which was purchased along with the garlands, is added to the center. Having straightened all the flowers, they are sewn onto the corner of the V-shaped ribbon with flowers.
Manufacturing stages
First, you need to make a heart-shaped base from wire 3.5 meters long. Connect the ends of the wire and secure with transparent tape. Try to make the frame even, otherwise you will end up with a crooked decoration.
Editor's choice: The best wedding themes, options and ideas with photos
Then you should inflate the balloons and tie their tails together. Then inflate two more balloons and tie them together. Now twist these two pairs together. You should end up with clusters of four balls. To make a heart, you will need to make 40 of these clusters.
Once the balloons are inflated and secured, you need to start stringing them onto the heart shape base. All this is done until a beautiful fiery heart is obtained.
Wedding procession design ideas
If you are going to organize a car parade during the celebration, then you will have to register each of the cars participating in it.
But first, find out how many people will come to the wedding in their own transport. This way you can at least roughly estimate how much decor you will need. You can do it easier and ask guests to register their cars themselves. Although in this case you cannot be sure that you will be able to maintain the overall style of the celebration. Therefore, it is best to make simple decorations and distribute them to guests in the morning. Source