/Accessories and decor/Decoration/
If you want to paint wine glasses for yourself or as a gift, for a wedding or a theme party, rest assured that you will get great pleasure from creativity - because it is done easily, quickly and inexpensively.
Before you begin the step-by-step master class on painting glasses with your own hands, you need to decide on the future design of your wine glasses, so we invite you to get inspired and get original ideas for “glass” decor in the next chapter.
Painting glasses and wine glasses can vary in drawing technique, degree of complexity, use of materials and, of course, subject matter.
What is a stencil for?
People involved in handicrafts know that a stencil is simply necessary for decorating various surfaces in their home. With their help, you can create an amazing atmosphere in your apartment, demonstrate your creative abilities to the maximum, create unprecedented designs and patterns by cutting out figures from paper. At the same time, it is not at all necessary to have certain drawing skills. You can buy ready-made paper stencils for decorating glasses in stores, but the easiest way is to make them yourself. Once cut, they can be applied to surfaces such as glass, wood, ceramics or thick fabric.
Preparation
First of all, you need to choose a drawing. Just find similar stencils on the Internet and print them. For people who are just trying themselves in this field of art and decor, something simpler will do: rings, patterns, lines or flowers.
Stencils are made not only from paper, but also from parchment. Therefore, the next stage is the choice of material. To reuse the same design over and over again, you can use plastic or laminated paper so that it can be easily washed after finishing the work. To transfer the image you will need a pen and carbon paper.
Next, cut out the design using scissors. Before you start cutting, you need to secure the edges or thin parts of the stencil so that it does not tear while transferring the decor to the surface. After this, you need to place the design over the place of application and apply the image with careful movements of a brush or sponge with paint. Once the job is completed, you need to remove the stencil before the paint dries.
Related article: How and with what to decorate walls with your own hands: 7 decor options
Holiday cutting patterns
Hello, friends!
How to decorate a wedding celebration and bring a special “zest” to such an important event in life, doing it gracefully and without unnecessary financial costs, calling only paper, cardboard and your own imagination to help? Our conversation today will focus on this and more.
The secret, in fact, is simple, and it lies in the presence of cutting patterns. This is truly a very affordable tool that allows you to create delightful, sophisticated and fashionable holiday accessories: cards, bonbonnieres, all kinds of decorations, etc...
Of course, cutting out paper requires some effort and effort. But lovers of this type of creativity always find true pleasure in the process itself. It is not surprising that the number of conquered Kirigami is constantly growing.
I think it’s no longer a secret to anyone that the cutting patterns used to create the wedding accessories presented in the photo above belong to the hand of Olga Kachurovskaya. The style is well recognizable. 
Well, if you are getting acquainted with Olga’s works for the first time, take a look at the “Paper Cutting” section. There are many master classes prepared by her and, of course, templates for cutting.
Olga professionally produces cards, invitations, and all kinds of handmade gifts using scrapbooking and paper cutting techniques. The portfolio can be viewed in her personal Scrap Workshop.
The new collection of templates was developed by Olya not only to replenish her own assortment, but also to help everyone who wants to create original holiday accessories with their own hands. And I will now be happy to demonstrate what possibilities open up when using new holiday cutting patterns.
Wedding set
First of all, I would like to draw your attention to the book of wishes.
The tradition of inviting guests to fill out such a book with their own hands is gaining increasing popularity. For a wedding celebration, a book of wishes will become a stylish decoration, and the newlyweds will have a wonderful memory for many years.
The set contains a template for making a carved motif for the cover (2 options). A step-by-step master class will reveal all the nuances of making a book of wishes.
In addition, templates for book pages with design and text have been prepared, which can be immediately printed and cut out or adjusted to your liking.
By the way, a book of wishes does not necessarily have to be used only at weddings. It may well be useful, for example, for celebrating an anniversary in an official or semi-official format.
The following accessories, absolutely necessary for wedding decoration, are made in the same romantic style:
- table numbers;
- and place cards.
An additional decorative element will help decorate napkins or wedding invitations made in the form of scrolls.
Guests will certainly be pleased with small gifts in charming bonbonnieres with a carved pattern.
Invitation with initials
And this is an excellent addition to the wedding set - an invitation with a carved pattern in the same style and with the carved initials of the newlyweds. It looks very impressive, you must agree.
Of course, preparing templates with initials for all occasions in advance is an unrealistic task. We are ready to make templates to order (enter the required initials). In this case, you can choose one of two patterns and one of two font options.
Again, it is worth noting that the options for using a template with initials are by no means limited to wedding invitations. The product can serve as a wedding card, which guests will present to the newlyweds in addition to the main gift, and as a postcard on the occasion of some memorable date that is dear to the hearts of spouses or couples in love.
Set of greeting cards and invitations
This set of templates is an almost universal assistant for those who like to congratulate (or invite to a holiday) in a non-trivial and creative way. Two types of invitations and four types of cards are a good resource for variety. Templates will come in handy in many cases, and they will last a long time.
A small “defile” to take a closer look at the cards and invitations from this set.
A reasonable question arises: where are the templates and sets themselves? And they are available in the Kartonkino store. Come in and purchase ready-made sets or order personalized invitations. We will be happy to help you prepare for the upcoming holidays!
WEDDING CUT-OUT TEMPLATES
See you again!
Yours Inna Pyshkina and the KARTONKINO team.
kartonkino.ru
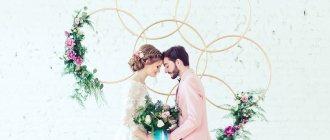
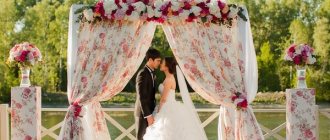
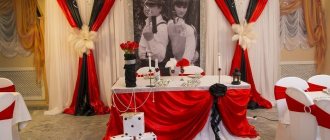
Wedding decorations
Now you can find a huge number of stencils and lessons on cutting out shapes from paper on the Internet. Moreover, they are divided by topic. The choice is so huge that you can choose the best option for a specific wedding style. With such sketches you can decorate bottles, glasses, candlesticks and room walls.
If you are tired of banal bows or hearts, you can create your own paper stencil with images of flowers, patterns, stars or romantic couples. You can cut out any shapes from paper. If you don’t want to fantasize a lot or lack artistic talent, you can simply download the picture you like from the Internet and act according to the instructions described above.
Available means, such as light satin fabrics, candles, lace, are attached not only to glasses, but also to the decoration of the wedding arch, walls, and ceiling. Garlands of flowers, cut out using paper stencils, will add romance to the overall decor and will be remembered for a lifetime. They can be made voluminous or decorated with rhinestones, sparkles, and lace for greater realism.
Master class No. 1: Confetti style glasses
Wine glasses decorated with small peas look very festive and can be either elegant, as in the photo below, or cheerful, multi-colored.
The circles are associated with champagne bubbles or bright confetti. Difficulty level: very easy.
What you will need: acrylic or contour paints for glass and ceramics; regular nail polish will also work (but acrylic paints are much more durable) or a special marker for painting dishes.
To degrease the wine glasses, prepare nail polish remover, degreaser or alcohol; for drawing - cotton swabs, a pencil with an eraser at the end or a small hard synthetic brush, and to correct the drawing - cotton pads and swabs.
Painting technique:
- Wash and degrease the glass thoroughly with alcohol or another product using cotton pads or a napkin.
- Now you can start drawing circles. Squeeze a little paint into a small container or just onto foil (paper, file).
Turn the glass over and start placing dots from top to bottom, maintaining the same interval between them.
You can draw points as in this master class, that is, starting from large to small, gradually increasing the distance between them.
Otherwise, the dots can be the same size, different in color, and they can also form a pattern or pattern (point to point or pique technique), and also slightly overlap each other.
Advice:
- It is convenient to place large dots with a pencil eraser, and small ones with a brush or a cotton swab with a pointed end, as in the photo below (scroll through).
- It is better to maintain a distance of about 2 cm from the edge of the glass to the drawing, especially if the paint is toxic.
- If you draw with contours, then first you need to practice placing small, medium and large dots on paper at the same distance from each other and with the same degree of pressure on the tube.
- Now you need to let the paint dry. Drying methods largely depend on the paint; usually the manufacturer specifies drying time and firing instructions.
- As a rule, painting with acrylic paints or contours requires firing if you want to use the glasses frequently and wash them in the dishwasher. To do this, you need to put the glasses in the oven at a temperature of 150-170 degrees for 30 minutes, and then turn off the oven and, without removing the glasses from it, let them cool naturally;
- The markers dry for 24 hours and do not need to be fired;
- Nail polish dries quickly, but the design will not last long, so this option is not suitable for decorating gift or wedding glasses that you want to keep as a keepsake. But you can’t find better paint for themed parties.
Here are other ideas for painting glasses with multi-colored polka dots that will decorate any table setting at a fun party (scroll the photo to the right).
Gold, silver, and white polka dots are more suitable for decorating wedding glasses.
By the way, circles can be not only drawn, but also glued. You can buy vinyl self-adhesive paper of the desired color and cut out circles from it using a hole punch or special scissors, and then carefully glue them onto the glass. The photo below shows glasses decorated in this way.
Master class No. 2: Artistic painting of glasses
In this master class we will turn glasses into flowers, because its stem is so similar to a stem, and its bowl is like a bud.
Difficulty: medium.
What you will need: any degreaser, cotton pads and cotton swabs for degreasing and pattern correction. And for painting, prepare synthetic art brushes of different sizes, a plastic plate or palette for mixing paints, as well as acrylic paints for glass and ceramics. If you wish, you can complement the drawing with contour and stained glass paints, markers and glitter.
Drawing technique:
- Degrease the surface;
- Mix paints on a plate or palette, achieving the desired shades. In order to make the color pastel and delicate, colored paint is mixed with white;
- Now we need to draw the stamens: we put dots with a narrow small brush or a cotton swab with a pointed end. Pollen color can be black, yellow or orange. In our master class, we use yellow to paint the stamens of the lilac Italian aster and black for the sunflowers.
Next, drawing the flower will be layered, so you need to wait until the drawn stamens dry. You can dry them naturally, leaving them for 2 hours, or bake them in the oven at 150-170 degrees for 15 minutes.
- Once the drawn pollen has dried, you need to draw the petals as shown in the photo below. If desired, draw details - veins and color nuances. Then you need to let the paint dry (see point 3).
- The last step is to paint the peduncle and stem in green and bake our glass flower again, but now for 30 minutes - and then the paint will not “peel off” the glass for a very long time.
- Well, that's all, the decor of wedding, gift or holiday glasses is complete.
- In the photo below you can find other interesting painting ideas with floral and plant motifs (scroll through).
- And here are examples of painting on glass with peacock feathers.
- The theme of flora and fauna is also very popular.
- Glasses for festive serving of themed parties can be decorated brightly and funny.
Glasses as a gift or for a wedding can be additionally decorated with rhinestones, feathers, pearls, sparkles, ribbons and other decor.
Other methods and secrets of glass painting: how to dry a glass with a painted stem and use a stencil or sketch
- If you want to completely paint the base of the wine glass, that is, paint its bottom as well, then you need to dry it hanging or carefully placing it on a homemade structure made of paper and four buttons as in the photo below.
- It is easier to do glass painting using a background sketch, drawn with your own hands or printed in the required size on a printer. You can also use a drawing on a napkin. The paper with the image must be placed on the bottom of the wine glass, aligned and glued with tape as shown in the photo.
Stencils will also help you paint on glass with your own hands. To do this you need:
- Draw them yourself or print a picture from the Internet and then cut them out with a stationery knife;
- Buy ready-made stencils at a craft store that are very easy to stick and peel off;
- You can draw stripes, geometric abstractions and simple designs using the stencil principle using regular or masking tape;
- You can get the effect of an openwork pattern if you use lace as a stencil.
Tip: you can apply inscriptions or images through a stencil with a special matting paint on glass with the effect of frost or frost, which is sold in art stores or online stores. An example of such decor is in the photo below.
Master class No. 3: Stained glass painting
Stained glass painting on glass is a slightly more complex painting technique, since stained glass paints, unlike acrylic paints, are much more fluid and therefore difficult to apply.
In addition, they are less wear-resistant, and mixing colors will be very difficult, since the paints dry very quickly on the palette.
But they are more transparent and unusual, and in combination with stained glass contours you can create the effect of real stained glass.
Advice: this type of paint comes in different varieties; for painting glasses, it is better to use water-based baked paints rather than toxic solvents.
Please also pay attention to our site guide in the section Kitchen design and decor - site guide.
Source: https://kitchendecorium.ru/accessories-decor/dekorirovanie/rospis-bokalov-svoimi-rukami.html
Flowers from templates
Flowers are considered the best decoration for any holiday. They can also be decorated with paper crafts. To do this, you will need medium-weight colored paper, a stencil, scissors, a pencil, carbon paper and a stapler. After the sketch is ready, you need to fasten the sheets with staples, combine them with fresh flowers into a garland, and then attach the resulting products to the wall or lay them out on the table. You can also use simple stencils with beautiful fonts to create wall decorations in the form of posters, garlands or flags. No one will forget such an original design.
Flower stencils for decoration - the best selection
Flower stencils for decoration - the best selection:
Flower stencil for decoration - the best selection
Stencil of flowers for decoration - the best selection Stencil of flowers for decoration - the best selection Stencil of flowers for decoration - the best selection Stencil of flowers for decoration - the best selection Stencil of flowers for decoration - the best selection Stencil of flowers for decoration - the best selection Stencil of flowers for decoration - the best selection Stencil flowers for decoration - the best selection Stencil of flowers for decoration - the best selection
Glass decoration
Don’t forget about the glasses, which will be in front of the eyes of not only the newlyweds, but also all the other guests. To decorate cutlery, you will need a minimum of materials.
Article on the topic: Decoupage using photographs (MK with photos)
To decorate glasses with stencils, you need:
- take masking tape, which will become a stencil or basis for the drawing;
- glue it onto the glass;
- using rhinestones, lace and sparkles, which are attached using universal glue, repeat the stencil design;
- wait until everything is dry and remove the tape.
The result is an elegant glass that is suitable for a wedding in the style of classics, romance or Provence.
For decoration, you can use various images: a regular simple design, flowers, newlyweds’ rings or something else.
Glasses can be decorated not only with stencils, but also with decoupage, painting or appliqué. It all depends on taste and personal preference.
Wedding glasses in the “royal” style - a master class on imitation mother-of-pearl
08.06.2016
This master class will be devoted to decorating glasses. A wedding theme is very fertile ground for flights of fancy. I will tell you how you can make glasses for a stylized “royal” wedding, with an abundance of gold, diamonds and mother-of-pearl.
- In order to make wedding glasses with imitation mother of pearl, we will need the following materials:
- • two glass glasses;
- • nail polish remover or white spirit;
- • brush made from squirrel hair;
- • glossy acrylic varnish “Tair”;
- • metallic Gold spray paint;
- • “Acrylic-Art” paint: Gas Carbon Black, Zinc White, Orange-Red;
- • paint “Decolor Decorative” Gold Aztec;
- • contour for glass Gold;
- • modeling gels “Chameleon”;
- • adhesive-based stencil, palette knife, Moment Crystal glue, masking tape;
- • decorative jewelry with rhinestones; elastic lace elements, pre-cast in molds, cameo, contour stickers;
- • construction glossy varnish for finishing coating.
Performing a master class
Let's start decorating the glass-cup. First of all, degrease the surface with nail polish remover.
We mark the working surface with masking tape, and place the bottom and top of the glass in bags, which we also secure with masking tape. This is the design we came up with.
We take gold spray paint in a can and paint the entire unprotected surface, creating, so to speak, a gold frame for a glass. Don't forget that the paint has a strong smell. It’s better to do this somewhere on the balcony, having first laid something on the floor, so that later your balcony doesn’t become golden either).
We remove all of our protective structures made of tape and bags.
Let's start decorating. For decoration, I chose ordinary children's bracelets with rhinestones and an elastic band.
Gently coat the surface of the glass along the edge of the paint layer with a thin stream.
We put the bracelet on the glass and carefully “plant” it on the glue. We do the same with the bottom of the glass.
I wanted the glass to have a thin gold openwork edging. To do this, I took contour stickers and pasted them strictly at the place where the bracelets were glued to the glass. I didn’t glue them earlier, before gluing the bracelets, because the Moment Crystal glue would definitely get on the stickers and corrode them. That's why I did it in that order.
At the bottom of the glass, where the surface is more convex and difficult for stickers to stick evenly, I simply trimmed them a little, trying not to disrupt the integrity of the design.
- We fix the resulting contour edging with two layers of construction varnish, trying not to go beyond the boundaries of the picture and avoiding smudges from the varnish.
- To decorate the stem of the glass, I took elastic lace elements and painted them with gold spray paint.
- We coat the back side of the elements with Moment Crystal glue and carefully apply it to the base of the stem of the glass.
- To give integrity to the openwork weaving, to make it “without breaks,” I glued small rhinestones in gold frames with glue in those places where the elements did not connect.
- In order to “weight” the stem of the glass in relation to the top, I decided to paint the bottom of the stem with Decolor Decorative Aztec Gold paint, and thereby create an imitation of a cast gold plate at the bottom of the stem.
We fix the result with several layers of construction varnish with intermediate drying of each layer. Mandatory construction material, otherwise the glass will then stick to the surface of the table, because artistic varnishes stick even after drying.
Imitation mother of pearl
Let's start simulating mother of pearl. To do this, we need three types of Chameleon modeling gel: Pink, Purple and Blue.
Imitation can be done in a very easy way or in a more complex and time-consuming way. I'll tell you both ways.
Method No. 1 - Applying gels through a stencil
.
A simple way to imitate mother-of-pearl inlay. We apply a stencil on an adhesive base to the gilded surface of the glass and with a palette knife begin to apply modeling gels to the stencil, alternating colors, i.e. one stroke of a palette knife with one color, the next with another, and so on, to create heterogeneity of color transitions, like real mother-of-pearl.
Immediately remove the stencil and leave the resulting pearlescent pattern to dry for a day. It turns out this kind of mother-of-pearl inlay.
I wanted to make the mother-of-pearl plates of the design appear as if they were framed in gold. To do this, take a golden outline on the glass and carefully, slowly, trace each plate of the design.
- This is how it turns out in the end.
- Method No. 2 - Imitation of mother-of-pearl mosaic.
Glasses have a complex convex surface, and I recommend that you first practice performing mother-of-pearl mosaics on something flat, for example, a box. But the sequence of actions will be the same.
Let’s take some plastic or glass flat surface and with a palette knife we begin to apply “Chameleon” modeling gels on it in a chaotic manner, changing colors, i.e. stroke one color, then another, and so on.
Painting and applique
You can combine several methods of decoration at once, use not only sketches cut out of paper, but also paints and other decorative devices.
To create an application you need:
- degrease glasses with alcohol;
- attach a sketch or stencil using masking tape or paper tape;
- paint glasses with oil-based glass paints;
- after drying, decorate the product with stones, twigs of dried plants, fabric or other decorative elements;
- wait until everything is dry and remove the stencil.
Almost all wedding symbols, be it rings, doves, hearts, can be created using paper, sketches and available materials. The main thing is to decide on the theme of the holiday in advance and use your imagination.
After the celebration, glasses and other decorative items can be stored as a keepsake or used at other events.
DIY wedding glasses: decoupage and glass painting
There is joy in waiting for a wonderful event, which is a wedding in every person’s life. You always want everything to be at the highest level: from the outfits of the bride and groom to the smallest details.
If you have time before the wedding and you have a developed creative imagination, then why not start decorating glasses.
You can make original masterpieces from ordinary, even glass, wine glasses. Only you will have these. And all because you will make them with your own hands!
There are several techniques for decorating glasses. This can be either applique, decoupage, or painting with stained glass and acrylic paints.
Applique and decoupage of wedding glasses
It will require all kinds of decorative elements: hot-melt rhinestones, beads, small flowers, satin ribbons, ready-made boutonnieres, lace. The most common way to decorate glasses is a small bouquet, which is selected to match the bride’s outfit.
Glasses decorated with boutonniere and tulle
This boutonniere is attached to the glass where the container transitions into the stem. To do this, use silicone glue, glass glue or even tape.
We cut off the stems as much as possible, and attach the remaining ones with ribbons. Thin satin ribbons can be wrapped around the leg and left hanging, stringing beads onto the ends.
The flower itself is straightened so that it fits around the glass, and for this the lower petals are fixed with glue.
Glasses with pink roses and decorative mesh
If desired, you can add a string of pearl beads to the composition, which is secured at the place where the flower is attached. The ends of this thread can be brought to the edge of the glass and secured with glue. If you need to hide the attachment point, rhinestones are placed on top. They even decorate glasses with fresh flowers!
Glasses decorated with fresh roses
Original glasses are obtained if the outer part of the bottom of the glass is placed in a flower.
Glass “Rose”
To do this, select ready-made roses from a florist shop. They can be very diverse in color, size and shape. You can choose white and blue flowers, respectively intended for the bride and groom.
White and blue roses
Now we disassemble the finished flower into petals. We lay them around the stem of the glass, starting with the inner ones, and fix the petals with glue. We wrap a thin satin (tulle) ribbon or a thread of beads around the base of the petals. They also need to be fixed with glue, after which the ends are brought out at your discretion: either hanging down, or fixed to the walls or edge of the glass.
Glasses decorated with flowers made of satin ribbons and rhinestones
Decoupage of glasses can be done with lace, rhinestones, and beads. A glass decorated with pearls will look beautiful and sophisticated. They are distributed and fixed evenly over the entire outer surface. The same is done with ordinary rhinestones. Such a glass will sparkle not only from splashes of champagne, but also from glare.
Glass and rhinestones: simple and elegant!
Another way. A stencil of masking tape is attached to the surface. This could be a heart or wedding rings. Glue is applied around the stencil, and glitter or tiny beads are thickly sprinkled on top. After the glue has dried, the stencil is removed and the excess glitter is lightly brushed off. This will create a brilliant pattern on the glass.
Lace on glasses
Decoration of wedding glasses in the style of the bride and groom
Lace is also used to decorate glasses. Patterns are cut out of it and used to wrap glasses. The lace is also fixed with glue. This can be either a strip of openwork fabric glued in the center of the glass (try not to glue the lace in the place where you will need to touch your lips). Or maybe an openwork skirt, reminiscent of a bride's dress.
How to decorate wedding glasses with your own hands? Very simple!
Using black and white lace, you can make the glasses look like the bride and groom themselves. He is in a black tailcoat and with a bow tie, she is in a snow-white outfit with a veil. Glasses simply decorated with small flowers look beautiful. You can always choose a unique combination of small elements: beads, flowers and rhinestones.
DIY glass painting on wedding glasses
The use of this technique can be safely combined with appliqué. To begin with, decorate the glasses at your own discretion, and then add ribbons, beads and other accessories to the overall design.
Glass painting, decoupage and applique on one masterpiece
To implement the glass painting technique you will need: paint for glass painting, outline, paste, spatula, napkin, palette knife, beads, ribbons, pearlescent paste, hot-melt rhinestones.
Glass painting
The first step is to degrease the surface of the glasses. Use glass cleaner or alcohol for this. Draw a sketch of a heart on a thin paper napkin. We apply a napkin to the glass and draw an outline around the heart. Then the napkin is removed.
You can attach a sketch in the form of the same heart inside the glass, and then draw on it. To make the drawing accurate, it is better to place the glass on a small pad and rest your hand on the table surface, then it will not tremble.
After the outline has dried (about 6 hours), the resulting outline is painted over with stained glass paints. You can leave only one outline, decorating it with rhinestones, golden sand for manicure, and the entire glass with ribbons and beads.
Don't forget to cover the resulting drawing with a palette knife. This will make it resistant to water. Thus, it is possible not only to decorate a glass with hearts,
Seventh heaven for newlyweds
Homemade invitations
Materials:
- sheets of paper and cardboard;
- lace;
- satin ribbons;
- scissors;
- glue;
- hole puncher;
- lighter.
First you need to decide what size the invitations will be and print the text on paper. Any color can be used. Usually white or pastel colors are used. But to make colorful invitations, you can use bright cardboard or ribbons. To cut text from paper, it is better to use special curly scissors. Use a hole punch to make a hole to attach the bow.
Related article: Stool decoupage - the correct technique
The envelope can also be made directly from paper. To do this, cut out a shape using the measured template, taking into account that the side edges need to be folded, they should protrude. The next step is to decorate the blank for the envelope with lace ribbons. To do this, you need to secure it with glue on the inside of the lace. Then fold the edges and attach them to the back to form an envelope. You need to make a hole in the top of the envelope, insert the invitation and secure it with a ribbon bow.
The final touch is to make a large bow in the center of the envelope. To do this, you need to bend two pieces of wide tape, secure them with a thin tape and process the edges with a lighter, and then glue the resulting product to the envelope.