Birthday photo zone
Gone are those naive, funny and beloved Soviet times when photographs were taken against the backdrop of carpets hanging on the wall. Moreover, the carpet, and not the people, was the main figure in this case, so to speak, the source of pride.
I wonder why no one thought of photographing the carpet work of art itself without people?
Judging by some photos taken in the 90s, the happy “heads” at the bottom of the pictures were clearly superfluous.
Although even at that time they were trying to build something like a photo zone out of pieces of furniture, although they had no idea that it would be called that. They often called it a beautiful background.
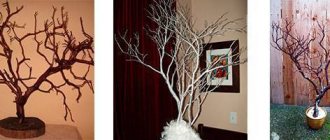
DIY foil photo zone
Creating a sustainable structure is important, but what is even more important is the design. The most available materials are used. For example, foil is a cheap and bright material. It is very suitable for decorating a New Year's area. The reflections from its surface will create a festive mood and decorate the photo. You can use New Year's rain as decoration.
Photo zone for children
Children's parties are always fun for kids and exciting and troublesome for parents. Persuading children, especially little restless ones, to stand in a certain place and take an interesting pose is sometimes a very difficult task.
Therefore, the photo zone is made colorful, attracting the attention of children. In fact, it should look like a play area, then the child will want to stay and take pictures there longer, which will allow mom and dad to “click” their beloved offspring to their heart’s content.
"Rainbow Party"
This option is suitable for small children. Hang multi-colored balls (along the edges) on the selected wall of the living room (or cafe). Make numbers from cardboard, colored paper and paints (how old you are). Place circles of blue color and different sizes at the top.
If desired, you can depict butterflies or birds. And attach a large rainbow in the middle of the composition and to the bottom. Place multi-colored balls at the bottom of the wall.
"Sweets"
For girls of kindergarten age and first grade, it will be interesting to arrange a photo zone in a confectionery style. To do this, you will need cake pillows, three-dimensional figures of lollipops (can be made from cardboard), imitation cotton candy and large candies made of corrugated colored paper.
You can hang posters on the wall with the words “Happy Birthday” and wishes. You can build a garland of sweets, chocolate bars (and real ones too). Everything should be beautiful and harmonious.
"Favorite hero"
For boys, the background for photography is made in a space theme or based on cartoons and films with their favorite characters. Cardboard figures of rockets and airplanes in a cartoon style look original.
Ideally, install cardboard sculptures on stable stands that are safe for children. If this is not possible, then the figures are placed directly on the wall.
- To make a rocket, draw a spaceship with a porthole on a large white piece of cardboard.
- Then use a utility knife to cut a hole. On the front part, the details are indicated with a black marker.
- If you make a figure on a stand, then when photographing you can stand behind the rocket and stick your head out of the window to look into “outer space.”
Summary
It’s not difficult to decorate a photo zone in a rustic style with your own hands, because this is one of the simplest and most economical themes for a wedding. The bride and groom can bring to life their own interesting ideas to personalize the photo shoot location. Future newlyweds don’t even have to turn to professionals - they just need to enlist the support of their own imagination and design a photo zone in harmony with nature.
admin 115
Previous article
Wonder Day with Alice and her friends - a wedding in the style of “Alice in Wonderland”: script and decor
Next article
Photo zone for adults
Adults are the same as children, but only much older. They love to have fun and take pictures. A birthday is a holiday that everyone looks forward to and carefully thinks through everything down to the smallest detail. Everyone can organize a photo zone correctly and creatively. There would be a desire.
After the celebration, birthday people enjoy looking at unusual photos from the birthday party for a long time.
Screen with artificial flowers
There are many video tutorials on the Internet that teach you how to create flowers from crepe or colored paper. You will need a lot of flowers. They need to be put on threads using the method of threading on a needle or gluing, and then fixed to the wall or hung on a frame.
Heart made of butterflies
These beautiful insects are a win-win. Many, many butterflies are cut out from red or pink paper (the template is downloaded from the Internet or you draw it yourself).
On the wall (not on the wallpaper), mark a large heart with a pencil, and then put butterflies on double-sided tape or glue, filling the entire space of the figure.
- Before gluing, paper butterfly figures are folded in half and only the body is attached to the surface: The wings remain free.
- This way you can create the effect of living butterflies. It is better to glue insects to a canvas mounted on a special frame (you can also make it yourself).
If there is no stand, then first attach two to four Whatman paper (depending on the size of the heart) to the painted wall (or to the one covered with wallpaper). And then butterflies are glued onto the paper.
Paper garlands
Garlands made from circles cut from white corrugated paper look fascinating. To make the screen look lush and beautiful, elements are applied frequently. In order to make a garland you will need scissors, thread, a needle, glue, 3 rolls of corrugated white paper.
The paper is folded several times, and then a circle template is placed on it and traced. Circles are cut along the marked line. To prevent the parts from flying off, make knots or coat the thread with glue.
Background separately
All comments regarding lighting technology and decorative design of the photo zone are valid for it with an adjustable hard backdrop. But the possibilities of a photo zone with a separate backdrop are much wider, if only because it can be optimally positioned relative to the available lighting. Not to mention the fact that such a backdrop can be used to hang quite heavy voluminous decor and something else, see below. Therefore, even if you have every opportunity to organize a photo zone using improvised means, the option of at least a small additional one with a separate backdrop should be considered, as long as there is enough time in the pre-holiday efforts.
The good thing about a hard solid backdrop made of wood or plywood is that rogue guests won’t just knock it over or break it, and you can decorate it with anything, even buckets of water. But as for the light, tricks with ribbons and garlands do not work here. This is partly compensated by the ability to optimally set the background itself, but shooting in backlight (from behind) is excluded. For installation outdoors, the jibs of the hard back are dug into the ground or secured with L-shaped bent reinforcements (item 1 in the figure); for installation indoors or on a paved area, you need to make a foot-heel, pos. 2.
Backdrop designs for photo zones
The most widely used frame backdrops for photo zones are advantageous in all respects; For them, “Joker” sets are produced and sold, pos. 3. The background fabric on the Jokers is attached with a cord through the eyelets. To home-made structures on tubular steel (item 4) or wooden legs (item 5), the panel is pinned to the back with a furniture stapler or pushpins. In that other case, the protrusion of the paws forward is at least 1/8 of the height of the frame; back twice as much. Construction material – timber from 50x75; assembly on steel angles or carpentry joints. The permissible width of one section without intermediate supports is 1.5 m when assembled on corners from pine beams and up to 3 m from oak timber.
Frame feet
The most labor-intensive parts of the photozone backdrop frame design are the paws. If the frame (or frame of a wooden rectangular arch) is placed on the ground, instead of them you can use “nickels” measuring from 450x450 made of plywood with a thickness of 12 mm, pos. And in Fig.. In this case, a beam of 100x100 is needed for the frame. The thrust bearings are attached to the ends of the legs with 5 self-tapping screws (4.2-6)x(120-150) in an envelope. The thrust bearings themselves are pinned to the ground with L-shaped reinforcements, one per corner, and covered with turf or decor.
Methods for installing a photo zone backdrop frame
In other cases, it is possible to make universal support crosses (item B) from boards with a thickness of 40 mm or more. They will later be useful for the New Year tree, construction scaffolding, etc. The legs of the frame are not fastened to the crosspiece with steel: it is assembled using pairs of self-tapping screws through the faces into the ends of the boards. The legs of the frame are inserted into the sockets and wedged with wooden wedges - it will be quite reliable.
A special case
It also happens that, by general desire, the entire outdoor feast becomes a photo zone. In this case, it requires a large, especially strong and stable backdrop. He will also fence off the feasters from prying eyes.
Drawings of the frame of a durable welded pipe screen - the backdrop of the photo zone are given in the figure:
Drawing of a screen frame - a large durable backdrop for a photo zone
Fastening the background panel with a cord through the holes in the frame. An option for not particularly wild fun - the edges of the panel are folded and basted with thread No. 10 or harsh. At the table in front of such a screen (increasing sections in length is possible) there will be room for 20 people. And - even sleep with an inspired face in a bowl of Olivier, or even dance topless in a dish of lula kebab. And the photographer (or camera operator with a video camera) is taking pictures - he’s seen something else in his work.
Screen and light
A photo zone in the form of a folding screen (see figure) is suitable not only and not so much for covering up indecent revelry. Its decisive advantage is the ability to provide good light in almost any shooting conditions. due to different wing flaps. As a result, the photo zone - folding screen is not picky about decor. In terms of color and brightness, it can be virtually anything, because... the lighting technology of the resulting filming booth has almost no effect.
Screens for photo zones
Examples of the most common cases of setting light using a photo zone - a folding screen - are given on the following. rice.:
Using a folding photo zone-screen to set the light for photo/video shooting
On the left is a photo taken with the bright Sun standing high in an “industrial” slightly dusty sky. The mesh cover of the filming booth not only softens the light, but due to edge diffraction on the filaments, it “knocks down” its polarization, which in such conditions is quite significant. In the center - shooting in partial backlight with the Sun at a low position. On the right is a photo zone at home and head-to-head shooting indoors on a phone or tablet. In all cases, the cabin height is 2.2-2.4 m; The width of the central section is 1.5-2 m, the side sections are 1.2-1.5 m.
Covering the photo zone
There are several options for covering the back of a photo zone with your own hands:
- Pure white (not shiny!) translucent canvas - ideal for lighting technology, weight and size and ease of use. Disadvantages - if an awkward guest knocks over the backdrop (it’s a holiday), the panel may tear or become so dirty that you can’t do without washing, and you can’t attach heavy decor. Another minus is that the slots for the frames are labor-intensive, although if the frames are foam plastic, they are quite doable.
- Plywood, fiberboard or chipboard, painted white (see below) is a durable, but quite expensive and labor-intensive material. Can withstand any decor; openings for tantamaresque can be frameless. The backdrop canvas can be larger in size than the frame and have a complex shape. Lighting qualities are limited: backlit photography is impossible, the backdrop and wings can only work for reflection, but not for transmission.
- Corrugated packaging cardboard, painted in the same way, is a cheap or completely waste material and is very easy to process. The disadvantages are the same as those of sheet materials from before. n. In addition, it is fragile, the openings of the tantamaresque must be decorated with light frames, and traces of bends must be covered with decor.
- Rolled paper and wallpaper on the reverse side are only suitable for a small children's photo zone at home, and only if there are unnecessary ones.
- Expanded polystyrene (preferably not granulated foam, but extruded EPS) - produced in sheets with a thickness of 4 mm. It is very light, the lighting performance indicators are almost equivalent to woven fabric, but it is quite expensive and fragile, and easily becomes dusty. Suitable in 2 cases: for light and not an eyesore tantamaresky, additional to the main photo zone (pos. A) in Fig. lower, or if you need to quickly install a backdrop of a complex shape and/or a larger size than it, pos. B. Expanded polystyrene, as you know, is easily cut with just a knife and glued together with PVA.
Foam photo zones
How to paint the backdrop?
The hard backdrop of the photo zone must be painted with water-dispersed (water-based) paint for ceilings and walls. Any other, incl. acrylic bath enamel does not sufficiently diffuse reflected light and in most cases increases its coherence and polarization. This, both, and the third give glare, dips in brightness and dirty, unprocessed shadows in the picture.
Men's photo zone
To photograph a group of men, you can make a background on the wall from garlands made of black and gold circles. Place drawers at the bottom and place bottles of champagne or cognac.
Also, if desired, install an armchair or chair, hang balloons of two colors: black and gold.
An imitation jacket and bow tie made of colored cardboard, as well as a full-length black silhouette of James Bond, looks incredibly stylish on the wall. All this splendor is framed with black and white balloons.
Paper decorations - beautiful and budget-friendly
Volumetric decorative details are unlikely to be made permanent in the interior. Therefore, they must be light in weight and have low cost of materials. Cardboard and paper are quite suitable for these purposes. Modern glossy and matte dyes in aerosol cans make it possible to give these materials a truly aesthetic appearance. You can even cut out a model of a tank with the inscription “To Berlin”. Other options:
- a paper domed parachute that hangs from the ceiling;
- three-dimensional glued paper stars reminiscent of the victory in the Great Patriotic War;
- maps with the disposition of troops in the background.
You can create a background from paper. To do this, stretch it on any frame so that the paper does not sag. You can use a frame made of wooden slats for these purposes. The background should be large enough so that its edges are not included in the frame.
You can choose a background map representing troop dispositions. To do this, you should familiarize yourself with any real-life map from a photo on the Internet and transfer it to a background of a larger scale in cells. The most economical option is acrylic construction paints. To make your drawing more precise and subtle, you should buy synthetic brushes at an art store.
Another option is to create a paper background with a complex pattern. There may be outlines of military equipment: planes, tanks and ships. There may be pieces of maps, imitation letters from the front, and even an enlarged drawing of a “top secret” stamp. It all depends on the imagination of the background manufacturers.
An option for craftsmen: transfer to paper the inner world of an entire submarine or dugout. Of course, this option already requires some artistic skills. You can transfer images from photos to cells.
Ready-made paper decorations
Most often these are ready-made paper garlands. They may contain text greetings on February 23 or depict certain troops. Nothing prevents you from using only one garland on a thematic background or including it as part of a more complex and original composition. Another option is paper scarlet stars on spiral pendants. On sale you can find paper caps that imitate a cap, and much more.
Congratulatory posters
And this is a handmade option. Paper is selected for the base, and the mounting is thought out. The poster may contain text greetings or even imitate Soviet-era posters.
It is important to think about the materials and thickness of the paper in advance. Ordinary thin paper such as Whatman paper will not withstand watercolor drips; for these purposes it is better to choose watercolor paper.
The contours are first outlined with a pencil. To create a smooth texture, you can use acrylic construction paints. A less budget option is gouache paints. Glossy shine can be created using homemade paper stencils and paint in aerosol cans.
Important! To create the effect of old paper, do not apply coffee grounds or tea. The resulting color may be too pale, and you will have to repaint it several times.
It’s easier to use watercolor paints like dark ocher and sepia. Apply them with a damp sponge in an uneven manner so that in some places the colors do not completely mix. The white color of the paper is completely covered. After drying, they begin to apply the intended design with gouache or acrylic.
Multi-colored pom-poms
Paper pom-poms can represent a bouquet of red carnations or imitate fireworks. You can also simply use them as abstract decorations. Making paper pompoms with your own hands is quite easy:
- a roll of corrugated paper is repeatedly cut into squares;
- then the paper in the squares is assembled with an accordion, it is still held in layers;
- all layers are folded in half and tied with wire in a winding;
- the paper is trimmed on both sides to obtain characteristic edges;
- finally, the entire structure is carefully unfolded; first, any material is wound to the wire that will allow the pom-pom to be tied to the desired place in the interior.
Important! Pom-poms in white, black, red and warm yellow shades will suit the decor in a characteristic swamp color scheme.
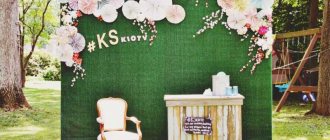
Wedding photo zone
An event such as a wedding should not go unnoticed. A professional photographer is invited to the event and a stand for a photo zone is set up.
You need to order or make a frame with a banner yourself, which is decorated with flowers, fabric, paper figures and balloons.
- The choice of location for installation is also taken seriously.
- The main requirement is that the photo zone be well lit.
- If necessary, install additional lighting sources.
Suitable flowers
The following flowers are used to create bouquets for a photo shoot:
- chamomile;
- cornflowers;
- bells;
- lilies of the valley;
- snowdrops;
- sunflowers;
- asters;
- anemones;
- craspedia;
- chrysanthemums.
Pastel shades of pink, blue, peach and lilac in the design of the photo zone will make it ideal for vintage, retro or shabby chic themes. A classic wedding can also be decorated with a similar corner for a photo shoot if it takes place outdoors in a modest atmosphere with the closest people.
If you want to make bouquets of classic wedding flowers, then it is better to use small peonies, eustomas or spray roses in pastel shades. You can add cereal ears, twigs with berries, or even succulents to the composition, made in a deliberately careless manner. It is better to tie bouquets with lace braid or regular twine.
Photo zone for a cafe
An arch made of artificial flowers looks very gentle and elegant. Of living plants, this is the most expensive and exclusive option. It is more affordable to make an installation from paper plants.
- Flowers should be of different sizes: large, medium small, but in a single delicate color scheme: Beige, peach, almond, blue, etc.
- The canvas is either completely filled with buds or an arch is made on the frame, on which a beautiful fabric is first hung for photos.
- The names of the newlyweds are placed in the free space.
Letters and numbers from different materials
If you don't use balloons in the form of numbers, you can try to make them yourself. Thick cardboard or plywood is suitable for these purposes. The cardboard is draped with fabric or covered with thick paper, which is spray-painted using a stencil.
You can paint the numbers in one color, so they will not be visually lost in the photo. Cardboard can be fastened with a construction stapler. The plywood will have to be cut out. You can also use construction adhesive and tying wire to create the frame and fasteners.
Street photo shoot
Empty frames on which garlands of paper hearts are hung look great for the street.
- The stand filled with two-color fan circles also looks unusual and beautiful. Making them is very simple.
- To do this, a rectangular sheet of colored paper is folded like an accordion, and then the edges are glued together.
- It is natural to use only two shades in creating such a canvas: blue and white, pink and white, peach and white.
An interesting idea is to hang empty frames at one corner from large tree branches. The frames are also decorated with flowers.
You need to think about an evening photo shoot and decorate the photo zones in advance with electric garlands and flashlights.
To make your holiday photos enjoyable for a long time, you need to spend a little time, money and patience and build a homemade photo zone in which everyone will enjoy taking pictures.
air clouds
An unusual photo zone in the form of air clouds will add lightness and ease to your wedding photos. It's easy and simple to make!
Materials and tools:
- polyester fiber (pillow filling);
- ribbon;
- paper lanterns (small, medium and large);
- hot glue.
Time: 30-40 minutes.
Step-by-step instruction:
- Fluff the polyester fiber and glue it to the paper lanterns.
- Tie ribbons to the clouds and hang them from the ceiling, creating an imitation of floating clouds. Now you know how to make a photo zone from the most ordinary materials, creating not only a unique corner for filming, but also an original decorative element!
Photo ideas for creating a photo zone
Fabric draperies - to create coziness
Drapery is a quick and economical way to create a backdrop. The best option, of course, is a camouflage mesh, which is quite easy to find on sale. But the mesh can be relatively transparent, in which case you will need to drape the background and then use the mesh.
For these purposes, you can use a plain fabric of a marsh or sand shade. Or black and neutral gray. It is important to visually evaluate the intermediate result and then begin to detail the photo zone.
Construction pallets can help create trench “furniture”: to do this, they are first painted in the tones of old wood, and after drying, sanded with sandpaper. For decoration, you can use ready-made posters and black and white photographs of the war years, as well as old leather suitcases and even hay - after all, battles took place in the countryside.
A photo zone for February 23 is a good way to spend time with your family and tell your children about the meaning of the holiday. For adults, making a photo zone and the process of creating a photo shoot is also a pleasant pastime that leaves positive emotions. The stronger half of humanity will appreciate attention to themselves and their holiday.
Application of photo zones with flowers
Photo zones created using different colors are ideal for many holidays and venues:
- weddings;
- corporate events and presentations;
- birthday;
- photoshoot;
- decoration of stages and shop windows;
- themed holidays;
- city events.
How to make a New Year's photo zone in the living room
The living room is the first room for a photo zone that you can decorate with your own hands. Here, most often, a Christmas tree is installed, which will be considered the center of the composition. Therefore, preparations usually begin with it. In minimalism or Scandinavian style, toys may not be used. The tree is often decorated with a bright garland with multi-colored light bulbs. In photographs they can create a bokeh effect that looks nice.
We recommend reading:
- Decorating the house for the New Year
- DIY door decoration for the New Year 2022, how to make a Christmas wreath at home
- How to decorate a Christmas tree for New Year 2022 in an unusual and stylish way with your own hands
The more toys on the Christmas tree, the more impressive it looks. Any New Year's decorations are suitable for her - bright or modest, in the form of animals or fairy-tale characters. By the way, the part that will not be visible in the photographs does not need to be decorated.
You need to think about decorating the space under the Christmas tree. Soft toys and fake gifts do the best job. To do this, the boxes are covered with wrapping paper and a bow is added.
Near the tree you can organize a relaxation space with chairs and armchairs, pillows, and a beautiful carpet. It is not necessary to buy them: there are services that rent out props. To complete the photo zone, small accessories are used - made with your own hands or purchased in a store.
Photo zone with soft toys
Decorations for children are often selected using soft toys. For the little ones they prepare baskets and small benches, New Year's houses and fluffy carpets. They complement the decor with themed toys. They can keep the kids distracted so the photo shoot goes off without a hitch. The photos will turn out positive and bright.
We recommend reading:
- DIY Christmas tree on the wall: the best ideas for chic home decoration
- How to beautifully decorate a room for the New Year, interesting holiday decor ideas
- New Year's fireplace decoration: new ideas and classic options
With animals
Another option for decorating your room is to find a company that rents animals. They can be either wild or domestic. You can also go to the studio. Some of them offer to take pictures with lynxes, foxes, owls and wolves. The pictures turn out to be unusual, and the emotions received during the session will remain for a long time. Of course, safety measures must be taken. And for families with children this option is not always suitable.
With fireplace
The fireplace can be decorated with improvised means. It doesn't have to be real, you can use a fake one. This area is often connected to a Christmas tree to make the picture even more interesting.
To decorate the fireplace, garlands of pine needles, complemented by candles, flowers and thematic figures, are suitable. Socks for gifts will complement the decor. To complete the photo zone, you can use chairs, coffee tables and prop gifts.
We recommend reading:
- How to decorate windows for the New Year: chic DIY decor options
- Fireplace from boxes: how to make it yourself
- How to decorate the hallway for the New Year 2022: photos and ideas for beautiful decoration and decoration with your own hands
Photo zone options with flowers
There are different types of flower photo zones. To determine the appropriate option, you should familiarize yourself with the main design options:
Banner with flowers
Banner with flowers. A fabric with a pattern and a floral background is stretched over the structure of beams/pipes. Next, all that remains is to decorate the stand with artificial or fresh flowers. You can attach flowers over the entire area of the banner. In the design you can use flowers along with flowing fabrics. They should drape easily. This photo zone looks airier and more tender.
Screen with flowers
A large mesh or screen decorated with flowers. It’s very easy to make such a frame, as well as move it from location to location.
Arches with flowers
Flower arches. Arches can be created in different shapes. Arches are decorated with fresh and artificial flowers and buds
Full size flowers
Growth flowers. Large flowers 2 m high are created from isolon. You can come up with many creative shooting ideas with them.
Volumetric figures from flowers
Volumetric figures made of flowers. First, a three-dimensional frame is created and covered with fabric or other material. And then the entire structure is decorated with flowers.