Champagne flows like a river, glasses crash against granite. Today the wedding is taking place, having fun and making noise. And someone must prepare, buy and distribute this river of champagne. Moreover, each stage of the wedding ceremony has its own requirements for the main festive drink - champagne. It is not surprising that so many questions arise when preparing for a wedding related to sparkling wine. The resource has collected all the information about wedding champagne: its quantity and quality, traditions and rituals, decorations and terms of consumption.
What materials are traditionally used to decorate a wedding bottle?
It is advisable to decorate both bottles using the same technique so that the paired combination can be seen.
For example, if it's just white spray painting, you can buy one larger bottle and decorate it with a homemade hat and a bow tie for the neck. Then a smaller bottle may have a white veil or skirt with 2-3 rows of flounces.
They can be gathered with elastic or sewn from a beautiful and light white fabric, gathered with a drawstring:
- tulle;
- atlas;
- silk;
- organza;
- tulle;
- veil;
- guipure;
- lace;
- embossed ribbon.
More attention is paid to the design of the “female” bottle; the “male” half of the table decoration looks more restrained. Modest decor can be sophisticated if you think through every detail.
You can spy on other people's ideas or make something from scrap materials that no one has ever had before, when you have such a desire.
Advice. The design of wedding glasses and bottles should not be taken lightly. These attributes will be in full view, so there is another opportunity to surprise your guests.
If the wedding is non-alcoholic, you can arrange any fizzy drink in a beautiful bottle. Some people want to decorate a bottle of cognac or other strong drink. The basis of the decoration is the same - wedding theme:
- he and she;
- rings;
- hearts;
- color;
- elements of the bride's outfit.
You can use beads and stones with a flat base (for gluing), sparkles and beads, small artificial flowers and fragments of jewelry.
If you are ready to do the work yourself, do not put this part of the wedding props on the back burner. It may take longer than expected. To choose something creative and unconventional when you don’t have your own ideas, look at the topic of decorating wedding bottles with your own hands, master classes and step-by-step explanations.
Of course, such a wedding attribute can be bought ready-made or offered to a craftsman to make it to order.
This won’t surprise anyone today, but where is the guarantee that your guests didn’t celebrate another wedding at a table with exactly the same decor? It can get awkward when asked, whose champagne is it? Therefore, it is better to choose something original so that no one around you has this.
An order for a craftsman will cost 2-3 times more, but it’s not even a matter of saving, although everything can be done from scrap materials. No one can put as much warmth into decorating your wedding as the bride and groom themselves or their loved ones.
Important! You can vary the color of the decor of wedding bottles with your own hands, but it should not bring disharmony to the overall design of the festive feast. If this is a wedding in lilac, gold or turquoise tones, then it is better to complement a white bottle of champagne with decor in the agreed upon range.
The original decoration can be made in duplicate and sold to guests at an impromptu auction. Or offer a souvenir as a prize in the most beautiful or original competitions.
A few ideas on how to decorate wedding glasses
“It’s better to practice decorating wedding bottles and wine glasses on ordinary glasses and empty containers”
Let's start with the classics of the wedding genre - gilding. There are two ways to decorate wine glasses in this way.
Option 1
This is where the leg will be decorated. Need to stock up:
1. masking tape;
2. old newspapers;
3. with a can of spray paint of the desired color.
Necessary materials for decoration
You need to start working by preparing the wine glass. It is thoroughly washed and dried. In order not to stain the top of the glass, I wrap it in newspaper approximately to the middle of the height of the stem and secure the wrapper with tape.
Secure the newspaper with tape
For greater reliability, the paper can be fixed at the top. This way you will be sure that it will not turn around at the most inopportune moment. Next, paint is used in decorating wedding glasses with your own hands. The table is covered with old newspapers, on which a wine glass prepared for decoration is placed upside down.
Painting the bottom of the glass
The open part of the leg must be evenly sprayed with paint. In order for the coating layer to lay down perfectly, it is better not to spray the composition from too close a distance. Work by stepping back a couple of steps from the item you are decorating.
The finished result
Option 2
In this case, the upper part will be partially covered with gold. Painting tape will help you decorate wedding glasses beautifully with your own hands. It can be wrapped figuratively, in a spiral, or in some other way around the bowl.
Wrapping the top of the glass with tape
Hide the leg, almost up to the stand, under a piece of cellophane. Further everything according to the scheme. Paint is applied to the exposed parts. The glasses are left in this form until it dries completely. Now you can remove the protection and tape. The glasses for the wedding celebration are ready.
Decor of the top of the glass
A wide variety of materials can be used to decorate glasses for a wedding:
- feathers;
- rhinestones;
- beads;
- beads;
- ribbons;
- textile;
- paints;
- flowers;
- clay.
If you don’t have handmade skills, you shouldn’t immediately take on finishing work. It’s better to practice decorating wedding bottles and wine glasses with your own hands on ordinary glasses and empty containers.
Working with fabrics
Most often, needlewomen tend to use lace and this is quite justified. Its luxurious weave is gorgeous to begin with. All that remains to be done is to correctly place the fabric on the wine glass. Decorating wedding glasses with your own hands begins with degreasing their surface. To do this, use alcohol and a napkin.
Romantic decoration of glasses with lace
Measure the required length of the lace ribbon and make a blank, not forgetting to add an allowance of 5-7 mm to the seams. We fix the strip on the bowl of the wine glass using a glue gun. This must be done carefully so that there are no glue drips. From another piece of lace we will assemble a skirt. When decorating glasses for a wedding, it is attached to the stem. The finishing touch will be a satin ribbon bow imitating a belt.
Original glass with lace skirt
You can complement the lace composition with a scattering of sparkles and beads. The same algorithm is used to decorate with other types of fabrics: guipure, tulle, satin.
Working with ribbons
Decorating wedding glasses with your own hands using ribbons is a springboard for unleashing your imagination. Both a modest bow and luxurious drapery can become a stylish decoration.
Trimming wedding glasses with ribbons
Usually, satin or silk ribbons are beautifully woven around the stems of wine glasses, but you can complicate your task and make flowers from ribbons. To make, for example, a rosebud, which, by the way, is also suitable for decorating wedding bottles with your own hands, you will need a large ribbon. It is folded in half, bending along the wrong side, and the joined edges are swept away. To form a bud, you need to pull the thread. You can put together a whole bouquet of these roses.
Making a rose from ribbon
It is permissible to make the buds multi-colored. The compositions are fixed to the bowl of a wine glass. Decorating glasses for a wedding with ribbons is traditionally completed by decorating the latter with rhinestones and beads. They are used to embroider flower petals and make their cores. Thin, green ribbons or twisted thread can act as stems. To imitate drops of dew on flower petals, when decorating wedding glasses, they are decorated with small rhinestones.
Roses made from ribbons for decorating glasses
The most effective bows are made from satin, gauze or silk ribbons.
Decor with rhinestones
Bright and shiny, with their sparkle and tints they create a unique play of light. The most effective decorations for DIY wedding glasses are the so-called stars. You can make some pretty fancy patterns out of them. In general, it is recommended to use medium-sized pebbles of the same size and the same color spectrum. How to decorate wedding glasses with them? Yes, as your imagination dictates! If you want, post the symbol of celebration - wedding rings. You can make star scatterings and monograms.
Rhinestones create a unique play of light
Those more experienced in needlework can work with different fractions and colored rhinestones. They will help you lay out entire stories and fantastic allegories.
Working with beads
A universal decor used not only in decorating wine glasses, but also in decorating wedding bottles with your own hands. Typically, beads are used in symbiosis with beads. The elements are fixed to the glass surface with glue. The product must be degreased before decorating. After applying a layer of glue to the area chosen for decoration, carefully place large beads in the design. Fill the remaining voids with multi-colored beads and leave the glass to dry.
Decoration of glasses with beads of different sizes
Engraving
Decorating wedding glasses in this way can only be done by specialists. The only thing in which you can take the initiative is composing the text of the inscription or creating a sketch of the drawing. You can place an invented family logo, words of declaration of love, or portraits of the newlyweds on the glasses. The engraving design should be complemented with a delicate colored ribbon curling around the leg.
Example of engraving on wedding glasses
Do you want to do something similar to engraving in the design of wedding glasses with your own hands? Try making your desired lettering on glass using a stencil, clear glue and powder glitter. Draw and cut out letters or phrases on paper. Attach the workpiece to the bowl. Apply glue to your work surfaces and immediately sprinkle them liberally with glitter. Remove excess by shaking the glass slightly and leave the decor to dry. The paper is removed after the adhesive base has completely dried.
Fresh flowers to decorate glasses for a wedding
A unique, but, unfortunately, short-lived spectacle. All the charm of the decor will fade on the second day, but they will still complete the mission, and with what success!
Fresh flowers in the decoration of glasses
Fragrant romance is present in the decoration of the dresses of the young guests, so why not draw it as a red line in the table decoration? What else, if not a rose, a symbol of love, could become the material for decorating wine glasses for newlyweds. If you decide to start decorating wedding glasses with your own hands, then be prepared to sit through the work the evening before the celebration.
Step-by-step master class
In addition to the wine glasses, you will need:
- gel “super moment”;
- rose buds;
- beads;
- scissors;
- brush.
Decorating wedding glasses with your own hands traditionally begins with degreasing the glass. It is wiped with alcohol, and in the absence of the product - with acetone, the remains of which are washed off with running water. The surface of the glass is polished to a shine. We set the product prepared for work aside and begin disassembling it into flower petals.
We cut the bud from the stem and carefully, so as not to damage the delicate petals, disassemble it in parts. It is advisable to immediately sort the petals by size. This will make it easier to decorate glasses for the wedding in the future.
The petals are fixed to the bowl of the glass
The moment of truth is coming. We grease the pink petals with glue and fix them to the bowl of the glass. The decor is done from top to bottom. The smallest petals will be used first. They should be glued completely, over the entire surface. Don’t forget to leave 2 cm from the top border of the bowl. This is important when decorating wedding glasses, because these are not souvenirs that will simply be placed on a shelf; you will need to drink from them somehow.
Attaching the petals to the glass knife
Having made the core, we move on to creating the next tier. Let's use slightly larger petals than we have already used. We will glue them only when the core is dry. We will place the second petal ring not end-to-end with the first, but retreating 0.7-1 cm down.
The petals will block the gap and the bare glass will not be visible.
We continue to work according to the already familiar algorithm, but now we coat only the base of the petal with glue.
Further on increasing. The largest pink petals should appear at the base of the bowl of wedding glasses decorated with your own hands. From the outside, the finished product should look like a wine glass planted in the middle of a flower. The base is ready.
Now we need to solve the issue with the leg. The easiest way is to decorate it with a satin ribbon in green shades, but if the desire to create has not yet disappeared, then decorate it with beads and seed beads. It will turn out very impressive.
DIY wedding glasses with rose petals
Feather decor of wine glasses
The technique is also universal, suitable for decorating wedding bottles with your own hands.
You should not cover the entire glass with feathers. It will look ridiculous. It is quite enough to make a feather edge at the base of the bowl, and then complement the decor with beads, ribbons, sparkles, and painting. The last option should be highlighted in a separate column, since it is very good in itself.
Wedding glasses with feather decor
How to decorate wedding glasses with painting
You can decorate wine glasses with paints in a variety of ways. If drawing is not your thing, that's okay. Stencils will help you make thematic drawings. They are fixed to the prepared glass surface with tape and the voids are painted with acrylic paints. Allow the latter to dry and remove the sticker.
Painting glasses using a stencil
When designing wedding glasses in this way, it is important that the picture does not “float”, so it needs to be hidden under a protective layer of varnish. The painting can be supplemented at your discretion with sparkles, scatterings of beads, sequins, and ribbons.
DIY wedding glass painting
Decoupage technique
“This decorative technique is often used when decorating wedding bottles with your own hands.”
A very unusual way to decorate glasses for a wedding. You need to prepare:
- rice paper (white);
- decoupage napkin with a themed pattern;
- pearl paint;
- glue;
- Polish for hair;
- two-centimeter wide masking tape;
- regular varnish.
We prepare the surface for decoration. Use masking tape to protect the edge of the bowl. We wrap the remaining part with rice paper so that it fits closely to the edge of the tape. The side ends of the paper are fixed with an overlap, with a wrap of no more than 0.5 cm. The excess wrapper is torn off.
Initial stages of decoupage of glasses
The next stage of decorating wedding glasses with your own hands is fixing the paper to the surface of the glass. This is done as follows. The bowl is moistened with water and wrapped in paper. The paper will get wet and cover the glass evenly. All that remains is to fix it in this position by covering it with decoupage glue. It is applied with a flat brush. The base for decor is ready, and it is sent to dry.
This will be followed by colorful decoration of wedding glasses. We select the necessary fragments of the drawings and lay them out on a file or cling film. We treat the pictures with hairspray several times. This will promote better adhesion of the parts to the surface. Place the pictures one by one on the bowl of the wine glass and coat the top with glue.
Spray the pictures with hairspray several times
At this stage of decorating wedding glasses with your own hands, you need to be especially careful. The pictures should not wrinkle or deform, so the glue should be applied from the center to the periphery and very short strokes should be made with a brush.
After all the elements are laid out and the glue has dried, the bowl of the wine glass is coated with glassy varnish and dried again. The glass is ready to use.
Final coating of glasses with varnish
This decorative technique is often used to decorate wedding bottles with your own hands. Decoupage will make it possible to indicate the purpose of each of them. Don't understand what we're talking about? Whether wedding guests will drink from decorated bottles or not is a rhetorical question, but two beautifully decorated bottles must be on the newlyweds’ table. They will not be uncorked. This champagne has a different mission. The first bottle will be unsealed to celebrate the first wedding anniversary, and the second will wait until the birth of the first child. The theme of decorating wedding bottles with your own hands is intuitive. The one that is destined to be drunk on the occasion of a new addition to the family can be decorated, for example, with angels; the second one, it makes sense to veil it under fabric. Choose a small floral pattern to look like printed chintz.
Decoupage bottles for a wedding
Polymer clay in the decoration of glasses
Looking for a way to decorate your wedding glasses? Take a closer look at the stucco decor. This is quite an impressive design. You will have to work with polymer clay. Do about the same as with plasticine. Blanks of flowers, leaves, wedding symbols, doves, and cupids are made from clay. While the product is at the modeling stage, it can be tried on at the place of future fastening and the shape can be adjusted. As soon as the blanks for decorating the wedding glasses are ready, they are sent to bake in the oven. Smaller parts need to be baked separately from massive ones. How long to keep the clay in the oven can be found in the instructions for the material.
Decorating wedding glasses using polymer clay modeling
The base of baked decorative elements should be leveled. This can be done with a wide file, usually used for manicure. For greater beauty, the components are opened with varnish.
The decoration on glasses for a wedding should be fixed using an adhesive base. Additionally, you can decorate the composition with rhinestones, make flower cores from beads, and paint the missing stems with acrylic paint.
Types of decor for wedding bottles
Designing and decorating champagne bottles for a wedding can be done using several methods.
Types of decor:
- ribbons;
- photos;
- polymer clay;
- fabric trim;
- engraving;
- decoupage;
- paints;
- rhinestones.
Before carrying out it is necessary to prepare all the tools, as well as the bottle itself. The surface must be cleaned of labels and thoroughly degreased. This will help achieve high quality results.
Note. When decorating, it is recommended to adhere to the general style of the hall in which the celebration is taking place.
Glass decoration
For decoration, it is not necessary to take glasses of the same size. So, if you want to decorate the vessels in the “bride and groom” style, then it is more logical to take one large and tall glass as the groom, the second should be smaller, round in shape and with a thin stem, reminiscent of a woman’s silhouette.
Related article: Decoupage of interior items in the shabby chic style: technique
The glasses are decorated with almost the same materials as champagne bottles. As decoration you can use:
- satin ribbons;
- polymer clay;
- lace;
- artificial flowers;
- rhinestones;
- feathers.
Decoration of glasses with ribbons and lace Decoration of glasses with polymer clay Decoration of glasses with feathers
Decorating glasses with rhinestones
Glass is often decorated with mother-of-pearl beads. They can be glued in the middle of a decorative flower or placed evenly over the entire surface.
How to choose a decor style?
Champagne is the most traditional drink for wedding celebrations; any festive table is abundant with it. Many wedding competitions and games also use bottles of this drink. This is a good reason to make champagne a small highlight of the holiday.
You can turn bottles into real exclusives by showing a little imagination and ingenuity. You can do the decoration yourself, which will save money.
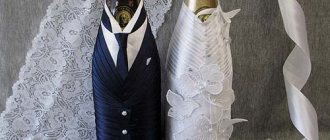
There are a lot of design options for champagne bottles. The most common option is to decorate the sparkling wine in the “bride + groom” style. Such a “couple” is usually placed on the newlyweds’ table. The classic color scheme in this case is black and white.
But if the celebration involves the use of some bright color (this is fashionable now), then the bottles can also have colorful elements.
It is popular to celebrate weddings using bright colors in addition to classic colors (white, ivory, champagne, milk). It can be turquoise, blue, orange, purple and even red.
The holiday will clearly become bright and unforgettable, but then it’s worth thinking about color accents in everything. Including in the decoration of wedding attributes.
There are a lot of design options - decoration with three-dimensional elements, fabrics and lace, pearls, scrapbooking, modeling. The drink looks good in bottles hand-painted with acrylic paints.
The most important thing is not to overdo it and create such decor that the bottle of champagne does not stand out from the overall style of the holiday.
Two beautifully decorated bottles are usually made and it is not customary to open them during the celebration. They remain for the couple for the future: one for their wedding anniversary, the second for the birth of their first child. Here is another reason to make a bottle of champagne beautiful and unusual.
The main rules of decoration are compliance with the given level of solemnity, combination with the furnishings, dishes, and outfits of the newlyweds
. For example, gold and silver engraved bottles would be completely out of place at a boho or Provence style wedding. But delicate floral motifs and lace are an excellent decorative option for a classic wedding with aristocratic notes.
If the wedding takes place under the auspices of a specific theme, for example, maritime, then the decor may include appropriate details. Bottles of champagne can be painted to resemble a sailor’s vest or decorated with anchors and chains, painted with sea waves, etc.
An autumn wedding in the Russian style presupposes the presence of autumn fruits and vegetables in the paraphernalia and the use of a red-red color scheme. Here bottles can be decorated with stylized painting, autumn apples or leaves.
The main thing in decorating is to show your imagination.
You can find many master classes on the Internet, which detail the sequence of actions and the necessary materials for the work. It’s these little things that make up the overall atmosphere of the holiday, so pay due attention to decorating not only the newlyweds, the cortege and the banquet hall, but also small accessories.
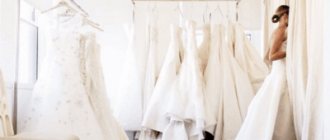
Variety of glasses
Wedding preparations are taken responsibly and seriously; This also applies to glasses. The appearance of the wedding attribute depends on the material of manufacture, and here the choice is limited.
For a classic wedding, traditional crystal glasses would be appropriate. Bohemian glass products are very popular. Such glasses are an indicator of excellent taste; they will decorate a wedding decorated in any style.
Variety of decor Source koffkindom.ru
Less often, newlyweds prefer metal accessories - they are practical because they will not let you down at the most crucial moment. Such products can be made entirely of metal, or a combination of glass and metal (with a metal leg). The shape of the glasses is also varied:
- Factory-produced glasses can have a traditional, V-shaped or modified shape.
Simple and elegant Source vizzara.com.ua
- The configuration of the leg can be normal or modified. There are souvenir products: correctly combined legs form a heart.
- For champagne, elegant products in the form of flute are purchased. Wine glasses are used for wine, choosing the shape depending on the type of drink.
- If you are planning a wedding in a retro style, you will need special vintage wine glasses; They are often wide and low.
Vintage Source rozetka.ua
The glass of glasses is not necessarily colorless (transparent). The choice of color is influenced by the details of the wedding design, including, for example, the bride's dress. Popular colors include pink and lilac, as well as shades of blue (from blue to turquoise). Accessories in bright red, silver and gold are common.
The main decoration of wedding glasses is the decor. It is manufactured in a factory (engraving), it can be ordered in a specialized workshop or made independently.
Designer wedding glasses Source wedlux.ru
DIY wedding bottles with ribbons
So there are at least two bottles of champagne. Making it exclusive is not at all difficult, the main thing is to prepare well.
To begin with, get rid of unnecessary labels, only carefully so as not to scratch the glass. Then you can start decorating. One of the most popular methods for decorating champagne is using satin ribbons. This method is simple and affordable, but the result is a bottle that looks gorgeous.
Ribbons are needed to wrap vessels with sparkling wine, and also as an additional decoration. The satin ribbon should be the optimal size and color.
ADVICE. It is better to process the edges of the tape (carefully burn it) so that it does not diverge.
The meaning of champagne
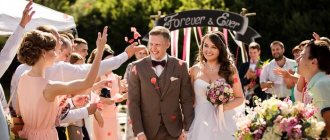
Champagne is a symbol of celebration and carefree happiness , which fits perfectly into the wedding menu and decorations.
A sparkling golden drink accompanies the ceremony from beginning to end. Toasts, the first kiss of the newlyweds to a deafening “Bitter!” Perhaps at the banquet there is a place for a whole fountain or a tower made of glasses.
It is important that the champagne is of good quality, but if you want every little detail of the wedding to be perfect, then you should think not only about the content, but also about the form - about decorating the bottles.
Idea! If you have a themed or colorful wedding, then decorating the champagne with bright paint or other non-standard elements will be an excellent solution.
Champagne bulls
In addition, there is an interesting custom. Two bottles of champagne, for the groom and for the bride, are decorated in a special way and are not opened during the feast. They are used exclusively for decoration and as a symbol of the “full cup”; they wait on the table for the end of the celebration, and then go home to a new family.
This particular pair of bottles is called "bulls". The custom came from ancient times, when instead of champagne, the newlyweds were given a bull and a cow tied by the horns, and on the first anniversary, the new family treated all guests to fresh milk.
Today, the groom's bottle is allowed to be opened on the first anniversary as a symbol of man's patience, love and ability to maintain a long-lasting union. Interestingly, the first glass of drink still goes to the wife.
The bride's champagne is opened for the birth of her first child. For obvious reasons, the mother will not get a drink on this day.
Decorating champagne with satin ribbons master class
The method is simple and universal; satin ribbons can be selected to suit your taste.
Materials:
- tape – 2.5-3.5 m;
- gold brocade ribbon – 1.5 m;
- instant glue;
- champagne with gold foil;
- scissors.
How to decorate a bottle with ribbons master class
1. Let's get started! First you need to measure out enough tape for the first layer.
2. Cut the tape and use glue to mark the points.
3. Wrap a satin ribbon around the vessel, pulling it tightly. Do the same with the other cut, which will be larger as the bottle expands. Make the third and fourth layers in the same way.
4. Now it's the turn of the brocade ribbon. Two layers are enough.
5. Glue the gold ribbon to the bottom of the bottle so that the seam is at the back. And also cut 7-8 ribbons of the same length of the chosen color, glue them in the same way so that the seam is at the back.
6. You can remove a sloppy seam using another tape.
7. Cover empty spaces with gold tape.
8. Carefully trim off any protruding corners.
9. For additional decor, you can use beads, lace, bows - whatever you like, the main thing is not to overdo it.
10. DIY wedding champagne is ready!
Clothes for champagne made of organza and velvet
Following the master class below, you can decorate champagne for your wedding in an original way with your own hands.
The magnificent clothes of the bride and groom, made with velvet and organza, will certainly attract the attention of all guests to the bottles. This kind of work can be done by any girl who can hold a needle in her hands.
Decorating champagne with your own hands will not take up much of your time.
Necessary materials
To create your own champagne clothes you will need the following materials:
- organza for a skirt 30x80 cm;
- white satin;
- velvet black paper;
- black velvet fabric 30x40 cm;
- lace 1.8 m;
- adhesive tape for finishing edges;
- instant glue;
- organza for veil;
- flesh-colored ribbon 40 cm;
- white satin ribbon 2 cm wide, 0.5 m long;
- white narrow ribbon 1m long;
- rhinestones, beads, artificial flowers for decoration;
- wide organza ribbon for bow.
Pattern and creation stages
- In those places of the wedding champagne where there will be light fabric, we wrap it with white mounting tape, paper, cardboard, or cover it with paint, and tear off the label. On the bottle symbolizing the groom, we lay a mounting tape along the bottom of the shirt and the collar.
- For the bride's corset, we wrap the front of the wedding champagne with a piece of white satin 3-5 cm wide.
- We put a body braid around the neck, cross the ends and hide them.
- To secure the corset to the champagne for the wedding, we apply adhesive double-sided tape along the edges of the corset on the inside.
- Fold the fabric for the skirt so that the bottom part is one third larger than the top.
- We sew lace 2.5 cm wide onto the top flounce.
- We sew narrow lace onto the hem.
- We place a ribbon between the flounces and tighten the skirt at the place of the bottle where the waist is supposed to be.
- We distribute the pleats beautifully and sew the skirt to the corset. We sew the edges at the back.
- We decorate the corset with lace and sew a bow on the back.
- For the cape, cut a piece of fabric 5x28 cm, bend the edges.
- We intercept with a narrow braid in the middle and connect with a ring.
- We put it around the neck and secure it at the back with glue.
- We cut a piece of organza for the veil 30 cm long, 25 cm wide. We assemble it by stepping back from the edge by 10 cm with a thread and tighten it.
- We tie a braid or a string of beads to the head, and attach a veil. The bride's clothes are ready.
- To make champagne clothes for the groom with your own hands, we wrap the bottle with paper, then you need to draw the outlines of the suit.
- To make trousers, sew black velvet 8 cm wide, 27 cm long, add a seam allowance.
- We hem the bottom edge, turn it inside out, and put the trousers on the champagne. We lay a white braid along the top edge and sew it to the trousers.
- We lay a small piece of white fabric along the front of the neck and secure it with adhesive tape.
- We attach a body tape to the neck. Below we wrap the neck of the champagne with a satin white ribbon, hiding the ends at the back. For the collar, we throw a 20 cm white ribbon, cross it on the chest, and secure the ends with glue.
- We cut out a frock coat from velvet according to the pattern, connect its parts, and sew a white ribbon on the front.
- At the top of the coat, on the wrong side, we make four small darts so that the garment fits well.
- Let's try on a tailcoat.
- We cut out a velvet collar and glue a white ribbon along its edges. Glue the collar to the champagne.
- We make a bow tie from ribbon, a black top hat from velvet paper and two buttons. We dress champagne in ready-to-wear clothes.
Popular articles Corner shelf
Decorating wedding bottles with velvet
You can decorate champagne for the newlyweds' festive table using velvet. This luxurious and elegant material looks great.
Even an ordinary container is transformed thanks to the velvet decor.
Decorating champagne for a wedding with your own hands is very easy to do. You only need stretch velvet, thread, paper and a pencil, as well as two bottles and decor.
ADVICE. It is better to lightly burn the pieces of fabric needed for processing along the entire perimeter.
Design ideas and preliminary preparation
Usually all elements of the celebration are decorated in the same style in accordance with the theme of the wedding. It could be:
- costume party based on your favorite works and movies;
- holiday “based on interests” (sports, professional);
- correspondence with the time of year;
- wedding in national or retro style and so on.
The decoration of the champagne is also chosen in accordance with the theme of the celebration itself. You can entrust the decoration to professionals or create unique compositions from bottles for your wedding with your own hands. There are many options:
- photo of the newlyweds;
- ribbons, rhinestones, beads;
- imitation of wedding suits made of fabric;
- using fragments of a drawing on paper (decoupage);
- flowers made of fabric, clay or living plants, repeating the motifs of the bride’s bouquet;
- engraving;
- acrylic or stained glass paints;
- feathers, colored cords, shells and much more.
Decoration ideas are not limited to the above list. You can always come up with something of your own or combine several different techniques. To ensure that the work looks neat and the composition does not fall apart at the most crucial moment, the decor of wedding bottles begins with careful preparation of the surface:
- Remove the label. To do this, place the bottles in warm water for a while to soak the glue. It is most convenient to leave them overnight.
- Clean the glass. No matter how carefully you remove the paper, a thin layer of adhesive base will remain on the surface, which will interfere with the application of paints, clay, and paper fragments, so the glass must be degreased (ordinary alcohol will do).
It is not advisable to use cologne, glass cleaners and other complex compounds for cleaning, as their components may react with decorative materials, and the result will be unpredictable. Small bottles of rubbing alcohol are sold in pharmacies. Another option is ammonia, but you need to remember the strong smell of this product.
The simplest design of wedding bottles is a photo of the newlyweds. In a photo studio you can order a stylized label, similar in appearance to a standard one, but with portraits of the bride and groom, inscriptions, and wishes. This champagne decoration does not require special knowledge and skills, and the result can be very impressive. Typically, such labels are printed on self-adhesive paper; the newlyweds will only have to attach it over the factory paper.
There are no special rules for decorating champagne for a wedding table. But it should be remembered that a large amount of decor is poorly consistent with elegance.
How to decorate champagne for a wedding with engraving
Perhaps not everyone can do this work with their own hands. Engraving on glass requires a special machine, so in this case a professional will do everything in the best possible way. The main thing is to decide on the pattern, image, inscription and the master will create an exclusive, impeccable decor.
Engraving is an original design for wedding glasses and bottles; you can add decorations with flowers, ribbons, beads and bows with your own hands.
Decorated wedding glasses using decoupage technique
Another popular way to decorate wedding glasses today is the decoupage technique. This design looks interesting, bright and quite attractive.
The main thing here is to choose napkins with a suitable pattern, cut them correctly and transfer them to the glasses. It is better not to decorate the part of the glass with which your lips come into contact, as moisture can ruin the decoupage.
Decorating bottles for a wedding with your own hands: champagne for the bride and groom
The bride and groom at a wedding can be not only at the table, but also on the table. Of course, we mean decorated champagne. You can make a bottle bride and groom with your own hands using bias tape or ribbon.
For two bottles you will need the following materials and tools:
- 10 m of white bias tape;
- 8 m of blue or black bias tape;
- 4 m of bias cream binding;
- 10 cm white lace;
- 3 m of wide lace, bow or piece of tulle;
- glue in a pencil (super glue moment);
- scissors;
- decorative ornaments;
- cardboard for hats.
Below is a step-by-step process for making wedding bottles.
Bottle for a wedding - Bride: step-by-step master class with photos
- Just like a real bride, the bottle of champagne in this outfit should be the center of attention, and this requires perfect execution of the job.
- Initially, use a marker to draw a straight line in the front center, along which you will need to glue the edges of the tapes. Try on the lace at the neck, cut off the required piece. Spread the bottle with glue and glue the lace. Coating the glass of the bottle, glue the bias tape, cutting off its long part after gluing.
- Continue oblique gluing until the middle of the bottle. From the middle, the bias tape is glued in a circle to the very bottom of the bottle.
- Take a wide bow near the subway, use an iron ruler and a hot soldering iron (a knitting needle heated over a fire) to solder the edges of the bow. It should look like this.
- Fold it in half and sew with a cast-on stitch. Put the resulting skirt on the bottle, tighten the thread to its size. Remove part of the skirt and follow the same example to make two more skirts.
- Determine the place where the skirt will be attached. From its upper part you need to mark a place for two petticoats, coat these places with glue and glue two blanks.
- Sew golden bias tape to the overskirt. Glue it onto the bride bottle.
- Fold a piece of a wide bow in half. Using a mug and a hot soldering iron, make a circle (the edges will stick together under the influence of the heat). As shown in the photo, cut out the darts so that the brim of the hat can be glued on.
- Make a ring out of cardboard to fit the diameter of the bottle neck. Cut out a circle with teeth for the top of the cap.
- Bend the teeth, glue the top part of the cap and brim. Glue a white ribbon in a circle on the outside and tie an organza ribbon.
- Glue beads to the bride’s “neck” and put on a hat. The bottle-bride is ready for the celebration.
How to decorate bottles with your own hands?
Bottles of wine, decorated by hand, should fit into the overall tone of the holiday and its style. There are simply an incredible number of options for decorating a drink; choose the one you like and follow the instructions step by step. For those who have a penchant for handicrafts, a great option is to decorate a bottle with polymer clay. Minimum costs and your masterpiece will delight all guests!
You will need:
- a couple of bottles of sparkling wine;
- white spray paint;
- ready-made polymer flowers;
- glass pencil;
- rhinestones, beads for decoration;
- glue, ribbons, lace, scissors.
The work itself will not take much effort and time. First, paint the bottles with white spray paint, then draw the outline of the desired decor option. Place polymer flowers, beads, ribbons, rhinestones, bows along the finished contour and secure them with glue. This type of champagne decoration is very simple, and the effect is amazing.
An equally interesting, but much rarer option is decorating champagne with photographs of a married couple. Photos can be placed on bottles instead of labels. In a similar way, you can decorate the bottle with a sticker with the date of the celebration or wedding, with the names of the bride and groom. Decorating with photographs is a simple process. First, print the necessary photographs on thin paper, and then apply them to the bottles using the decoupage technique. The contours and the rest of the bottle can be decorated with ribbons and rhinestones.
You can contact your nearest photo studio, where they will help you select special wedding pictures and logos and print them on paper of the required format and quality. Champagne with images of newlyweds in reality look magical and intriguing. Be sure to consider this option for decorating the drink and you definitely won’t go wrong.
Champagne looks rich and elegant in bottles decorated with gold or silver. In this design, the drink can retain its original appearance for many years. The choice of patterns and inscriptions suitable for decoration, of course, is a purely personal matter, but it is better to entrust this kind of work itself to professionals who know a lot about this matter.
You can create another champagne decoration option on your own - decorating bottles with satin ribbons. To work you will need:
- bias tape;
- glue;
- rhinestones, beads, feathers for additional decor;
- two bottles of champagne.
The point of the process is to attach pieces of bias tape to the bottle according to the pattern. The pattern depends on the selected pattern. These can be bottles in the suit of the bride and groom, vest bottles for a wedding in a nautical style, etc.
It is better to start designing from the neck of the bottle. The top can be decorated with a black hat or mustache, or a veil. Add beads and rhinestones as desired. Do not cut the ribbon into pieces at once, as the length will change as you work, depending on the shape of the drink bottle.
As you move from top to bottom, the edges of the attached tape are hidden under the top edge of the next row. The widest bottom part of the bottle is also decorated with ribbons, but the tails are secured from the bottom. It is not at all necessary to attach the tapes at an angle, it all depends on your imagination. If somewhere you get a sloppy stripe or the ribbon is crooked, you can fix everything by attaching a decorative element over the satin. This decor option looks good with the addition of feathers of different colors and sizes.
As you can see, there are really many options for decorating champagne. This is only a small part of what you can do with your own hands. It’s up to you to decide – use ready-made ideas and master classes or come up with your own unique design.
Bottle for a wedding - Groom: step-by-step instructions for working with photos
The bride is ready, now let's get down to creating the groom. The work is carried out identically to the execution of the bride bottle.
First, fold the white ribbon in half and try it on the neck of the bottle.
- Apply glue to one half of the folded tape and glue it to the neck of the bottle so that the upper part can bend.
- Raise the top of the collar of the first tape, glue another 2-3 rows to the bias underneath it.
- Measure out the main color of tape to attach to the bottle. Raise the collar and tie a ribbon tie for the groom.
- Lower the collar and continue gluing the blue ribbons (on top of the tie) onto the bottle.
- When the narrowed part of the neck ends, cover the bottle in a circle with ribbons to the very bottom.
- Glue buttons to the groom's jacket. Decorate the “chest” with a boutonniere.
- Prepare such parts for making a top hat for the groom.
- Glue a cylinder out of cardboard. Cover it with ribbons and decorate it to match the jacket.
- Place the top hat on the bottle and the groom is ready.
Rose petals
How beautiful these glasses turn out! The only negative is the fragility of the composition. Therefore, it must be done right before the celebration. In order not to worry about the result, you can prepare backup glasses with a different design just in case.
You need to take the living roses apart into petals and glue them overlapping from the edge of the glass to the stem. You need to start with small petals and attach larger ones to the bottom.
You need to wait until each row dries. The leg can be wrapped with tape in a spiral or simply secured with a small braid, hiding the traces of the fastening of the petals.
- DIY hats for newborns. Several types of knitted winter hats for every occasion in a baby’s life
- How to prepare essays on physical education
- How to crochet beautiful napkins: tips with video lessons and patterns
An alternative would be to use petals from artificial flowers if the couple has no prejudices. This will save a lot of time and nerves, because the glass will definitely turn out spectacular, and it can be made in advance.
Try to implement one of these ideas so that the glasses become a wedding decoration and delight the newlyweds!
Do-it-yourself champagne bottles for a wedding using decoupage technique: instructions with photos
Decoupage is a decoration technique based on transferring an image onto a specific object.
To make a wedding bottle using this technique, you will need to spend a decent amount of time, but the end result will certainly please both the newlyweds and their guests. To complete the decor you need to prepare:
- napkins with the image or decoupage cards that you want to apply to the bottle;
- primer for glass of the desired shade;
- sponge;
- acetone;
- fine abrasive sandpaper;
- brush;
- tweezers or clothespin;
- glue;
- acrylic paints;
- clear nail polish.
Initially, clean the bottle from stickers, dry it and spray it with acetone. Apply glass primer to the bottle. If you don't have one, it doesn't matter. Mix acrylic paint of the desired shade with PVA glue in equal proportions. Cover the bottle with the mixture.
Gently secure a piece of sponge in tweezers or a clothespin and apply the composition using patting movements.
The primer must properly matte the green color of the bottle, otherwise the end result may be spoiled by the green color showing through.
- After the primer has completely dried, you need to go over the bottle with sandpaper. The surface of the primed glass must be smooth. Place napkins on the cork and prime it so that the top does not differ from the rest of the composition.
Separate the lower layers of the napkin, leaving only the top one with the pattern. Cut out the selected picture, stepping back from the beginning of the image by 2-3 cm. Use your fingers to carefully tear off the remaining strip so that the edge of the decor is not more than 0.5 cm from the starting line of the image.
The torn structure of the edge will help smooth out the sharp transition of the decor to the background of the painted bottle.
- Place a napkin on the surface of the bottle. Use a brush dipped in glue to cover the entire pattern.
- You need to start from the center, smoothing out all the bubbles and irregularities towards the edges. Wait for the picture to dry.
- If the base of the napkin was not white, then using acrylic paints you need to select the appropriate shade and paint the white spaces between the pictures with a brush. After complete drying, the entire bottle must be coated with clear varnish.
When it dries, if desired, you can glue sparkles to the picture, decorate the composition with sequins or beads.
Decorating a champagne bottle with sparkle and chic!
Another light and at the same time effective decor for “wedding bulls” is the use of sparkles. Their color can be any! The brightest and most festive, of course, is gold.
Materials:
- a bottle of champagne;
- glitter;
- decoupage glue;
- varnish and brush.
1. Carefully apply glue to part of the vessel and generously sprinkle with glitter.
2. Coat the bottle with additional varnish. Ready!
DIY champagne bottle painting for a wedding: painted bottles
You can beautifully decorate bottles of champagne for a wedding using your talents. We offer several options for painting bottles at home.
Painting with decor.
Glue pieces of paper tape in the shape of the chosen decor onto the prepared bottle. Paint the bottle with spray paint. To ensure an even color, the bottle is painted 3 times. Before applying the next layer, you need to wait until the previous one has completely dried.
- Remove the tape from the dried bottle. Decorate the pattern with flowers, butterflies, beads, etc.
- Paint with acrylic paints and tie a ribbon.
- Spot painting. You can beautifully paint a bottle of champagne for a wedding using a glass outline.
- You can apply the design to the glass itself, or by pre-matting the bottle in the desired color.
Decoration using photographs of young people
Festive bottles of alcoholic drinks, decorated with photographs of young people, look quite original. Photos can even be placed on labels, the main thing is to use your imagination in time and not be limited to standard ideas.
In addition, sometimes images are placed on glass using a special decoupage technique.
You can create such an original decoration yourself. If you don’t have enough time for this, contact a printing company, where they will print a label or a separate photograph on thin paper.
Engraving on bottles
For true lovers of luxury, an excellent option for bottle design is glass engraving. But here you cannot do without the help of a professional. Only a master will be able to apply any pattern you choose, regardless of complexity. Even simple and small patterns will look great on dark green glass.
With this decor you will add luxury and aristocracy to the bottle.
The choice of bottle decoration depends on the personal wishes of the newlyweds. Some people choose patterns in the form of angels, curls, rings, doves, etc. Any version of the design looks great, and you can choose engraving in silver or gold.
But modern experts can offer you images in other shades, even transparent ones.