When the wedding time comes, you want to remember this moment for the rest of your life and be the most beautiful that evening, have the most beautiful dress. However, not everyone is ready to buy expensive products at a high cost for one evening: it is quite expensive. Moreover, experienced craftswomen can sew themselves a dress that is in no way inferior to fashionable products from salons and ateliers. This not only saves a lot of money, but also develops sewing skills and provides an interesting pastime. This material will discuss sewing wedding dresses: how to sew a dress for a wedding, what style to choose, how to cut and sew the product.
Choice of style
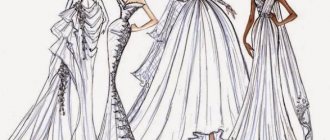
First, you should choose your style: determine which one you like best and which one fits your figure better. Since the choice directly depends on the proportions of the body and its length, you should remember tips that should not be neglected:
- For short women, a non-fluffy outfit that touches the floor is ideal. When paired with high heels, the product will lengthen your figure;
- Overweight women should avoid voluminous skirts. A straight dress is better for them. This also applies to pregnant women;
Ideal style for plus size people
- For women with curvy hips, the look should fall on products with a round neckline and open shoulders with lace. This will shift the focus from the legs to the chest;
- Tall height can be hidden with a dress with a full skirt, if this is, of course, necessary;
- Large breasts look good in high-necked garments;
- For small breasts, Greek-style dresses and bustier dresses are perfect;
Lush product with a train
- For girls with an hourglass figure, any type of dress is suitable, but special attention should be paid to the “mermaid” or “fish” type. This way the waist will look even narrower and slimmer;
- Women with slender legs will benefit from short products that highlight the beauty of the body;
- For girls with beautiful shoulder lines, a dress with straps is recommended.
You might be interested in this. Pattern of a children's and adult's hat: sewing order
Dress decorated with stones
Color
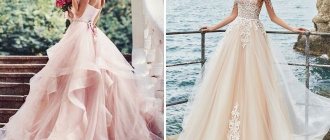
The traditional color of the bride's dress is white. In fact, this is not at all necessary. Look at wedding catalogs - you will see gorgeous red, blue, green, purple and whatever brides wear.
Several principles must be followed:
- You should like the color and even the shade.
- The main task of your outfit is to emphasize your beauty, that is, you need to choose a material that suits you.
- Don't forget to take into account the groom's outfit - your white dress will certainly go with a classic black suit with a white shirt, but if you are marrying a sailor and he will be wearing a white jacket, it is better to choose something brighter.
- Most often, brides choose plain fabrics, but this is also not necessary; large bright patterns and multi-colored elements are not prohibited.
Variety of materials and accessories
Before purchasing materials and other accessories, you should sensibly assess your capabilities and skills. Wedding dresses are typically made from satin, silk, taffeta, cotton or tulle.
Important! If you have little experience in sewing, then you should give preference to simple fabrics. Chiffon, lace or silk can be too much for even experienced seamstresses.
Bow decoration
The material of the canvases is also selected based on the theme of the celebrations. Silk is suitable for an aristocratic style. To add sophistication and sophistication - lace materials. For an outdoor wedding ceremony, chiffon would be ideal. Warm taffeta is suitable for a winter holiday.
The color of the canvas also plays an important role. Usually they choose classic white or milky colors, but if you want to stand out, you need to choose a shade that matches your skin color and tone. It is worth paying attention to blue, beige, cream, pink and scarlet colors. You can either sew an entire outfit from such fabric or decorate it with it in certain places.
Product with cords
Where to begin?
Before you start making a wedding dress, you need to choose a style, decide on the material and find a pattern. How the final version will look depends on the right choice. An ideal figure is the dream of all girls, but not everyone can boast of it. Therefore, the dress should emphasize the advantages and hide the disadvantages.
Remember that the bride herself should attract attention, not her dress. If you decide to sew your wedding dress yourself, choose a style that is not difficult to make, but one that will make you unique and sophisticated
A simpler dress will be easier to sew and will emphasize impeccable taste. Programs where you can virtually try on the style of dress you like, expert advice (you can contact a professional cutter), various websites, sewing and design magazines, and catalogs will help you in your search. You can combine all methods.
KNOWLEDGE BASE: Popular wedding accessories, or what is a wedding veil
Constructing a pattern
If the dress pattern has been selected, then you can begin to transfer it to tracing paper using carbon paper and cut out the patterns in natural sizes.
If you can’t find anything interesting, you can create a pattern yourself using your individual measurements. Ready-made options can be found in special magazines or on the Internet.
Bead decoration
Important! The purchased or downloaded pattern must be checked against your dimensions and proportions and adjusted if necessary.
Work on the pattern begins with working out the basic mesh of the product. When all calculations are completed, points are plotted and connected by segments. In this way, the neckline, dart, waist, shoulders and their slopes are formed, and the length of the dress is adjusted. Such an experiment will be within the capabilities of experienced seamstresses. Beginners are recommended to use ready-made patterns.
Unusual color
Mermaid
We can say that the mermaid is the most interesting style for designers. The fitted silhouette and flared skirt remain unchanged, but what the bodice and tail will look like depends on your imagination.
We present to your attention a simple model with straps and a light drapery on the bodice, which will give a small volume to the chest and focus attention on the neckline area; a wide belt will further contribute to this.
Front modeling
- Add the length of the skirt you need on the basic pattern and flare it out. The splendor of the “tail” depends on the width of the flare.
- Draw the neckline and armhole. Close the dart.
- The bodice is cut off, so set aside 15-16 cm from the neckline and model a belt 8-9 cm high (see pattern).
- The belt is ready, we will cut it.
Bodice modeling
Cut the front of the bodice along the lines and widen it by two cm (see picture). The distance between parts can be increased to 3 cm if you want the number of assemblies to be large.
Back modeling
Model the back in the same way as the front of the dress.
This outfit should be very tight-fitting to the silhouette, which means that minimal increases in freedom of fit are made.
Decoration of the belt and bow
- To drape the belt, you need a rectangle with a width equal to the width of the front part of the belt (detail 2). Its height is 2 times greater.
- Sew the rectangle along the sides, carefully pull it evenly to the width of the front waistband. Baste them together and stitch them together. Then baste the drapery along the top and bottom edges. Then sew as a single-layer piece.
- For the bow, also cut out two rectangles. Their finished width should be equal to the width of the front part of the belt, and their length should be 75 cm.
- Sew all the details of the dress. Sew the finished bow elements into the sides of the mermaid and tie with a bow.
How to sew a wedding dress with your own hands
After the pattern is constructed, you can begin sewing, which involves cutting the fabric and stitching it together. Cutting is the main process in the manufacture of clothing, requiring care and precision. If cut correctly, sewing the parts together will not be difficult.
You might be interested in How large-format prints are made on fabrics
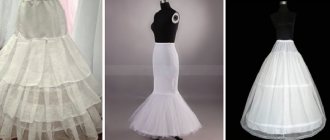
Satin dress
Uncover
Cutting helps to check the accuracy of the pattern layout in accordance with the selected model and body parameters. At this stage you need:
- Check the allowances for a loose or tight fit of the product;
- Check and determine the front and back sides of the future product;
- Check the direction of the patterns and pile, if any.
After this, the parts are cut - cutting out the outlined contours with strict consideration of all seam allowances. If the fabric is dense, then you should cut out the parts in one layer one after another. This will significantly reduce the physical stress on your hands.
Silk product
Sewing
When the cutting is finished, it's time to start sewing the dress for the wedding. While sewing, you should accurately and clearly baste the parts together at the seams, check the parameters of the product according to its shape, and put it on for preliminary fitting before the final application of the internal seams.
Important! Before sewing, all auxiliary elements of cutting are removed: pins and needles are removed, cuts of darts and pockets are transferred using various methods.
Scheme of facing the sprout of the neck
Assessing the pros and cons of your figure in the mirror
The main task of a bride at a wedding is to be beautiful! The slightest miscalculation in the image can knock the impressionable bride out of the saddle. This means we think through the outfit down to the smallest detail.
Let's start by recognizing our shortcomings and identifying our strengths.
Posture
Stand barefoot on a vertical surface, press your shoulder blades and heels against it:
- If you feel comfortable in this position, then you have normal posture.
- If the back of your head presses with difficulty, you have to bend your neck to do this, which means you have a stooped figure.
- Provided that the shoulder blades do not “want” to touch the wall, we can talk about a kinked figure.
It is important to consider your body type:
- Circle. This type is also called an apple.
- Triangle (there are two types, depending on the position of the base of the triangle). The figure - a triangle with the base downwards is also called a pear.
- Hourglass.
- Rectangle.
These are the main types, there are several more transitional ones.
Depending on these types, different styles of dresses will suit you.
Advice! Before sewing, be sure to visit several stores, try on dresses of different cuts, perhaps a style you haven’t even thought about will suit you. All that remains is to bring it to life.
Sewing a train for a wedding dress
The train automatically adds elegance to any floor-length product. It is suitable for both a fluffy dress and a Greek version. It can be of different shapes and lengths, but you should not overdo it, because a heavy and too long train will prevent the bride from moving and dancing. An important recommendation when sewing with a train: pay attention to the overall style and texture of the dress, so that the element goes well with them.
The element itself is sewn into the back of the skirt. A long wedge is made that will be longer than the product itself. The second option is to lengthen the main back seam of the dress by the required amount. At the same time, the side seams also widen, leaving seam allowances within one centimeter.
A long dress emphasizes tall height and a slender figure well
Fitted outfit
Patterns for beginners do not contain complex elements. Simple geometric shapes indicate parts of the product that remain to be cut out and sewn together:
- Draw the main parts on a rectangle. This model hugs the figure and is designed for small sizes.
- The side of the rectangle includes the length along the back and the length of the hem. The width is common for the back and chest parts. Will be adjusted with underbust darts.
- The depth of the collar is equal to the width of the straps. Round off the junction of the back, chest and sleeves, leaving the fabric to create a seam.
- Cut out two sleeves and grind them down, finishing the edges.
- Sew down the main parts, process the bottom edge and neck. A hidden zipper is inserted on the side.
- Connect all the parts. Hem the edges of the fabric. Create grooves according to the figure.
They are planning how to sew a dress with their own hands. Create a supply of the required color of thread, meter, paper, crayons. Properly selected fabric does not deform after washing. Store finished clothes in an upright position on hangers to prevent wrinkles from appearing. Things that stretch, fold and store on shelves.
Decorating the product
You can decorate the product with accessories, which are selected in the same store or salon where the fabric was purchased. You should give preference only to high-quality fittings. In recent years, when decorating, they often use:
- White or colored lacing;
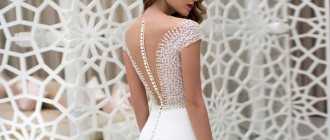
- Embroidering the corset with rhinestones or crystals;
- Decoration of the back with bows, which can be combined with lacing;
- Decorating the chest or waist with flowers;
- Sewing pearls, beads and beads;
- Hanging chains;
- Embroidering appliqués and patterns in the form of flowers;
- Decoration of the product with lace.
You might be interested in this: Creating a pattern and sewing a beautiful evening dress
Dress "Doll"
In conclusion, we can say that sewing a beautiful wedding dress is a task that only an experienced craftsman can do. If a person is new to this business, then you should buy ready-made patterns in a studio or find them on the Internet. Further steps are easier to perform, since they involve cutting and sewing individual parts together.
Taking measurements
Very rarely, wedding dresses are made in oversized styles. For the most part, these are dresses with an emphasis on the waist, emphasizing the bust and curves of the shoulders. It is these silhouettes that express the bride’s femininity, fragility and tenderness. For these reasons, taking measurements of the bride must be approached very carefully.
Since the example is a style with a tight bodice and a fluffy skirt, for the bodice you will need measurements of the waist circumference, chest circumference and front length. Moreover, if the bodice has sleeves, you will need to measure the length of the sleeve and the length of the armhole.
It should also be noted that bust circumference will be required if the bodice is sleeveless and rests on the bust. For the skirt, you will need to measure its expected length from the waist line.
Choosing an image
You will have to decide on many important “small” details of the solemn image that you are striving for. You understand that I used the word “small” in a figurative sense
After all, in such an important matter there are no insignificant details.
Deciding on the style
Of course, having decided to sew a wedding dress with your own hands, you looked at many photos of outfits in magazines and on the Internet. If you do not have professional seamstress skills, then it is better to choose among simpler models.
But also, when deciding on a style, remember that what matters is not how it looks on the model, but how it suits you personally. The ideal outfit should highlight all the bride’s advantages and hide existing shortcomings from prying eyes.
Therefore, I will give some advice:
For plump girls, a long straight dress will help them appear slimmer and taller; if you have prominent hips, then switch your attention to the chest and neck - embroidered and decorated top, open shoulders, round neckline; tall women will look like princesses in models with full skirts; to visually add volume to the chest, use draperies, ruffles, embroidery; High-waisted styles will perfectly hide the imperfections of an apple figure; brides with an hourglass figure will look great in mermaid dresses; If you have slender legs that you can show off, take a look at short or asymmetrical models.
To make such a complex choice as simple as possible, you can use one of the many special programs that allow you to “try on” the outfit you like.
If you can combine both of these methods, it will be just great!
Choosing fabric
Now in stores there are a great variety of fabric options for sewing a formal dress. But there are timeless classics of the wedding genre: satin, silk, lace, taffeta. If you are not very experienced in sewing, choose simpler materials that are not very demanding on the skills of a seamstress.
Some tips:
- A chiffon outfit is perfect for summer ceremonies, and taffeta can be used for winter weddings.
- Silk and satin are indispensable for aristocratic ceremonies in a restaurant;
- Lace is such a versatile material that it will suit any celebration. It can be used to make not only a complete dress, but also individual elements.
Don't forget about the accessories
It is very important to buy these “little things” before sewing a wedding dress. You can find them in craft stores.
Choose high-quality fittings - they are more reliable and look better. These include:
- various rhinestones, stones, beads, pearls;
- ribbons, bows, lace;
- embroidery and appliqué;
- chains, lacing, zippers.
Be original and unique! But don't overdo it. Additional elements should be in moderation so as not to look stupid and vulgar at your own wedding.
For babies
A year or two will pass and your young family will be replenished with a new member, you will have a child
All care and attention will be directed to the little man. To him you and your spouse will give all the best that you have.
It's time to take the box out of the mezzanine and out of the closet and think about what you can make from a wedding dress for your baby:
- envelope for a newborn;
- baptismal set (shirt, dress, cap);
- from a veil, a fluffy thin skirt, an openwork canopy for a crib, cradle.
Of course, you will have to buy additional material for lining, insulation, decorative tapes, and so on.
Before the New Year holidays, the problem of buying a carnival costume for a child for the “Christmas tree” in kindergarten or school always arises. From a wedding dress, you can easily even sew a “Princess”, “Snowflake”, “Snow Maiden”, “Snow Queen” outfit for a girl yourself. With a little effort you can turn it into a costume for a boy: a small snow-white bunny.
Half couture
At one of the shows, Elie Saab presented a red chiffon dress with the illusion of nudity.
The cut of the model is quite complex, so we will consider the sewing stages in detail.
Required for work:
- lining fabric to match the skin tone;
- Chantilly lace;
- chiffon:
- lightning.
Constructing a pattern
Please note that there are 2 options for creating an evening dress pattern with your own hands:
- draw on graph paper and then cut out;
- use the RedCafe program.
The program has a convenient function that divides lines by color, so you can see the location of all the lines.
Note that modeling a skirt is quite simple and you can immediately do it on fabric.
Cutting out the lining
The modeling stage is over, let's start working with the fabric.
- Print out the pattern and fold it into a single piece, matching the corners.
- Then transfer the pattern to the lining fabric and trace the lines with soap or a piece of chalk. You can use a disappearing marker.
Sew darts and side seams on a machine without backtack and with a wide stitch width. This basting is necessary to check the desired fit of the bodice on the mannequin.
Since the model is difficult to sew, check the fit frequently. This way you will be more successful in achieving the desired results.
Working with lace
Cut out the lace fabric according to the pattern of the lining fabric. Fasten it on the sides and sew the darts, after cutting off the excess lace along all the cuts.
Sew the darts at the waist and press them towards the center. Make sure that they are not visible on the lace from the front side.
Stitching raised lines
At this stage, the sequence of stitching the embossed binding is important. The pattern should be beautiful, without overlapping lines. To understand which line will come first, make a sample. For contour lines, use knit bias tape. It is shine-free and easy to work with.
Processing slices
Use knitted tape to trim the edges of the armhole and neckline. Finish the neckline, which turns into a slit on the back, with tape stitched into a spread.
Cut out your skirts
The half-sun skirt consists of a thick lining and transparent chiffon.
First you need to calculate the radius of the waist circumference (From). The radius formula will help you with this: R = (Otx2) / (2x3.14).
Make the bottom radius the desired width.
Working with large cuts has its own characteristics:
- Make sure there are no defects, stains, or stitches on the fabric;
- Try to buy the material in stock, so you won’t overpay.
- Keep in mind that chiffon with natural threads can shrink, so carry out a damp-heat treatment on a sample of the material.
Get rid of the edge. After making a cut, tear it off along the bottom and top edges of the fabric.
To assemble the skirt along the waist line, lay 2 lines 1 cm apart and carefully pull to the desired width. It is better to take reinforced threads, they are resistant to strong tension.
Sew a lined chiffon skirt. Process the cuts using an overlocker. Attach the resulting hem to the bodice of the dress on the mannequin. Correct any discrepancies if necessary.
Next, cut out the belt. Its finished width should be 3 cm.
Sew the zipper into the middle seam of the skirt.
At the final stage, connect all the parts. Sew the belt to the skirt with frills along the bottom edge, and then to the top of the dress.