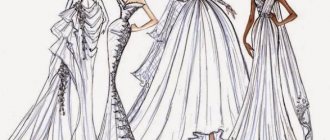
A classic wedding dress is an outfit with a fluffy, voluminous skirt that turns the bride into a fairy-tale princess. It emphasizes the narrow waist and helps you truly feel like the main “actor” of the celebration. To achieve the desired volume, the dress is complemented with a special element - a crinoline or frame. It should be quite rigid, retain the correct contours of the skirt and help to hold up throughout the wedding day, during which the owner will move and sit.
alisa-wedding.ru
Many beautiful dress models lose their “zest” without an underskirt, which adds fluffiness, emphasizing multi-tiered frills, lace of the dress, folds and draperies. It is a stereotype and a myth that petticoats are uncomfortable. Modern products include flexible, elastic rings that do not interfere with walking and quickly restore their shape.
Crinoline is worth using for many reasons:
- unlike several layers of petticoats, crinoline is easy to use - you don’t need to constantly straighten it, it doesn’t bunch up, and the dress looks right;
- crinoline is suitable for summer weddings - it is ventilated and not stuffy;
- outfits with crinoline have a clear, pronounced shape and spectacular style;
- a modern petticoat weighs little, it will be easy for the bride to move, and she will not get tired during the day.
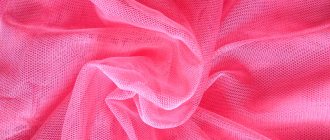
Classic crinolines are skirts made of mesh or light fabric, into which rigid or elastic rings are inserted. Hoops are made from different materials: metal wire, plastic tape. Additional tulle frills are often sewn onto them to create “maximum volume”. The rings support the entire length of the skirt, preventing the fabric from wrinkling. The bride will be happy to review wedding photos and videos, remembering the beautiful outfit.
svadbavo.ru
How to decorate a petticoat for a girl
We have already figured out how to sew a tulle petticoat for a girl.
We also found out that such a product can become an independent wardrobe item. Designer decor can add a special mood to a product. The bottom of the petticoat can be edged with satin braid or ribbon. You can sew small flowers made of fabric, foamiran or even leather onto the product. Don't limit your imagination! Feathers, beads, sequins, balls felted from wool of different colors can also serve as decoration. For the winter version, knitted elements are suitable. A fluffy light skirt trimmed with fur will look stunning.
If your baby plays the role of a snowflake or snow maiden, then the bottom of the product can be sheathed with lush “rain”. For a ladybug costume, small circles of black felt, scattered on a red background of a skirt or a peeking out petticoat, are suitable.
Tutu skirts made of tulle can be worn not only by little ladies. Grown-up girls can use this simple and inexpensive material to sew matching bridesmaid dresses.
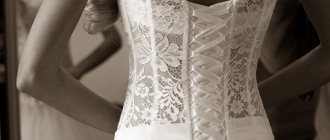
How to properly tighten a corset to fit a bride's figure
The best way to put on your outfit is through your legs. This will prevent you from ruining your makeup and hairstyle. The first step is to fasten the zipper, if there is one on the corset.
You can tighten the corset alone, but it is better to have an assistant.
Traditionally this is done by one person who:
With his left hand he holds the ends of the tape, and with his right hand he gradually pulls it down and touches it in places where crosses have formed.
It is important to smooth the tape so that it has an attractive aesthetic appearance. Once at the waistline, you need to tighten the corset. This cannot be done in the chest area, as the bride will not be able to breathe normally.
At this point, she should be asked to raise her chest with crossed arms. Make sure the zipper runs down the center of your back. Make sure the dress fits snugly on the bride. To do this, ask her to walk around in the dress and find out about her feelings. Then proceed to forming the bow. It can be of different shapes and splendor. The classic option is always in fashion. The length of the ribbons can vary from 5 to 10 cm. To prevent the cord from starting to unravel, it can be coated with colorless varnish.
An elongated corset requires special attention. The procedure for tightening it is almost the same as described above, but has one nuance. Having reached the waist, you need to pull out the ribbon and leave a margin of approximately 15-20 cm. Lacing it to the very end, we form the first bow. Tighten the loops left earlier and tie a second bow from them. We straighten the tape and enjoy our work.
We invite you to watch a video that shows in more detail how to properly lace a wedding dress with a satin ribbon:
Is it possible to alter a wedding dress: what do the signs say?
Do you remember if your mothers and grandmothers still have wedding dresses? Not everyone. But the wreath and veil are definitely lying in the far corner of the closet, neatly folded in a box. The fact is that, according to superstitions, it is the bride’s jewelry that cannot be transferred or sold to other people, because this way you can give your family happiness into the wrong hands.
What can you do with the dress after the wedding? Anything you want - donate, sell, or alter. This is even considered noble, because not everyone can afford to buy a new outfit, and buying and fitting a used dress is much cheaper. And if you manage to transform the wedding dress and continue to wear it, this is a sign of the young wife’s thrift and thriftiness.
Are you one of those millions of women who struggle with excess weight?
Have all your attempts to lose weight been unsuccessful?
Have you already thought about radical measures? This is understandable, because a slim figure is an indicator of health and a reason for pride. In addition, this is at least human longevity. And the fact that a person who loses “extra pounds” looks younger is an axiom that does not require proof.
To look perfect, maintain a royal posture all day, highlight her advantages and hide her flaws, the bride needs to choose a corset that will become an indispensable assistant for her. We will tell you how to lace a wedding dress correctly and what to consider when choosing it.
Correct lacing of a dress is one of the keys to a successful wedding, because if it is not done correctly, then at best the bride will feel uncomfortable all day, and at worst it can lead to suffocation or disruption of the cardiovascular system.
How to fold a wedding dress petticoat
But if to store the dress itself it is enough to simply choose a place in the closet, then to store the petticoat of a wedding dress. rings or crinoline need a lot of space. Folding a crinoline is a difficult task - the rings wrinkle, bend and simply refuse to fold. Skirts with removable rings are available in stores, but they are significantly more expensive than regular ones.
Why does a wedding dress need a petticoat?
Try to imagine Cinderella at the ball. The imagination immediately pictures a fragile girl in a magnificent ball gown. But the fact is that the dress itself cannot be magnificent. In some cases, the effect of pomp is achieved by layering skirts, but most often this is the merit of a petticoat or crinoline. The larger the diameter of the rings, the fuller the skirt; With a petticoat, the hem of the dress will always lie in an even circle, and the skirt itself will have an ideal shape; A petticoat will give you room to walk, it’s comfortable to dance in, and your legs won’t be too hot.
Difference between petticoat and crinoline
Crinoline is basically a construction made of rigid mesh and flexible rings. The petticoat may not have rings at all, but consist of many frills or tails. This is the look that is chosen for dresses with a long or heavy train. They are made from tulle, mesh or organza - the choice of fabrics is great.
How to fold a crinoline or petticoat as compactly as possible?
For this you will need the help of a friend. If you have a crinoline with three rings, place it on a flat surface, circles one on top of the other, take them and try to fold them all into an eight at the same time, then turn the resulting eight over to the reverse side. Next, you need to stack the resulting circles on top of each other, and take them in bulk and pack them in a thick crinoline storage bag.
If your petticoat has more than three circles, you will also need help. You need to place the crinoline on a flat surface, in circles on top of each other. But you need to fold each pair separately, everything except the smallest one. Fold the figure eight backwards again. By the way, using the same principle, it is recommended to fold the product on several rings when you need to get into the car.
In order not to suffer from the problem of how to fold the petticoat of a wedding dress, pay attention to how the crinoline is folded in a wedding salon. Find out what material the rings themselves are made of, how flexible they are and how susceptible they are to deformation.
Almost all modern crinolines use hoops made of regilene or flexible but durable plastic.
So, the only way to compactly fold a crinoline or petticoat of a wedding dress with any number of rings is to stack the hoops on top of each other and roll them into a figure eight. Then you need to fold the figure eight with the back side and put the circles on top of each other, take someone to help you with this. With this storage method, the rings do not deform even for a very long time - if necessary, they can be easily unrolled, after which they need to be allowed to hang for a while and they are ready for use again.
Useful tips for lacing a dress for a wedding, video
Experts recommend adhering to the following rules:
- If you are lacing the bride's robe for the first time, it is better to start with the dress removed.
- It is recommended to start lacing from the top and work your way down.
- If there is a zipper, the first thing you need to do is fasten it, and then start lacing.
- The bride's dress should fit snugly around the waist.
- While lacing, you need to support the bride's breasts with your hands so that they have a beautiful shape.
Pregnancy is not at all a reason to refuse an outfit with a corset. Wedding dresses for pregnant women need to be laced up to the strip along which the bra line runs. At this point the ribbon is tightened and a bow is formed. Then they continue to lace, but so that the belly is not pulled and the bride feels comfortable.
For a wedding dress with an open back, it is important to lace up the bride so that no folds of skin form above the corset. Ask the girl to stand straight and straighten her shoulders and only then start lacing
In this case, do not tighten the tape too much. It is also necessary to ensure that it does not dig into the skin.
Here is another video with detailed instructions for tightening the corset on a wedding dress:
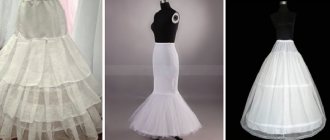
Types of petticoats
In order to choose the right petticoat, you need to consider the features of all models. Modern wedding fashion suggests the presence of several options for these clothing details. They can be:
- made from soft and lightweight materials with the right amount of frills (this depends on the silhouette of the dress);
- soft with plastic rings;
- crinoline with rigid rings;
- multilayer air.
The first option without rings can be used to slightly expand the skirt towards the bottom in Empire styles and models with a slight flare. It will add elegance and femininity to A-line dresses by slightly raising the sides of the hem. The volume of such a product will depend on the number of frills sewn onto the main fabric.
Greater volume is created by designs with plastic rings on soft woven bases. They are very comfortable, do not rub the skin and are almost invisible while moving. They do not rise when walking, remaining in a natural position. Such models can be used even for very light overskirt materials, such as chiffon and thin lace.
Depending on the number of rings, the design can be used for outfits of various styles. With one or two rings, the petticoat will look good in empire and slightly flared silhouettes. The design with a number of rings from three to five perfectly supports princess and A-line outfits. For a “mermaid” dress, there are special elements with rings at the bottom.
The classic option is a rigid crinoline with solid rings. This is the most inexpensive and simplest type of petticoat. This design is quite comfortable when moving, the girl practically does not feel it. They add volume well to fluffy dresses, expanding the hem around the entire circumference.
The disadvantage of these models can be considered a certain rigidity of the rings, which can be visible when moving, especially if the fabric of the upper skirt is thin. Such elements are well suited for dresses made of satin fabrics or with a lush train. The second drawback is that the structure can rise when walking, revealing itself. It can also be seen when the bride sits down or lifts her skirt.
Multi-layered full petticoats without rings are more comfortable and invisible under clothing. They fit well under the top of the outfit, effectively lifting the necessary parts of the dress. They do not restrict movement at all, allowing the girl to dance and move without tension. These elements do not shine through even through the thinnest materials of the overskirts.
In some models, petticoats can peek out from under the upper skirts, forming part of the outfit. They perform two functions: they raise the hem and create the necessary volume, and also effectively decorate the bottom of the dress, acting as a decorative element. They can be close in color to the main outfit or contrast with it. Airy multi-layered petticoats in contrasting colors look incredibly romantic and original.
Purpose
crinoline The purpose is to give the dress an additional ring-shaped. The splendor of the details gives wedding dresses enormous pomp and volume. Other accessories cannot boast such data. A crinoline skirt helps give it a voluminous shape. Depending on the number and location, the girth of their rings determines the final shape of the skirt.
Voluminous skirts made of light fabrics or wedding skirts with skirts fall between the legs when walking. In this case, if the dress is not planned to be voluminous, buy a petticoat with minimal rings. It externally protects the bride’s appearance from the impression that she is wearing wide pants.
How to change a wedding dress into a child's dress?
If you want to create an original and unique costume for your child for the New Year or any other special occasion, you can change a wedding dress into a child's dress with your own hands. A Snowflake, Fairy, Princess or Snow Queen dress from a wedding dress will turn out just great! But for this you will have to work hard: tear off all the decor, rip the dress into its component parts and smooth them out, take measurements from the baby and make patterns, cut out parts from the resulting material and sew them again, and then add decorative elements. But, believe me, you will get an excellent children's dress, which will exist in a single copy!
If you have a son, your outfit can also benefit him:
- a wedding dress will make an excellent envelope or blanket for discharge (you just need to buy padding polyester or other soft padding);
- from the dress you can sew a baby vest and a baptismal cap;
- the translucent fabric from the skirt will make an excellent canopy for the crib.
As you can see, it is quite possible to change a wedding dress into an evening, everyday or children's dress after the wedding. Depending on the cut and style, model features and decorations, you can choose any alteration option acceptable to you. For example, you can remove the entire bodice or skirt and replace it with new ones; remove all decorative elements or frills and ruffles, reducing the pomp of the dress.
Well, as an option: you can repaint the dress - completely or partially. For example, you can rip off the top lace layer, dye it and sew it back, leaving a light base. There are many ideas!
We will always tell you whether it is possible to alter a wedding dress, how to do it and what the end result will be. The wedding portal www.svadebka.ws is your best assistant in preparing for the wedding!
- 1231 views
- 24 photos
First steps
There are a lot of models of wedding dresses on the Internet, magazines, and catalogs. And the first thing to begin tailoring is the choice of style. Of course, you don’t need to sew the most fashionable outfit, and not the one that looks beautiful on the cover, but the one that suits you personally: it removes flaws and emphasizes your advantages.
Where to look?
- Special programs will help simplify the selection of a style, using which you can virtually try on yourself, or rather on your photo, the outfit you like and evaluate how well it “fits”.
- You can browse websites, catalogs, and magazines on this topic.
- It is better to seek advice from professionals. Going to a bridal salon is one such option. You should definitely take your mother or a sincere friend with good taste for company. Unlike a virtual fitting in a wedding salon, you will be able to test in practice the convenience of a particular model and the comfortable feeling in it. At the same time, you will have a good opportunity to take a closer look at the materials and their textures.
It’s very good to combine both options for searching for a dress style: programs and salon. Be sure to try on several types of dresses of the same model and, if possible, take photos.
Subtleties of choosing a style
Let's look at some nuances regarding choosing an outfit:
If you have beautiful, lush breasts, it is better not to focus attention on them on this day. Therefore, put the dress with a deep neckline aside
Large lace and lush frills are also not suitable for you. This also applies to a bustier dress made of satin, organza or silk. But on a bride with graceful small breasts, a bustier dress and dresses of an asymmetrical cut or Greek style will look perfect. The missing volume in the neckline area will be added by draperies, embroidery or ruffles. If you have curvy hips. Here, turn your attention to the chest or neck. The neckline of the dress can be round, V-shaped, the top of the dress can be embroidered, decorated with lace or unusual drapery. You can choose an off-shoulder outfit. A bride with an apple figure will be adorned with a wedding dress in the new look style. This style will emphasize all the advantages, namely the legs and hips, but you need to choose a dress that is less fluffy and not tight. A good solution would be to choose a high-waisted model in the Greek style or a straight wedding dress. The mermaid model is very suitable for a bride with an hourglass figure; A tall girl in a fluffy dress will look like a real princess.
Choice of fabric and accessories
Shops that specialize in fabrics for wedding dresses will provide you with a wide selection of fabrics, colors and textures. For example, organza, satin, satin, all kinds of ribbons, mesh, decorative elements, etc.
If you are new to sewing, it is better to opt for simple fabrics that do not require sewing skills. Also, when purchasing, you should clarify the possibility of combining different materials. For example, for satin with a shiny surface, the ideal companion fabric would be a matte material that will reduce its shine. Lace is suitable for any type of fabric. Using it, you can give your outfit a strict or playful look.
If you have found a pattern with a description of the work and the necessary materials, you can choose the fabric to your taste, choosing exactly the color and material that will be comfortable and best suits you.
Search for a pattern
The chosen model or the one invented must be transferred to paper. Before this, measurements are taken. To do this, ask your loved ones or friends, or use the services of a seamstress.
The pattern can be found on the Internet on paid and free pages, or by entering the dimensions into the appropriate programs, you can search in magazines or use the services of a seamstress or model it yourself.
The main thing is that the construction of the pattern must correspond to your dimensions, be accurate and correctly constructed.
The step-by-step process of sewing a wedding dress is presented in the following pictures. It is not difficult to sew such a dress.
Constructing a pattern
A simple option would be to transfer the finished pattern from a magazine onto a large thick sheet of paper using carbon paper; you can take old unnecessary wallpaper. Make a pattern.
If you were unable to find the desired model and working with the drawings does not cause difficulties, then you should start working by constructing a basic pattern. By the way, you can ask around for a ready-made version of it in sewing stores or look for it in the same magazines and websites.
The basic pattern drawing starts with a basic grid. Then, according to the formulas, dots are applied and connected by segments, forming the neckline, shoulder bevel, main darts, armhole, waist and length of the dress.
What kind of petticoats can there be?
It is so beneficial to emphasize the features of the style of the dress you have chosen, like a petticoat, it is impossible in any other way. The skirt is gracefully designed, fluffy and complete. The bride in this look looks stunning.
Jest
The Jest petticoat consists of five tiers of fabric or rigid mesh. In its own version it is suitable for A-line and empire-line dresses. Can be used in combination with crinoline rings, preventing them from spoiling the silhouette of the dress.
And there is a minus here, which is the lack of pomp if the Jest petticoat is used without rigid rings.
With soft rings on fabric
Similar in design to classic petticoats are elements of a wedding look with a soft fabric base and flexible rings. Such petticoats do not cause irritation to the skin and do not rise during movement. They are so invisible under a skirt that they can be used for very light fabrics folded in several layers (chiffon and tulle).
Depending on how many rings are present on the petticoat, it should be used with different outfits:
- if there is not a single ring, then you can complement the empire style and mermaid dress;
- if you have one ring, you can use it in outfits from the previous point, A-line and any dress with a straight cut;
- two or three rings are suitable for A-line dresses and ball gowns;
- four or five rings are an option for ball gowns.
Crinoline on a rigid mesh
The classic, most popular and inexpensive are petticoats with crinoline rings. Their shape is characterized by rigidity, which is supported by rings placed one above the other. Such a petticoat can have one ring or as many as seven.
The advantage is that the bride will not feel tightness around her legs, will be able to move freely and not get tangled in her skirt. Everything would be fine if not for one thing.
The price is not great, but the appearance is unaesthetic. The petticoat with crinoline rings rises slightly when moving, and if the skirt of the wedding dress consists of thin fabric, then its frame is visible. Therefore, it is suitable for skirts made of dense fabric, for example satin and models with a train. Metal rings will best provide the necessary support.
With a train
The meaning of petticoats with a train is the same as in the options discussed above. But here additional support for the cable is required, which affects the cost.
However, this can also be considered a disadvantage, since when sitting down or lifting the skirt, it can expose the petticoat.
Petticoats without rings
In terms of beauty, effectiveness and high cost, multilayer petticoats win, the design of which lacks any hint of rings.
This option cannot be compared with crinoline models, since its advantages speak for themselves:
- lay down beautifully;
- not visible through the fabric of the skirt;
- do not show through even through very thin fabric;
- look impressive with any movement of the bride;
- They allow you to sit down freely and not worry about protruding rings, which are simply not there.
Discussions
1 message
How many times do you have to try them on, travel around the floor, and maybe the whole city, to find THE SAME one!
Some will prefer the “Mermaid” silhouette, while others, on the contrary, will prefer a full, floor-length skirt.
And here is the next article for those who choose the latter.
Let me make a reservation right away that CONS occurs when the rings and crinoline are not chosen correctly.
1. The dress does not curl around the legs, does not get in the way
2. If the petticoat has rings, it makes it easier to lift the skirt when you step over something, sit down, etc.
3. The dress wrinkles less and keeps its shape
4. Relevant for many – it creates an additional silhouette (like an hourglass, hiding the hip area)
5.A dress with a petticoat is easier to wear. The petticoat takes on some of the weight of the material
1. Classic crinoline, simply mesh with built-in rings
they come in one, two, three, four or more rings, usually up to a maximum of 7.
Also, the rings themselves can be of different diameters.
– how fluffy do you want the dress to be?
– as much as the dress model allows you (if you have a low-waisted corset, then this is a maximum of 2 rings)
– your convenience! because ideally, the top, or at least one of the rings, should be at the level of your hand down, so that you can easily take it and elegantly lift your skirt without getting tangled in the folds.
You can wear it BY YOURSELF, that is, just wear it under a skirt to add a little fluff and soften the silhouette of the dress
But most importantly, dressed over a crinoline with rings - IT HIDES THE RINGS!!!
There are also crinolines or petticoats specifically for dresses with a train
they have a layer of tulle at the back, this is so that your train does not fall immediately along the back, but first falls gently.
If the groom lifts you in his arms, hold your skirt with your hand so that nothing unnecessary
DIY petticoat with frills
If desired, a girl can sew this wardrobe item with her own hands. If she chose a model without rings, then making it is quite simple. Once you decide on the silhouette of the dress, decide how full the skirt will be. The largest volume is found in the princess and A-line silhouettes with large flare from the hips.
A soft petticoat with a small amount of frills is suitable for styles with a slight extension, such as an empire line or a slightly flared A-line. For the manufacture of soft structures and medium hardness, fabrics that hold their shape, such as tulle, calico, and organza, are used. The choice of material when creating a petticoat with your own hands depends on the desired degree of softness of the underskirt.
First you need to sew the base of the element according to the shape of the dress. Most often it has a medium flare starting from the waist. Don't forget that the bottom part should be at least 10 cm shorter than the top skirt. The top of the product can be gathered with elastic to make it easier to put on.
Then determine how many ruffles you want to make. The pomp of the overskirt will depend on this. The more flounces, the more voluminous the dress will be.
Next, straight strips for rent are cut out. To do this, you need to measure the diameter of the skirt at the place where the flounce is sewn on. Please note that the finished frill will be approximately three times smaller than its original length.
Gather the top edge of the flounce with a thread and sew it to the desired location on the base. Sequentially sew all the flounces to the main part.
When choosing a wedding dress, do not neglect such an important detail as the petticoat. A correctly chosen model will give completeness to the image and make it more solemn.
You should start choosing this element after you have finally decided on the style of the wedding dress.
Design Features
The bride can independently choose between a removable and one-piece train. Many fashion designers are of the opinion that the best solution would be to lay out the train in the form of a bustle. To do this, it is raised a little, and then attached so that its lower fold coincides with the length of the skirt. Then the train can be draped.
There are several ways:
- Thread loops are attached to buttons that are placed at the waist of the dress, and then this design is disguised using a variety of decors, such as rhinestones, lace or appliqués.
- On the underside of the overskirt there are loops attached to which a train, pre-folded, is attached.
- An alternative way is to use just one loop, which should first be sewn to the train, and put on the hand or finger for the celebration.
- The train in the form of a cape allows you to attach it to the back or straps of the dress.
In turn, one-piece trains can also have several varieties:
- decorative elements begin to be used from the knees (the “Mermaid” model);
- the train is sewn along the waist line;
- from the hem of the dress, then the train refers to the continuation of the wedding dress;
- from the hips.
We sew a train for a wedding dress
The train automatically makes any floor-length robe look elegant! It is suitable for both a lush wedding dress and a Greek-style outfit. The train can be of any length and shape, but a train that is too heavy can prevent the bride from moving and dancing freely. To sew a dress with a train, you should focus on the overall style and texture of the outfit.
There are several ways to cut a train. If desired, you can always add stride length by sewing in an additional wedge. It should be sewn into the back of the skirt, making this wedge longer than the dress itself.
Another option is to lengthen the main seam of the back side of the dress to the required length. The side seams should also be widened. When cutting, you need to leave small seam allowances (about one centimeter).
A little history
Each new element of decoration is initially criticized and rejected. This was the case with the train back in the 15th century. The magnificent Agnes Sorel, one of the queen’s close associates, introduced this decorative element into fashion. The clergy flatly refused to accept the luxurious lace fragment, saying that the tail was a personification of the devil. But, despite the remark of the ancient Old Believers, brides chose the outfit of a princess in a wedding dress.
The royal train came into fashion in the 19th century after the wedding of Princess Victoria of the British state. The girl's image was truly royal, especially the magical detail that decorated the back of the dress. Many iconic figures from different countries choose a dress with a train, showing its majestic beauty, and theirs too.
The Swiss princess had a lace tail that reached 3 meters. The famous Kate Middleton also opted for a wedding dress with a train. Many celebrities and ordinary girls love the interesting design with an extended hem at the back for the charm and beautiful combination that can be achieved.
Ten stylish tips for choosing a wedding dress style
The choice of style directly depends on the proportions (height and figure). Below we give a few tips that should not be neglected if you want to sew a wedding dress with your own hands.
For girls of small stature, a modest, floor-length outfit is best suited. In combination with a high heel, it elongates the figure. It is better for plus-size women to avoid outfits with voluminous skirts; in such a situation, a straight dress would be optimal. For ladies with curvy hips, we advise you to take a closer look at dresses with a round neckline, open shoulders and a lace top - this way you will shift the emphasis from the hips to the chest and neck. Tall height will be hidden (if, of course, you want to hide it) by a dress with a full skirt. Lush breasts look neater in a dress with a high neckline
It would also suit a lady with a swan neck;) Grecian-style wedding dresses and bustier dresses look great on figures with a small bust. For the lucky owners of an hourglass figure, any model will suit you, but we recommend paying attention to the “mermaid” or “fish” - your waist in such an outfit will be even thinner! Apple-shaped figures will also suit an outfit with a high waistline. If you can boast of slender legs, pay attention to short wedding dresses. For girls with a beautiful shoulder line, we recommend thinking about a dress with straps that are slightly lowered on the forearms.
Constructing a pattern
Has your wedding dress pattern been chosen? Then you can safely transfer it to tracing paper using carbon paper and cut out the pattern in full size.
If your search for a pattern to sew a wedding dress has not been successful, you can try to build it yourself using individual measurements. The finished pattern can be found in magazines (we recommend checking out Burda issues), purchased in fabric stores or found on the Internet.
Important! Be sure to check the purchased or downloaded pattern with your measurements and, if necessary, adjust it!
Work on a drawing, as a rule, begins with the construction of a basic mesh. Having completed the appropriate calculations, we draw the points, connect them with segments, form the neckline, darts, waistline, shoulder bevel and adjust the length of the product. Sewing a wedding dress with your own hands using your own pattern will be within the capabilities of experienced craftswomen, but we recommend that beginners use ready-made patterns.
Sew it yourself
Undoubtedly, a wedding dress requires a much more responsible approach than any other outfit. And for obvious reasons: not only is this an outfit for a special occasion, but this outfit will be the center of attention of all those present. But first of all, the dress should please the bride herself.
It is worth approaching tailoring with all seriousness. Each step of the sewing algorithm requires a lot of attention.
The algorithm of action is, in principle, the same as when sewing any other dress:
- Taking measurements.
- Choice of style.
- Choice of fabric.
- Construction of a pattern.
- Cut out the material.
- The process of sewing a dress.
- Trying on and correcting flaws.
Now in more detail about each stage. For an example of sewing a wedding dress, let’s take a style with a tight bodice and a full skirt.
Tips for different body types
A curvaceous girl would be better suited to a modest, fitted, floor-length dress.
On your wedding day, you should not focus on protruding breasts. Avoid lush frills, ruffles and deep necklines
An A-shaped silhouette, a minimum of decor, and an emphasized waist will make the figure slimmer and more elegant.
For a bride with a graceful figure, on the contrary, all of the above will suit amazingly. Beautiful draperies, ruffles and embroidery will add volume to small breasts. The ideal option is a bustier dress.
A bride with curvy hips should turn her attention to the top of the dress. A V-shaped neckline on the chest or an open back will help with this.
A fluffy dress with an accentuated waist will cope with this task perfectly.
A dress in the new look style is suitable for a short girl.
And on tall people a dress in the Greek style will look great
Modeling a wedding dress by Godet
As an example, let’s model Godet’s wedding dress. The fabric for the dress can be any dress material, for example satin, taffeta, openwork. It must be taken into account that it is tight-fitting and allowances should be minimal.
Sequencing:
- On the front and back patterns, transfer the darts and draw a cutting line, as in the photo below. When cutting the dress, you will have a front consisting of three parts and a back consisting of 4 parts. The central part of the back consists of two parts, since a hidden zipper will be sewn in.
- Decorate the neckline of the dress.
- Choose the length as you wish. Moreover, the flounces are not taken into account, that is, the length is measured to the place where they are sewn.
The pattern of the flounce, like the belt, is done separately. It is advisable to cut the shuttlecock in one piece, without seams, and if it doesn’t work out, then make it from 2 parts. When assembling, the seams of the flounce should match the side seams of the dress.
Depending on the length of the dress, you can choose the flounce at your discretion.
Uncover
The finished pattern can be transferred to the main and lining fabric.
Open:
- for the front - 2 side parts and 1 part with a fold in the central part made of outer and lining fabrics;
- for the back - 4 parts, 2 of which are side parts made of similar fabrics;
- for a shuttlecock - 1-2 parts from the main fabric;
- for the belt - 2 parts.
It is worth noting that the facings of the neckline and armholes repeat the bodice of the dress. After cutting, reinforce them with thermal fabric.
You will also need metal boning or regillin for the side seams of the front and back, and for the neckline of the dress.
Sewing
- Sew the front and back pieces separately and press the seams.
- Place a stitch 7 mm from the line of each of the front connecting seams, starting from the relief seam and ending with the waist line. You get drawstrings into which the bones are pulled. Their length should be 1 cm less than the length of the drawstring.
- To keep the bones in place, re-stitch the side drawstrings at the top and bottom.
- Make the same drawstrings on the back. Then sew it to the front on the sides and sew a stitch at the top of the bodice for the bones. Insert them and stitch the drawstrings.
- Sew a hidden zipper on the back.
- Overcast the bottom of the dress and sew on a flounce.
- Sew the facings reinforced with thermal fabric with parts made of lining material, and then sew the front and back parts.
- Now you need to sew the lining to the main fabric. To do this, fold them facing each other and stitch along the neckline of the bodice and zipper. When you turn the dress inside out, the seams on the lining will remain on the wrong side. Be sure to iron them.
- Fold the bottom of the lining inward and sew with hidden stitches, thus covering the place where the flounce is sewn. Also tuck the edge of the flounce and hem it with hidden stitches, you can overlay it.
- Place the belt parts facing each other and stitch, leaving a small section so that you can turn it out later. Turn the sewn belt inside out and iron the seams well. Finish the unsewn edge with a hidden seam.
- You can sew the belt to the dress at the junction with the flounce and tie it in a bow or simply tie it beautifully at the waist.
The following video describes in detail the technology of sewing a corset.
The final stage
During the sewing process, of course, the future bride tries on individual basted or pinned parts and elements of the dress. But when the outfit has already been formed, the final fitting takes place. At this stage, the shape of the dress is adjusted, the result is evaluated, and the fabric is decorated.
In conclusion, I would like to say that a hand-made wedding dress will be unique, which means it will be advantageously different from the outfits of other brides. Most of all at a wedding celebration in the summer, when there are no fur coats or capes.
Lush
A dress can become voluminous in two cases - the use of rings or multi-layering. It is believed that the latter option is more applicable for non-curvy models, as well as short or medium-length dresses.
Made of tulle for a half-sun skirt
For a petticoat under a half-sun skirt, volume in the waist and hips is not needed. Therefore, the basis will be a semi-sun skirt and tulle frills.
The material you will need is a lining base (calico or silk) and tulle.
Take the necessary measurements for the half-sun skirt (waist size and length), taking into account the fullness of the future dress, and cut it out of the fabric. Process the top.
Be sure to leave room for the elastic to pass through if there is no button or zipper closure.
Cut out 3-8 rows of ruffles from tulle. The upper tier should cover the fastening seam of the lower tier by 3-4 cm. Therefore, the height of the frill is calculated from the distance between the tiers.
Narrow ones will add fluffiness, but will be able to puff up under the light fabric of the dress, while wide ones will add roundness to the silhouette.
Each cut out frill must be sewn into a ring along the side cut. Process the bottom.
Place one or two lines along the upper edges to tighten evenly. Stitch the tightened rings to the desired size. If you wish, you can make bookmarks by hand and then stitch them on a typewriter.
All that remains is to try on the petticoat along with the dress. If the petticoat gets very tangled in the legs, then sew on a weighting agent, soft wire or regilin, making a narrow drawstring.
From mesh on rings
In order not to get tangled in the multi-layered skirts of a fluffy wedding dress all day, we will sew a petticoat with rings.
From the mesh, make a skirt of the desired volume, which determines the number of rings and their length. You can use a half-sun, sun or six-piece skirt as a basis. In this case, the wedges should correspond to 1/4 of the circle.
The belt can be held in place by an elastic band and additional ties, or you can sew in a hidden zipper.
Now all that remains is to secure the rings with a wide satin ribbon.
- Turn the finished petticoat inside out. Attach a ring to its bottom. Pin the ribbon on top of it so that it completely covers it. Then carefully stitch along the top and bottom edges of the tape so as not to break the machine.
- There is a second way - topstitch the seams, and then thread a ring or regilin.
Attach the remaining hoops at the same distance from each other.
The petticoat is ready. It remains to turn it inside out and if you want it to have a rounded shape, sew on frills. Their width should be equal to the distance between the rings. Length – selected individually.