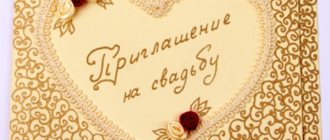
You can inform all relatives, friends and acquaintances about the upcoming wedding, tell them that the bride and groom will be glad to see loved ones as guests at the ceremony and banquet in different ways. Invitation cards are a traditional, but win-win option. They will look especially warm and touching if the bride and groom make original envelopes for them with their own hands.
In them, invitation cards are protected from any damage and look more attractive. A wide variety of materials are used to make envelopes. It is important to make sure that just by the appearance of the envelope the guest can understand in what style the holiday will be organized and held.
Wedding Accessories: Car Decoration
The wedding procession, in which the newlyweds go to the registry office, is decorated with flowers, a composition of flowers and two rings, dolls or soft toys. Various balls, ribbons, and shapes (for example, intertwined hearts) are often used. It is possible to order a carriage with ready-made decorations or rent them in a wedding salon, but the design created by yourself will warm your soul every time you look at it.
You can make a common design with rings yourself. You will need hoses, ribbons, a base for the arrangement and artificial flowers. The scheme for creating the decoration is as follows:
- We connect the hoses to form rings. We attach them to the base (this can be an old plate or polystyrene foam).
- We wrap the rings with floral ribbon.
- We decorate with artificial flowers, bells and other available accessories. The decoration is ready.
See photos for examples of finished jewelry.
Using ribbons, you can create a composition of connected hearts on the rear window of your car.
How to make an original wedding gift with your own hands
There are a huge number of ideas for making memorable gifts. If you decide to present the newlyweds with a sum of cash, then you can create an attractive multi-envelope for money, which will be an unusual gift for the bride and groom that will last a lifetime. Moreover, a thing made with your own hands is always appreciated. An exclusive gift for storing money will be one of a kind, because it is addressed to a specific young family. A do-it-yourself wedding savings book can be made in the form of:
- Folders that will contain envelopes for banknotes inside.
- An album or magazine, where on each page there will be a monetary theme with mandatory cells for banknotes.
What is needed to make a passbook?
A handmade wedding passbook is an interesting postcard, but with more spacious and interesting content. It can be filled with humorous congratulations, wishes of good luck, autographs, poems or unique photographs. The design can be varied, but when choosing, it is advisable to take into account the following nuances:
- The text design should harmoniously match the theme of the page.
- Symbolic photos and drawings should be selected only with festive content and bright design.
- On each page you need to place an envelope for bills, which can be created from suitable fabric or delicate lace.
Cover design options
When creating a savings book for newlyweds with your own hands, you should decide what design you want to give to the product. If you initially choose a suitable thematic direction, it will be much easier to select materials and combine them with each other, creating an original wedding gift. When making a masterpiece, try to use your imagination to the maximum, be guided by the feelings that you want to express in a gift.
Options for designing a passbook cover can be completely different:
- A folder covered with padding polyester and double-sided tape.
- The cover in the form of an image of a state savings book will also look attractive.
- A popular choice for many needlewomen is the scrapbooking technique, which is often used to create a decorative design for a book for storing banknotes.
Additional Tips
You need to create invitations for your wedding in the right mood, then they will turn out to be truly original. Future newlyweds are advised to carefully select materials for work so that the result does not look cheap or tasteless. And the original text of the wedding invitation, composed with humor, did not accidentally offend anyone. Cards for guests should be combined with the theme and color scheme of the entire wedding.
It’s not difficult to create original wedding invitations with your own hands; you just need to use your own imagination and taste and be patient and persevering.
If you do everything carefully and with soul, the result will be no worse than professional, and the guests will be pleasantly surprised by the unusual treatment from the bride and groom.
Types of photo zones
A variety of interior details and furniture can be used in the design of a photo zone. Candlesticks, floor and table vases with flowers, and frames look impressive as a background for photos at a classic wedding.
To design a photo zone for a wedding, various techniques are used:
The simplest option for decorating a photo zone for a wedding
– press wall.
A photo wall is a frame on which banner fabric with a printed image is stretched. When renting wedding decor,
you can order a press-wall of any format and type.
You can install a tantamaresque in the photo zone. This is a stand with holes for a head or face, which will be an excellent solution for having fun for guests and a background for original photographs. Thematic decoration will complement the design concept of the hall.
Wedding decoration rental
will help create an island of beauty not only in the hall, but also on the street. Decorative designs will help convey the romance and solemnity of the moment. Arches decorated with flowers and carved screens will help you remember wonderful moments and save them in spectacular photographs.
When creating photo zones for a wedding celebration, you can bring any creative, original ideas to life. And then the wedding will be remembered for a long time not only by the newlyweds themselves, but also by their guests, and bright photographs will confirm this.
Why control emotions?
Let's think about how often each of us utters such phrases: “I acted so rashly,” “I couldn’t contain my emotions,” and the like? In fact, people tend to justify their own actions by their inability to control their behavior. But such incontinence leads to the destruction of a person’s social contacts, in particular, it negatively affects family relationships, impedes professional fulfillment and career growth, as well as personal development. Therefore, one of the secrets of a successful person can be called calmness - only calmness will help you find the right solution in critical situations and confidently take the necessary measures.
How to develop such a quality in yourself? Where to begin? Below we will tell you
Psychology considers the concept of balance as the ability to respond to external stimuli. Thus, by learning to correctly perceive factors of different types and strengths, it is possible to achieve the ability to control one’s own emotions. How can you stop taking the troubles that arise in life too close to your heart? Below we offer several effective ways to solve this problem.
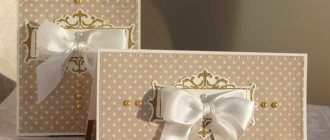
Master class on creating invitations using the scrapbooking technique with your own hands
This option is suitable for the laziest designers. Buy ready-made cards and use them as invitation templates, make your own bows from satin ribbon and glue them on, or stick on a pattern of beads or bugles. You can also make holes in the invitation and thread the ribbon through them. The postcard will become original and unique, and you won’t need much time to make it.
Most newlyweds, when choosing how to make wedding invitations, turn to the scrapbooking technique.
Necessary materials:
- thick paper;
- hole puncher;
- scissors;
- satin ribbon;
- lace;
- glue.
Type the text of your invitation on your computer and print it on thick paper. Cut out a rectangle measuring 9 cm by 13 cm with curly scissors. The color of the paper can be any, choose it in accordance with the theme of your wedding.
At the top of the sheet, in the middle, use a hole punch to make a hole.
From thick paper, as shown in the picture, bend the envelope and glue the edges with glue. The color of the envelope can be the same as the invitation, or contrasting.
Thread a satin ribbon through the hole on the invitation and tie it with a bow.
Use glue to attach lace to the left side of the envelope and a bow to the center.
We admire the beauty.
Another way to make an invitation with a satin ribbon. This option is more labor-intensive and will require perseverance and patience from you.
Necessary materials:
- thick white or colored paper;
- Double-sided tape;
- designer cardboard;
- scrapbooking paper;
- satin ribbon at least 1.3 cm wide;
- beads, pearls, flowers for decoration.
Detailed step-by-step instructions will help you complete this invitation.
Choose the templates you like on the Internet and print the invitation text on white paper, and the front side of the card on colored paper.
Cut out a rectangle of scrapbooking paper identical in size to the front of the card. Glue tape onto scrapbooking paper as shown in the photo. Glue the satin ribbon onto the tape, leaving allowances of 1.5-2.0 cm on the sides. Turn the paper over and secure the ends of the tapes on the wrong side, gluing them to double-sided tape. Cut about 15 cm of satin ribbon. Glue a piece of double-sided tape (about 0.5-1.0 cm) to one edge of the tape.
We roll the tape into a ring and secure it with double-sided tape. Glue a piece of tape inside the ring, to the place where the ring is glued. Glue the ring in half and get a bow. Glue tape to the back of the bow (approximately 2.0-3.0 cm). Glue the bow to the center of the ribbon (you can use a ruler to determine the middle). We cut out a rectangle measuring 14.3 cm by 33 cm from designer cardboard. Fold the resulting blank in half. Paste the invitation text on the right side. Place tape on the inside of the invitation with the text.
Glue the top part of the invitation to the base. Place tape on the bottom part (the one with the tape). Glue the lower part onto the workpiece, making an overlap of about 1 mm to hide the joint between the parts. Decorate the resulting invitation to your taste (for example, with beads and a flower).
Method No. 4
Another option for a gift envelope.
It can be made from multi-colored gift paper: 1. Fold the sheet in half crosswise.
2. Bend the top edge of the folded half of the sheet down so that the cut coincides with the bottom edge of the part.
3. Then fold the flap in half again as shown in the picture. Fold it back again, just marking the fold.
4. Now fold the bottom edge to the resulting fold once, then again.
5. Fold the top edge of the sheet down towards the point marked in the figure.
6. Fold in the bottom right and left corners.
7. Fold the right and left edges of the part to a width equal to the width of the folded triangles.
8. Mark the folds along the dotted lines as shown in the picture.
9. Unfold the folds so that you have a sheet of paper folded as shown in the figure.
10. Using the previously marked folds, bend the right and left sides of the lapel so that two triangles are formed along the bottom edge of the figure.
11. Fold the top edge of the flap along the existing fold.
12. Fold the right and left edges, laying out the lower triangles as shown in the figure.
13. Then tuck the bottom corners inward.
14. Mark the folds along the dotted lines marked in the figure.
15. Pull the edges of the lapels marked with dots and tuck the top corners inward, as shown in the picture. Smooth out all folds.
16. Now you can close the envelope by simply folding the top and tucking in the corner.
Ready:
Envelopes for wedding invitations
The bride and groom send invitations in advance to all guests who will be expected at the wedding ceremony. An invitation card is a traditional, best option. Envelopes for invitations that young people have made themselves will look especially tender. The postcards will remain intact in them - they will not be wrinkled, dirty, or torn. To make a cover, you can use a variety of materials: colored cardboard, paper, lace, fabric, beads, sequins. It is better to make a wedding envelope so that guests immediately understand in what style the celebration will take place.
Wanting to organize the upcoming holiday original and memorable, the future spouses try to think through every little detail, and make many accessories themselves, not only for the purpose of saving money. Unusual invitations look impressive and will surprise guests. It’s not difficult to make them yourself, but the work will require perseverance, painstakingness and imagination.
We offer a master class on how to make a simple, but at the same time unusual wedding invitation. What materials will you need:
- colored cardboard or paper;
- a simple pencil;
- glue;
- decorations: lace, beads, buttons, sequins, beads, ribbons;
- photo of the newlyweds;
- artificial flowers.
Let's get started:
- First you need to make cards with invitations, the size of which the envelope will be glued to. Using a simple pencil and a ruler, draw the diagram below on the wrong side of the paper.
- Carefully cut out the templates and fold along the lines. Glue the joints so that the glue does not get on the front side.
- Glue a photo of yourself together to the top of the cover - such an exclusive invitation will remain with the guests for a long time and will remind them of a wonderful wedding celebration.
- If desired, decorate the product with lace, beads, beads and other decorations.
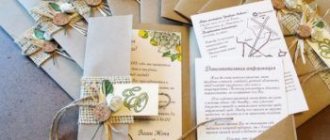
The so-called “lace” cards, where invitation cards are inserted, look elegant and impressive. To make them you will need the following:
- sheets of thick paper/cardboard;
- thin paper;
- ribbons, braid;
- lace;
- stencils for ornament;
- glue;
- curly scissors.
How to make a “lace” card:
- Fold a sheet of thick paper or cardboard in half - this will be the basis for the future cover.
- Process the thin paper using curly scissors - this piece of paper will then contain the text of the invitation.
- Decorate the front side with braid, ribbon, beads, lace (you can use a lace napkin).
- Place your prepared personalized invitation inside.
- On both sides of the card, glue ribbons or ribbons that need to be tied so that the invitation sheet does not fall out.
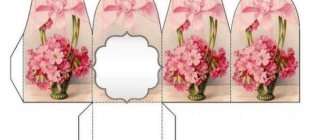
Templates
A template for making envelopes in which wedding invitations will be placed makes their production much easier and allows you to use your own decorating ideas. To find such templates, just turn to Internet resources for help.
This video will show you how to make your own invitation envelope:
Before you start searching and printing templates, you need to decide on the size of the envelopes in which the invitations will be placed. The sizes of sheets of printed paper depend on this.
Now you need to choose an image that fully matches the theme of the wedding. After all, it could be a Love Iz style celebration, a French wedding, rural or vintage, summer or seaside. For any holiday, you can find envelope templates on the Internet for downloading and printing.
How to make an envelope out of paper
Most wedding envelopes are made of paper. Some people prefer to use cardboard for this, but thick paper does not bend as comfortably as required to create beautiful, smooth lines. Therefore, preference should always be given to paper as the basis for crafts. If you use colored paper for these purposes, you will encounter the problem of its thinness. To seal colored paper, first glue it onto a sheet of white stationery paper. Next, continue working on creating the envelope.
Original wedding envelope templates will help you make exquisite crafts for all occasions. Choose the shape you like and fold the envelope according to the photo instructions. In such paper crafts, there is enough space inside not only to place a monetary gift, but also to write your congratulations on the inner wall.
Product selection criteria
Various materials are used to make a wedding bank: thick cardboard, plywood, wood. Fabric, decorative paper, artificial and fresh flowers, rhinestones, ribbons, and beads are used for decoration. You can consult with the bride in advance, and she will help you decide on the style of the accessory in accordance with the wedding concept.
But the main thing is that the money box looks elegant and is as comfortable as possible
When purchasing a product, you need to pay attention to the following criteria:
- Size. When choosing the size for a wedding bank, you need to consider the number of invited guests. So, if about 50 people come to the celebration, it is enough to purchase a medium-sized box (about 20 cm in height). With a larger number of guests, preference is given to a more voluminous product.
- Form. Nowadays, a variety of forms allows you to choose a wedding attribute for storing money to your liking. This could be a classic box, an old-style chest, or a cardboard cake with several tiers, made in the same design as the edible one.
- Style. A chest for storing money at a wedding can be made in any design and color. The main thing is that this attribute is combined with the wedding decoration of the hall and fits harmoniously into the festive interior.
- Safety. It is worth taking care of the reliability of the box. A big plus is the ability to lock it. When there is a large crowd of people at a wedding event, it is not always possible to keep track of the safety of funds.
An accessory made of thin cardboard may not withstand constant use during the celebration. Each of the guests will definitely want to touch the original wedding attribute and make their contribution in the form of a cash envelope. Therefore, it is better to give preference to denser materials.
Ideas for original congratulations
- Idea No. 1: Along with your official gift, give the newly-made spouses a small gift in which 2 things will be neatly packaged - a rolling pin for the wife and ironclad gloves for the husband. To consolidate the “marriage set” effect, choose toasts in the same theme.
- Idea No. 2: also as an unforgettable gift, you can present a “golden” brick, which will become the very first brick in the foundation of their strong and indestructible marriage. In extreme cases, this will be a good reason not to quarrel in the future, since someone may later get hit with the same brick.
- Idea No. 3: in your congratulatory speech, wish the young people lots and lots of money, and in conclusion, give them... a cob of cabbage. When the cabbage is handed over to the happy couple, you will see banknotes stuffed among the leaves. In addition, you may wish to find their first-born in the same cabbage.
Many congratulations are very fun, accompanied by a video or photo selection of photographs of the little bride and groom. For your congratulatory speech to be the best, it should be prepared not a couple of minutes before the ceremony, but several days or a month in advance. Then your success will be guaranteed.
Wedding guide: how to creatively congratulate the newlyweds.
Sputnik has developed a kind of “handbook” for wedding guests, in which you can find the most daring gift options: down with bed linen and money in envelopes!
Summer has long been considered a wedding time: and indeed, many registry offices are already booked for a long time in advance, and it will definitely not be possible to organize a wedding in some restaurants and estates in the near future.
Of course, brides and grooms want to celebrate their wedding in a special way: after all, they are getting married once and for all. Invited guests and witnesses can help them with this with original gifts and congratulations, and Sputnik will tell you how!
We have prepared a kind of “guide” that tells you what gifts you can give for a wedding so as not to get into trouble, and how to beautifully congratulate you with words if God has deprived you of literary talent.
Wedding gift ideas
The most difficult thing for a guest is not so much to find the money to attend such a rather expensive event as a wedding, but to choose a present that would please both the bride and groom.
More than one joke has been made about wedding gifts. They also remember bed linen, which for some reason is given in large quantities, and money in envelopes - you can’t imagine anything more banal. Of course, if you don’t have time to look for a gift, and money is more suitable for the couple getting married, then you can give that too. How much money should I give for a wedding? Amounts of $100 or more are considered good form.
But Sputnik proposes to go against the system! And choose something creative for the newlyweds.
Give a certificate for a wedding
Recently, it has become popular to give certificates for goods or services. But we suggest choosing the most impractical and pleasant ones, for which young people busy setting up a hearth would spare money. Believe me, they will be given an iron or vacuum cleaner without you. You can choose a hot air balloon flight, dinner on a yacht for two, a photo shoot in the studio, swimming with a dolphin in a dolphinarium, a sightseeing flight on a sports plane and more. By the way, the cost of the most expensive of the listed options in Minsk is about 999 rubles. You can find other offers on the Internet.
Give a wedding night
It's no secret that some newlywed husbands and wives spend their wedding night unpacking gifts. But if you place them away from gifts and, for example, book them a luxurious hotel room for the newlyweds, then, for sure, they will finally remember each other. It’s not for nothing that they say that the best gifts are emotions and memories.
A selection of the most unusual texts
Whether it is worth signing a postcard that is intended for a monetary gift, everyone decides for themselves. It may already have a congratulatory inscription: “Happy wedding day!”, “Congratulations on your wedding day!”, “Advice and love!”
Additionally, writing a few words of sincere wishes on the money envelope is a good idea, especially if you use a humorous style. You can joke about explaining the purpose of the banknotes, for example: “To the future heir/heiress to the throne.”
Original signatures can be like this:
- Let there be as much money as you need, and we donate this for seedlings.
- Here's a contribution to the family nest egg.
- Here is what helps make life better and brighter.
- There are a few notes here for “haute couture” diapers.
- For financial freedom from salary dependence.
- Since money is evil, let this evil be enough for everything.
- Accept thousands of congratulatory greetings from us, my friend.
- Instead of a carpet and dishes.
- Here we take care of your wonderful mood.
For invitations
We offer several options for ready-made invitation texts that can be printed or handwritten in calligraphic handwriting:
Congratulatory inscriptions
You can put a beautiful postcard in the envelope with money, on which sincere congratulations and wishes will be written to the newlyweds.
Here are some examples of congratulatory inscriptions:
When going to a wedding, prepare in advance a beautiful envelope in which you place the prepared banknotes. A hand made envelope, made with love and diligence, will be remembered by the newlyweds for a long time. But even if you present a monetary gift in a purchased postcard, be sure to accompany it with sincere, warm congratulations and wishes.
https://youtube.com/watch?v=JZGvS5qkK3Q
Scrapbooking envelope with ribbon
Using the step-by-step instructions with photos below, you can quickly and easily make a beautiful wedding envelope from scratch.
- Print out the envelope template.
- Cut it out and transfer it to thick paper or cardboard.
- Cut the workpiece along the contour.
- Make deep grooves on the inside of the workpiece corresponding to the dotted lines of the template. This can be done with a needle and ruler.
- Fold each edge of the future envelope towards the center along the line of the grooves.
- Gently press down the edges with a wooden ruler to avoid opening.
- Place money or an invitation into the received envelope and close all sides one by one.
- Take a 1 m long ribbon and tie it around the envelope.
- Tie the ribbon into a beautiful bow.
- Cut off the edges of the ribbon that are too long, and singe the cut so that it does not crumble.
https://youtube.com/watch?v=89C5gtld5YA
Adviсe
To create an unusual wedding envelope, you must take into account recommendations from professionals.
To make an envelope, it is better to choose paper and cardboard in light colors. Patterns can be applied to the surface of the product using ink, paint or gel paste. With a hole punch you can make figures of angels, butterflies, flowers and others. They should be knocked out from decorative paper. They are fixed on the front side of the product with a glue gun in any order. In order for the upper opening part of the envelope to acquire its original shape, you need to use decorative scissors with a wavy edge or a border. Lace patterns are also obtained through the use of designer scissors. To decorate the front of the envelope, you can use photos of the newlyweds, their relatives and friends.
It is important that the photographs are printed on regular paper and not photo paper. The latter will make it difficult to decorate photographs.
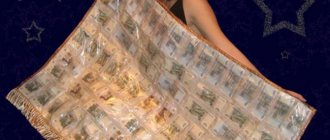
Money cake master class
A money cake is a great way to not only present the newlyweds with money, but to do it in an original way. You can have everything you need to make it at home, you need:
- one hundred small bills;
- thick cardboard, preferably white;
- satin at least 2 cm wide, about 2 m long;
- paper clips;
- Double-sided tape.
We will make three tiers. Step-by-step instruction:
- take cardboard and cut out three circles with diameters of 30, 20, 10 cm;
- for each tier we cut out strips of the appropriate length, the height of a bill (we will attach banknotes to them);
- Using double-sided tape, glue a strip for banknotes vertically to the base of the largest circle;
- Next, we roll the bill into a tube, secure it with a paper clip and attach it to the first tier of the cake;
- We carry out the same manipulations with the remaining circles;
- we put tiers on top of each other;
- We make a beautiful large bow from satin and attach it to the top of the cake.
An original wedding gift for newlyweds is ready! This craft looks unusual and luxurious in appearance, and can also complement wedding decor.
Elements of the image of the bride and groom
Wedding accessories for the bride and groom are no less important than the outfit. Similar elements can also be made using needlework.
Jewelry for the bride (jewelry, tiara), made with your own hands, will highlight the style of the bride, giving her a special charm. What and how to do?
It's easy to make a necklace using seed beads, seed beads, or even satin ribbons. It is also possible to use various small wedding accessories from the bride’s maiden box. It is better to use high-quality fittings so that the jewelry looks stylish and rich. Jewelry should be in harmony with the bride's outfit, and also match the theme of the wedding.
You can make your own tiara, a basket for rose petals, or a small bride’s handbag.
A boutonniere is considered an integral element of the groom’s image, which is also easy to make with your own hands. Important advice: this decoration should be in the same style as the bride’s bouquet and in the same color. For this purpose, compositions of fresh or artificial flowers, or porcelain flowers can be used. A porcelain boutonniere will look impressive and will retain its original appearance throughout the day, unlike decorations using fresh flowers.
How to make your own boutonniere, watch the video master classes:
Wedding wish tree – original design ideas
A wedding wish tree cannot be called the main attribute, but it adds charm and grace to the atmosphere. If the area of the banquet hall allows you to place an extra table, on which a shiny tree, decorated with decorative elements and bright leaves, will flaunt.
Some young people believe that a book is ideal for making wishes, others are inclined towards an album or not to create trouble for themselves by simply buying a special album for this purpose. Young people who prefer chic and brilliance in everything will be happy to offer guests such a fascinating way to describe their thoughts.
Original design of a wish tree
No less interesting is the option of a drawn tree on a large sheet of paper. To do this, draw a large tree with many branches, but without leaves. The leaves will be the imprints of the guests, on which they will leave pleasant and affectionate words. It would be nice if those invited leave a signature under their wishes.
The tree of wedding wishes can be hung on the bedroom wall in a frame - let it be the first decoration of your common home.
To create a wish tree with your own hands you will need:
- A3 paper;
- stamps of different shapes;
Editor's choice: How to live happily - the “formula of happiness” - does it exist?
- multi-colored gel pens;
— an interesting frame for the paper size;
- wet wipes.
The photo shows colorful and elegant design options for the wish tree.
If one of the young people has artistic talents, drawing a lush tree will not be difficult. But what if you don’t have enough time for drawings? To do this, you can download the A3 templates with a flick of the wrist. The resulting drawing will only have to be signed - the wedding date and the names of the heroes of the occasion, and put in a frame.
Options for creating a holiday tree
A wire wish tree will become noticeable and large-scale. The main thing is to paint over the wire, giving the wood some piquancy.
How to make such masterpieces that guests would want to leave their wishes on it? Everything is easy and simple, a minimum of material and time, but a maximum of delight.