Wedding gifts are a long-established tradition. Most often, invited guests prefer to give money. This is not only convenient, but also gives the newlyweds the opportunity to buy themselves the things they really need. After all, you must admit that few people will need two irons, for example. In this regard, a money chest is becoming a frequent attribute of a modern wedding. It will not only fit harmoniously into the decor, but will also make gift-giving more convenient. There is also a sign according to which one should not give money to young people personally.
How to make a money box (chest) for a wedding with your own hands
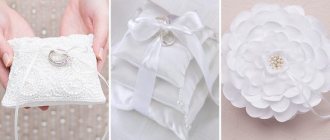
A chest for collecting money is a box or casket.
Such an item is decorated with fabric, beautiful wrapping paper, ribbons, flowers, rhinestones, beads, anyone has enough imagination for anything. The main thing is that the decoration is completely in the style of the wedding and in the same color scheme. If you want to show all your originality, you can make a box in the form of a wedding cake with tiers, in the form of a house or a box. There are many master classes on the Internet with videos on making such chests.
Such a chest will be very interesting and unusual, thereby symbolizing a family hearth. So, to make it you will need PVA glue, a medium-sized box, a stationery knife, tape, colored paper and decoration elements (ribbons, braid, beads, rhinestones).
Remember that you can make such a thing from scrap materials. For example, you can use a shoebox as shown in the photo.
It’s worth saying a few words about the fact that before you start creating a magic money chest, you need to decide on some important points. First, decide on the shape of the future box: square, rectangular, in the form of a box with a dome, or do you prefer a heart shape.
Secondly, be sure to take into account the entire style of the wedding celebration, the color scheme of the decoration, the costumes of the bride and groom and, of course, the very size of the intended box. Next, you need to prepare all the tools that you will need to make a holiday accessory. And then prepare all the accompanying material that will serve as decor for the future chest.
By the way, such a chest can serve to collect not only donated money, but also as a chest for a competition in which money is collected for a boy or girl. And here you need to take into account specific goals and maintain certain colors. For example, to collect money for a girl, the chest must be in “female” colors, and for a boy, accordingly, in “male” colors.
What is needed to make a chest
The advantage of this attribute, made with your own hands, will be:
- Price. A wedding is already a rather expensive event; a little saving won’t hurt.
- Unique design. With the right approach, you will get an item that fits well into the wedding setting.
- A memorable gift. Will give pleasant memories of this event.
Such a chest, of course, can be purchased in a store, but if you wish, it is not difficult to make it yourself. This will make it possible to choose materials and colors that will most harmoniously fit into the festive atmosphere, and save a little. After all, a wedding is already a very expensive event.
Making an unusual casket that will decorate the celebration atmosphere is not difficult at all and will not take much time. Even if you don’t want it to have a rectangular shape, but, for example, the shape of a heart or a wedding cake. In this case, the casket will look chic and attract the attention of guests.
After some effort, this chest will become an important holiday attribute, symbolizing the prosperity of the new family. The opportunity to save money and add additional zest to the wedding atmosphere does not require large investments and effort. You will need a shoe box or thick cardboard, glue, scissors, decorative elements and a little perseverance. Also, special attention will need to be paid to the finishing material. It can be velvet fabric, silk, corrugated paper. It is better to choose a color in the style of the holiday. White, red, brown or cream colors and their shades are recommended.
Step-by-step instructions for making your own wedding money box
- small box;
- thick cardboard (you can also use old boxes or parts thereof);
- double sided tape;
- high-quality glue stick;
- ruler;
- heat gun;
- stationery knife;
- tape measure;
- pen or pencil;
- scissors;
- masking or transparent tape;
- satin or crepe-satin of a suitable shade;
- beautiful lace;
- a small bouquet or individual small flowers;
- decorative bow.
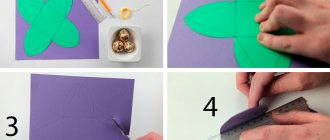
- Cut the lid of the box as in the photo. We use a utility knife and scissors.
We strengthen the resulting high “walls” with appropriate pieces of thick cardboard, gluing them to double-sided tape.
We cut out the parts for the wide walls and also glue them to the base. We make sure that all cuts are even. Using masking or regular tape, we fasten the corners of the structure. When the corners are securely fastened, we form the “lid” of the chest. To do this, measure the top cut of the wide wall and cut out the part from a sheet of cardboard. Then we mark the hole for money exactly in the center, making it slightly larger than the width of a standard envelope.
Note! For this part, it is important to use thick cardboard, because it lends itself well to molding. Multilayer corrugated material is not suitable for the top part, but it is perfect for creating the walls of the structure
Carefully cut a hole by placing the cardboard on a ring of tape - as in the video. We correct unevenness using scissors. Give the part a semicircular shape.
We cut two thin strips of double-sided tape and glue each to the top edge of the wide wall of the structure. Glue the top piece to these strips.
We cut out suitable semicircular parts, adjust and adjust them, bringing them into full compliance with the shape of the upper part. We move them slightly under the top part (literally half a millimeter) and secure the corners with tape. In order for the tape to repeat the semicircular shape and securely fix the joints, it is necessary, after gluing one half of the piece, to cut the free end in half. Then, having fixed one half, glue the second one a little obliquely - this way you get something like a dart. The tape glued in this way will not bubble, deforming the edge, and the work will turn out quite neat.
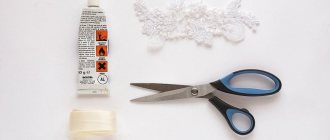
Let's prepare the fabric and lace for work.
They must be ironed thoroughly.
Having measured the chest, cut out a piece of the appropriate size. Apply double-sided adhesive tape around the perimeter of the lower part of the structure and stretch the fabric well. Leave the side parts in a free position. Carefully cut a hole as in the photo.
Turn the structure over with the hole facing down. Generously coat the inside of the slot (cardboard part) with glue stick. Carefully fold the fabric allowances inward, gluing them at the same time. Wait until it dries.
First step
Cut off the small side pieces from the box, leaving a rectangle open on one side. You need to cut out two elements from additional cardboard - these will be the sides of the treasury. One of the long sides must be cut in the middle along the entire length. What should happen in the layout can be seen in the photo. Now you need to give a rounded shape to one of the cut halves. If you just try to round such a thick cardboard, there will be creases, or even the cardboard may even break. Therefore, you need to draw parallel lines on a ruler with a non-writing pen at a distance of one centimeter from each other. There should be 20 lines. After this, the lid can be rounded, and then the sides can be glued, but not with glue, but with tape. Make a slot in the middle of the lid for envelopes.
After this, turn the box upside down and use a utility knife to cut three of the four joints - so that you can then open the treasury with money.
Photo of a money box for a wedding
Nowadays, money is one of the most common gifts and, it would seem, there is nothing simpler than. But sometimes you really want to add something unusual to such an ordinary gift. And this is not at all difficult to do; all you need is the desire and the simplest materials. So, we suggest you make a money box with your own hands, following our master class.
Money box scrapbooking – master class
Required tools and materials:
- 2 types of scrap paper (backgrounds for it can be found on the Internet and printed or bought ready-made);
- white and colored cardboard;
- watercolor paper;
- pencils and watercolors;
- brush, pencil, stationery knife, metal ruler, scissors;
- an inscription or picture (you can also print them yourself);
- glue (preferably “moment-crystal”);
- double-sided tape (you can limit yourself to glue);
- decorations (beads, half-beads, buttons, pendants - whatever you see fit);
- ribbon.
Performance:
- First, using a ruler and a stationery knife, you need to cut cardboard and paper. The dimensions of paper and cardboard, as well as the principle of distribution of colored and white cardboard, are shown in detail in the photo.
- Next, we take the largest square (18x18 cm) and line it. The next step is to do the creasing (mark the places of the folds) - in addition to a special stick, many objects are suitable for this (a non-writing pen, a plastic card, and even the handle of a simple teaspoon). I used an ice cream stick. The principle of ruling and scoring is shown in the photo.
- The next step is to make cuts and trim off the excess.
- And finally, we coat the necessary parts with glue and fold our main box.
So, all the most difficult things are left behind, but it’s too early to stop, because only half the way has been completed.
It's time to make the second part of our box, and for this we will line and crease the largest rectangle of cardboard. This must be done as shown in the photo.
This is the kind of box we should get. Now it's time to start decorating. We glue narrow strips of paper (1x9 cm) onto strips of cardboard (1.5x9.5). The next step is to glue these double borders onto the box (2 each for the inside and outside), and also sew on a bead that will serve as a handle.
Now take 2 11x11 cardboard squares and two 13x13 paper squares.
We coat the cardboard square with glue, glue it to the wrong side of the paper and cut off the corners.
We fold the excess paper and glue it to the cardboard. We do the same with the second pair and get two neat squares.
We glue our dense squares to the outside of the box so that an equal amount of cardboard protrudes along the edges.
It's time to decorate our creation:
We crease a 10x20 cm cardboard rectangle and fold it in half - this will be a card for wishes.
Now you need to glue the ribbon and the top layer of paper - a 9x9 square.
We paint the inscription with a thin layer of watercolor paint, outline it along the edge with a pencil and glue it to a cardboard rectangle 0.5 cm larger than the inscription itself.
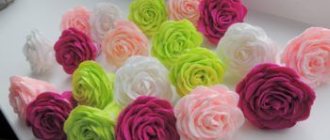
Flowers are great for decoration and you don’t have to buy them - you can make them yourself. Let's draw a few large flowers and a few smaller flowers on the wrong side of the watercolor paper, and then cut them out.
We wet our flowers with a damp brush. Immediately after this, add color to taste (saturation depends on your desire), and then we give shape to the petals - twist them around a pencil or (as in my case) the shaft of a brush.
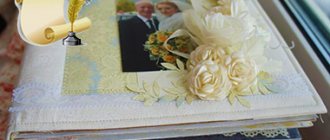
Let's add clarity and volume to our flowers - lightly outline the petals and draw veins, and then glue them in pairs and stick a rhinestone or half-bead in the middle. And here’s the finale: we attach all the decorative elements to the postcard, and glue the postcard itself to the box.
Our box may well become a package not only for money, but also for other small gifts, and later it will not get lost, becoming a place to store useful and pleasant little things.
Each wedding guest gives a gift to the newlyweds. Currently, the most popular gift is money. With them, newlyweds will be able to buy exactly what they need most. To ensure that not a single bill gets lost, it is proposed to make a money box (chest) for the wedding with your own hands. This material will discuss exactly this.
Box
The easiest way is a treasury in the form of a box, but, of course, not an ordinary one, but beautifully decorated with ribbons and covered with some elegant paper. For this option you will need cardboard of sufficient size, satin ribbons, brightly colored velvet paper, scissors, a ruler, pencil, and glue. The work steps are as follows:
- using a ruler and pencil, draw the outline of the box on the cardboard;
- then it is cut along the marked lines, and an ordinary box is glued together, in the upper part of which a narrow hole is cut along the length of the envelope for money;
- the blank is covered with velvet paper, bows and roses are made from ribbons, which are also glued to the box.
The finished product looks like the one shown in the photo:
How to choose a chest?
If you don’t have the time or opportunity to make a chest for collecting money at a wedding yourself, then you can purchase a finished product at a wedding accessories store.
Photo of a wedding money chest
When choosing a casket, pay attention to the following criteria:
Drawer size. Its parameters should be such that several dozen envelopes and greeting cards of European standard can fit into the chest one at a time without unnecessary difficulties. The optimal size of the box for a ceremony consisting of 80 people is approximately 20 cm by 30 cm, and the height should not be more than 20 centimeters
If you choose a very large chest, it will attract the attention of guests and hide the young ones in photographs.
Number of dowry chests. As a rule, only one casket is used, but if you plan to invite more than 150 people to the celebration, then you can prepare two boxes, slightly different in design style.
Product basis
Many people will come to the ceremony and everyone will definitely want to touch the casket. It may even be passed from person to person to deposit money. Therefore, if you choose a flimsy wedding chest for gifts, it may not withstand such torture and will fall apart. A paper product will not work. When choosing a cardboard treasury, pay attention to its corners and joints: they must be reinforced. Better yet, buy a product whose base is made of plastic.
Safety. This is one of the most important points. The money chest for a wedding must be securely and hermetically closed for the entire period of the event, so that no one except the newlyweds can open it. There will be a lot of people and staff at the banquet. And someone will certainly want to covet the goodness of the young couple.
Compatibility with the overall style of the holiday. The casket should be designed in the same style with all the accessories at the wedding. For example, if the book of wishes is decorated with a bow, then it should also be present on the treasury. But in this case, hearts and roses will not be “at the box office”. And if the whole holiday is held in eco style, the chairs are covered with burlap, the tables are covered with linen tablecloths, and other items contain cotton, then the chest should be covered with one of these materials.
Photo of a wedding money chest with accessories in the same style
Important Details
Why is a wedding treasury set up at the newlyweds' celebration? So that guests can give the heroes of the occasion a lot of money. This means that in any such design the most important thing is reliability, ease of use and, undoubtedly, beauty. Reliability does not mean that money is not stolen, although this is also important, but that the product does not fall apart during the holiday. This means it must be strong. If the treasury is made of whatman paper, it must be placed on a hard bottom, strengthening all the walls as much as possible. To do this, whatman paper can be decorated with wallpaper. Yes, oddly enough, it is this affordable material that is used most often, since it comes in amazing colors. In addition, many types of wallpaper, vinyl, for example, will sufficiently strengthen the base of whatman paper. So first, wallpaper is glued onto a sheet of whatman paper according to the markings, and only after the glue has dried well can the pattern be cut out. The gluing valves should not be covered with wallpaper.
The hole for money can be made of a standard size - 10-15 mm wide and 180-200 mm long. It is located either on the lid of the treasury, or in the upper part of the walls - wherever you like.
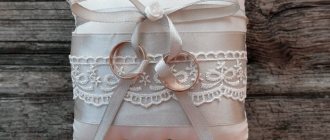
DIY wedding money chest in red and white colors.
The long-awaited day of your wedding is just around the corner. Friends, relatives and acquaintances begin to think about gifts. Some guests will bring beautiful packages and boxes with sets, blankets, household appliances, and some guests will decide to make their modest contribution to your family budget and just give money. As you know, money loves not only counting, but also careful handling, so for such a valuable gift it is necessary to allocate a separate place at the wedding celebration. I bring to your attention a master class on how to make a wedding money chest in red and white colors.
Wedding chest for money.
Detailed master class.
The base of the chest is a cardboard box measuring 25 cm x 17 cm x 20 cm (L x W x H).
If you are lucky enough to get a completely white box, then you can safely proceed to the next stage of making the chest. Otherwise, you need to cover the box with white thin cardboard. We glue all sides except the bottom. We glue the cardboard joints on the edges of the box with white electrical tape.
2) Open the bottom and again cover it with thin white cardboard.
3) Cover the edges of the open bottom with white electrical tape, close the bottom and fasten it in several places with electrical tape. The bottom must open, since it is through the bottom that the newlyweds will be able to take away the donated money. Therefore, use duct tape rather than duct tape, as duct tape can be easily peeled off without damaging the structure of the cardboard.
4) Make the lid of the chest. To do this, take a sheet of white thick cardboard and, using electrical tape, glue it first to one side of the box and then to the other. The result was a dome. Carefully cut off the remaining cardboard.
5) Prepare a slot for money. The slot should be 18 cm long and 1 cm wide. We measure the length and width of the dome and draw a rectangle measuring 18 cm x 1 cm exactly in the center.
6) Using a sharp blade, cut out the drawn rectangle.
7) Prepare the sides of the dome. To do this, place the wedding money chest sideways on a sheet of white thick cardboard and trace the side. Next, cut out the part we need.
Glue the side to the dome using white electrical tape.
9) Place double-sided tape 1 cm wide on the edges of the chest.
Let's start covering the chest with fabric.
Take a piece of white satin fabric and stretch the fabric over the front and back of the chest through the dome.
Let me remind you that the fabric is fixed with double-sided tape. Similarly, glue the fabric to the sides of the chest. Using a sharp blade, carefully cut the fabric in the place where the slot should be.
Please note that, unlike working with cardboard, we do not cut out the entire slot, but only make 1 cut, and fold the rest of the fabric inward and fix it with hot glue.
10) We glue double-sided tape to the side edges of the chest, and a red satin ribbon 2.5 cm wide on top. We do the same along the perimeter of the chest in the place where the box meets the dome.
11) Take a narrow white satin ribbon 0.4 cm wide and use hot glue to decorate the red ribbon along the edges of the dome.
12) Make a flower from fabric. Take a red satin ribbon 5 cm wide and cut rectangles measuring 5 cm x 6 cm. A total of 25 rectangles are needed.
13) Fold the rectangle in half and cut it into the shape of a petal. Burn the edges of each petal over a candle. The petal will begin to curl and take on a natural appearance.
14) Cut out a circle with a diameter of 4 cm from the fabric and begin sewing on the petals.
15) Prepare a bow from a red satin ribbon 0.7 cm wide and a white satin ribbon 0.4 cm wide. Leave the ends 30-35 cm long. Glue the bow to the center of the flower. The flower, in turn, is glued to the lower right corner of the chest. We lay out the long ends of the ribbons in beautiful patterns and fix each turn with a small drop of glue. 16) Glue 10 cm wide lace onto the dome on both sides of the slot. Decorate the space near the flower with red rhinestones.
Well, that’s all, the master class is over and the wedding money chest is ready. Now you can go accept your first contribution to the family budget as a gift!
Types of wedding chest design
In order to make your life easier, you can, of course, order a ready-made box. But this is decor into which you have not invested your own strength and emotions. The design can be absolutely anything.
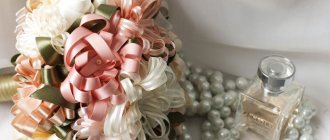
Some people create a box in a classic style, covering it with white satin fabric and adding artificial pearls. But you can choose fabrics to match the wedding, which will also look harmonious. The main thing is that all this is arranged as neatly as possible. Therefore, for the outer part, buy beautiful ribbons. An excellent solution is to decorate with fresh flowers. To complement the composition, choose dried berries and various plants. Delight your guests with your own piece of art.
Design options
According to the masters, even the most unusual and complex shapes of chests can be made independently. For example, an unusual and original solution would be a wedding box made in the shape of a house, symbolizing a family hearth, a box or a cake. In order to make a cardboard chest with your own hands, you will definitely need:
- stationery knife;
- ruler;
- scotch;
- medium-sized cardboard box;
- stationery glue, PVA, or better yet, a glue gun;
- elements for decoration - pictures, pebbles, beads, ribbons, shells;
- colored paper for interior and exterior decoration.
To make truly visually beautiful and high-quality chests with your own hands, photos of which can be seen in the article, you need to have only the right materials and the right tools. As practice shows, almost all the materials needed for this can be easily found at home, in the pantry, or in the garage.
The main thing is to remember that the quality of the glue directly determines how tightly the decorative elements, finishing paper will stick, and most importantly, whether the chest will come unglued during the special event.
How to make a chest from a box with your own hands more neat, without visually visible seams? To do this, it is recommended to give preference not only to double-sided tape, but also to a glue gun, with which you can evenly distribute the adhesive composition over the entire surface of small parts.
When starting directly to make our ceremonial chest, it is recommended to prepare the ground in advance, namely, draw up diagrams or patterns, which can be made from a huge cardboard box.
The back of the chest should be higher than the front. In this situation, the length equals the sum of the width and height of the front of the box. The bottom protrusion should be about seventy millimeters with a slot on top of the entire pattern so that the bottom does not fall out.
The required slot for the money envelopes should be made directly on the pattern, because after the chest is ready, cutting the hole will become a little problematic.
First house
It is important for every family to have their own home, albeit small, but definitely their own. And the first such house for the newlyweds, symbolic of course, could be the wedding treasury, made with their own hands on the eve of the celebration. You can make a pattern for a treasury house for a wedding using the drawing below.
This piggy bank can have absolutely any decor. There is no need to weigh down the shape with additional parts if the piggy bank-house is made from whatman paper. After the pattern is transferred to thick cardboard, all fold lines must be drawn with a thin, blunt object, without cutting through the paper. Windows and money slots must be cut out before the product is assembled into a single whole. A wedding treasury-house, made with your own hands for a holiday, can have a removable bottom on which the entire structure is installed. You can see what such a thing looks like in the photo below. Cute, isn't it?
What is a chest made of?
By making a chest yourself, you can not only save money, but also decorate it in accordance with the theme of the wedding.
A money chest can be made in the form of a beautifully decorated cardboard box or a classic suitcase. But it’s also easy to make such seemingly complex products as a money box in the form of a cake with several tiers, a house, or an interesting box. But no matter which option you choose, the following materials are required for mastery:
- cardboard box or sheet of thick cardboard. The quantity and shape depend on the chosen chest model. You can purchase a plastic or glass box. If you have skills in working with wood, you can make a product from it. This money chest will last for many years and will become a family heirloom.
- PVA glue or glue gun. The glue must be of high quality. The strength and beauty of the future product depends on this.
- scissors and stationery knife;
- masking tape;
- colored or corrugated paper for finishing the casket. You can use satin, silk or velvet fabric.
- elements for decoration: ribbons, beads, beads, decals, shells, bugles. An interesting design would be a collage of photographs of spouses.
- figured hole punch. With its help you can make various figures to decorate your chest.
If you want the casket to serve not only during the celebration, but also to be preserved as a keepsake, use only high-quality materials. Having prepared everything you need, you can proceed to the next stage - creating a chest.
Making a casket
You can make a money chest from a shoe box:
- The front of the chest may be slightly lower than the back.
- It is necessary to select a box of such a size that the length is equal to the sum of the height of the front wall and the width of the box.
- The lid can be made curly.
- After this, the box must be covered with paper or cloth.
- Decorate the chest with various accessories.
If you want to make your own pattern from a sheet of cardboard,
It’s worth finding a suitable scheme in advance. For example, the photo shows a diagram of a rectangular casket.
Detailed instructions on how to make a chest with your own hands consist of several steps:
1.Cut out a template from cardboard
Carefully bend the folds and allowances. We seal all the allowances to the inside of the chest with glue or regular tape
2.Cut out a strip of cardboard. We glue the cut strip at the junction of the inside of the box. This will help to securely fasten the walls of the casket together. 3. In order for the box to look like a casket, the lid must be given a convex shape. Thick cardboard does not take on this configuration well. Then longitudinal grooves can be made on the inside of the lid using scissors or a stationery knife. This must be done carefully so as not to cut the cardboard through. Otherwise you will have to start all over again. After this, the lid will easily take a rounded shape.
We connect the lid to the bottom of the box using tape. It is better to glue it to the inside, then the joints will not be visible.
4. The resulting gaps in the lid of the money chest are covered with cardboard cut to the shape of the holes. They are also attached with tape. For reliability, you can use a furniture stapler.
5.Next, it’s worth making a cutout with a hole for envelopes. To do this, draw a rectangle about 1 cm wide and the length of an envelope on the inside of the lid. Using a utility knife, cut a hole.
6.You can start draping the box. To do this, we measure the base and cover separately. In accordance with the parameters, we measure a piece of fabric or decorative paper of the required size. First, the lid is sheathed, then the remaining parts of the chest.
7.After this, you need to make a hole in the lid fabric. There is no need to rush, because the entire appearance of the casket depends on accuracy. The edges of the cut hole are processed using a lit candle.
8.The final stage is decorating the money chest. Here you can use your imagination to the fullest. The main thing to remember is a few tips:
•the sides of the side walls and the joining places should be decorated with satin ribbons to match the main color of the casket;
•the lid of the chest should not be decorated with heavy elements, otherwise it will begin to sag;
•if the main color of the drapery is neutral, use contrasting colors, red or purple, for cladding;
•a chest for collecting money, decorated with photographs of the newlyweds, looks romantic. They are placed on the sides.
A master class on making a casket is shown in the video
Making a gift box in the form of a chest with your own hands is not difficult. You should follow the instructions and the casket will become a real masterpiece.
Chest shape
This unique shape brings to mind ancient chests. To do this you will need a sheet of cardboard and instant glue.
Step-by-step master class
- Create a diagram of the future product.
- Transfer it to paper.
- Transfer the sketch onto the base material.
- Cut along the lines and glue in the right places.
- Decorate with various decor attributes. These can be satin ribbons, lace fabric, various beads, buttons or semi-precious stones.
For example, this decor option will look great
Tools and materials
You don't need expensive tools to create a truly beautiful money chest. Most people have everything they need at home. You can order decoration pieces online or go to your local craft store.
You cannot do this without the following tools:
- Ruler. It will be needed for marking, because everything should look beautiful and neat.
- Stationery knife and scissors. We will use them to cut the box and make a hole in it for envelopes with money.
- Glue. PVA is perfect. A hot glue gun will come in very handy; it will make working with decorative elements easier.
- Scotch. It will be convenient to attach finishing materials. Double-sided tape will be much more practical and convenient.
Almost everyone has all of the above tools at home. If something is missing, young people can borrow it from their parents or friends. As for materials, you will need the following:
- Shoe box. If you don't find the right size, no problem. The required container can be easily glued together from thick cardboard.
- Beautiful fabric for outdoor decoration. Velvet satin and others are suitable here.
- Materials for decoration. You can use decorative ribbons, artificial flowers, beads, feathers, stones, rhinestones.
When everything you need is available, all you have to do is stock up on a little patience and you can start. If you are not confident in your abilities, ask your family for help. Although this task is not at all difficult, and anyone can handle it on their own.
Treasure chest
Money is hidden in a chest, this has been the custom since ancient times. And the wedding treasury, made with your own hands in the form of a chest, will become the first repository of the family budget. This item can be made from thick cardboard according to the proposed pattern.
In order for the wedding treasury, made with your own hands, to have a beautiful shape, without creases or distortions, all the fold lines along which the chest should be folded must be pressed using a sufficiently narrow, but not sharp object, such as a knitting needle, a sushi stick, or, finally, , the blunt side of a knife with a rounded end. The triangular marks on the side flaps need to be cut, removing the falling parts. This trick will allow you to carefully glue the side panels to the main panels. You can strengthen whatman paper or cardboard from which the wedding treasury is made (it’s not so difficult to make such beauty as in the photo with your own hands, believe me), using another layer of paper. This must be done if you plan to place voluminous and weighty decor on the chest.
Carrying out wrapping
No matter how beautiful the base is, in its original form it is not suitable for a wedding, so the box needs to be covered. This can be done using various materials:
- Textiles - silk, velvet, satin, brocade or any other. For a boho style wedding, natural fabrics with hand sewing are suitable. Proponents of eco-friendly design can use linen or cotton with a rough texture, even burlap. The base can be covered with plain or textured fabric, and elegant draperies can be made using light or translucent materials. The inside should also be upholstered using a contrasting material.
- Leather is white or pastel shades.
- Colored cardboard or craft paper - on such a monochromatic basis, a spectacular decor will look very good.
- Designer paper - gold or silver, with an “antique” effect, textured, etc. Beautiful wallpaper with neutral patterns, sparkles, pastel colors.
- You can simply paint the future money chest with white water-based paint.
Volumetric upholstery
A chest for money, the upholstery of which is made with a volume effect, will look great. You can do this with your own hands as follows:
- Cut pieces of padding polyester according to the size of the edges of the box (in 1-2 layers) and glue them to the base.
- Using the same dimensions, cut out parts for the sheathing from a suitable dense fabric, leaving allowances of 2–3 cm.
- Lay the fabric over the padding polyester, securing with tailor's pins.
- Using smooth buttons, attach the fabric to the base, arranging them in a “diamond” pattern. Bend the edge of each button on the reverse side.
- Cover or line the inside of the box with fabric.
- Fold all edges of the outer upholstery inward and glue.
- Carefully trim the excess fabric at the joints, and then cover all the gaps with thick decorative cord to match or contrast.
- The button caps can later be hidden by gluing rhinestones, flat beads, small flowers or bows on them.
Instead of buttons, you can use beads; in this case, they just need to be sewn to the base through all layers of fabric, placing them crosswise, as for a quilted ornament.
It is best to glue the covering using transparent glue or PVA; for light materials (paper, thin fabric) regular office glue is suitable.
Cake piggy bank
If newlyweds love sweets, there is an interesting solution for them - a wedding treasury made with their own hands in the form of a cake. The principle is as follows:
- Three round boxes of different diameters are placed one on top of the other at the same center.
- Holes are cut between the boxes - exactly the same as in the previous version.
- The boxes are fastened together, so it looks like one whole with the decor on the lid.
- A large cake box is decorated. So the wedding treasury is ready! Anyone who has at least a drop of imagination and a little patience can make such a miracle out of boxes with their own hands.
- The “cake” is placed on a special stand.
DIY wedding chest from a box
Small chest made from a candy box
Small models can be made from candy boxes; for larger ones, you need to take cardboard boxes of the selected size. Whichever option you prefer, you will need the following materials:
Boxes or several sheets of thick cardboard. If you have skills in working with wood products, you can take this material. By the way, such a box will serve the newly-made family for many years and can be used as a piggy bank in the future.
- Paper tape, paper scissors, stationery knife.
- For the main decoration of the chest, you can take corrugated paper, satin in white, red, blue, purple. The choice depends on the theme of the celebration.
- Accessories for decoration: ribbons, beads, rhinestones, beads, appliqués, photographs of future newlyweds, etc.
To make and decorate a wedding chest, use high-quality materials, then the product will serve you for a long time.
Purple chest for wedding gifts
The process for making a casket for newlyweds is simple. It consists of the following stages:
- It is advisable to choose a box of such a size that its length is equal to the sum of the height of the front wall and the width of the box.
- The lid can be made curly or flat.
- Cover the box with fabric or paste it with crumpled paper.
- Decorate with your chosen accessories.
A template for a cardboard chest can be found on the Internet. The manufacturing sequence of such a model is as follows:
- Cut out parts from a sheet of cardboard according to the diagram.
- Fold along the indicated folds.
- Cover all joints with paper tape.
- Glue the internal joints with a strip of cardboard.
- To give the lid of the product the shape of a casket, you need to make longitudinal grooves on its inner surface using a stationery knife.
- Bend the lid and cut the sides out of cardboard to size.
- Connect all parts using tape. Use it to glue one side of the lid to the casket.
- On the inside of the lid, mark a hole for envelopes with money.
- Cut it out using stationery tape.
- Decorate the lid with your chosen fabric or paper.
However, it is worth following a few recommendations:
- The joints between the cardboard and the side should be decorated with satin fabric or ribbons.
- It is not advisable to place heavy accessories on the lid of the chest so that it does not sag under their weight.
- It is better to choose a neutral color as the main color of the drapery, then contrasting accessories will go well with it.
- An interesting option is to place a photo of the newlyweds on both sides of the chest.
Decorating a wedding chest in the form of a house
Whatever casket you make with your own hands, it will definitely become the subject of admiration and attention of all guests. There are many options for models and design today. The main thing is to use your imagination and put in very little effort.
Treasury-box
If the box has a hole for an envelope, then the top lid of the box opens to place the envelope there. Boxes can be of different shapes, including heart-shaped or oval. The easiest way to make a box is from a shoe box, since it has a ready-made opening lid.
Editor's choice: Getting married in a leap year: to marry or not?
The step-by-step instructions for making such a treasury are as follows:
- the inside is covered with paper;
- the outside of the box is decorated with silk fabric, the corners are decorated with ribbon;
- Artificial flowers and rhinestones are attached to the lid.
Selecting size and shape
The casket, in which guests will place monetary gifts during the wedding celebration, should look impressive and be as convenient as possible. To ensure
that this accessory does not catch the eye of everyone who will be present at the celebration, it is important to choose its size correctly. A chest that is too small will make it difficult to collect envelopes and cards, and a chest that is too large will stand out, which will provoke a variety of ambiguous conversations.
In addition to the usual convenience, the size of this box is important due to the safety of the contents. A container that is too small can easily be stolen while guests and newlyweds are busy.
The optimal dimensions of a money chest are 20-30 cm with a height of no more than 20 cm. Such standards are designed for a ceremony not exceeding 80 guests. If the wedding is planned to be very large, then you can increase the size of the product or provide several drawers for financial gifts to the newlyweds. The size depends not only on the number of guests, but also on the shape of the chests.
The most common option is a round and square greeting box, purchased or made by hand. Usually, preparing for a holiday takes quite a lot of time, so making such an accessory will not be difficult, especially if you know what exactly needs to be done. If you want something unusual, you can design the product in the shape of a heart or a barrel. If the couple is already expecting their first child, then they can make a stroller-chest, and those who are planning a trip after the ceremony can create a box in the shape of a car or a ship, which will look original and interesting.
Depending on the purpose of fundraising at the wedding, the color of the product may also differ. For future children, the box can be blue or pink, taking into account the gender of the future baby. For travel, the chest can be colorful and bright, like the emotions that a couple should receive on vacation. In case of collecting finances for the family hearth, a pure white color is usually provided, symbolizing purity and harmony, which is so necessary and important in family life.
Choice of color and shape
A wedding chest can have any color design, from snow-white to black. It all depends on the wishes and preferences of the heroes of the occasion. However, if this accessory is made for a specific purpose, it is necessary to choose the right color:
- If the chest is used to collect money for a future son, this accessory should be made in blue or light blue.
- If you are collecting funds for your future daughter, you should give preference to shades of pink.
- If the money box is intended to raise funds for a honeymoon, it should be bright and colorful.
- If this attribute simply acts as a family bank, it is made in white or another neutral color.
In addition, depending on the purpose of collecting money, a certain shape of the chest for the wedding is chosen:
- For future children - in the form of a stroller or cradle.
- For travel - in the form of a car, plane or map.
- For a house, car, etc. - in an appropriate form illustrating the desired object.