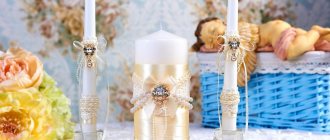
Today, a wedding pillow is as necessary as air for holding a wedding ceremony in a registry office. The newly-made spouses give positive consent to marriage and exchange rings placed on a special soft stand. A DIY wedding ring pillow will help add uniqueness and solemnity to the moment of marriage. This tradition came to us from European countries. And it became popular quite quickly.
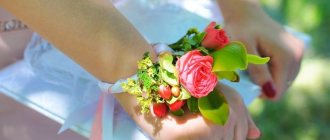
A pillow for wedding rings is a small thing, but this cute little thing will be captured in the photo and will be included in the unified image of the entire celebration
The choice of options is very diverse, from a simple wedding item of a standard type to an unconventional, exclusive item. How to make a wedding ring pillow with your own hands? It can be performed by parents, friends of the newlyweds or close relatives who know more deeply the psychological character of the couple. A favorite hobby, a favorite color of material, or the place of a first date - these aspects can form the basis and lead to the creation of a purely individual holiday accessory.
It is customary to photograph the wedding couple's rings on a delicate and elegant pillow.
Pillows for wedding rings: materials and decor
- A piece of small fabric, 0.2*0.2 meters in size.
- Stuffing agent.
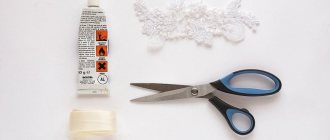
- Materials for decoration: lace, beads, ribbons, rhinestones, beads, white feathers.
- Hand needle or sewing machine.
- Threads, scissors, glue gun.
The choice of fabric for a pillow needs to be approached carefully. After all, wedding rings are imprinted on it - a symbol of the unity of two hearts. It is best to fill the pillow with padding polyester or holofiber. A specialized department in a children's world or sewing store is quite suitable. Buying a couple of linear meters is enough to ensure that the wedding ring pillow is not empty.
Manufacturing
Having chosen the desired size and shape of the pillow, you should draw its pattern on paper . Then the material for the pillowcase is folded in half with the right side inward, a pattern is applied to it, and the contours of the future product are outlined with a tailor's chalk or a piece of soap.
The easiest way is to cut a square pillowcase: in this case, you will only need to make three seams.
Do the following:
- The workpiece should be cut not along the drawn lines, but with an indentation of about a centimeter from them: this is done so that the material does not split during stitching.
- Then the pillowcase must be stitched or sewn by hand along the drawn lines, leaving a seam approximately 5 cm long unsewn.
- Through this seam, the pillowcase is turned inside out and stuffed with padding polyester, previously torn into small pieces: this way the fabric will lie better.
- Having stuffed the pad, the seam should be carefully sewn up.
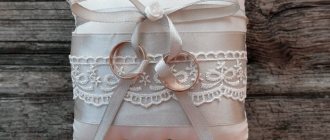
Square wedding ring pillow with satin ribbon pillowcase
An effective accessory for attaching rings. Wide ribbons for weaving consist of a satin border, sold in a store or sewing studio. Choose your favorite ribbons by color and size. We lay out the future pillowcase in the form of a square on the desktop.
We place the lace at a distance of 2 cm from the edge of the satin square, fix it with needles and sew it on
We adjust the satin ribbon along the lace stripes
We alternately pull each horizontal tape through the vertical guide. We fix the ends of the product with safety pins.
We connect the top part with the bottom and sew along the perimeter at a distance of 0.5-0.7 cm from the edge, leaving a section for turning inside out
When all the strips are woven to the end, we perform the sewing operation around the perimeter of the pillow. The second, back side of the pillowcase is made of satin fabric of the same color without decoration. We sew cut-off lace elements into the sides. Then we proceed to the final sewing operation.
We turn them inside out, straighten the corners, stuff them with synthetic down or holofiber and carefully sew up the open area with a fine needle.
The next step is to apply decoration elements to the front of the ring pillow. Using glue, fix the thin tape.
Attach a ribbon for the rings in the center of the pillow
We make a beautiful fluffy bow from ribbon
Decorations for the newlyweds will be placed on it. The finishing touch is a decorative buckle or large bow.
We turn the ribbons for the rings down so that the front side of the ribbon is visible from above, apply glue to the middle of the wide satin ribbon and glue the bow
Glue a paper flower on top for scrapbooking
That's all. A magnificent wedding pillow for rings made of satin ribbons is ready.
A beautiful do-it-yourself pillow for rings is ready
Wedding pillows made using thread and needle, glue and their varieties
A wonderful individual example. Just a few operations and the pad is ready!
- Choose a material.
- Draw and cut out two squares measuring 20*20 cm using scissors.
- Draw a straight dotted line for your glue gun to follow.
- Using a neat seam, go along three sides of the product, and leave the fourth side untouched for a while.
- Turn the work material right side out.
- Fill the resulting square blank with halofiber, cotton wool or padding polyester.
- Finish the free edge on the fourth side of the pillow so that the fabric does not fray, and wrap it inside the product.
- Make a blind seam on the last side or seal with glue.
- Decorate the front side with decorative elements and lace on the sides.
Pillow decorated with artificial flowers
A pillow for wedding rings, made of white satin and decorated with ribbon flowers and lace, looks festive and solemn.
Prepare the following materials:
- satin fabric 50x50 cm;
- openwork/lace fabric 50x50 cm;
- white satin ribbon 0.5x50 cm;
- golden wavy braid 1 m, 20 cm;
- satin rose made from ribbons (you can buy ready-made or make it yourself);
- small white and beige beads;
- golden flowers;
- 4 decorative small flowers;
- padding polyester;
- hot gun;
- threads, scissors.
How to make a pillow step by step:
- Cut out a square of cardboard to the desired size.
- Place a cardboard template on lace and satin fabric and trace it with a special marker or a piece of dry soap.
To secure the fabric well, pin the cardboard to it using pins or needles.
- Cut 4 squares: 2 from lace fabric, 2 from satin.
- Sew a lace piece on all sides onto a square of satin fabric using a basting stitch. We sew the other two squares together in the same way. You should end up with two pieces, with satin fabric on the bottom and lace on top.
- Place the two squares together, lace sides facing each other, and secure with a basting stitch on three sides.
- Sew the product using a sewing machine, leaving 1 cm at the edges.
- Pull out the basting thread and turn the workpiece inside out.
- Cut a rectangle from padding polyester to the size of the pad, fold it in two layers, carefully place it inside, and straighten it to fill the entire space.
- Sew the last side with a blind stitch.
- Select a square in the center - this will be a recess for the rings. Sew a through stitch on all four sides, glue gold braid and four beige beads along the edges.
- Glue a white ribbon rose to the top left corner.
- Cover all sides with gold braid.
- Cut 3 strips of white tape, about 10 cm long, and burn the edges. Fold each piece into a loop and glue it to the top of the rose.
- All that remains is to decorate the pillow with golden flowers and beads. Try to maintain style and symmetry so that the product does not look too pretentious and ridiculous. Glue a small decorative flower to each corner.
Cushion for wedding rings in rustic technique
Increasingly, weddings are taking place in a rustic style, demonstrating unity with nature and concern for the environment. An accessory for rings using the rustic technique involves the use of natural materials: burlap, linen, cotton, embroidery, lace.
What you will need to create an original pillow:
- a piece of burlap;
- cardboard;
- twine;
- filler (sintepon, cotton wool);
- thread to match the color of the fabric, needle;
- decor
Step-by-step instruction:
- We make a square template from cardboard, apply it to burlap, and cut out two identical blanks.
- We sew the burlap on three sides, turn it inside out, and stuff it with stuffing.
- We sew the remaining side with a hidden seam.
- We sew a bow of twine in the center of the product - the rings will be held on it. If desired, you can decorate the finished product with embroidery (a suitable pattern can be found on the Internet, several options are presented below) or with initials made with acrylic paint using a template. Use wooden buttons, beads, and lace as decoration.
Round Wedding Decorative Ring Pillow
For a stylish round shape that goes well with the fine work of the jeweler, a dense material is best. Two pieces of crepe de Chine or satin would be just right. We draw a line along which the pillow will be glued together. Don’t forget to add tucks in the upholstery in two or three places and lace elements on the sides. Using a glue gun, glue sections of the working material. Remember about the free area for turning the festive accessory outward. It is not easy for a non-professional to make an even round seam. Using glue instead of threads will give the product an ideal shape. Synthetic padding polyester or artificial wool are perfect for filling. For decorative elements, you can buy lace ribbon and thin white ribbons. They are fixed separately for each ring or tied together. A similar, round, original shape with rings in the center is ideal for a wedding.
Answer quickly!!!
Surely many of you, dear friends, are already tired of “fidgeting” in place while waiting for an answer, what is the mission of this cute accessory? I’ll be honest, I reviewed a lot of material, went to forums about weddings, and to fortune-telling sites, and to all possible stores, but I didn’t find any “underlying background”. The main function of the ring cushion is to beautifully present jewelry that represents the family.
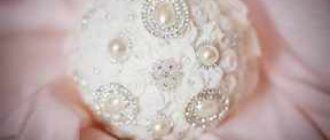
Moreover, not every registry office allows you to place rings on anything other than a saucer. Therefore, sometimes a pillow is needed only for stunning wedding photo shoots. And again the question is, is it really worth spending a specific amount for the sake of several, of course, beautiful photos? Yes, that's exactly how it works. But you must admit, there is something to pay for. These little clouds are so beautiful that they will take your breath away!Heart Shaped Wedding Ring Pillow
Materials and tools for making a symbolic heart-shaped ring holder
To make an original pillow for wedding rings with your own hands, you need to decide on your thoughts and dreams in advance. The main form of manifestation of love is the human heart. Therefore, the design of a heart-shaped pillow is the most classic and suitable option.
We form a heart from a wire based on a paper cutout
We cut off the remaining wire, taking into account that the ends should overlap each other by 2-3 cm, wrap the ends of the wire with tape as tightly as possible
This shape can be achieved either with a glue gun or with a machine, if you are a professional seamstress who knows how to make seams evenly and accurately.
We wrap the outline of the heart with yarn at different angles and in different directions to completely cover the space in the center of the wire frame
To prevent defects and mistakes, you need to make a heart stencil on paper. Then cut it out with scissors and place it on the work surface of the festive fabric. Using chalk, mark the edges of the future pillow for the rings. Cut out the two resulting hearts again, not forgetting to leave a fabric allowance for the seam.
Glue the lace and pull the ribbon into the button
It is best to decorate the finished front side of the pillow for rings with a wide ribbon and a bow with a wide bead. The wedding rings will take up space just around the perimeter of the bow. Any color scheme of your choice. Of course, you should avoid dark colors.
The cushion for the rings is ready - put the rings on the ribbon and tie a bow
Practical part with photo and video instructions
And now, finally, we come to the most interesting moment. Now I will tell you and show you how to sew the accessory discussed in this article yourself. Of course, you don’t have to worry about it and buy it without any problems.
And now I present to your attention instructions that outline step by step the process of creating this wedding ceremony attribute:
- Preparing a pattern (scheme)
- Material cutting
- Sewing and printing
- Decoration
As you can see, the manufacturing plan is quite simple, and even if you have no experience in this matter, you will be able to cope with the task, and I will help you with this with my advice.
Pattern
The simplest template is a simple square measuring 10 cm by 10 cm.
It is very important to maintain proportions: if you make them smaller, the rings may slip off, and if you make them larger, they may get lost in the design, but all attention should be focused on them
There are other designs, so don't stop your imagination. Very often, for such purposes, a heart shape is chosen, round or in the shape of a flower, which, in principle, will not cause you any difficulty. On paper, draw the outlines of the future pillow for the rings. Be sure to take into account the seam allowances (they are approximately 0.5-1 cm on each side). Then carefully cut out the pattern.
Uncover
Now we transfer the pattern to the fabric. It is better to choose a dense and rich fabric (silk or satin are excellent). And for a rustic style, it would be good to stock up on burlap, as it may be useful to you not only for these purposes. If you decide to make a heart-shaped pillow, then it is best to choose red velvet.
Carefully cut out the pieces from the fabric and fold them right sides inward.
Sew the base
Now we sew the edges of our parts along the perimeter, leaving a small part so that we can turn our product inside out and stuff it. Regular cotton wool is suitable for this, but you can also use padding polyester. After the pad is stuffed, carefully sew up the remaining area.
To prevent the rings from slipping, you need to make a pad with a recess. To do this, you need to sew the parts after stuffing in the place where you marked the place for the recess. This can be replaced with fasteners, the functions of which can be performed by flowers, thin ribbons, decorative buttons, bows and more.
The most interesting
Let's move on to the most exciting and important moment - decorating. This stage depends entirely on your tastes and imagination. I can give you a couple of ideas, I hope you like them.
- Embroidery or applique can be used as decoration. But then it is worth decorating the fabric with this technique before sewing the parts, since doing this after the pillow is sewn and stuffed will be very inconvenient. The main motifs for such embroidery are flowers, crossed rings, swans or doves. You can also embroider the initials of the future spouses or the date of marriage registration
- Another method of decorating fabric before joining is to use the puff technique. These are small gatherings of fabric that are held together with decorative stitches. By the way, you can even get a set if you decorate the cover of a guest book using the scrapbooking technique in a similar way.
- For decoration you can use ribbons, beads, rhinestones, seed beads, etc. Or you can use everything at once and make a decoration like kanzashi. And don’t be alarmed – there is nothing complicated about it. Watch the video master class and see for yourself
- For eco-decoration, dried flowers, various natural materials, jute rope and lace are useful.
I believe that everything will work out for you, and you will create a real work of art. I hope that you will show off your masterpieces - you can do this by uploading a photo in the comments.
I hope you liked the article and took advantage of the tips. Even if the wedding is not planned for you, but for your friends, I think that they will appreciate it if you give them such a gift. Don’t forget that the article can be supplemented with comments and reviews, so quickly share it on social networks: more people – more reviews and new information.
Soon I will prepare a new batch of fresh ideas for you, but for now you can refer to the section of the site where you will find specialists in wedding decorations.
Well, that’s all for today, see you soon, successful and easy preparation for you. Bye.
Ring mount
Options for attaching rings may be different. You can show your own ingenuity and add individual details.
- Firstly, choose auxiliary materials such as velvet and pearls. Using a glue gun, attach two large pearls and several small beads. Your wedding rings won't fall off when you pair them with this mesmerizing combination.
- Secondly, use satin ribbons as a ring holder. Tie two bows in an original way and attach them to the pillow with drops of glue. Place two rings on top of the bows. Such a fastening mechanism will ensure the reliability of the design and impeccability, originality of appearance.
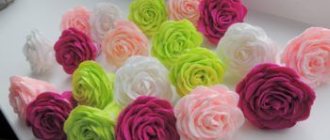
- Thirdly, ribbon and fabric flowers can be an excellent solution. You can roll them from a variety of colored, satin ribbons. A master class on making them can be completed in 10-15 minutes. Fasten and tuck the end of the ribbon, and make satin flowers in a circular motion, placing one edge on top of the other. Ready-made fabric bouquets with several beads threaded through rings will firmly hold the entire original composition.
Thus, a wedding is an exciting, touching event in the life of every young man. In order not to spoil the mood, you need to carefully think through all the events in advance. Hall decoration, champagne, glass decoration and ring cushion. Everything should be in the same style. There are many options. There are no comrades for color and taste. The choice of the shape and method of making a pillow for rings is yours, dear newlyweds, and dear parents.
A little history
How long do you think people have been using rings for marriage? Long enough? Certainly! Even in Ancient Egypt, there are references to the exchange of rings as a sign of consolidation of the marriage union. But our Motherland did not lag behind.
Rings are a symbol of the sun. And two rings are a symbol of infinity. Which together gives us endless love, protected by the power of the sun.
It is reasonable to assume that pillows were not used for wedding rings for several decades, but wedding processions from limousines did not travel on the roads either. Everything changes and everything strives for beauty. In Rus', wedding rings were predominantly silver; only very rich people could afford gold, and in ancient Egypt there were hardly rings with diamonds, as they are now. So where did the tradition of carrying rings on a pillow come to us?
This beautiful moment was spotted at the coronation. Do you remember? True, the size of the pad has decreased slightly since then. The monarch was presented with a crown on a bright velvet pillow decorated with gold and expensive stones. This symbolized the elevation of the crown above the earth, and the person who carried it did not touch the attribute, which was passed down from generation to generation to the Divine chosen one.
When exactly this tradition began to be applied to rings, no one can say for sure. Perhaps a couple of centuries ago, maybe several decades, or maybe even less. But it came to us from Europe. And now you and I have the opportunity to enjoy the wonderful and touching beauty of the air cloud and the two symbols of love and fidelity rising on it.
A selection of photos for choosing and making a cushion for rings with your own hands:
PreviousPillowsNeck pillows
Next
PillowsBaby feeding pillow
Decor
Cushions for rings are most often sewn from satin in white or pastel shades .
For a rustic or retro wedding (learn more about weddings in this style), you can use unbleached linen or deliberately rough matting. The easiest and fastest way is to decorate the pillow with a piece of guipure or lace . You can sheathe the entire surface of the pillow with guipure, as well as its middle or just a corner.
The main thing is to sew two satin ribbons or pearls for rings in the center of the applique . To prevent the ends of the ribbons from splitting, they are burned with a candle flame.
A contrasting strip of satin sewn onto a white pad looks impressive. In the middle, such a strip can be compressed with a clip with rhinestones to form something like a bow.
If burlap or canvas is used as the material for the pillow, cream lace goes perfectly with it. Instead of pearls, gilded hazelnuts are sometimes sewn onto such a pillow .
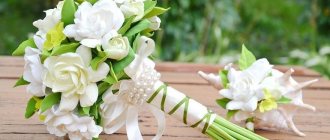
Often artificial flowers are sewn onto ring cushions. Large artificial roses or peonies on round pillows look especially impressive: then the pillow itself seems like a flower. Rings can be secured in the middle of the flower.
Small artificial flowers (apple trees, lilacs, daisies, daisies) sewn into the corner of a square pillow look cute in spring.
For a wedding in a nautical style, appliqués in the form of starfish or funny octopuses are often made on pillows. A variety of embroideries are also appropriate on the pads , even simple ones that any girl can handle: stylized daisies, willow branches, hearts.
What kind of pillow should it be: top 3 tips
Before buying a pillow or starting to make this important attribute, consider these three important points:
- We do not recommend making pillows smaller than 10*10 cm and larger than 15*15 cm.
- Don't get carried away with the decor. At the most exciting moment, rings can simply be lost from sight among the abundance of ruffles and ribbons.
- Pay special attention to the ring mount on the pillow you purchased for your wedding. Make sure it is secure, otherwise the rings may fall to the floor at the most crucial moment. Why do you need unnecessary panic and worry?!