Photoshop is a set of all the tools needed to work with images. Its convenience is that it is intuitive for those who have at least once used standard Paint.
Of course, Photoshop is a more complex program in which not only beginners, but also professional photographers work, so some functions are difficult . But due to its widespread use, there are a lot of instructions explaining all its properties. Therefore, it is ideal to create wedding invitations either with your own hands or using templates.
Recommendations
There are a large number of unusual invitation templates posted online, but to make them truly unique, take the idea and adapt it to your celebration:
Before starting work, think through all the details - fonts, design, colors, number of guests
In this case, you will not have to correct what has been done; You can start by making a sketch and showing it to a friend or relative whose taste you trust; Heartfelt invitations in verse will delight elderly relatives, humor will be appreciated by friends, formality and severity will be appreciated by colleagues; If possible, it is better to give invitations personally - this way you will demonstrate the importance of each guest; Involve creative friends and your fiancé in the process - joint creativity brings you closer together; Small details in the invitations, duplicated in the wedding decor, are a great opportunity to demonstrate excellent taste!
seal
If you're not sending your invitations to a printer or using custom materials, you can print your invitations on standard letter-sized card stock.
First save the invitation as a PSD file and then select Flatten Image from the Layer menu. Press Ctrl-A and Ctrl-V, copy the prompt, and then close the document without saving this last change.
Press Ctrl-N to create a second document and select Photoshop's Letter USA preset. Press Ctrl-V, paste copies of the invitation into the document, and drag them into place. Once printed, you can cut out the invitations from the cards using a pencil, ruler, and sharp scissors.
Scroll
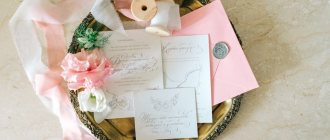
This type is one of the most trendy and stylish and can become a highlight in the recipient’s interior. To make it you will need paper, sealing wax and imprint, ribbons, rope.
It is better to choose paper with an antique effect. You can trim its edges with embossed scissors or lightly singe them for greater realism. A striking impression is achieved by tinting with brewed coffee.
Next, type the text or write it by hand with pen and ink. The invitation is wrapped in a package, twine is attached and a bow is tied. The scroll is ready, and for greater authenticity, put a company seal.
Document Layout
Launch Photoshop and press Ctrl-N to create a new document. Enter the height and width for the invitation. Note that you can change the unit of measurement from Points to Inches by clicking on the menu next to Width or Height . Click OK .
In this example, the card is 6 by 4 inches. Credit: Image courtesy of Adobe.
Click on the View menu and select New Layout . Click on the Field check box and enter the fields for the invitation. Margin guides will appear above the document to help you align your invitation cover.
A 25-inch margin is used here on all sides of the invitation. Credit: Screenshot courtesy of Adobe.
Wedding-Invitations
Once you open the Wedding-Invitations app on your iPhone, you can choose from a variety of options for your virtual invitation design and background. To get started, go to the Designs section and look through the available samples. After you click on one of them, the editing tab will automatically open. Here, in one of the categories, select the theme of the drawing - for example, “Autumn Wedding”, “Invitation for a Child”, “Religion”, etc.
Having decided on the graphic design, proceed to applying the text. Customize the font style, color and size. Upon completion of all operations, you can save your creation or immediately send it to recipients in any convenient way.
The application is free and contains advertising. But the ads are located only at the top or bottom of the screen, and do not cover its entire area, as is often the case in other programs. You can also purchase a paid version, which will allow you to get rid of ad blocks and gain access to advanced features.
DIY holiday invitation. Magic lace.
For this invitation you will need lace napkins. They can be found in almost any supermarket. There are 100 napkins in one pack, but we only need as many as there are invitations.
You will need:
- lace napkins with a diameter of 24cm
- thick paper
- scissors
- ribbon
1.
From thick cardboard you need to cut a rectangle 10.5 x 11.5 cm.
2.
Place the cut out rectangle on the lace doily and fold the edges.
3.
You can bend the bottom of the napkin into a triangle shape.
4.
Fold the top corner and the bottom triangle and thread a ribbon through them and tie a bow.
*You can decorate the invitation to your liking.
Scrapbooking
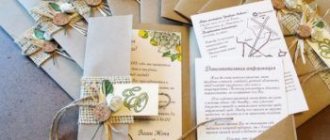
Up to 90% of all invitations are made using this method. Thanks to the variety of materials, almost any original idea of the author or the newlyweds can be brought to life. Follow the following sequence of actions:
- Select a textured material and print text on it.
- Use curly scissors and trim the edges of the rectangular sheet.
- Make a hole at the top with a hole punch and pass a ribbon through it, which you elegantly decorate into a bow.
- Make an envelope and put a message in it.
- You can stick decorations on the envelope: lace, rhinestones, sequins, fringe and much more.
LiveInternetLiveInternet
—Subscription by e-mail
—Search by diary
—Tags
—Categories
- Themes and Schemes (2268)
- People/Celebrities (1064)
- Avatars (1025)
- Gif and animation (945)
- Backgrounds and screensavers (690)
- Animal world (634)
- Miscellaneous (607)
- Flowers (597)
- New Year and Christmas (375)
- Nature (350)
- Postcards (325)
- Love/Romance (270)
- Fantasy (241)
- Frames (231)
- Greetings (and other courtesies) (197)
- Mood/Emotions (191)
- Food (155)
- Decor (148)
- Angels (132)
- Wallpapers (129)
- Easter (112)
- Religion (90)
- Humor (89)
- Painting (80)
- Birds (79)
- Toons (75)
- Valentines (60)
- Dolls (57)
- ART/Creative (49)
- Dividers (42)
-Statistics
Rustic style
For this technique you need a glue gun, a printer, pruning shears, a hole punch, a label, an openwork napkin for cakes, as well as various elements for decoration (beads, fabric, flowers, ribbons and others).
Let's look at the development process step by step:
- To begin, print the invitation on a piece of paper and attach it to a napkin.
- Fold in the top, bottom and sides to create an invisible outline without using a pencil.
- Remove excess top and bottom along the lines using a ruler.
- Four pieces of double-sided tape are attached to the back of the card.
- Next, it is centered on a napkin and pressed until it is completely glued.
- The text can be decorated with small rhinestones.
- Tie a ribbon around the craft, secure the label and tie a bow.
Making a list of guests for the wedding
Make a list of guests correctly, then it will be easier to determine how many and what kind of invitations you will need. With a guest list, it is easy to control the sending of invitations, as well as the gathering of guests. In the guest list you should note those invitees who will not be able to attend your wedding for some reason.
- Thoughtfully and calmly discuss what kind of wedding you want: a small one, with friends and close relatives, or a large-scale one, with a large number of guests.
- Estimate what budget will be allocated for the festive event.
Tip: Don't expect gifts to recoup your money. As a rule, this does not happen.
Check how many people your chosen banquet hall can accommodate.
What the guest list looks like (option):
| Guest name | Note | Invitation sent | Participation confirmed | Address or telephone number |
| From the bride's side | ||||
| Papa Vladimir Petrovich | + | + | ||
| Mom Anna Nikolaevna | + | + | ||
| Sister Katya | + | + | ||
| Girlfriends | ||||
| Masha | With baby | + | + | |
| Olga | vegetarian | + | + | |
| Relatives | ||||
| Aunt | ||||
| Nephew | With a guitar | |||
| From the groom's side | ||||
| Papa Ivan Petrovich | ||||
| Mom Tamara Nikolaevna | ||||
| Brother Kostya | poet | |||
| Friends | ||||
| Vic | sings | |||
| Oleg | + | Will arrive on the second day | ||
| Mutual friends | ||||
| Tomashovs | ||||
| Additionally | ||||
| Igor Petrovich Ivanov | Will be late |
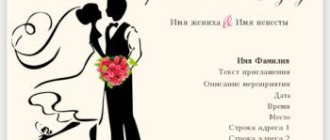
First of all, decide in what style you see the wedding, in what color scheme, because... The wedding invitation is the prologue of the wedding, and it must match the chosen style.
Once you understand these details, prepare your materials and let’s get creative.
Following this master class, we will create beautiful wedding invitation cards with our own hands that will reflect individuality and also reduce the cost of the wedding budget!
Rules
There are several etiquette rules that apply to the design of invitation cards:
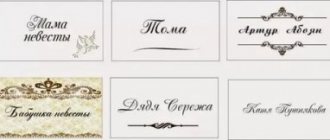
- The names of invited guests are entered by hand;
- An invitation verbally must be confirmed on paper;
- Invitations begin to be sent out several weeks before the event so that guests have the opportunity to prepare;
- If the wedding is themed, then the wishes for the dress code are indicated in the card;
- It is better to abandon the official business style of writing and stamps. The text for those closest to you must contain warm words;
- The postcard is sent in a humorous manner to people with a good sense of humor. Remember - the invitation should not offend or cause unpleasant associations;
- An invitation in verse will appeal to older guests.