Often it is not easy for newlyweds to decide on the types of wedding decor or the design of a photo zone. Many lovers want to see not only beautiful decor, but also meaningful decor that would convey the mood and character of the young couple. Wedding letters will help create an original accent.
Beautiful Russian capital letters for design: letter templates, print and cut out
If you need to make an inscription in capital letters, then look for a suitable option in this section.
Beautiful Russian capital letters for design: option No. 1
Beautiful Russian capital letters for design: option No. 2
Beautiful Russian capital letters for design: option 3
How to decorate with your own hands?
If you want to create your own unique presidium, and also save on the services of a decorator, then you can try to do the design yourself. Please note that decorating the bridal area includes several stages:
- Planning materials, in particular, what to make the backdrop from (if provided).
- The procedure for installing and decorating the backdrop.
- Table decoration.
- Decorating the area in front of the table.
Screen and fabrics
The podium, decorated with fabric, looks very solemn.
- The ideal combination is a denser fabric, such as satin, and a light, airy one, such as organza or tulle.
- The contrast of two or three colors looks harmonious in the design. White or any other light colors and more saturated bright shades are often used.
- So, the combination of white and red material will give the young people’s area more luxury. The table is covered with a long white tablecloth, which goes down to the very bottom in even, symmetrical folds. The lower part of the fabric is beautifully laid out on the floor. A fabric of contrasting color is thrown over the top of the table on one side and draped downwards at a slight angle, securing it to the folds of the tablecloth at different levels. The lower ends of the fabric are placed in picturesque disorder on the edges of the tablecloth lying on the floor.
- The backdrop is decorated with alternating stripes of red and white fabric. The material is draped in even vertical folds flowing to the very bottom.
- The space in front of the table can be supplemented with flower petals, and neat vases with small bouquets of delicate shades can be placed on the table itself.
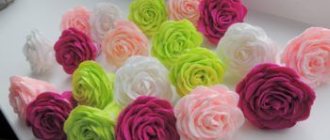
Flowers
Decorating with fresh flowers looks very unusual, gentle and, at the same time, chic. If you want to create your own flower meadow, then you need to stock up on a large number of flowers, because in this design option they will dominate.
- It is better to choose flowers in three or four shades close to each other. For example, white, soft pink and deep pink or scarlet.
- When decorating the backdrop, the flowers need to be placed as close to one another as possible, so that they create a single, inextricable composition. The buds should cover the entire backdrop or most of it. In the center of the backdrop, not hidden by flowers, it would be appropriate to place the letters of the newlyweds' names.
- If desired, flowers on the backdrop can be placed in the form of a voluminous arch or a large heart.
- The table should also not be deprived of flowers. When decorating, the front part facing the guests will be mainly used. Flowers can be placed on the folds of the tablecloth in the form of a kind of arch, alternating them in shades. Small garlands of flowers look beautiful, hanging as if standing out from the overall arched composition.
If you're planning to decorate your reception venue yourself, you'll find our guide to outdoor ceremony accessories helpful.
Light
- You can use different options for dim lighting. However, do not overdo it, otherwise the desired effect will easily become comical.
- The waterfall garland looks great. It can be placed on the long folds of the tablecloth or decorate the backdrop.
- The table can be decorated using an LED strip, securing it under the edge.
- The space in front of the table will be perfectly complemented by small compositions of candles.
Beautiful Russian New Year's letters for decoration: letter templates, print and cut out
In this section you will find a selection of beautiful Russian letters for decorating a New Year's event.
Beautiful Russian New Year letters for decoration
Beautiful Russian New Year letters for decoration
Beautiful New Year's inscription for decoration
Beautiful Russian New Year letters for decoration
Beautiful Russian winter letters for decoration
Beautiful Russian winter letters for decoration
Beautiful Russian winter letters for decoration: letter templates, print and cut out
To ensure that the inscription itself does not commemorate the frosty, clear days of winter, it is worth looking for appropriate letter templates to decorate the holiday. To make your search easier, we have collected them in this section.
Beautiful Russian winter letters for decoration
Beautiful Russian winter letters for decoration
Photography at the banquet
The wedding photographer conducts reportage photography during the main part of the banquet. During congratulations, the photographer will photograph your guests (portrait photography), and during dance breaks there is an opportunity to take photos with those guests who were not there for the walk. In this case, be sure to notify the host of your celebration. A small photo session can be held indoors or in the surrounding area. You can also leave the banquet with your partner for 10-20 minutes together with your photographer, but we do not recommend disappearing for a long time. Agree that fun without a bride and groom is not the same. Discuss all the nuances with the photographer and presenter in advance.
When you throw the bouquet (bride) and garter (groom), be sure to warn the photographer - he may be busy at that moment with your guests or, for example, changing a battery or flash drive. Just make sure once again that the photographer is nearby so that such a unique moment is not done in a hurry.
Beautiful Russian capital letters for design: letter templates, print and cut out
- For years, art schools and other specialized educational institutions have been teaching how to create inscriptions and correctly place texts on a poster. Therefore, all the nuances of writing letters cannot be revealed in one article. We won't even try. After all, now there are a lot of ways to bypass the process of writing text: letters and entire inscriptions can be printed on a printer, redrawn from a finished poster or cover onto tracing paper, and then transferred to a poster or other surface.
- If necessary, you can simply paste the text printed on a black and white or color printer. But if you have time, you can experiment with colors, textures and apply paint in some unusual way.
What tools do you need to write beautiful text?
Beautiful Russian capital letters for design
Beautiful Russian capital letters for design
DIY wedding banner
Creating a beautiful banner for a wedding photo zone is a real art, but it is not necessary to involve professionals in working on it
For example, a banner with flowers attracts the attention of guests and leaves a lot of positive impressions. But to develop it, it is not necessary to hire expensive florists; there are many ready-made ideas on the Internet that can be easily brought to life
Among the main rules for making original canvas:
- it must correspond to the theme of the wedding celebration;
- it is beneficial to highlight the outfits of the newlyweds;
- fits organically into the overall color scheme.
When creating, you can experiment with different concepts and styles, from retro to pirate or gangster themes.
Materials
You can create a wedding banner from thick paper, fabric or vinyl. A popular type of decor is a garland. Creating such a design does not require any special skills, so even a beginner can handle it. The structure for the printed canvas can be rented or made independently from wooden blocks, boards, profiles, plywood sheets and other materials. However, when creating wooden structures, you need to know that they are not stable and create a number of difficulties during transportation.
Step-by-step instruction
If you have a limited wedding budget, it is not necessary to order a banner from a professional studio. You can do it yourself.
- To create a layout, use Photoshop or a similar program. The photographs are edited, the color gamut is aligned and defects are removed. Since creating unique images requires certain knowledge and preparation, a ready-made template can be borrowed from the Internet.
- Print out the finished layout; it will cost less than ordering a turnkey banner from a specialized agency.
- If there is no frame, fix the canvas on one of the walls in the banquet hall using clothespins, ropes or ordinary fishing line.
A variety of elements are suitable for decorating a banner, from tinsel and balls to garlands and fresh flowers. Those who decide not to spend money on printing the canvas should make stencils and paint inscriptions on pre-cut rectangles of fabric. Words and sentences are formed from individual letters and secured in the banquet hall using adhesive tape or decorative pins.
Beautiful Russian letters with monograms for decoration: letter templates, print and cut out
- Get started by creating a sketch. You will reduce the time spent on creating a poster or inscription for an event if you write the text in a small format, displaying the maximum amount of detail.
- While preparing the sketch, you should have a clear idea of what your inscription should look like in the end. Finish execution can begin only after preliminary sketches. The decision about the location of the text also needs to be made at the sketching stage.
- When starting to write text, you should adhere to a simple and simple rule: all characters must have the same width. Also, the inscription should consist of the same combination of thin and wide lines. Do not write overlapping graphic elements, or have characters of different heights, lengths, or widths. Between letters, no matter what format you create them in, the same distance should be maintained.
- If the above requirements seem too complicated for you, then write the letters without complicating them with various additional elements. Take your time, because this activity is only for the patient.
- If you are not sure that you will be able to write a beautiful inscription on a large-format canvas, then use a stencil for the work. Now there are many sites where you can find stencils for printing, made in various styles.
- But if you find it difficult to draw using a stencil, then choose a suitable font and print the letters on your computer. Next, you will need to carefully cut out the letters and place them on the poster, gluing the bottom part. such an inscription will also look good.
Beautiful Russian letters with monograms for decoration
Beautiful Russian letters with monograms
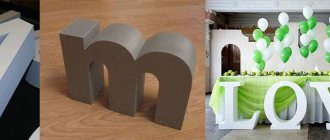
Volumetric letters made of cardboard for wedding decoration
To create large three-dimensional letters from cardboard, you need to prepare: corrugated cardboard, scissors, cutter, ruler, tracing paper, pencil, double-sided and regular tape, elements for decoration (threads, ribbons, fabric, braid, artificial flowers, buttons, colored or self-adhesive paper, etc. .P.).
Step by step guide:
Volumetric letters made of cardboard for wedding decoration
Volumetric letters made of cardboard for wedding decoration
— The word or letters you choose must be transferred to cardboard in two identical copies (back and front). To do this, you will need tracing paper and a pencil, which you should use to draw the desired letters. Or you can simply print the layouts on a printer.
— We transfer the words onto cardboard in duplicate, after which we cut out each letter with an allowance of about two centimeters. We bend the allowances so that double-sided tape can be glued to them and as a result, sticky sides are formed.
— We cut a large number of cardboard strips of equal width (for example, 5 centimeters).
— Gently bending, we connect the strips with the letters, gluing the two sides of the letter and the cardboard strips with double-sided tape.
The result should be three-dimensional cardboard letters ready for decoration.
Beautiful Russian letters for decoration: letter templates, print and cut out
If you need to design a poster in a humorous way, with cheerful notes, then look at the letter templates presented in this section.
Beautiful Russian letters for decoration
Beautiful Russian letters for decoration
Options for a wedding photo shoot with letters
The question may arise as to how letters can be used beyond decoration in various places. Here comes the application in a wedding photo shoot.
There are various options for their location and use:
- put or place on the ground. Where the newlyweds stand behind the letters in various poses. Which will lead to defocus;
- you can hold them in your hands. It all depends on the idea, for example: the newlyweds keep the word or phrase together; either the groom is one thing, and the bride is another word; or someone standing in front or behind each other;
- binding to helium balloons. Which allows you to support them above your head, for newlyweds or friends;
- the use of words or combinations of phrases in the presence of native ones. For example, the designation of mom and dad, sister, and so on;
- in humorous photography scenes. For example, the groom holds in his hands the phrase “gotcha”, and the bride “mine forever” and so on;
- in scenes depicting love. For example, guests hold the word “Love”, and the newlyweds hug each other tightly or kiss.
Editor's choice: How a wedding is celebrated in the Maldives. Photo review
Using letters when taking photographs can help newlyweds not get confused during the process. Somewhere to relax or give free rein to your imagination. Taking the initiative can leave a lasting and memorable impression of the event.
People who value wedding moments and want to preserve memorable ones try to experiment with different decor options. The letters used in this article are in the form of various variations.
Beautiful Russian fairy letters for design: letter templates, print and cut out
To decorate a children's party in a fairy tale theme, special templates are suitable. All you need to do is find the ones that suit you from this section and print them.
Beautiful Russian fairy tale letters for decoration
Beautiful Russian fairy tale letters for decoration
Beautiful Russian fairy tale letters for decoration
How to make wedding signs yourself: step-by-step instructions
Both the future newlyweds and their friends will be happy to take part in the process of making wedding signs for the photo shoot.
Everyone will be able to show their imagination by creating their own masterpiece. There is no need to buy expensive components for this.
Paper and wood, foam and plastic, satin ribbons and lace can be used as manufacturing materials:
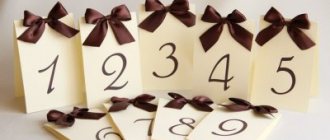
The lightest signs are made from colored paper and cardboard (left over from making place cards). It is enough for the master:
- come up with a sign shape;
- draw it on a sheet of cardboard;
- carefully cut out (if necessary, the inner part);
- use the resulting product as a stencil;
- using a ready-made stencil, transfer the image onto a sheet of colored paper and cardboard;
- Having cut out the image, glue it onto one of the cardboard blanks;
- glue a wooden skewer to the wrong side;
- apply glue to the surface of the second cardboard blank and cover the part with the skewer with it;
- Place the almost finished sign under a press and leave until completely dry.
No less popular are speech clouds, which are quite easy to make with your own hands:
- you need to prepare as many sheets of cardboard as there are signs of the same shape that are supposed to be made;
- one of them will serve as a template;
- transfer the outline of the card created on the template to the remaining sheets;
- cut carefully;
- Place a wooden skewer between two cardboard plates and glue both sheets together.
You can design such signs to your liking and in accordance with the inscription that will be applied to the surface or in accordance with the design of the numbers on the table. In this case, a wand is definitely needed; speech clouds are raised above your head, silently expressing your thoughts during a photo shoot.
Large letters from which the most cherished words are composed can be cut out with a plywood jigsaw or a sharp foam knife
It is important to follow the form exactly and do all the work carefully:
- draw the outline of a letter onto the surface of the selected material with a felt-tip pen;
- if you have to cut it out of a sheet of plywood with a jigsaw, then after completing the work you need to sand the edges of the product and its entire surface with fine sandpaper;
- The finished letter is painted and varnished.
Letters cut from polystyrene foam do not need to be painted; their surface is decorated with ribbons and flowers, it all depends on the preferences of the hosts of the holiday.
A photo session is required for every celebration, and for a wedding this event is of particular importance, which is why decorating the photos is so important
Beautiful children's cartoon Russian letters for decoration: letter templates, print and cut out
A children's event can be decorated with original cartoon letters. Where can I find them? In this section!
Beautiful children's cartoon Russian letters for decoration
Beautiful children's cartoon Russian letters for decoration
Beautiful children's cartoon Russian letters for decoration
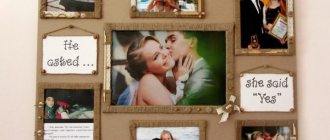
DIY wedding accessories master class (photo)
Wedding items are not difficult to find in stores; there is a huge selection of craftsmen ready to make custom-made accessories, taking into account all the wishes of the newlyweds. But the ideal option is to find a little time and create the necessary little things with your own hands, putting a piece of your soul, heart, and love into them. These dear accessories will be priceless for spouses; they will cherish these little things throughout their lives, just like their love.
Flower pillow for wedding rings
The process of exchanging wedding rings is an exciting moment for newlyweds. The photographer will definitely capture this moment, and the ring pad will be included in the frame
Therefore, you should approach the choice of this little thing with all the attention and responsibility. The stores offer a huge selection of such accessories, but they are all the same type, fabric, sometimes even boring, but you want something special, unique
It’s not difficult to create a truly original pillow with your own hands.
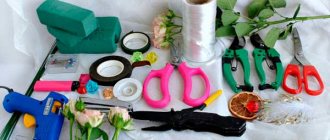
To create a wedding flower pillow you will need:
- Satin ribbon to match the composition.
- Wire.
- Gardening scissors.
- Floral sponge (size approximately 4x5x2 cm).
- Orchid, amaranth, hydrangea, brunia berries, eucalyptus, moss.
Creation stages:
- The top and sides of the floral sponge must be wrapped in moss, evenly distributing it over the entire surface.
- The moss must be secured with wire, creating a mesh from it.
- Wrap the sponge with a satin ribbon, similar to how a gift is wrapped - cross to cross. Tie a bow on the side where there is no moss.
- Insert flowers into the grid, filling the space so that there are no empty spaces left. When placing flowers, you need to make sure that the finished composition looks harmonious.
- Cut part of the bow in half so that the ribbon does not unravel; you should tie a knot. Thread wedding rings through the free ends and make a bow. The original, fragrant pillow for wedding rings is ready.
- You should create such a charming little thing in the evening immediately before the wedding, and leave it in the refrigerator overnight so that on the wedding day the flowers on the pillow are fresh and beautiful.
Bow for wedding shoes
A variety of little things will help you make a small redesign of your wedding shoes and give them some sophistication. It is possible to decorate them using a beautiful bow, rhinestones, and beads. To create a bow you will need:
- Bride's wedding shoes.
- Satin ribbon to match the color of the shoes.
- Rhinestones.
- Stapler.
- Scissors.
- Shoe clips.
- Fabric glue.
Stages of creating small items for decoration:
- Cut the ribbon to the required length and make a bow. To create a more magnificent bow, you need to make more folds (minimum 3).
- Secure the bow strictly in the center using a stapler. In order to disguise the place of fastening, you need to cut a small piece of ribbon and wrap it around the center of the bow, securing it with glue. Wait for the glue to dry completely.
- The next stage requires maximum accuracy and attention to detail, because the quality of the final result depends on this. Using a brush, apply glue to the edges of the bow and glue the rhinestones. To make it more shiny, it is worth gluing rhinestones to the core of the bow.
- Glue a shoe clip to the back of the bow or glue it directly to the shoes. Wedding shoes are ready!
Preparing for a wedding takes a lot of time, effort, and finances, but by taking the time and taking care of even the little things, the newlyweds will end up with the wedding of their dreams, where everything will be thought out to the smallest detail, organized at the highest level and done with love. And if the future spouses create some accessories with their own hands, investing a piece of their soul, then they will delight the eyes and warm the heart, and in the future they will become a reminder of the happiest day of their lives!
Beautiful large Russian letters for design: letter templates, print and cut out
- Whatever font you choose for the design of your stand or poster, the letters should remain readable. Otherwise, the beauty you create will turn the text into a puzzle. When creating an inscription, you can, of course, be guided by your taste or idea of the design of the future text, but frills will only complicate the text, and not make it more beautiful.
Letters written with fountain pens turn out beautifully
- When using a computer program or ready-made templates, you should not count on the special “beauty” of the inscription or its uniqueness. This is explained simply: the creators of such templates do not bother searching for information about a well-created font.
- For example, you can click on one of the template links and see the letters in the presented font of different widths. Letters can be created in violation of all requirements. One font may contain rounded, wide letters and elongated ones, some may have protruding ends. If you think this type of font is beautiful, then use it to design a poster. However, you should not expect that everyone will like the result.
Beautiful large Russian letters for design.
Here is an example of a readable simple font:
Beautiful large Russian letters for decoration
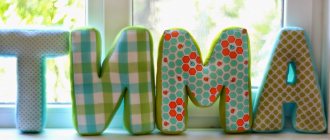
Cardboard garland with words for wedding decoration
It is very easy to make such a garland with your own hands. To work you will need cardboard, scissors, a paper knife, twine, clothespins and materials for decoration.
Step by step guide:
Cardboard garland with words for wedding decoration
Preparing templates
Preparing templates
Decorating the surface of letters
Decorating the surface of letters
The finished letters remain to be secured with clothespins on a rope
The whole process is extremely simple. Cut out letters from cardboard. We decorate them in any way. We stretch the rope and secure the letters with clothespins. The original wedding accessory is ready.
Video - How to make three-dimensional letters for wedding decoration
Beautiful Russian letters with flowers for decoration: letter templates, print and cut out
Beautiful Russian letters with flowers for decoration
Beautiful Russian letters with flowers for decoration
Beautiful Russian letters with flowers for decoration
How to beautifully write letters for the design of a poster, stand, holiday: samples of letters for writing
When creating text, follow the following sequence:
What you will need to create beautiful letters on a large format poster or sheet of whatman paper: a fountain pen for ink and ink
- set of nibs for fountain pens (nibs of different thicknesses)
- wide markers (special, for glossy surfaces)
- paint for these markers (specialized stores sell paint with various tints, for example, metallic)
- If you don’t have a fountain pen, you can use felt-tip pens, colored pencils, gouache or watercolor
If you don’t have a fountain pen, you can use felt-tip pens, colored pencils, gouache or watercolor.
To write vertical dashes and lines, you can use a narrow tip; for the side parts of letters, use a wide tip. With this method of writing, letters acquire volume.
- If you decide to use markers or colored pencils, start by outlining the letters. This is done with a simple pencil. The outline is then outlined with a felt-tip pen, and only then the letter is painted over with paints or pencils.
- To prevent the inscription from looking boring, you can add shadows behind the letters. This will create the illusion of a wall behind the 3D letters, which will cast a shadow. Letters drawn in 3D also gain additional volume.
- So you've chosen a font. Today it won't be difficult. you just need to be able to correctly search the Internet.
How to write letters beautifully to design a poster, stand, or holiday
How to beautifully write letters for the design of a poster, stand, holiday
Technical part: recommendations
- we decide where the inscription will be located
- Without pressing hard on a simple pencil, we make a horizontal line on the sheet (there should be no traces left after using the eraser): we apply alternating stripes according to the height of the font and the line spacing
- if you decide to make an inclined inscription, then immediately prepare an inclined line like a school copybook, but place the lines less frequently
- after drawing the auxiliary lines, we begin to write the letters with a simple pencil, maintaining maximum accuracy in reproducing the configuration and adhering to the width of the letters of the selected font
- mistakes made when writing letters are corrected immediately with an eraser
- We outline the finished inscription with a pen, felt-tip pen or marker
- do not erase draft and auxiliary lines (they can be removed only after the main inscription has completely dried)
How to apply text using carbon paper?
- Print out your favorite template
- Place carbon paper on a sheet of Whatman paper
- Place the original text on top and trace it with a pen or pencil
- After this, remove the copy paper and template, trace the resulting contours again with a pen or felt-tip pen
Don't be afraid to draw lines with a pen and pencil. The ink will cover the contours drawn earlier in pencil and the letters will be drawn evenly and equally. But if you skip the step of drawing pencil lines, the inscription will come out sloppy.
You can choose from the letter outlines proposed in our article and use them as cheat sheets when creating your text.
Three-dimensional foam letters for weddings
Foam letters, even after the wedding, will serve as a pleasant interior decoration for a very long time, reminding you of a happy event.
Three-dimensional foam letters for weddings
To create foam letters, you should prepare: polystyrene foam itself, sandpaper of different grains, newspapers or paper, PVA glue, superglue and wallpaper glue, a paper knife, ruler, marker, scissors, decorative elements.
You can combine several layers of thin foam, fastening them with double-sided tape (but without using Moment glue), then the composition will be more voluminous and stable.
Step by step guide:
- First of all, you should make a paper template for future letters - draw and cut out letters of the desired size and shape from paper. After this, you need to transfer the contours of each letter onto the foam - circle the template with a marker. Using a sharp paper knife, cut the foam along the contours. To prevent the foam from crumbling, movements should be made quickly and confidently.
— When all the letters are cut out, we clean the edges with sandpaper, achieving smoothness.
— Since polystyrene foam is porous, it is difficult to paint or decorate. Additional rigidity can be achieved by using the papier-mâché technique. We tear newspaper or thin paper into small pieces. We dip each piece in a solution of PVA glue (2 parts) with water (1 part), and then place it on the foam letter. We wait for the glue to dry and begin decorating - painting or gluing the letters with different materials.