A new trend has emerged in the design of wedding ceremonies - decoration with paper floral arrangements. Coming from the backdrop of theatrical productions, it allows you to create unique decorations that will look good throughout the celebration.
Some people think that this way of creating a holiday will allow you to save on fresh flowers, but unfortunately, this is not the case. After all, attracted by the unusual design, guests will examine every touch. Therefore, to produce such decor you will need high-quality materials and long, painstaking work, which increases the cost.
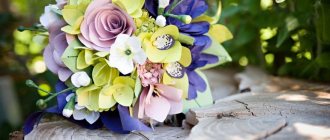
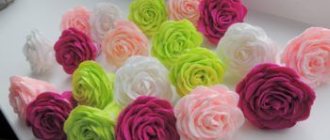
Large flowers made of corrugated paper
Currently, photo zones are being created for holidays, which are intended for photographing guests and the birthday boy, another hero of the occasion. Designers can do the design, but it is possible to build it yourself.
This method perfectly helps to turn fantasies into reality and show the vision of creativity. For example, for a children's birthday party it would be appropriate to make a so-called Candy bar decorated with voluminous flowers.
This way you will be able to surprise your guests, because it is not as usual as balloons. The designer will have a guarantee that the guests will receive it with a bang. In addition, the decoration in question can be made part of a permanent decor. To do this, you will need to choose colors that match other interior elements.
Often, such flowers are used to decorate a bedroom or corridor, to decorate a wall and fit the composition into the arrangement of a particular apartment. Such elements are quite bright when compared to real ones. With this decoration it will be possible to eliminate minor cosmetic defects.
Initially, you will need to find a place where these flowers will look suitable. After which, the required size for a specific room is selected. At the same time, these elements can be placed in different orders, for example, in the shape of a circle or oval and other shapes. You can also post numbers or other significant objects that will be perceived by family members as indicating their home.
In addition, you can place a flower on a picture or an arch, a clock. Double-sided tape should be used for this purpose. The general appearance will depend on the density of the component in question.
If a master wants to create a carpet, then multi-layer models are used, which are arranged quite tightly together. These elements should be made from the same color scheme. The emphasis can then be placed on uniformity and large quantities.
There is another option for using this decor. To do this, you will need to make many flowers that have different shapes and colors. It should be noted that they require a large number of details, and accordingly, preparation time will be required many times more. They need to be placed at a distance from each other to highlight the uniqueness of the composition. Bouquets that combine flowers of different sizes look quite harmonious, especially if you include unopened buds.
Before starting work, you need to determine the color scheme that is used at the holiday or in the interior. If you plan to use one color, then you should study its depth in advance. For example, pink goes well with red and coral.
In the photo you can see large floor flowers made of paper:
Paper buds:
How to use
How to place on the wall
What to make from
Manufacturing methods
Among simple ways to decorate a room, decor using improvised materials is popular. Hand-made paper flowers on the wall look elegant and do not require any special skills.
Instagram @love.paper.flowers
Instagram @luxpompon
Instagram @fancybloom_
Instagram @floraset_ykt
What kinds of flowers are there for decoration?
There are many different colors that can be created using paper. The origami technique is also used. It involves folding the material in question into different formats and objects. You need to use paper painted on both sides, glue and scissors.
The process of making life-size flowers is quite simple:
- a sheet of colored paper with a square shape is prepared;
- it is bent halfway until smooth edges are obtained on each side; straight bends are also made, which are formed by folding the square in half;
- a fold is made directed to the center of one of the vertices;
- similar actions are implemented with the remaining corners;
- folds are made along all the triangles so that it can be folded, initially the triangle is formed along one edge, then when forming the fold, in a different way;
- the element is turned the other way;
- the corners of the square are bent;
- the workpiece is rotated;
- on the folds located on the triangles bent towards the central part, the same actions are performed. Folds are made in the middle of the figure and smoothed out.
The same actions are done for the remaining triangles, wrapping and turning the flower over. All the corners turned out to be similar to the petals of a flower that need to be unfolded. The ends of the resulting flower are slightly sharpened on the outer part.
Flowers can be created using colored paper. In this case, it will be possible to involve children in the process. You will use plain paper of different colors. There are many methods for creating a bouquet, but it is better to use simple methods.
In the first case you will need:
- when using a ruler, take measurements and mark them with lines on paper, which are used to form a template. Narrow strips are cut out of them, acting as a blank for the future flower;
- each strip is bent halfway and the ends are secured using glue;
- then, using a yellow sheet of paper and a compass, make a circle that will be the core of the flower;
- petals are attached on the reverse side;
- The petals and stem are made from green paper.
The composition can be placed on a white sheet. There is also another way to create a flower. You will need to make a template to design the bud. For this purpose, a spiral is reflected on the sheet. You need to cut along the drawn lines and use them as a blank.
The entire spiral is twisted, with the end point being the beginning, and the stem and leaves are formed. To do this, you need to use a sheet of green paper. Before connecting the parts in question, you need to slightly press the spiral.
Types of frames
The base for the photo zone can be made from the following materials:
Specially welded metal or wooden supports and cemented forms can be used as a supporting base. To install ready-made panels made of plywood, foam board or PVC, structures made of timber or metal are used.
If you need a large photo zone with a fabric sheet evenly stretched, then it is more advisable to use a wooden frame. There are two main options for this design:
- Frame. You can stretch the canvas onto a frame made to specified dimensions evenly using a furniture stapler. Installation will require special fastenings to the wall, floor, ceiling or supporting base.
- Box. In this case, it is necessary to make a stable frame from a wooden beam with a cross-section of at least 40 mm, a height of at least 2.2 m, a width of 1 m and a depth of about 30–40 cm. If a larger photo zone is required, then a composition of several such panels will be required. No special fastenings are needed, which is an advantage.
In some cases, it is advisable to use screen photo zones . They are made of timber or plywood, and furniture hinges are used as fastenings to connect individual panels.
The advantages of this decor
There are several positive aspects in this decor:
- it's quite beautiful. Experiments can be carried out endlessly, using different combinations and placement densities;
- cost savings compared to using real flowers and other decorations. The chosen option will be much cheaper;
- Even a novice master can use the algorithms for creating such a flower;
- environmental friendliness. This suggests that when using the item in question, only different types of paper are used, which can be easily disposed of as needed.
In addition, such decorations will help not destroy the souls of those who worry about fresh flowers when they need to be thrown away.
Little Rose
The technique of making a rose is so simple that even a child can handle it. All we need is to take colored, multi-colored paper. According to scheme (a) draw a spiral, you can add more waves and then the flower will turn out to be embossed. And just cut it out so that the flower can be inserted into the composition, wind the resulting spiral onto a wooden skewer. When you roll the flower, you can periodically lubricate our petals with glue.
How to choose paper - which one is best?
To work in this direction, you need to pay great attention to the process of selecting material. For example, it could be craft, corrugated, plain or packaging paper. If the artist plans to make a colored model, it is recommended to use paper that is colored on both sides. Each individual option should be considered separately.
For example, corrugated materials have different purposes. To create flowers, you should use floral paper, which has a density of approximately 120 to 180 g/sq.m. You can find it in stores labeled crepe extra. This variety makes it possible to create more realistic flowers.
A feature of this material is also that it has a low cost. There is a large selection on the market. At the same time, it can be plain or with signs of metallization. Peonies or dandelions are excellent.
Craft paper is quite thick and is used for gift wrapping. Due to the fact that it has great rigidity, this allows it to hold its shape and create buds. Finished products are decorated using varnish or glitter.
The designer type of paper has distinctive features from the simple one; mainly, they lie in the density, which ranges from 150 to 290 grams. also used, for example, shine or the use of embossing. Fakes made from it will look expensive and extraordinary.
Before purchasing material, you will need to calculate how much it will need to be used. To do this, make a preliminary calculation of the elements that are planned to be created.
Decorator
A photo zone for a wedding made of artificial flowers is not only an economical way to decorate a corner for a photo shoot, but also a fashion trend. Many compositions cannot be decorated with living plants. Kristina Mayakova
To decorate a corner with artificial flowers for a photo shoot, you need to choose a base. This can be thick cardboard left over from boxes, polystyrene foam or a sheet of fiberboard. Prepared flowers are attached to the base using glue or a construction stapler in a pre-selected order. The resulting screen is installed as a background in the photo zone; the side walls can be decorated in the same way.
In addition to the floral background, it is advisable to select other accessories that will be useful for the photo shoot. For example, you can set up a small table for two people with a tea set and a bouquet in a vase. Another option is a carved bench, next to which there are fake flower beds or an easel with a landscape.
Interesting! Consider other interesting ideas for decorating a photo shoot area. For example, in chalk style or Marsala color.
The option with a photo zone made of artificial plants is suitable for many weddings. At a classic celebration, you don’t even need to use additional attributes, creating an original composition of buds. For example, you can arrange them in the shape of a heart or in the form of an arch, from which colored satin ribbons or translucent fabric go down. To make the background you created with your own hands look like real flowers, you need to select high-quality materials.
Themed weddings can also be decorated with a similar photo zone. For example, it is suitable for a celebration in retro, vintage, shabby chic or boho style. If you decorate the base with burlap, you will get a suitable backdrop for a rustic wedding. For a celebration in an oriental or Japanese theme, the photo zone is decorated using paper or fabric peonies or lotuses.
Making a flower with your own hands - master class with photos
Large flowers created using corrugated paper act as a beautiful and delicate decor that can be used both in everyday interiors and at special occasions.
To get started you will need to use:
- thread and needle;
- newspapers;
- glue;
- corrugated paper of different colors.
Initially, you need to prepare the base where the petals will be glued in the future. You will need to inflate the balloon and cover it with paper around the entire perimeter, using several layers. In this case, the papier-mâché technique is used. Next, you need to let the mold dry and cut it into a couple of pieces of unequal size. The smaller height should be approximately 7 cm.
The smaller part is inserted into the larger one and stitched around the entire perimeter. Glue is used on top.
The next step is to start cooking the petals. At the same time, you will need to make several varieties of petals, that is, of different sizes, in quantities from 5 to 30 pieces. The format is below.
Please note that the measurements in the photo are in inches. Then they begin to create a flower.
You should start with petal number 1, which form the central part of the bud. Glue is used for fixation. Next, the new petal is wrapped around the one that is already located in the form. Glue is used to fix the base.
Similar petals should be placed at the base of the bud.
The edges of the form are closed when using paper, you need to take the same color scheme.
You should start working in this way: you will need to stretch the petal so that it looks like a vessel or plate, that is, curved. Glue is applied to the lower part, and the pattern is used to glue the flower from the central part to the base. You need to fill out the entire form and get a large blooming flower.
The petals are attached with glue.
Large petals are used in the amount of 4 pieces, which are attached to the edges from the outside so that the upper part is level with the others. The result is a flower like this:
All that remains is to trim off the excess parts and mask the space under the petals. You will need to use about thirty petals. To do this, they are bent and fixed with glue.
If gaps remain, they are masked by small petals.
This idea can have different embodiments depending on your imagination.
Thus, if a person wants to get an original decoration for a wall or a certain area in the house, you can use paper. There are many techniques for creating flowers, and you can also use your imagination.
Let's get started
We will need: paper, cardboard (for the base), scissors, glue (hot, instant or PVA), stapler, wire. To curl the petals, you will need a pencil or a round marker without edges. To understand the essence of the process and practice, it is better to start with small buds. This will save time and material. Then, having understood the principles and corrected mistakes, you can begin to make large models.
Accordion method
With its help you can make flowers from corrugated paper for the wall: peonies, carnations, daisies and other fluffy types. The sheets are folded into accordions. To prevent them from unfolding, we secure them with a paper clip or paper clip. We cut the accordions to the required size - we reduce each one by 2 cm. We give the edges of the blanks the shape of petals (sharp or oval). Now let's unroll all the rolls and place the sheets on top of each other, starting with the largest one. We roll up the resulting accordion and tie it in the middle with wire. Carefully straighten each layer upward, leaving the wire at the bottom. We fasten the edges of the opposite ends of the accordion with a stapler or glue. To close the core, cut out a small rectangle, make cuts along the long side, twist the parallel side into a rope and glue it to the center. Beads, buttons, and rhinestones are also suitable for decorating the middle.
Single petal method
This is what roses, tulips and lilies do. To do this, we prepare several patterns of the same shape, but of different sizes: the smallest for the center and the largest at the edges. How many sizes of petals - so many patterns. Then we cut out the required number of parts from the base material. We trim the edge of each figuratively with scissors to give it a natural look. If the paper is corrugated, you can make the workpiece voluminous - stretch it in the center and bend it. If it is ordinary, we make a cut at the base, glue the edges of the cut overlapping one another, providing volume. We glue all the parts onto a cardboard base. Assembly starts from the edge of the cardboard in a circle. We move each next layer towards the middle. The core can be masked in the same way as in the first method.
Multilayer method
You can use it to make an aster or peony. On a colored double-sided sheet, draw a circle of the required diameter (according to the size of the flower). We cut out more circles, reducing the diameter of each by 8 mm. For a small bud, five parts are enough. Fold each circle in half, then again, making a quarter. We cut it from the edge to the center, stopping in the middle. We round the resulting two petals on one piece to an oval shape. It turned out to be something like a heart. We unfold the circle and bend each leaf lengthwise. We repeat the whole process with the remaining parts. Then we take the largest circle and glue the remaining parts in the center in descending order. The petals can be given different shapes - bent inward, as described above, or vice versa, turned outward using a scissor blade.
"Noodle" method
In this way, you can make not only the centers, but also the flowers themselves, for example, a white dandelion. We bend the rectangular strip in half lengthwise. We cut the side with the fold parallel into thin strips, slightly short of the opposite edge. In handicraft stores you can find special scissors that have parallel blades. They allow you to make several cuts with one press of your hand. Now we roll the workpiece into a roll, gluing the uncut edge. A dandelion will require many of these buds. We fix them on skewers and stick them into the base. Other fluffy flowers are made in the same way, only without skewers.
Knowing the basic principles of construction, combining and imagining, you can create your own compositions. We hope our article will help you make your own paper flowers for the wall and bring new creative ideas to life.