Rating: No rating
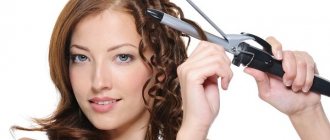
Every future bride prepares for the wedding ceremony in advance, thinking through all the details of the outfit, accessories, jewelry, makeup and, of course, hairstyle. Many people go to a hairdresser-stylist to choose and create a beautiful bride’s hairstyle, without thinking about the fact that it is quite possible to do it at home . We bring to your attention an overview of various wedding hairstyles, as well as simple instructions for performing them.
Wedding web
Step-by-step master class:
- Separate the hair on the crown and back of the head using a round parting.
- From the hair on the top of the head, strictly in the center, form a tail (its thickness should be enough to weave a braid around the head).
- Weaving starts from the bottom of the head, closer to the ear. The tail is divided into 2 parts (upper and lower). The strand of hair from below is divided into 2 parts, and the 3rd is taken from the bottom of the ponytail, forming a classic French braid.
- Having reached the top of the head, strands from the top of the tail are used for weaving according to the same principle.
- Having reached the starting point of the braiding, the braid is connected: the end is tied with an elastic band and hidden inside the hairstyle, wrapping the remaining braid around the elastic band on the top of the head and securing it with a bobby pin.
- The junction between the beginning of the weaving and its end is fixed with pins.
The hairstyle is suitable for young petite girls and brides of medium height with an oval face shape.
The strands woven from the temple must be straightened with your hands. They should be approximately the same size.
Watch the video for more details:
Greek style
Greek style hairstyles for weddings are suitable for all brides. You can adjust your face shape by leaving strands on the sides of your face.
Step by step instructions:
- The hair is combed back from one point.
- The upper strands at the roots are combed and fixed with varnish.
- The hair is slightly smoothed on top to leave volume, but the backcomb does not stand out and is fixed with varnish.
- The initially specified direction of the hair is fixed from the ear along the lower part of the head circumference with invisible devices.
- Weaving a loose 3-strand braid with a lower tie begins from the left temple to the right temple.
- The remaining braid from the right temple is thrown over the top to the left temple. The tip is fixed with a silicone rubber band and placed under the beginning of the weaving at the left temple.
- Along the entire circumference from the beginning of the braid, it is necessary to fix its contact with the hair on the top of the head under the braiding with invisible pins. Spray your hair with hairspray.
If the hair length is not enough, you can use extensions to continue the braid.
Video tutorial:
For curly hair
Sometimes women complain about their curly hair and that it is difficult to care for. Sometimes even in a professional beauty salon it is not easy to straighten some particularly curled strands.
But don't despair! Those with curls are very lucky. They may not even use professional styling services.
The natural look of this hairstyle gives romance and lightness to the bride. Curls will make her style airy and memorable. You can slightly adjust the length of the strands to achieve different degrees of curl. In any case, curly hair, decorated with a shining tiara, will simply look stunning on a girl.
Inheriting the classic wedding image options, you can also braid a spectacular braid. Thanks to the weaves, the hair will hold tightly even without hairspray. An ideal solution for active competitions from toastmasters.
You can decorate your braid with multiple small flowers or beads, this will give the feeling of a “water flow” in your hair. This hairstyle will suit almost any owner of long hair, except for curly women.
A separate type of braid is a hairstyle in the Greek style. This is a “lighter” execution of the weaves. This braid has a specific shape and suits almost any type of face.
From a reverse French braid step by step
This wedding hairstyle will suit all girls, thanks to its rather voluminous weave and neat appearance.
Instructions for doing it at home:
- It is necessary to make a deep side parting.
- A large strand is separated from the temple and the creation of a French braid of 3 strands begins with reverse braiding approximately to the earlobe on the opposite side.
- The end of the braid is tied with an elastic band. Throughout the entire braid, strands are slightly straightened (pulled) from all sides, making it more voluminous. Fix with varnish.
- The hair near the ear, where the braiding ends, is secured with bobby pins. The remaining braid is twisted into the shape of a flower and secured to the ear with bobby pins and hairpins.
Video instruction:
On the side with your own hands
A wedding hairstyle on the side can decorate almost any bride, except for those with protruding ears or full cheeks. Previously, we wrote about who it suits, why it’s interesting, and what it looks like.
Step-by-step instruction:
- At the top of the head, the hair is divided into upper and lower parts.
- The hair in the lower part is collected on the side in a ponytail.
- A strand is separated from the top of the head and collected into a ponytail.
- To create volume, a special pad is attached to the crown with bobby pins and pins.
- The hair adjacent to the top of the pad is combed at the roots. From above it is covered with strands taken from the crown (the strands are fixed in the pad with invisible pins).
- The hair is varnished on top and smoothed.
- The remaining strands in the front, framing the face, are wound onto a large curling iron and laid back. Then they are fixed at the junction of the hair with the pad, covering the ear.
- The remaining strands at the bottom, gathered into a ponytail at the beginning, are wound onto a large curling iron.
- The twisted strands are laid on their sides, slightly wrapped around each other, and fixed with varnish.
Master Class:
Additional accessories
The main thing in choosing accessories is to match them stylistically to the outfit. Large and shiny jewelry items will look appropriate in multi-layered embroidered dresses with fluffy skirts; for delicate, flowing fabrics, it is better to give preference to simple shapes or completely abandon jewelry.
A veil is the personification of purity and innocence; it gives every girl a delicate and fragile look. The veil looks great with any hairstyle; it can be attached to the top of the head, completely covering the bride’s face, or at the bottom of the hairstyle, for example, above or below the bun. To fix the veil on the comb, you should braid a small braid at the back of your head and cover it with hair from the top of your head. A long cascading veil goes well with gathered hair - a Greek braid; a single layer can cover the entire head, then neat curls will be visible through a thin layer of fabric, creating an atmosphere of mystery.
A tiara is a classic decoration in the form of a wreath made of stones and precious metals. The large and richly decorated attribute is harmoniously suitable for voluminous, lush curls and buns, creating a truly royal style. For a floral crown, you should give preference to light beach curls. Any type of tiara goes perfectly with a veil.
Earrings are the finishing touch to a bride's look. When choosing earrings, you should take into account the overall look. If the choice fell on the princess style, purchase large shiny models. These earrings will look good with loose hair and will not disappear into your hairstyle. For simple summer looks, the best choice would be stud earrings or small, neat clip-on earrings.
With a tiara - the most detailed step-by-step instructions
The hairstyle is suitable for brides with long thick hair of any height and build.
Instructions:
- A round parting is formed at the back of the head, the hair is gathered back into a ponytail and secured with an elastic band.
- A special roller is put on the tail to give volume to the hair, covered with hair and tied with an elastic band. You should get a neat bun.
- Comb the hair from the front, fix it with hairspray and lay it in front of the bun, securing it with hairpins.
- Wind the front strands onto a medium-diameter curling iron and place them against the bun, securing them with bobby pins.
- Wind the remaining side and bottom strands onto a curling iron and lay them around the bun, covering it. Secure with pins and fix with varnish.
- Place a tiara on a voluminous bun with curls in front.
If your curls are just above or below your shoulders, here you can find master classes on creating spectacular wedding hairstyles for medium hair. Laying in the style of “retro”, “boho”, “rock”, “Greek”, how to do them, read in another article.
For those who boast curls much lower than their shoulders, an article on how to do a wedding hairstyle for long hair will help. Various options are highlighted here - curls, braids, buns, babettes and others.
Complex options
- Plume. Outfits that have a train look luxurious and attractive, so just long, curled curls are not enough. The veil should also be abandoned. It is better to choose a hairstyle with a high styling. You can add a tiara and other additional decorations.
- Short dress. This is one of the most difficult options, for which not all hairstyles are suitable. Any design on the head that will be varnished is inappropriate. Stylists believe that it is better to do simple styling that would have wet curls (the effect of pomp). To create, you may need a headband or hairpin.
- Fish. Large, curled curls go well with a dress with this style.
Using the lace technique – master class
The hairstyle will suit almost all brides. The main condition is not monochromatic hair. The styling looks advantageous on curls with highlights or color gradations.
Instructions:
- Make a root corrugation.
- Gather the entire occipital area in the shape of a shell upward so that the center is at the point with the minimum volume. Secure the shell with pins. Straight, clear partings should form on the sides.
- The remaining tail at the top is divided into 2 parts.
- Using radial partings, moving gradually towards the edge, the strands are separated and, in a checkerboard pattern, in squares, they are inserted into the previous strands according to the darning principle.
- The inserted strands are slightly stretched to give the hairstyle some airiness.
- The remaining voluminous large tail is stretched with a cobweb and fixed with liquid varnish.
- All remaining strands are lifted up, collected into a random bun, and secured with hairpins and bobby pins. Then the hairstyle is given the required shape.
The size and shape of a high volume bun should be no smaller than the head itself.
Watch the video:
Features and traditions
There is nothing difficult about doing your hair at home yourself. Moreover, this is happening more and more often. There are several reasons for this.
The money issue plays an important role. If your budget is limited, this is a good opportunity to save money. Moreover, the cost of services specifically for weddings is often increased unreasonably. Recently, everything that is done with one’s own hands is not only a source of pride, but also a fashion trend. Handmade wedding details are more relevant than ever
The bride can even make a video about her pre-wedding preparations, thereby sharing her experience and attracting the attention of a huge number of people.
- You can pay tribute to traditions. In the old days, the bride's close relatives and girlfriends were engaged in preparing the bride. Now not all rituals are observed. But, of course, you can ask your girlfriends for help. Who knows all the advantageous aspects and will help to emphasize them. In addition, such a pleasant pastime will help you relax and feel happy.
- The format of modern weddings can be very different. And even if you are planning a simple ceremony, any woman can use our tips and do her own hairstyle, while looking especially attractive.
- And finally, situations are different. The master may be delayed, late, or do something you don’t like. To be prepared for any circumstances, come up with a feasible but beautiful option in advance.
When choosing, you should take into account several nuances.
- Don't rely entirely on other people's opinions or fashion advice. In the first case, you risk radically changing your appearance, and in the second, you risk turning into one of the same type of brides. A wedding is a rather conservative event, but you shouldn’t be afraid to be original. If you had dreams or ideas, feel free to bring them to life. The main thing is to feel confident.
- Clothes, shoes, bouquet and hairstyle should complement each other. Here it is necessary to take into account everything - textures, the presence of decorative details, style. In addition to the traditional veil, the hairstyle can be complemented with fresh or artificial flowers, tiaras, headbands, hairpins, combs, hairpins and other elements. In this case, the flowers in the bouquet and on the hair may match. And hair accessories and jewelry should be made of the same materials.
- Using a hairstyle, you can visually change your face or hide imperfections. High hairstyles elongate the oval of the face, but open the ears and neck. All kinds of curls and curls have the exact opposite effect, but make the upper body more voluminous. In addition, complex styles do not last equally long on all hair. Coping with curly, too thin or thick hair is more difficult. Therefore, you should not only learn how to do your hair, but also check how well it will hold up after a few hours.
Low bun at home
The bun styling is suitable for all girls, but for those with large facial features, it is advisable to make it voluminous rather than smooth.
Instructions:
- Make a root corrugation, lightly comb at the roots and curl all the curls.
- Separate the edge line from ear to ear.
- At the very bottom, collect a strand of about 2 cm, divide it into 3 parts. Take the middle strand and comb it. Take a round roller, put it on the combed strand, wrap it around it and secure it with a bobby pin. The roller should hang on the neck, and not be attached to the back of the head.
- Fasten the wefts over the roller.
- Separate the strand and twist it into a small bundle and pull it up with your fingers, slightly pulling the strands out of it. Wrap the tourniquet around the bundle and secure at the bottom. Repeat for the remaining strands on the tresses, forming a voluminous bun.
- Separate about 1 cm from the bottom of your hair and comb it. Attach twisted tresses on top of your separated strands. Form 6 bundles out of them. Secure them with bobby pins and hairspray in a bun.
- Divide the remaining hair on top into 2 parts (small top about 4 cm oval and massive bottom).
- Cover the bun with the lower zone and lightly spray with varnish. Use a bobby pin to pinch the hair area above the bun.
- Form strands from the strands covering the bun, straighten them and place them on the bun.
- Hide the place where the hair is fixed with bobby pins under the hair strands.
- Carefully place the remaining strands on top of the bun in a “cap”.
You can decorate your hair with a long wide comb or flowers.
Detailed video with lesson:
Who is it suitable for?
For tall girls with long hair, any voluminous and light curls are suitable, and for petite ladies it is better to take a closer look at tall hairstyles, such as curls in a ponytail or loose curls with small curls. Girls with broad shoulders and curvy brides who have chosen a wedding dress with an open back or sleeveless should give preference to careless pinned curls. Freely hanging strands will balance the proportions and give the image a special charm.
We’ll look at how to decide on a hairstyle based on your face type below.
- Oval. This type of person can easily tolerate all types of curls; a calm, smooth wave also looks good here. A bride with an oval face can experiment with any look.
- Round, square. For those with large features, the best choice would be loose curls or a collected hairstyle with separate strands, which with their lines cover any protruding parts of the face and allow you to visually adjust its shape, bringing it closer to an oval. The volume of installation should tend to be in height, but not in width.
- Triangular. This type of person loves voluminous curls. They can be pinned at neck or shoulder level, thereby adding volume to the hairstyle and correcting the shape of the face. Give preference to the images of old Hollywood divas.
Loose curls remain the most popular curls, despite the ease of creation. Textured, light and messy or carefully styled curls turn a girl into a princess. To prevent your hair from constantly falling on your face, you can pin it up on the inside with bobby pins or pick it up with a headband or tiara.
Any parting is allowed: straight or asymmetrical; those with bangs also choose loose curls. This styling fits any wedding style.
Large and voluminous curls are created for subsequent collection into a Greek braid or ponytail. This styling goes beautifully with open dresses that show the femininity of the shoulder lines, curves of the neck and back. The ponytail is more suitable for young brides; it will emphasize their youth and give the image freshness and romance.
Light curls are the choice for a summer, beach wedding in boho style. The simple flowing texture and the wind in the hair create a very delicate and light look for the bride. If you want a runway look, you can comb your curls away from your face using gel, leaving the middle and ends of your hair untouched.
Loose curls - step-by-step implementation
The hairstyle is suitable for owners of long thick curls. Hairstyles with loose hair are also discussed in our other article. You will find out what you will need for installation, what they are, who is suitable for which option and what features are inherent in it.
Instructions:
- Make a root corrugation, comb the roots, twist the curls with a curling iron, divide the strands into several zones.
- Detangle the curls using a wide-toothed massage comb. You need to comb your curls vertically.
- Each layer of curls is fixed with liquid varnish.
- The strands at the ear can be fixed and slightly removed from the face with the help of jewelry (hoops, hairpins with ribbons, bows, dried flowers).
Here you can watch a video of the process:
Fashion trends
The choice of easy options for creating wedding hairstyles will also be based on the relevance of certain models, so as to allow the image to be modern and in line with fashion trends. For those with long curls, there is a varied selection of simple hairstyles that you can do yourself at home without the extra expense of visiting a hairdresser. Below are some options for trendy holiday hairstyles.
Careless curls, laid to one side and secured with hairpins or hairpins, can add innocence and airiness to the image. Therefore, this styling is perfect not only for the bridesmaids, but also for the bride herself.
How to do a hairstyle with bangs for a wedding
Hairstyles with bangs are suitable for most girls, except for those with a small, low forehead.
Instructions:
- Divide the hair into several parts.
- Form ropes from each part and slightly straighten them, adding volume.
- Fix each strand in a semicircle (the first strands at the bottom of the head, and the rest, laying higher and higher to the back of the head).
- Form a bundle from a strand near the left ear, straighten it, throw it over to the right side and fix it in the formed bun.
The hairstyle can be decorated with a comb, artificial flowers or rhinestones.
More details here:
https://youtu.be/OJAGyngs2gY