Are you unhappy with the boring appearance of a bottle of champagne on your holiday table? Are you thinking about what original gift to give to a relative, friend or maybe a colleague? We offer a simple but effective design option - decoupage New Year's champagne bottles with your own hands.
This bottle looks elegant for New Years and does not require any special talents at all. Not everyone knows how to draw, but many people have a craving for beauty, right?
Decoupage is a decoration technique based on transferring a cut-out picture onto an object and coating the surface with varnish to preserve the composition.
Every year this technique becomes more widespread. Rumor has it that in France, even luxurious royal interiors are decorated with decoupage.
We have selected for you some easy and beautiful bottle design ideas using the decoupage technique, and we can’t wait to share them.
Preparing the image
Decoupage begins with preparing the image. A suitable option is a regular paper napkin with a thematic picture on it. You can also select a drawing and print it using a color printer or color the black and white version yourself.
Decoupage champagne bottle with glitter
Decoupage champagne bottle with holly
If the image is printed on plain paper, you will need to make it thin and soft. The preparatory stage begins with applying varnish to the surface in 2-3 layers. Then the coating should dry completely. You can then choose one of the following actions:
- Place the prepared paper in warm water for 3-5 minutes (wait until the top layer softens). Then blot with a soft cloth or towel and roll the bottom layer by hand. As a result, only the top layer with the image will remain, which will be transferred to the bottle.
- Cover the paper with dried varnish with tape (on the back side). Press and hold for 5-10 seconds. Then peel off the tape, removing the top layer of paper. The result is a subtle image that can be transferred to the bottle.
Themed napkins are the perfect way to decorate your sparkling wine bottles. They provide a wide selection of ready-made pictures and are the basis for your own creativity.
Silver decoupage of a champagne bottle for the New Year
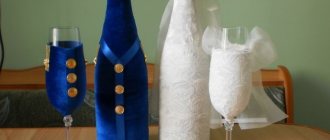
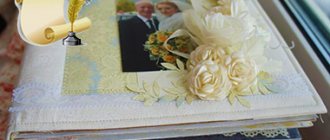
How to decorate champagne as a gift with your own hands
In this master class you can learn how to make a pink lady from a champagne bottle.
You will need:
- bias binding (10-11 m)
- glue (preferably construction glue)
- scissors
- fabric for bows
1.
To make the top of the dress you can use silver braid. You just need to glue it, covering the emblem on the bottle.
2.
After you have made two overlapping rows, prepare a pink ribbon. Use just a little glue to stick the tape to the bottle. Do it a little obliquely.
When you have reached the middle of the bottle, you should have something like this:
* Next, wrap the bottle completely with a whole cloth, while continuing to apply small drops of glue to the fabric.
3. After you have wound the fabric to the end, its end needs to be glued in the place where it will be approximately covered by the skirt. This way you will hide all the seams.
4.
It's time to make the skirt. To do this, prepare a ribbon for the bow and gather it onto a thread. In this example, the tape is 1.5 meters long, but you can choose it yourself, make it longer or shorter.
5.
The skirt can be attached to the bottle using glue or thread tied around the bottle.
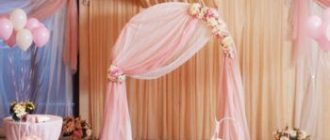
Decoupage bottles with flowers
You can decorate the bottle not just with ribbons, but with ribbons in the shape of flowers. And you will need the following things for this:
Bottle Ribbons Beads Acrylic primer Acrylic paint Silver outline Glue gun
The working process is as follows:
First, the bottle is degreased with varnish or alcohol. Now the primer is applied using a sponge. The bottle is coated with acrylic paint.
While the bottle is drying, you can start making flowers. The easiest way is to simply thread pieces of ribbon onto a needle and thread. The thread will tighten and the outline of a flower will form. Another way is to simply fold the corners and burn the edges. The last step will ensure adhesion. Once the bottle is dry, you can stick on the flowers. They can be decorated with beads and thin ribbons. Patterns appear along the perimeter of the ribbons
This is how you get decoupage of a bottle with flowers from ribbons
Decoupage with flowers can be done in different shades
A bottle presented for some holiday is, of course, a good gift in itself. However, you will agree that it will be much more pleasant to receive a unique thing, carefully made by someone else’s hands. In this case, decoupage can help out even those who have not previously had anything to do with needlework.
Popular articles Ice cream
Decoration with polymer clay flowers
A bottle of sparkling wine or champagne can be decorated with flowers made of polymer clay. The work will be divided into two stages:
- Making jewelry.
- Bottle decoration.
Polymer clay is ideal for beginners. Although the “classic” material requires firing, this name is now used to designate a group of self-hardening compounds. Only small-sized products are made from polymer clay. Using scissors, tweezers and needles, you can create neat clover heads, delicate orchid or lily buds, and miniature roses. To decorate a bottle, two or three types of polymer flowers are usually used so that the decor does not look poor and boring. Although no one limits the master’s imagination: if you have enough perseverance, you can collect a full bouquet of field herbs.
To make a clover from polymer clay, take an evenly rolled white ball. It is wrapped in a rolled out “pancake” of lilac or pink hue. The ends are carefully pinched and the surface is leveled. Now, using nail scissors, make triangular cuts over the entire surface of the future flower, starting from its base. At the same time, the staggered order of the petals is observed, like a real clover. Then each cut is carefully bent from the base and slightly pulled out. The result is neat inflorescence petals: pink on the outside and white on the inside, like real clover.
To create a simple flower, you only need polymer clay of one shade and a special tool with a ball at the end. The future base is first rolled into a ball and then smoothed to a “pancake” state. Gradually pinch off a large piece of polymer clay, roll it into balls, and then press it with force with the ball-tip of the tool. The result is neat circles with a thickened border. These petals are fixed to the base in rows in a checkerboard pattern. It is advisable to create four to five rows to get a lush flower. In the center you can use a round center bead of a different shade.
Clean the bottle from the label in hot water and carefully remove the layer of glue. Then you can apply spray paint (for example, silver) to the surface and wrap it with ribbons or cloth. When the background is ready, begin to attach the floral decorations. They are planted on glue. For the composition, they usually choose a place in the center (where the front label used to be) or closer to the neck. Additionally, the bouquet is decorated with crepe paper leaves or green satin ribbons.
Keeping New Year's traditions
Since the 1960s, the tradition of clinking glasses of champagne during the chiming clock on the night of December 31st has become a tradition among our compatriots.
Get ready for an extraordinary serving of fizz on your holiday table. Uncorking a bottle of sparkling and invigorating drink in decoupage style and just like that is not the same thing. Breathing a “second” life into a thing - this is the highlight of the “decoupage” technique. The word is French, but they came up with the idea of decorating household utensils back in the distant Middle Ages, and in Germany. Today, ancient technology is taking on unprecedented proportions: people of all ages are “infected” with it. The original design is expressed in different styles: from Provence to military and ethno. We are sure that you will not resist trying champagne decor for the New Year, when everyone gives each other gifts. YOURS can become the most original, New Year's and sincere!
Making an ice bucket for champagne
Surprise your family and serve them a holiday drink in a homemade ice bucket. You need to prepare in advance: take 2 buckets of different diameters. Try inserting the bottle into a smaller bucket, if it fits in without any problems, then you can safely get down to business.
Take any New Year's attributes: rowan branches, needles, cranberries, plastic snowflakes. You can add tinsel and even small New Year's toys. Insert the bucket into the bucket. Place a weight in a small bucket to prevent it from floating. Fill the space between the buckets with water, and put all the previously selected decorative elements into the water.
Freeze the bucket on the balcony or in the freezer for at least 8 hours. Just before serving, place the bucket on a large plate and place the sparkling wine in it. Bring your creation to your guests, they will be impressed by such beauty.
To make the ice beautiful, fill it with clean, twice-boiled water.
Interesting ideas and instructions for decorating
To implement interesting ideas in decoupage with your own hands, we offer a certain algorithm of actions. Depending on the selected materials, step-by-step instructions will vary, but the general logic will remain.
In classic decoupage, a layer of acrylic primer is applied to a degreased bottle. Do this with a sponge (sponge). Dry the first thin layer with a hairdryer and reapply the primer more densely. Many craftswomen in their master classes remind you of the need to paint the bottom. Remove the layer with the pattern from the decoupage napkin and carefully tear it along the contour. With this technique, the borders on the bottle will blur and will not be noticeable. Use a dry or wet method to connect the napkin to the bottle. The main thing is that there are no air bubbles left, and that the edges are glued tightly. For beginner decoupage artists, it is recommended to use decoupage spray glue
It allows you to tear off the napkin from the bottle if the gluing is uneven, straighten it and re-glue it. When making an applique from several fragments, it is important that they do not stick to each other. It is worth ruthlessly tearing off the edges of the drawings, but making the surface single-layer. After the pasted napkin has dried, the image is covered with decoupage glue, but not with a spray
This must be done very carefully in order to simultaneously straighten the picture. This stage also ends with drying, using a hairdryer. After applying all the pictures, the bottle is covered with 2-3 layers of acrylic varnish - this protects it from damage. But the decoration is just beginning. Next, you can use multi-colored outlines to give clarity and volume to the details of the drawing. Sparkles and glitters will make the picture bright. And ribbons, cones, candies, and doves will add specificity to the theme.
On March 8
On the first spring holiday, all girls (regardless of age) expect at least a small bouquet of flowers. And if there are no festive flowers in your locality on March 8, then you can create a mimosa flower yourself from cotton balls or a yellow sponge, making voluminous decoupage. Thuja or cypress are used as twigs.
For someone with a sweet tooth, you can give a pineapple bottle, where real candies are used as an applique. It is even more interesting to make the same bottle with reverse decoupage, and when you turn the “pineapple”, a photograph of your beloved will be visible through the glass: mother, sister, girlfriend, wife.
Girls love jewelry, and therefore it would be appropriate to use multi-colored ribbons as bows or serpentine, lace instead of a decoupage napkin or as a hat on the neck of a bottle, multi-colored threads of different textures.
For a birthday
The same ideas are also suitable for a woman’s birthday. But to show maturity and wisdom, you can use fabric and decorate the bottle in different styles. For example, this will be a photograph of the birthday girl, framed by beautiful folds of expensive fabric. Or, perhaps, a more brutal option for a birthday man using army symbols, literary tastes, and reminders of hobbies.
For other holidays
The most suitable holiday for champagne, of course, is New Year. Amazing possibilities and ideas for decorating a bottle using decoupage technique:
- sprigs of live juniper or thuja will fill the festive table with a forest aroma;
- To make the cones appear snow-covered, they need to be coated with white or silver spray paint;
- if you tie small toys or drawings of bullfinches to the neck of the bottle on long threads, it will seem that they fly with every movement of the bottle;
- After covering the bottle with glue or paint, you can roll it over a layer of salt, and then crispy snow will appear on the glass.
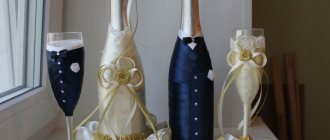
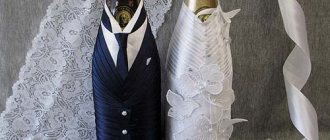
A wedding is another wonderful occasion to create a masterpiece using decoupage technique. Popular motifs: hearts, doves, rings, figures of the bride and groom.
Watch the following video for a master class on decorating a champagne bottle.
How to decorate champagne for the New Year
You will need:
- thick aluminum foil
- medium thickness wire
- glue
- decorations (artificial or natural spruce branches, tinsel, small New Year's toys, ribbons, beads)
1.
First you need to wrap the bottle in foil. It is advisable to cover in several layers (from 2 to 4 depending on the thickness of the foil). Try to press the foil tightly against the bottle.
2.
Now you need to attach the wire. Wrap it around the bottle, but not tightly, so that you can then remove it when you want to open the champagne.
3.
Proceed to the most important thing - the actual decoration. In principle, there are many options and they depend on your imagination and available materials.
You can take a few Christmas tree branches and use glue to attach them to the foil. This can be done in a spiral (see picture), and it is advisable to start from the base of the bottle.
In those places where the foil is visible, you can attach ribbons, fabrics, wide braid or decorative paper. Places where glue may be visible can be hidden with tinsel.
4.
Add beads, pine cones, toys, candies, small Christmas tree decorations, etc.
Decoupage of bottles with paper master class
Another available material for decorating a bottle using the decoupage technique is toilet paper. With its help you can create any volumetric elements.
You will need:
- Glass bottle.
- Degreasing liquid – alcohol, solvent, etc.
- Any PVA glue.
- Foam sponge.
- Stationery clip.
- Synthetic brush.
- Sponge with large pores.
- Toilet paper.
- Napkins.
- Acrylic paints.
- Acrylic varnish.
Clear the bottle of labels and degrease with an alcohol-containing compound or a napkin.
Prime the surface with white paint or a special primer; do not paint the neck yet. Let it dry.
Place the napkin on the bottle and cover it with glue; using a brush, try to carefully smooth out all the wrinkles from the center to the edges.
Coat the rest of the bottle generously with glue.
Place pieces of toilet paper textured onto the glue-coated surface. Leave the bottle to dry.
After the paper has dried well, coat the entire surface of the bottle with varnish.
Paint the bottle a color that matches the color of the napkin.
Complete the picture where necessary.
Dip a dry sponge into the paint, beat it thoroughly and go over the raised areas - this will add additional volume.
Dry the bottle thoroughly again and coat it with varnish, maybe in two layers.
The original decorative bottle is ready.
Tips for decorating a bottle
1. Regardless of how the bottle will be decorated, it must first be degreased.
2. The bottle must be completely clean, dry and without any labels.
3. It is best to use acrylic paints to decorate the bottle.
4. It is best to start wrapping the bottle with twine or thread from the neck to the bottom.
Decoupage bottles for a man's birthday
A good option for designing a birthday bottle for a man is a design with a portrait of the birthday boy:
Be sure to degrease the surface with alcohol, first removing all stickers on it.
Print out two photographs for the forward and reverse techniques. Pour a small amount of water into a container. Dip the photo face down in water - this will help the sheet delaminate. After holding the image in the water for a couple of minutes, carefully roll up the excess layers with your fingers so that only one thin color remains.
For decoupage, you need to remove excess layers from a photograph, leaving one with the image
Popular articles How to weave a Christmas tree from beads with your own hands
Meanwhile, on the bottle, in accordance with the size of the photograph, a place for it is indicated. This place is lubricated with acrylic varnish. A photo is pasted on top with the front side facing inward.
Gluing a photo onto a bottle during decoupage
This is how the photo will look from the inside after decoupage
After the photo has dried, you should stick a second one on it. Only this time the image will be facing the viewer. Smooth out the picture
Pasting a second photo during the decoupage process
In a very ordinary syringe, add texture paste, which can be purchased at a craft store. Squeeze it onto the outline of the photo. You can also write
Place texture paste into a syringe for decoupage
This is the outline you can make from a photograph during the decoupage process
To make the bottle look more elegant, you can draw some patterns with colored paste.
Decoupage patterns for bottles
Front side of a decoupage bottle
Don’t think that a design for a gift for a man cannot be bright. Here are some examples of gift bottle decoupage:
Decoupage of bottles and glasses in a marine style
But decoupage using leather is stylish and discreet
Decoupage using leather and acrylic varnish
Decoupage with napkins, buttons
Decoupage with leather and coins as a wish for wealth for the birthday boy
Decorate the bottle with tinsel with candies
For this method of decoration you will need about a meter of thin tinsel. Do not take very thick tinsel, it is inconvenient to wrap. Also take small candies. Immediately attach the candies to the tinsel using double-sided tape. Attach sweets at approximately the same increments to make them look more beautiful. Attach one end of the tinsel to the bottom of the bottle and wrap it all the way to the neck. Secure the other end of the tinsel with adhesive tape. Tie a piece of gold or a festive bow to the fastening site to close the fastening.
For decoration, instead of sweets, you can take beads. Wrap them with tinsel and then secure them to the bottle as above.
What is decoupage?
The French word découper translates to “to cut.” Using this technique, you can decorate any objects, including furniture and lighting fixtures. Its essence is that a drawing, painting, piece of fabric, thread and other original objects are cut out to size and shape, and attached to the base (in our case, to a bottle of champagne), that is, an applique is created.
There are 5 types of decoupage that can be combined on one item.
Direct (classic) is the basis with which beginners start. This is where you can learn how to properly glue decoupage napkins, pictures on cardboard, and photographs onto a smooth surface. The surface will remain smooth but renewed. The drawing will cover the entire area, and the previous background will no longer be visible through it.
Several methods are used to create decoupage.
Wet
The technology will depend on the thickness of the picture. Includes 3 methods.
The napkin can be placed on a file or plastic bag, with a design from yourself. Moisten generously with a spray bottle and place another bag on top. Squeeze out excess water and air with a sponge, remove the top bag and carefully attach the file with the picture to the surface
Flatten and carefully remove the file, leaving a napkin, then coat with glue and let dry. The drawing on ordinary printed paper or cardboard is coated with several layers of transfer varnish and dried well. The reverse side is moistened with water and the white layer of paper is carefully removed by thinning
The remaining thin layer with the pattern is glued to the surface. The design is cut to size, coated with glue on the front side and glued to the surface. After complete drying, the reverse (white) side is moistened with water and the layers of paper are rolled up by hand.
Dry
The design is covered with several layers of varnish, allowing each layer to dry thoroughly. Place double-sided tape on the back side and carefully peel it off along with the paper.
Hot
Should be used on a flat surface. Neither glass nor plastic is suitable for this method. Apply 2 layers of PVA glue to the surface, allowing each to dry well. A dry paper or fabric picture with a motif is laid out on the surface and covered with parchment (cooking paper) on top. Use a hot iron to iron the surface, especially the corners. The excess of the picture is cut off, and after cooling it is fixed with varnish.
Professionals give a few tips to beginning decoupage artists:
- any surface must be thoroughly cleaned;
- fragments that should not be touched by paint are sealed with masking tape;
- each layer of paint or glue must dry well;
- torn edges are much easier to disguise than cut ones;
- expels excess water and air bubbles from the center to the edges.
Methods of execution
Decoupage of bottles for the New Year or other events can be done in several ways. Some people prefer to work with a dampened pattern. After transferring the image onto the treated glass, it looks more natural and does not require any specific additional design.
In another method, the picture is fixed to the surface with double-sided tape, and then the remaining places are decorated. The number of layers of tape depends on the thickness of the paper.
Fixing the pattern with a hairdryer or hot iron is possible only after applying the base layer to the surface in advance. The illustration is carefully placed on parchment, applied to the area and then the cooled image is fixed with varnish.
Important!!! Thoroughly clean the area to be decorated before starting work; to avoid paint getting into areas, use masking tape; Each layer must dry perfectly.
Note!
- DIY wall clocks - the best clock designs for children
Crafts on a military theme: how to make a tank, a soldier, various patriotic models of military equipment
- What is a Candy bar - decorating a sweet table for a girl or boy for a birthday and New Year
How else can you decorate a bottle?
Decorating a bottle only with napkins will give a flat, volumeless decor. If you want something more, then barely dry acrylic can be sprinkled with coarse salt or sugar, imitating beautiful fluffy snow. Just first get rid of any black inclusions, if any. Such unwanted contrasting elements will greatly stand out from the design and spoil the image.
The stores also have various accessories for decoration: artificial flowers, plastic fruits and vegetables, lace. They perfectly complement decoupage and make the bottles truly festive and original.
If you have no ideas at all, then you can take a look at what bottles other users are making. Or go to the nearest store and look at napkins, thematic covers of notebooks and books, product and box labels. Such visual training will help you catch inspiration and make beautiful work that will delight your family and guests not only on the holiday table, but also after the holiday, when an empty bottle can be used as a vase.
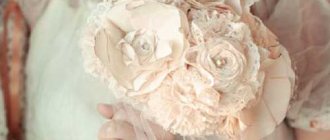
Making arrangements of fresh flowers and a bottle of wine/champagne
A bottle of wine or champagne can be presented in a simple box, wrapped in paper and decorated with a bow. Usually this gift is accompanied by a bouquet of flowers. What if both of these gifts are combined? You will get a luxurious gift, decorated with your own hands. Bottles are usually placed in wicker baskets. In addition to flowers, fruits are picturesquely arranged in them. First, the inside of the basket is wrapped in transparent film. Then a piece of floral sponge is adjusted (cut) to the shape of the wicker container. Such a “foundation” will not only hold the components of the bouquet in the desired position, but will also disinfect the water that will nourish the stems, which will preserve the flowers longer. The sponge is placed in the basket. The edges of the transparent film are folded inward.
Then they begin to form the bouquet: they start from the edges, placing decorative branches (asparagus officinalis, pistache). When most of the basket is filled with greenery, flowers are inserted into the sponge - the basis of the composition. Here the choice is limited only by the imagination of the master. The bouquet is made up of small roses, lilies, gerberas, asters, peonies, tulips. The shorter the stem and the fewer leaves on it, the more water the buds will get, which means the longer they will last. The bouquet is complemented with a bottle of wine and fruit. Alternatively, this decor can be placed on one side of the basket, and the flowers on the other.
Decoupage of bottles with eggshells master class
Decoupage with eggshells has a similar end result to the craquelure effect - aging by simulating cracks in the paint. The difference is that the surface becomes more prominent.
The advantage is that the material used is not expensive art material, but ordinary eggshells. Another plus is that with the help of shells we can hide various minor imperfections of the decorated surface, for example, chips.
Many may have a question - what to do first: stick on the shell or stick on the napkin. In principle, there is not much difference, act according to the situation. The main thing is that if you have already glued the napkin, before you start gluing the shell, cover the design with varnish, since when you are gluing, there is a high probability that glue will get on the napkin - this will make it wet.
Start by covering a small area of the surface with glue and, as shown in the figure, stick on pieces of the shell. Work in small areas.
Below we offer step-by-step detailed photographs.
Decorating with eggshells really helps to hide various inscriptions and that’s why I often use them to decorate bottles. If you already have an idea of how the bottle or object will be decorated, you can start by gluing the shell; if not, first do decoupage, then stick the shell.
After covering the entire surface as planned, leave the bottle to dry. This may take quite a long time, but be patient.
Then you can decorate the bottle as you wish - paint, stick a picture, cover it with gold - whatever your imagination is capable of.
Popular articles How to make a motanka doll yourself
Types of bottle designs
You can turn a simple bottle into an object of art using several technical techniques:
Decoupage bottles: decoupage
An item decorated in the dekopach style will resemble a patchwork quilt. There is special paper on sale that is used for decoping. You can also use improvised material, but it is recommended to choose one with a certain type of stylization (like fur, like the texture of the material).
Decoupage bottles: classic look
This is a direct method of applying an image to the surface of a bottle. Both napkins with images and rice-based cards are used.
Decoupage Easter eggs - an overview of methods with photo examples
Do-it-yourself kitchen decoupage - choosing equipment, style, ideas
- The pictures you like are cut out.
- The surface of the bottle is prepared with primer and paint.
- The image is glued using special glue for decoupage or using PVA. Although the method of applying the picture can be using an iron. This depends on the type of material chosen.
- It is smoothed out with special care so that the bubbles go away and there are no wrinkles.
- Everything is varnished and sanded.
- The drawing can be tinted or aged.
Decoupage bottles: reverse view
This method of decorating a transparent surface is called mirror in relation to the classical application of an image. The selected design is applied on the front side of the item of decoration, and on its reverse side. Typically, plates, flowerpots, and containers with a wide neck are decorated in this way.
The artistic form of decoupage
Decoupage technology allows you to create an imitation of painting when patterns are matched to the background design. The integrity of the picture is created. This decoupage is also called smoky.
Decoupage bottles: volumetric view
Decoupage combines images on paper with a relief surface. Natural materials (egg shells, shells, grains of various cereals) are suitable for creating relief; special paste that can be purchased commercially; textile.
Do-it-yourself furniture decoupage - choice of equipment, recommendations, photo ideas
DIY crafts from plastic bottles - types, manufacturing features, photo ideas
Feathers
One of the freshest ideas for decorating bottles for March 8 with your own hands is feathers.
This design will definitely become the highlight of the gift. Delicate and soft feathers look impressive and exclusive.
This bottle does not require additional decoration. The maximum that can be added in this case is a piece of ribbon or lace to hide the joint between the feathers and the label. And then, such decor may be needed only if the edge is not very neat.
To decorate your bottle yourself, you'll need feathers, glue, champagne, and maybe some ribbon.
Feathers are glued in rows, starting from the bottom edge of the bottle. The first row should be at such a distance from the bottom that the feather completely covers the container and extends 1–1.5 cm to the bottom edge.
It is better to use soft, downy feathers - if there are only hard flight feathers, then they should protrude beyond the edge by 0.5–0.7 cm. Otherwise, the bottle will be unstable.
It is advisable to hide the edge (the sharp edge that was used to write in the old days) of the top row under the label. If this is not possible, it is hidden under a layer of braid or lace.
Festive decoupage
Preparing a gift or decoration for a holiday is not difficult, especially if you have at least a little creative thinking and a desire to make the event varied.
March 8
On International Women's Day, it is customary to please and give gifts to all ladies, regardless of age. To prevent the gift from looking banal, you can use ideas for decoupage bottles for March 8th. It’s always a pleasure to receive a gift made with soul, and most importantly, unique. You can take artificial flowers or buy a small sprig of mimosa, choose a special image or a greeting card.
Prepare a non-standard plot and decorate the bottle with chocolates, which are glued to the main background. They can be placed below, diagonally or randomly. A bottle of champagne in the shape of a pineapple will be a curiosity. To make products carefully and beautifully, it is enough to follow the step-by-step instructions, which can be found in modern information sources.
New Year
The atmosphere of the New Year holidays awakens more and more creative ideas for organizing events. Without sparkling wine, the clock countdown does not begin. Traditions have helped create many options for how to decorate a bottle of champagne for the New Year.
Before starting the task, you need to prepare basic and auxiliary materials. You can choose various holiday decoration options, but budget remains important. Products with embossed paste, glitter, and rhinestones look magical - an ideal product for a holiday, but more expensive. You can use other methods of decoration, for which it is enough to purchase basic tools - decoupage of bottles with napkins.
Paper decor
Make a reusable case for the bottle, it looks aesthetically pleasing on the table, and you can use it every year. Thick paper that resembles cardboard will do. Take a piece of paper measuring 40x60 cm and roll it into a tube. The diameter of the tube should be a couple of cm larger than the diameter of the bottle itself. Unfold the tube back into a sheet and divide it vertically into two equal parts with a ruler. In one part, use a pencil to make identical strips 1-2 cm thick. Cut the paper into strips. Then roll the cardboard into a tube and fold the strips in half. Secure the strips with ribbons at the bottom.
Using double-sided tape, stick pine cones and cinnamon sticks onto the cardboard. You can decorate the paper with small snowflakes or rhinestones. Place the bottle in the case, the festive drink is ready.
The spectacular presentation of a sparkling drink will remain in the memory of your household for a long time, because attention is paid to such little things most often. Show a little patience and strength, bring creativity and give free rein to your hands, and everything will definitely work out. Happy upcoming winter holidays!
Decoupage bottles with napkins
Decoupage with napkins looks especially chic if craquelure varnish is used in the process - it helps to create the effect of antiquity. So, for this case you will need:
Bottle Acrylic paints Craquelure varnish Napkins Alcohol for glass degreasing Flat synthetic fiber brush
Craquelure varnish for decoupage helps create the effect of an old thing
Let's get started:
So, first of all, degrease the surface and remove old labels. Now coat the bottle with acrylic varnish. Try to make sure the layer is even. Best applied with a sponge
Wait for the varnish to dry. You can use a hairdryer. Now apply craquelure varnish on top. There is no need to dry this layer. Next, acrylic varnish is applied with neat strokes close to each other. It is important to dry this layer properly. At this stage, we begin to apply the design from a napkin. Peel off the top layer. Tear off all excess, while trying to avoid smooth edges, which are then difficult to make natural. Dilute PVA in water. Apply the solution to the surface of the design attached to the bottle. Move from the center to the edges. Cover the surface with varnish. Work out the details if desired.
This is what things look like after decoupage with napkins
Coloring
A bottle is usually painted to create a beautiful background against which the main decorations will look better. Acrylic paints are used for glass. You can paint the bottle both inside and outside. For interior work, simply pour the composition through the neck and shake the container thoroughly so that it is evenly distributed. Then the bottle is turned upside down and the excess paint is allowed to drain, and the paint that remains on the walls is allowed to dry. To paint the outside of glass, you can use brushes and sponges. The design is applied using a stencil. Those areas that need to remain untouched can be sealed with masking tape. Spray painting allows you to apply an even layer without brush strokes. The same method will help to obtain an ombre effect (color gradation), since each subsequent layer neatly lies on the previous one, and the color intensity is regulated by the artist himself. Glitter will allow you to create bright, festive decor. Glitter is applied to a surface that has been previously coated with glue. Shake off excess pieces. It is better to work on newspaper, as the waste can be collected and carefully poured back into the jar for reuse.