What wedding would be complete without champagne? This sparkling drink is an essential attribute of a wedding feast. If 15–20 years ago it was enough just champagne, today guests are surprised with elegant bottles on the table. Wedding decor stores offer hundreds of bottle decoration options. Why not make an exclusive champagne decoration for your wedding with your own hands? Step-by-step master classes, photo ideas and video examples of work with descriptions will be found below.
DIY bottle for a wedding: ideas for decoration
There are many options for decorating wedding bottles. Before you get to work, you need to decide on the material to use. also consider the color of the wedding, the decor of the hall and banquet tables. We invite you to consider options and ideas for decorations for wedding champagne.
- A classic of the genre - champagne bride and groom in black and white. You can buy ready-made clothes or make a decoration for a bottle of champagne with your own hands.
- Hand-painted - using your imagination, you can depict all kinds of ornaments, hearts, pictures from Love is, or draw a bride and groom on the glass of bottles.
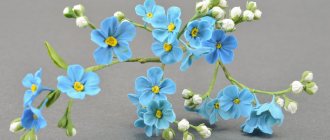
- Decoration with decorative flowers. The option with flowers is always appropriate for weddings of any income and style.
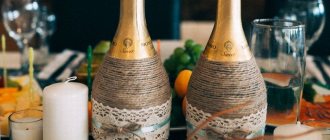
- Tulle and lace. Bottles decorated with lace look original. A successful combination of colors will make a simple decoration unusual.
- Decoration with beads. Modest minimalism with a special charm, this is how you can call the option of decorating bottles with beads, sequins and other small elements.
- Painting bottle glass . The bottle can be painted completely in a certain color or you can make unique pictures on the glass.
- Bottles made using decoupage technique will look original .
- Decorating bottles with velvet – luxurious decor for a wedding.
Required tools and materials
As a rule, both bottles are decorated in the same style so that pairing appears (after all, this is a wedding, a celebration for two). A simple decoration option is to spray bottles with spray paint. In this case, bottles will look harmonious, where one has a slightly larger size. It can be decorated on top with a small black hat and bow tie.
A smaller bottle will represent the bride: decorate it with a veil or a white skirt made of 2-3 layers of fabric. The skirt can be made from different fabrics:
- organza;
- silk;
- guipure;
- atlas;
- tulle.
Decorating champagne usually does not require a lot of materials, and they are quite inexpensive. So, for work you need to prepare:
- the champagne itself;
- glue;
- decorative paper;
- fabric, lace;
- beads, rhinestones, colored stones;
- paints and brushes;
- polymer clay;
- threads;
- napkins for decoupage and varnish.
Such materials are applicable in those design options that can be handled by anyone without any special decorating skills. Of course, there are more complex methods of decoration, such as engraving. It is better to entrust such actions to professionals who know the nuances of such work.
DIY wedding bottles: preparation for decoration
Have you already seen that a wedding bottle can look incredibly beautiful? Do you want to get started? Then we’ll talk about the first stage – preparing the bottles.
- Labels must be removed from bottles. To do this, place them in warm soapy water for 25–30 minutes.
- You can soak the bottles in the bathtub or use it to soak a bathtub, bowl, or saucepan. Dishwashing detergent is added to the water. It will perfectly wash glass, which is very important when applying coloring compounds.
- When the paper on the bottles softens, wash them using a thick dishwashing sponge.
- There should be no pieces of labels or traces of glue left on the glass.
- Wipe the bottles thoroughly and degrease them using acetone (nail polish remover). Now the bottle is prepared for further stages of work.
Decor with rhinestones and bows
This option can be used either as a single design or in addition to the methods described above. Rhinestones are useful when decorating with ribbons or painting; bows are used in the design of the neck and complement outfits for bottles made of ribbons or fabric.
When decorating bottles only with rhinestones, it is recommended to clean the surface of labels and degrease.
For more comfortable work, contours for gluing are outlined with paint. It is recommended to prepare in advance sketches of the drawings that will decorate the festive champagne.
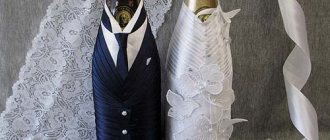
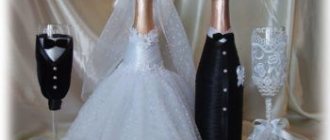
Decorating bottles for a wedding with your own hands: champagne for the bride and groom
The bride and groom at a wedding can be not only at the table, but also on the table. Of course, we mean decorated champagne. You can make a bottle bride and groom with your own hands using bias tape or ribbon. For two bottles you will need the following materials and tools:
- 10 m of white bias tape;
- 8 m of blue or black bias tape;
- 4 m of bias cream binding;
- 10 cm white lace;
- 3 m of wide lace, bow or piece of tulle;
- glue in a pencil (super glue moment);
- scissors;
- decorative ornaments;
- cardboard for hats.
Below is a step-by-step process for making wedding bottles.
Bottle for a wedding - Bride: step-by-step master class with photos
Just like a real bride, the bottle of champagne in this outfit should be the center of attention, and this requires perfect execution of the job.
Initially, use a marker to draw a straight line in the front center, along which you will need to glue the edges of the tapes. Try on the lace at the neck, cut off the required piece. Spread the bottle with glue and glue the lace. Coating the glass of the bottle, glue the bias tape, cutting off its long part after gluing. Continue oblique gluing until the middle of the bottle. From the middle, the bias tape is glued in a circle to the very bottom of the bottle.
Take a wide bow near the subway, use an iron ruler and a hot soldering iron (a knitting needle heated over a fire) to solder the edges of the bow. It should look like this.
Fold it in half and sew with a cast-on stitch. Put the resulting skirt on the bottle, tighten the thread to its size. Remove part of the skirt and follow the same example to make two more skirts. Determine the place where the skirt will be attached. From its upper part you need to mark a place for two petticoats, coat these places with glue and glue two blanks. Sew golden bias tape to the overskirt. Glue it onto the bride bottle.
Fold a piece of a wide bow in half. Using a mug and a hot soldering iron, make a circle (the edges will stick together under the influence of the heat). As shown in the photo, cut out the darts so that the brim of the hat can be glued on. Make a ring out of cardboard to fit the diameter of the bottle neck. Cut out a circle with teeth for the top of the cap. Bend the teeth, glue the top part of the cap and brim. Glue a white ribbon in a circle on the outside and tie an organza ribbon. Glue beads to the bride’s “neck” and put on a hat. The bottle-bride is ready for the celebration.
Bottle for a wedding - Groom: step-by-step instructions for working with photos
The bride is ready, now let's get down to creating the groom. The work is carried out identically to the execution of the bride bottle.
First, fold the white ribbon in half and try it on the neck of the bottle. Apply glue to one half of the folded tape and glue it to the neck of the bottle so that the upper part can bend.
Raise the top of the collar of the first tape, glue another 2-3 rows to the bias underneath it.
Measure out the main color of tape to attach to the bottle. Raise the collar and tie a ribbon tie for the groom. Lower the collar and continue gluing the blue ribbons (on top of the tie) onto the bottle. When the narrowed part of the neck ends, cover the bottle in a circle with ribbons to the very bottom.
Glue buttons to the groom's jacket. Decorate the “chest” with a boutonniere. Prepare such parts for making a top hat for the groom.
Glue a cylinder out of cardboard. Cover it with ribbons and decorate it to match the jacket. Place the top hat on the bottle and the groom is ready.
Photos of young people
Many newlyweds use personal photographs to decorate their bottles. This decor option has gained wide popularity recently. Photos are used instead of labels. In order to place the desired photo on the surface, it is recommended to print it on thin paper. The design is carried out with special care. You will need to think about the photo format, its location, and additional decorations.
Inscriptions with wishes (if the bottle is presented from guests), indicating the names of the spouses, the date and time of registration are suitable as decoration.
The vessel itself needs to be prepared for the technological process. The label is removed with warm water and the surface is degreased. The surface can be painted and a photo can be placed in the center. Small rhinestones will come in handy when creating a frame. The neck can be decorated with a ribbon bow, flowers, and a veil and a man’s hat (for example, a paper top hat) can be placed on the lid.
There are a lot of options for how to decorate this table souvenir.
Attention! Many specialized salons provide services for printing labels with the required image. This sticker will be a smart alternative to the real one.
Decorating a bottle for a wedding with your own hands using polymer clay flowers: instructions with photos
You can make an elegant bottle of champagne for your wedding using polymer clay flowers. They are sold in craft stores. To work you need to prepare:
- a bottle of champagne previously removed from the label;
- a can of white paint;
- tube of glass contour;
- ready-made polymer clay flowers;
- white beads;
- glue.
- Blow the bottle white with a spray can and let it dry completely.
- Using a contour on the glass, mark the location of the half-hearts on the bottles, draw decorative stripes, curls, etc.
- Glue flowers and beads along the outline of the heart.
- Decorate the top of the bottle with a satin ribbon bow and the beautiful champagne bottles are ready.
Master classes on decor
Decorating bottles using clay, ribbons, paints and other materials will require certain skills. It is advisable to start preparing long before the celebration in order to have time to think through the decor, select materials and, possibly, make several trial options. It may not turn out very neatly the first time, but don’t be upset. The main thing is to stock up on the necessary materials and follow the ready-made instructions.
Decoration with ribbons and beads
Decorating champagne for a wedding with your own hands using beads, ribbons, and rhinestones is relatively easy. You will need:
- satin ribbons of one or more colors;
- any superglue or glue gun;
- scissors, tailor's yardstick;
- additional decor (optional).
A set of wedding bottles connected by ribbons is called “bulls”. There is a hypothesis that this name arose in ancient times, when newlyweds were given a bull and a cow tied by the horns.
Sequencing:
- Cut the tape to the required length and apply a little glue to its end. You need to start decorating bottles from the neck, gradually going down.
- The next tier is made of ribbon slightly longer than the previous one. Secure the ends with glue, positioning them so that the right edge slightly covers the left.
- Repeat the turns 3-5 times, depending on the width of the ribbon and the intended decor.
- After moving to the flat part of the bottle, cut the pieces of tape to the same length. Connect the ends to the back of the champagne. Upon completion of the work, mask the joint with another even piece.
The decor of satin ribbons can be complemented with beads, lace, rhinestones, and feathers. Decorations that contrast with the color of the main design look impressive. For example, a red bow on the “bride’s dress”, a white bow tie on the “groom’s suit”. And lace and brocade will add sophistication to the entire composition. Bottles decorated in this way can be complemented with glasses decorated with the same materials.
Velvet suits
Such “clothes” for the bride and groom’s wedding bottles can replicate the style and colors of the newlyweds’ suits. It is not necessary to use this particular fabric, but velvet will make the decor luxurious and elegant. It is not easy to work with - the edges crumble very easily. When cutting, you should add significant seam allowances so that there is guaranteed to be enough material to decorate champagne bottles.
To create an original composition you do not need to have tailoring skills. Theoretically, to designate each of the newlyweds, it is enough to put a veil and some kind of skirt on one of the bottles of champagne, and tie a tie or build an imitation jacket on the second. But a full suit made of velvet with elements of fabrics similar to the material of wedding dresses looks much more impressive. For example, the “bride” is decorated with tulle, organza, pieces of lace, and the “groom” is given a ribbon tie, small tailcoat buttons, or a paper hat is made.
Necessary materials:
- elastic velvet, threads, needle, scissors;
- paper (graph paper or several sheets of squared paper);
- pencil, tailor's chalk or thin-edged bar of soap;
- additional elements (optional).
It is advisable to work with elastic material, since ordinary velvet will require more attention and skills. The threads should match the color of the fabric. Step-by-step instructions for creating “velvet” bottles:
- Make a pattern. It can be found on thematic resources and printed or constructed independently on graph paper.
- Transfer the pattern to the wrong side of the velvet using chalk or a piece of soap. You shouldn’t draw with a regular pencil or pen, they will leave marks that are too invisible.
- Cut out. You need to cut the velvet very carefully, slightly stretching the fabric. Seam allowances are required.
- Sew the blank. This can be done by hand or on a sewing machine. You should get a case that follows the shape of champagne. The bottom edge must be hemmed or overcast to prevent the material from fraying.
- Put the finished suit on the bottle. The bottom can be secured with glue. You shouldn’t be too zealous, a couple of drops is enough, since in the future the “suits” will have to be removed in order to uncork the bottles.
The finished “clothes” are optionally decorated with additional elements. The “groom” can wear a tie or a funny bow tie made of starched fabric or paper. Decorate the “bride” with a veil, flowers, and rhinestones. Even if you are planning a themed wedding, it is better to design the costumes close to the traditional version, so that later you can figure out whose bottle is whose.
Traditionally, the groom's bottle is uncorked a year after the wedding, and the bride's champagne is opened after the birth of her first child.
Polymer clay flowers
If the wedding bottle is decorated with clay flowers, the work will require certain skills and at least a little artistic talent. It is advisable to choose two or three different colors or shades so as not to create excessive diversity. To work, you will need polymer clay, gloves to protect your hands, and an oven in which the finished decor is baked.
How to decorate bottles with clay flowers:
- Carry out each plant very carefully, creating petal by petal. Make twigs and leaves separately too, and then combine them into a single composition.
- When the result satisfies the master, all the elements need to be placed in the oven, laid out on a flat base (a baking sheet will do). Usually flowers are baked at 110–130 degrees, but the temperature and cooking time depend on the characteristics of the material (indicated on the packaging).
- Attach the finished parts to the bottle using glue. The composition can be diversified with decor made using a different technique. Acrylic paint, ribbons, and decoupage are suitable as backgrounds.
Overheating of decorative clay will lead to discoloration and increased fragility of the petals, so you need to carefully monitor the baking time in the oven. For those who are doing this kind of modeling for the first time, it would be a good idea to watch a thematic video and make a few trial attempts.
After baking the clay, the oven must be washed and ventilated.
Decoupage technique
This method involves applying scraps or cut pieces of paper sheets with selected designs to the surface, a kind of “advanced” version of appliqué. The main advantage of this method is the ability to create an artistic masterpiece even without special education or drawing ability. Suitable materials include painted paper napkins, photographs, special decoupage cards (sold in craft stores), magazine clippings, and printed pictures. For test samples of decor, it is better to choose ordinary paper napkins.
The paper for decoupage should be thin. If you plan to use photos or other printed pictures, they should be applied to a regular, almost transparent base. The photo paper will not lie neatly enough or will not stick to the bottle at all.
In addition to drawings or photos, to decoupage bottles of champagne for a wedding you will need:
- glue - special or regular construction PVA;
- primer - acrylic composition for application under the paper layer;
- varnish - finishing coat;
- paints are an optional element; they can be useful for drawing individual fragments;
- sponges and brushes for applying primer and varnish.
The glass surface of the bottle does not absorb moisture, so applying a primer to which the paper will stick is necessary. As an alternative, you can use construction compounds for similar purposes, aerosols, varnishes, paints, and artistic primers for glass. A convenient option is a colorless varnish in an aerosol can, which can then be used to finish champagne bottles for a wedding.
Operating procedure:
- Clean the surface and degrease the bottles. Apply a thin layer of varnish or other primer. This is done with a brush or sponge.
- Dry the primer naturally, without using a hair dryer or high temperature, so that the varnish does not drip. After complete drying, apply another layer.
- Select paper fragments with drawings of flowers, butterflies, and thematic pictures. Stick them on the surface of the bottle. Wrinkles may appear along the edges of the paper; carefully smooth them out with the hard side of a sponge or a sheet of thick paper folded several times.
- After the paper decor has completely dried, cover it with a finishing layer of transparent varnish. To securely fix the application, you will need several layers, but each subsequent one can be applied only after the previous one has dried.
- When the last layer of finishing coating is ready, you can additionally decorate the bottle with rhinestones, beads, feathers, sequins, or paint bright accents with paints.
If an acrylic composition is used as a primer, you must remember that it dries in about half an hour. But for a few more days the soil will not be very strong, so it is advisable to have enough time left for the acrylic to adhere well to the surface of the bottle. Aerosols and other chemical compounds may have a strong odor. You should not work with them indoors. Minimal consequences - headache, nausea. For safety, you should apply the varnish outdoors (balcony, street).
Painting with paints
Painted champagne looks original and in its simplest form does not even require artistic abilities. It is enough to simply apply a layer of paint evenly to match the overall wedding design and complement the decor with various beads, ribbons, and feathers. Another simple option is to paint the bottle with stained glass paints. To do this, it is not necessary to make a background; a golden outline for stained glass looks very impressive on dark green glass.
Materials:
- stained glass paints, including opaque outline;
- marker or glass marker to match the outline;
- acetone for cleaning brushes.
First, the selected design is applied to the bottle with a marker, then the contours are drawn. After the paint has dried, traces of the marker should be washed off with warm soapy water. Then bright light shades are applied to the surface: dark colors are difficult to see on the green glass of the bottle. Small details can be done using a toothpick or a pointed match. Another option is to scratch the dry paint with a needle. Stained glass compounds are easily washed off with acetone, so any blemish can be corrected.
Do-it-yourself champagne bottles for a wedding using decoupage technique: instructions with photos
Decoupage is a decoration technique based on transferring an image onto a specific object.
To make a wedding bottle using this technique, you will need to spend a decent amount of time, but the end result will certainly please both the newlyweds and their guests. To complete the decor you need to prepare:
- napkins with the image or decoupage cards that you want to apply to the bottle;
- primer for glass of the desired shade;
- sponge;
- acetone;
- fine abrasive sandpaper;
- brush;
- tweezers or clothespin;
- glue;
- acrylic paints;
- clear nail polish.
Initially, clean the bottle from stickers, dry it and spray it with acetone. Apply glass primer to the bottle. If you don't have one, it doesn't matter. Mix acrylic paint of the desired shade with PVA glue in equal proportions. Cover the bottle with the mixture. Gently secure a piece of sponge in tweezers or a clothespin and apply the composition using patting movements.
The primer must properly matte the green color of the bottle, otherwise the end result may be spoiled by the green color showing through.
After the primer has completely dried, you need to go over the bottle with sandpaper. The surface of the primed glass must be smooth. Place napkins on the cork and prime it so that the top does not differ from the rest of the composition.
Separate the lower layers of the napkin, leaving only the top one with the pattern. Cut out the selected picture, stepping back from the beginning of the image by 2-3 cm. Use your fingers to carefully tear off the remaining strip so that the edge of the decor is not more than 0.5 cm from the starting line of the image. The torn structure of the edge will help smooth out the sharp transition of the decor to the background of the painted bottle.
Place a napkin on the surface of the bottle. Use a brush dipped in glue to cover the entire pattern. You need to start from the center, smoothing out all the bubbles and irregularities towards the edges. Wait for the picture to dry. If the base of the napkin was not white, then using acrylic paints you need to select the appropriate shade and paint the white spaces between the pictures with a brush. After complete drying, the entire bottle must be coated with clear varnish. When it dries, if desired, you can glue sparkles to the picture, decorate the composition with sequins or beads.
Decorating with stockings
The surface is also degreased, but instead of fabric, a stocking is put on the surface of the bottle, which must be soaked with glue.
The stocking can be pulled up to the level of the neck, or completely cover the container with it along with the stopper.
Moreover, it is not necessary for the nylon to lie flat; it will look interesting if you make chaotic folds on the surface.
After the glue has completely dried, white acrylic paint is used as an intermediate coating. The paint must be completely dry.
The next step is to draw the image from a napkin. The rest of the bottle's surface is repainted in a different shade.
The photo shows how fabulous the bottles look with decor made using decoupage technology.
DIY champagne bottle painting for a wedding: painted bottles
You can beautifully decorate bottles of champagne for a wedding using your talents. We offer several options for painting bottles at home.
Painting with decor. Glue pieces of paper tape in the shape of the chosen decor onto the prepared bottle. Paint the bottle with spray paint. To ensure an even color, the bottle is painted 3 times. Before applying the next layer, you need to wait until the previous one has completely dried. Remove the tape from the dried bottle. Decorate the pattern with flowers, butterflies, beads, etc.
Paint with acrylic paints and tie a ribbon. Spot painting. You can beautifully paint a bottle of champagne for a wedding using a glass outline. You can apply the design to the glass itself, or by pre-matting the bottle in the desired color.
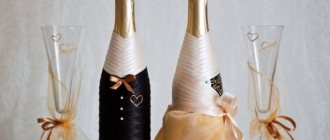
Bottle design in gold tones
It is very fashionable now to paint champagne bottles with acrylic paints. But this is very long and requires preparation. There is an excellent alternative - spray cans with coloring compounds. And if the wedding is planned for autumn, a bottle of champagne with a design in golden tones that repeats the shade of foliage will look very beautiful on the newlyweds’ table.
You don’t need anything special - the only tools you need are tweezers and a glue gun. You choose the shade of the fabric yourself. Champagne and gold color combinations look beautiful. It is better to take at least 1 meter of the main tape, and the additional one can be 15-30 centimeters. And you also need to buy aerosol paint.
Remove all labels from the bottles using a knife or soapy water. Degrease the glass (it is fashionable to wipe it with alcohol). You need to wait until everything is dry, after which you can apply paint. We place the aerosol at a distance of 40-45 centimeters from the bottle and spray the composition.
It is better to do all the work outside, because the splashes will fly around. Or you can make fencing out of cardboard to cover the walls of your home.
Cover the bottles with the first layer and leave for 15-20 minutes. When everything is dry, repeat the procedure 3 more times. But you need to focus on the paint itself and the resulting result - it happens that the shade does not appear immediately or, on the contrary, looks great after the second time.
While the bottle is drying, you can make decorations. Cut the fabric into strips 5 centimeters wide. We make 8 strips from a small piece and 6 strips from the main piece of fabric. It is better to take the length about 30-35 centimeters. If necessary, lightly burn the edges of the ribbons so that the threads do not fall out of them.
- DIY polymer clay jewelry: master classes with photos
DIY decorative candles: master classes with photos
- Decorating a vase: ideas and master classes on how to make a vase with your own hands (80+ photos)
Fold the strips in half and sew them together. We begin to make roses by twisting the fabric along the edges and fixing them with glue.
Meanwhile the bottle dried up. We glue a light, wide tape on it at an angle, and a narrower one on top. We attach the roses and decorate with beads. This type of decor is labor-intensive, but the result will be excellent!
Wedding bottles for a wedding, decorated with velvet: instructions with photos
Velvet is a luxurious aristocratic material. Velvet jewelry has long been considered a sign of luxury. You can decorate a bottle with velvet for a wedding by sewing an elegant cover for it.
To work you will need:
- velvet fabric, preferably stretchy;
- paper for making patterns;
- Velcro tape matching the color of the velvet;
- thread and needle for sewing (a sewing machine is ideal);
- scissors;
- a sharp piece of soap;
- decorative elements (beads, lace, ribbons, stones, etc.).
Stages of work:
- First you need to make a pattern. On paper, draw a pattern for the future cover. You can use the dimensions shown in the photo as a basis.
- Place the paper on the back of the velvet and trace the outlines with soap.
- Cut the workpiece along the contours.
- Sew the top slits to narrow the neckline.
- Sew Velcro along the side edges.
- Place the finished velvet cover on a bottle of champagne and decorate it with decorative elements of your choice.
Removable champagne decoration
Friends, if you need to make the champagne decoration removable, watch the master class: HOW TO DECORATE CHAMPAGNE FOR THE NEW YEAR. In this MK, the author shows how to make champagne decoration removable.
How to decorate champagne for the New Year
Friends, if you found my master class useful, share it with your friends!
Click on the social media buttons!
A bottle for a wedding made from ribbons - festive champagne: instructions with photos
Champagne in the form of the bride and groom is not a requirement for a wedding. You can deviate from the standard and place a bottle of champagne beautifully decorated with ribbons on the table. For decoration you will need:
- satin ribbon (blue, black, green are suitable for a men’s bottle; white, pink, beige, milky for a women’s bottle);
- Super glue;
- decorative elements (lace, beads, feathers).
Starting from the top, try on the tape at the corner, cut it and glue it. With the next one, do the same steps. Make 4-5 wraps with the main tape, change it to a decorative one. In our version it is a golden ribbon. Glue 2-3 strips of a different color, still on the corner. Cut ribbons of the main color according to the diameter of the bottle. Starting from the bottom, glue one gold ribbon, and then cover the entire bottle to the top with ribbons of the main color. Leave room at the top for one gold ribbon. The seam (the junction of the glued tapes) should be at the back. Place a ribbon of the main color under the bottom gold ribbon at the seam. Glue it to the seam to hide the joints of the tapes glued in a circle. Hide the top of the vertical ribbon under the last gold ribbon passed in a circle. Decorate the front of the bottle with ribbons, beads, and feathers. For a wedding, you can make two identical bottles or differentiate them for the bride and groom using the colors of the ribbons.
Wedding couple
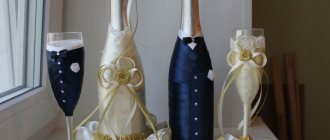
It is already difficult to imagine that there would not be a beautifully decorated bottle on the holiday table. The bride and groom are the main decoration of the festive bottles at the wedding. Such decorated vessels are left until the first anniversary or when a child is born, because you don’t want an ordinary bottle of champagne on the shelf. Therefore, the bride and her bridesmaids strive to decorate such wedding paraphernalia as best as possible. So, in this master class we will decorate a bottle in the form of a bride and groom.
What we need for registration:
- satin ribbon, width 4 cm, white;
- white satin ribbon 0.6 cm wide;
- the trim is dark blue;
- scissors;
- ruler;
- pencil;
- glue;
- white guipure;
- white stretch guipure;
- white half beads;
- glue rhinestones;
- two bottles of champagne.
We'll make the first bottle in the shape of a groom. First make a white shirt with a collar. To do this, measure the length of a wide white ribbon from the bottle. Now fold it in half, but so that one edge is lower than the other. Using an iron, iron it thoroughly. This is what we have made of the collar, which we attach to the bottle and glue it, as shown in the photo below. We take a ruler and mark the center, mark it with a pencil.
Next, glue a wide white ribbon under the collar, the ends of which are secured in the center. We take the string and cut it to the required length, put it on the bottle and knit a tie. The resulting tail of the tie should be cut off. We measure another strip of tape and decorate the white ribbon from top to bottom from back to front. We do this several more times, imitating a jacket. When we reach the flat part of the bottle, the side should be secured. And so we wrap the entire bottle in a circle, but periodically we put the tape on the glue. We lower the side and glue it. We make buttons from white beads on the resulting vertical ribbon. We made the groom.
Now let's start making a bottle for the young one. Like the groom, we will have a bride made of ribbons. We find the center of the bottle and now, using a white ribbon, which we have already measured to the required length, we begin to make the neckline area. We glue the ribbons at the desired angle of 45 degrees. This is how we design the entire corset of our bride, it’s better to go to the middle. And then we take a wide white tape and carefully cover the remaining part with it. We decorate the wide ribbon with stretch guipure. We cut out flowers and leaves from guipure. When we get the required number of decorative elements, we begin gluing them from the front. Next, glue a ribbon on top of the bottle in the form of a bow under the flowers, but so that it looks out from under them. We decorate this thin ribbon with half beads, and cut out guipure flowers with rhinestones.
We cut out two stripes from a wide ribbon and form them into a bow, one part should be larger than the other. We decorate the middle with blue trim, the middle of which is covered with rhinestones. Now we take the tape and glue a thin white ribbon in the middle so that on each side the tape is 10 centimeters longer than the tape. We tie the ends into a knot and glue the bow to it. We run scissors along the tape to create curls. The bow needs to be put on two bottles, and now our wedding champagne is ready.
You can decorate the glasses of the bride and groom in the same way. And on the bottles add a fluffy skirt made of satin fabric for the bride, and a cylinder made of cardboard and satin ribbons for the groom.
Photos of wedding champagne bottles for a wedding
An ideal wedding is an event thought out to the smallest detail. Champagne, pleasing not only with its contents, but also with its appearance, must be present on the table. According to tradition, such beautiful bottles are not drunk at a wedding, but are preserved for the following moments:
- one bottle for the first anniversary;
- the second bottle opens after the birth of the first child.
Having invested a piece of your soul into the design of wedding champagne bottles, you will remember your wedding day with trepidation all the time while the bottles are waiting to be drunk.
Decoration from the inside
If you plan to bring to life the idea of decorating the bottle from the inside, then you need to choose a container with transparent glass and a non-standard shape.
A bottle decorated with various irregularities on its surface looks interesting.
Paint with an acrylic base of any color is poured into the prepared bottle for decoration.
The contents of the vessel are shaken so that the paint evenly covers its walls.
After this, the bottle is turned upside down and left in this state for some time until the excess paint pours out of the bottle.
If, however, the walls are not evenly covered with a layer of paint, then the procedure must be repeated several times.