A wedding celebration is always a unique event and, perhaps, the only one of its kind in life. That is why all newlyweds want to make the holiday beautiful, memorable, bright and joyful. Making a guest list, making arrangements with the banquet hall, working out the menu, ordering or buying a dress for the bride or groom - it’s really a lot of trouble. The decoration of wedding cars or the presidium of the newlyweds at a banquet is often remembered at the last moment, but in vain: both the wedding procession and the decoration of the restaurant flash in memorable photos and video footage with enviable consistency.
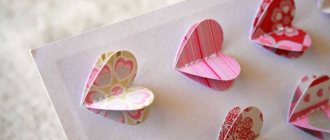
If you want something original for decoration or as a gift for the newlyweds, we recommend paying attention to funny wedding bears . Such cute wedding Teddy bears are gaining more and more popularity - they can be plush or handmade, but they invariably evoke positive emotions and create a mood, and then remind the newlyweds for a long time about this beautiful and joyful day of their family.
Photos of wedding teddy bears
How to sew a soft bear with your own hands
A teddy bear is a toy that provides soft sides to almost every little person during sleep;
listens to all the grievances accumulated during the day from girls who have already matured, silently supporting; becomes an indispensable friend in games. Beloved by everyone, the clubfoot has been giving joy and touching for more than one generation. But you don’t have to buy a soft friend in a store; you can sew it yourself.
The baby will definitely like this gift and anyone can sew this adorable creature.
We present step-by-step instructions - it will help you understand the intricacies and nuances of making a toy. Taking it as a basis, you can create not only a bear, but also any other craft. Everything is limited only by your imagination. Take action and let this article be the starting point for your further journey into the fascinating world of needlework.
- The basis of the fluffy “miracle” is soft-pile fabric. It can be plush, natural or artificial fur, mohair, velvet.
- Additional thick fabric of any other shade for paw pads and ears. It will look nice if you take it a couple of shades lighter, but it doesn’t matter. Not necessarily with pile - calico, flannel, silk, suede.
- Pattern paper.
- Pencil or pen, scissors.
- Threads, floss or strong silk threads, sewing needles.
- Black beads or buttons will be the eyes.
- Stuffing (cotton wool, padding polyester). Perhaps any old things, rags that have been lying “idle” for a long time.
Master class on sewing soft bears with your own hands
My favorite material for making soft toys is fleece. This material is soft and pleasant to the touch. Moderately stretchy, easy to cut, does not warp when cutting.
In addition, the seams on it are less noticeable and look neat.
I suggest you choose to sew one of the proposed teddy bears.
One of them is very simple - even a novice needlewoman can handle it, the other is a little more complicated.
For the simplest and easiest bear I needed:
- Fleece.
- Two pieces of felt, black and white.
- Sintepon for stuffing.
- Scissors.
- Needle and thread.
- Four black beads.
We take the pattern and, if necessary, increase or decrease it to the desired size
and cut out two identical parts, not forgetting to leave a small distance at the edges for the seams.
Step 1. Trace the pattern, leaving space for the seams
After we have cut out both parts, we hand baste them with thread.
Step 2. Connect the two parts and sew with a running stitch
Then we sew both parts together. It's better to use a sewing machine, of course.
Step 3. Sew according to basting
but you can also carefully sew it by hand.
We do not sew completely. Don't forget to leave a small hole on the side according to the pattern so that you can turn the workpiece out later.
Turn the bear right side out and straighten it carefully and carefully.
Step 4. Turn the workpiece right side out
Then we take a padding polyester and stuff the toy.
Instead of padding polyester, you can use foam rubber, cotton wool, holofiber or any other filler that you have on hand.
It is very important to carefully and evenly fill the toy, try to avoid the formation of thickenings or, on the contrary, too loose spaces.
Step 5. Fill the bear with padding polyester
After stuffing, sew up the remaining hole with a blind stitch.
Step 6. Sew up the hole with a blind stitch
We cut out an oval - a nose - from black felt, and a very small spot on the nose from white felt, and sew it on or glue it with special fabric glue.
I used Moment Crystal glue.
We embroider the paws with black thread.
Sew on beads - eyes and buttons.
Step 7. Sew the paws and make the face
Let's tie a beautiful bow from a satin ribbon and lighten up the cheeks. The bear is ready!
The second bear cub is a little more complicated.
To make it, I used this pattern and again took my favorite fleece.
You can use the material that you like best. It could be: faux fur, velvet, wool, velor, terry cloth or even knitwear.
I took fleece in two colors (I needed a small pink piece for the ears and legs of the bear), thread, needle, scissors, padding polyester or any other filler, two buttons or two ready-made eyes (they are sold in handicraft stores).
Material for the second teddy bear
We will prepare all the necessary patterns, according to which we will cut out all the details of our teddy bear.
Step 1. Make a pattern and cut out all the details
Now let's start stitching.
First we sew the head: ears, two back parts of the head, two front ones. Then we assemble all three resulting elements together in accordance with the pattern.
Step 2. Sew the head
Let's move on to the body.
Step 3. Assembling the body
The result is something like this:
Step 4. You should get the same workpiece
Sew the upper legs and sew them to the body. We also sew the pink feet to the lower legs.
Step 5. Sew on the upper and lower legs
Attach the head, leaving a hole for stuffing the toy.
Step 6. Sew on the head, leaving a hole.
Fill it evenly and carefully.
From a piece of black felt, cut out a nose and two stripes to form a muzzle and sew them on.
Step 7. Stuff the bear and sew on the face
Then we sew on the eyes. Once again we check the uniformity of the stuffing and sew up the remaining hole with a hidden seam.
Step 8. Sew up the hole
The finished teddy bear can be decorated with an elegant bow.
Additionally, you can sew shorts with straps and a T-shirt for a boy bear, and a dress for a girl bear.
Step 8. The teddy bear is ready
How to insert a wire frame
The wire frame is used quite often in soft toys; it allows it to hold its shape and gives it flexibility. To create it you will need a little wire; for safety, its ends should be bent using round teeth. The wire should be copper or floral, along the entire length of the toy.
Then, when the desired blank is made, it is lightly coated with glue and wrapped with the selected filler. This will prevent it from getting out while using the toy. Next, the filler is evenly distributed around it and a frame is obtained, which is then placed in a fabric pattern. The fragment is sewn together.
Bear pattern options
The popularity of bear cubs has not subsided since the 19th century, so the appearance of toys is varied. Drawings change over time and in different countries; there are many original models. The proportions of the animal's physique and the shape of the muzzle change. You can choose a model according to your taste, but you need to make sure that the pattern is accurate.
Before opening you need to check:
- The symmetry of paired parts by folding them closely along the axis of symmetry.
- The coincidence of the contours of adjacent parts is checked along the length. It can be measured by placing the thread along the outlines of the parts.
- The presence of all elements of the toy.
Even trusted sources may contain errors. Deformation of the correct drawing may occur when transferred to digital format due to the specifics of the work of graphic editors and their interaction with different image formats, so additional measurements should not be neglected.
Classic pattern
The classic pattern consists of six main parts: head, body and paws. The height of the toy's head is taken as one part of the proportion. The length of the toy is equal to four heads. The lower paws relate to the head in proportion 1.4, the upper ones - 1.6. The length of the body is calculated by multiplying the length of the head by 2. These are the bears that were sewn until 1970.
Simplified classics
This is an author's pattern by Natalia Shepel. It can be used by beginning needlewomen for their first creations. The classic drawing is simplified as much as possible: there are no darts, palms and feet are included in the design of the paws. The pattern does not include wedges or weights. The finished product does not require tinting. The physique and proportions repeat the classic model. The height of the finished toy is 19 cm.
The author recommends using two-color mohair, high-strength threads and floss in the color of the pile for the product. Due to its small size, the bear can be stuffed with regular felting wool or synthetic down. Using a fabric with a base color different from the pile allows you to avoid companion material. Accents and details can be created by plucking threads of wool.
Vintage model
Such toys were common in the 1930s. Vintage bears have slightly protruding muzzles and rounded chins. They turn out well-fed, with a thick belly and massive paws. The pattern involves the use of companion material, the inside of the ears and feet of the bear are drawn out in separate parts of the drawing.
To maintain a retro style, it is recommended to use fabrics with thick, short pile in classic brown tones. Bears sewn from white material look beautiful and gentle. The product does not require additional highlighting of details with paints. The design includes sewing clothes for the bear cub.
How to sew a Teddy bear (2nd option)
This cute little plush baby has a small belly and arms and legs that have enough flexibility to easily get the toy into a sitting position, but this little Ted is easy to make and can be created by hand or with a sewing machine. I used long thick fur for the teddy in the picture, the great thing about using long fur (besides the wonderful one of course) is that it doesn't show any imperfections so the stitching doesn't have to be perfect, which is good news because such thick fur can be hard work on a sewing machine, so I usually sew it by hand. When using any other fur or fabric, I would usually use a sewing machine.
Decorating a wedding car with bears
And now the bears are chosen and dressed up according to the occasion, you can decorate the wedding car with toys. The bears must be rather large, otherwise they simply won’t be noticeable - in photographs they will look like a small, unsightly spot, but you won’t be able to see them at all while walking. As a rule, bears are mounted either on the radiator of the car or on the hood; they can be placed on the roof of the car or securely mounted on the doors.
Photo of bears on a wedding car
You should understand: bears alone are not enough - no matter how beautiful and cute they are, they should be supplemented with satin ribbons, bows, balls, but so that the toys are in the center of the composition.
The symbolic tradition of giving bears at a wedding
According to legend, a rich girl ran away from her family and married a poor young man. In order to somehow support the newlyweds, friends brought them things necessary for living together. This is where the tradition of giving wedding gifts originated. Over time, it came to us, changed, and people give money, flowers, souvenirs, and symbolic gifts as gifts.
A pair of teddy bears will stand out from other wedding gifts by the amount of positive emotions it will evoke. The small size and cute faces will not leave anyone indifferent, and the colors and materials offered in stores provide a wide choice. Recently we came to the tradition of giving Teddy bears. This funny toy will be remembered by newlyweds for a long time as an original wedding gift.
Options for using wedding bears
In wedding salons, a small number of multi-colored ribbons and several tulle bows, the price of which is exorbitant, are offered to decorate the car or table of the newlyweds. For this reason, newlyweds began to use bears as an alternative for wedding decorations, which they use to their taste. Guests also like this solution.
Bears for decorating a banquet hall
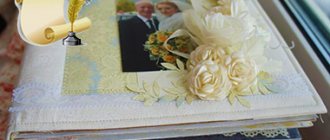
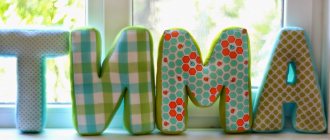
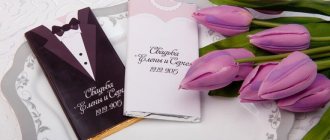
Many newlyweds have themed weddings in the style of Chicago of the 30s, with a certain color. A Teddy bear as a decoration for a banquet hall will look appropriate on any of them. If desired, balls, ribbons, and other bright attributes are added to the toys, which have a positive effect on the holiday atmosphere. Using bears for decoration, their image is placed on all wedding attributes:
- invitations for guests;
- pads for rings;
- napkins;
- album for wishes;
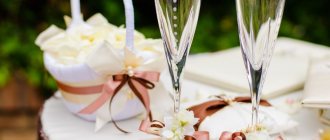
- glasses;
- bonbonnieres;
- like figures on a cake.
Having chosen a wedding theme using bears, the event organizers use them to decorate the newlyweds’ table. If desired and possible, smaller copies of toys can be placed on each table in the hall. Since Teddies are expensive, if you are on a limited budget, a good option would be to buy regular teddy bears or make them yourself.
For decorating a wedding car
Depending on the taste and financial capabilities of the newlyweds, decorations for wedding cars can be very diverse. For example, compositions made of ribbons, balls, bows and charming teddy bears. The last option is an original decoration that looks both laconic and festive. The composition looks elegant on cars of any brand. Bears, depending on their size, are attached to the hood, radiator grille, placed on the roof or hung on the doors.
Why are bears needed at a wedding?
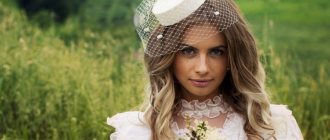
In fact, the scope of using the image of these cool bears is much wider than just decorating a table or a wedding car. The bears of the bride and groom at the wedding can be dressed in accordance with the theme of the wedding: a suit and dress of a certain color and style, simple natural fabrics and cut for boho and rustic style weddings, leather and latex, spectacular glasses and accessories - for weddings of representatives of subcultures (for example , bikers, goths, hipsters, etc.).
the classic style is more often used in the design of toys - a strict dark or light suit for the “groom”, a snow-white dress for the “bride”. When choosing toys, they usually focus on the images of the real bride and groom, sometimes simply copying them - if the bride chose an emerald dress, then her teddy bear in white will look somewhat ridiculous.
Wedding bears should match the theme of the wedding - let everything fit together, look stylish and organic
In addition to decorating the table at a banquet and the car of the newlyweds, the image of bears can also be used in wedding attributes , for example, on invitations for guests, seating cards, napkins in a restaurant, posters and albums; bears can often be found as figurines on a wedding cake. Smaller copies of toys can also be placed on the tables of guests. And if branded Teddies for some reason are not suitable or seem too expensive, if you have time and some skills, you can make them yourself or purchase identical plush toys and decorate them with appropriate clothes and accessories.
Photos of Teddy bears for a wedding
DIY wedding bears
If you have the right materials, time and appropriate skills, it’s easy to make bears yourself. Sewing and knitting will help you save a lot on this magnificent, but usually expensive wedding attribute. Patterns and descriptions on the Internet will help you sew bears from plush or felt, and you can also find descriptions of sewn or knitted clothes for them.
Crocheting bears for the bride and groom is not a quick task, so it is recommended to start preparations ahead of time. Such toys will look great whether made from smooth yarn or from special plush yarn. The undoubted advantage of handmade toys is that they will fully correspond to the idea, the theme of the wedding, and the interior of the room.
If time is running out, then another, quite simple and budget option is to buy ready-made teddy bears and sew or knit suitable clothes for them: a suit for the groom and a dress for the bride, decorate them with rhinestones, beads, and ribbons. All that remains is to choose elegant accessories, and the wedding bears are ready!
Photos of knitted bears for a wedding
Cute wedding Teddy bears are a symbol of tenderness, mutual respect and love for each other, the groom’s care for his beloved and her admiration for her chosen one. Decorating wedding cortege cars and banquet tables at celebrations with such bears is becoming a good and, to be honest, such a cute tradition. These bears can effectively replace the bride and groom figurines that have become classics - they look no less stylish, and even more modern.
Wedding bear: Teddy bear in the form of figures of the bride and groom for a wedding
A wedding celebration is always a unique event and, perhaps, the only one of its kind in life.
That is why all newlyweds want to make the holiday beautiful, memorable, bright and joyful. Making a guest list, making arrangements with the banquet hall, working out the menu, ordering or buying a dress for the bride or groom - it’s really a lot of trouble. The decoration of wedding cars or the presidium of the newlyweds at a banquet is often remembered at the last moment, but in vain: both the wedding procession and the decoration of the restaurant flash in memorable photos and video footage with enviable consistency. If you want something original for decoration or as a gift for the newlyweds, we recommend paying attention to funny wedding bears . Such cute wedding Teddy bears are gaining more and more popularity - they can be plush or handmade, but they invariably evoke positive emotions and create a mood, and then remind the newlyweds for a long time about this beautiful and joyful day of their family.
Photos of wedding teddy bears
Selection of materials
Sewing a bear from fabric is much easier than from faux fur, since fur or other similar pile fabric (suede, velor) has a pile direction that must be taken into account when cutting.
Plus, these loose fabrics are simply more difficult to work with. Therefore, we recommend that beginners try sewing a bear from regular thick cotton. Another great material is felt. It is also ideal for beginners, as sewing a bear from felt is the easiest. In other cases, take fabric that imitates fur, which does not fray too much when cut and does not stretch, so that the toy does not deform when assembling the parts. Also think about recycling unnecessary items and scraps, for example, how to sew a bear out of jeans or an old sweater. Take the amount of fabric based on the size of the future product. For beginners, we recommend the average size of the toy is 20-25 centimeters - this will make it easier to work with parts and the amount of work will not be too large. Miniature toys are the most difficult to sew, so we advise you not to start with them.
Next, prepare the stuffing material. You can use padding polyester or holofiber or even scraps of fabric for this, or you can stuff the bear with granules, sawdust or even cotton wool. Such materials are often found in specialized craft stores.
In addition to fabric and padding, you will need threads and needles (even if you plan to use a sewing machine, all parts are sewn together by hand).
The meaning of beliefs for newlyweds
In ancient times, almost every aspect of human life was determined by religious beliefs. Based on people's ideas about gods and other supernatural forces, signs and superstitions gradually formed, which indicated how in general one should live in order to achieve happiness and prosperity.
Particular attention was paid to the wedding, since it was always considered the most significant event in life. In addition, people believed that it was on the wedding day that the bride and groom became especially vulnerable to the influence of evil forces, and therefore future newlyweds needed to be protected from troubles. This was done simply - all the traditions and superstitions that had developed by that time were observed.
Gradually, belief in the supernatural began to weaken, and some of the signs were forgotten or lost their relevance. However, there are also beliefs that are still applicable to life, and people still believe in the patterns that were noticed by our ancestors.
As for wedding signs, most often the bride and groom observe them, since grandparents explained the importance of superstitions from childhood, and did so persistently and in bright colors. Other couples simply want to please their believing relatives or do not want to contradict them. And only a few truly understand the sacred meaning of signs.
Fastening moving parts
Typically, special fasteners are used to assemble Teddy bears. They consist of wooden disks, pins and metal washers. The pins are looped and T-shaped. Factory fasteners can be replaced with homemade ones if the design requirements are met.
Mounting parameters:
- The base disk must be made of durable solid material, usually wood or hardboard.
- The diameter of the metal washer is selected so as to prevent the edges of the pin from coming into contact with the wooden base.
- The pins should hold their shape well.
In order for the toy's limbs to hold tightly, the characteristics of the fasteners must correspond to the size of the parts for which they are intended. The larger the bear, the larger the discs should be, and the longer and thicker the pins. Typically, the size of the disk is determined by fitting it to the part; it should be located in the center of the upper part of the element, at a distance of 5-6 mm from the contour.
Differences between loop and T pin:
- Fastening parts to a T-shaped pin allows rotation only in a circle. Loop pins provide mobility of the limbs in various directions.
- A T-pin that is properly tightened will not show through at the joints of the members. Looped can be noticeable through the pile of the product.
- The fit when using the T-pin is quite tight, the loop fastenings are looser, which is good for retro toys.
- For fastening you need one T-shaped pin, or two looped ones.
The fasteners begin to be installed before the toy is stuffed, and are tightened and secured after it. Their shape and location have a tangible impact on the appearance of the product. When tightening the antennae, you need to make sure that there are no allowances under the fastening parts, and that the discs fit snugly to the fabric. The bear's head is usually screwed tighter so that rotation is carried out with force.
On the road to life together or a wedding procession: signs and superstitions
After the end of the bride price, or when the groom simply takes his beloved from home, bypassing the competitions, the whole procession, united, goes to the registry office, and from there to the place of celebration, most often to a cafe or restaurant. At all these stages, guests are seated in decorated cars, forming a wedding procession. Signs and superstitions must be observed so that the road to life together is smooth and prosperous.
Despite the fact that previously it was a line of carts and horses, and now powerful cars make up a wedding procession, signs and superstitions about this have not changed.
How to decorate a soft toy
There is a huge selection of accessories for decorating toys. The most commonly used are beads, buttons, sequins, ribbons and bows. They are sewn to the product using a hidden seam or special glue. You can also take small pieces of fabric, for example, velvet, cambric, silk, chiffon, they are overlapped and then sewn on using a buttonhole stitch.
Sometimes original embroidery appears as decoration, as this helps make the soft toy unusual. This option has increasingly become used when the product is created by hand.
Another option for creating a unique look can be specially tailored clothing, such as a dress, skirt or jumpsuit. It is made from beautiful lightweight fabric.
Beliefs along the path of the young
There are so many signs associated with the wedding procession, since it symbolizes the path of a young man and a girl into life together. First, they sit in different cars as the bride and groom, and then they are united in one car in the legal status of spouses, and at the same time they are accompanied by their closest people all the way.
The wedding procession allows the newlyweds to take their first joint steps into family life. For this reason, some believe that the life of the spouses will be similar to how decorated cars drove through the streets. If they did not encounter any obstacles (except for traffic lights) and maintained their order all the way, then the life of the newlyweds will be smooth and calm.
Teddy bear Me to you
This charming bear is familiar to everyone from his cute and touching postcards. These bears are distinguished by their gray-blue color, so choose fabric that is similar in color. They also have a specially designed muzzle - it consists of two parts of a contrasting color and a blue nose. These details and the special pattern of the fabric bear make the Me to you toy recognizable.
Please note that this bear must have feet made of suede or fine-pile fabric. They are sewn in a circle after basting the details of the lower paw and only then stuffed
Also a characteristic feature is a large decorative patch made of the same companion material. You can buy a blue nose ready-made from plastic and glue it to the muzzle. Otherwise, this toy is sewn in the same way as a Teddy bear, they may have the same pattern, but it can be assembled without hinge fasteners, but simply by sewing the parts to each other.
Using bears for decoration
It is not at all necessary to use standard sets as a decorative element. Often these are ribbons, flowers, fabric.
Bears for the car
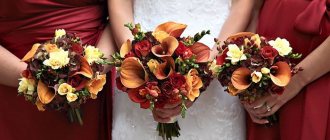
Two bears holding hands look cute and gentle. Animals are dressed to create images of the bride and groom. A jacket or tailcoat, bowler hat and bowtie are sewn for the boy. The girl traditionally appears in a wedding dress and veil.
Decorating a car with bears can be varied.
Most often they are used for:
- Hood decoration is a popular option. The animals are seated next to each other on a cloth that decorates a car like a path.
- Placed on the roof.
- Fastened to the handles.
Do not forget that the bears must be firmly attached so as not to fall while moving. It is best to sew them to fabric that is wrapped around handles or other elements of the vehicle. Another option is to install bears in artificial flowers.
Decoration of the celebration hall
Recently, newlyweds are increasingly choosing themed weddings. Bears will look great at any party and in any style. After all, they represent romance and love.
- The most popular and common type of hall decoration is toy bears on the table of the bride and groom. They are placed in the center, flowers are often placed around them or original compositions are made.
- It is possible to make a separate photo zone in which to place toys. Then your guests will have not only pleasant memories, but also beautiful photographs with symbols of your love.
- A large number of balls are often placed in the hall. You can print images of cute bears on them.
- Don't forget about the main wedding attributes: invitations, glasses, album for wishes, bonbonnieres. It will be enough to make a small image of your favorite animal on them.
- Cake is always memorable at any holiday celebration. Place the sweet fondant animals on top of it. Cakes are often sold at weddings. You can be sure that the confectionery product with the main symbol of the event will be bought very quickly for a high price.
Sewing tips
Since the bears are stuffed with sawdust and heavy granules, it is important to use strong threads. The easiest way to buy Russian LL70
Reinforced thread for denim, or thick threads from Maderia and Gutermann, are suitable.
Before stitching, it is recommended to attach the seams with a contrasting color thread and pins. To avoid bevels and displacements, the tip should enter the fabric at a right angle. To make it comfortable to work with thick material, the basting should be quite dense, so the stitches are made small.
Using a sewing machine is allowed, but may be inconvenient for small models and elements. Sometimes craftswomen combine methods, sewing straight parts with a machine, and curved and small parts by hand. The stitch length should not exceed 1.5 mm. The main seam should go strictly along the drawn contour line. To sew parts manually, use a back stitch with a needle; the finished stitch resembles a machine one. Afterwards the basting is removed.
The direction in which the parts of the toy's head are sewn affects the accuracy of the fit. To prevent the cub's face from becoming deformed, the seams should be drawn from the tip of the nose to the back of the head. Since the muzzle is the most noticeable part, the wedge is done only by hand. The elements on the back of the lugs are usually more sloping and slightly larger. To help them straighten out better when turning them right side out, you can bring the seam to the base.
How to do it
Step 1
Print and cut out this teddy bear design. Place the template on the cardboard and draw it, then cut it out to make the template. Hamster teddy bear
Step 2
Place the fur back at the top and place templates on it to make sure you have fur going from top to bottom. Draw the templates with a marker or chalk, then turn the templates over and draw them again.
Step 3
Cut out all four pieces (two backs and two fronts). This model was made to provide 1cm seams. With the right sides together, pin the 2 front pieces together. Sew the two front pieces together; start at the top of the bears head and end at the beginning of the legs (see the pins in the picture) Repeat with the back sections but leave a hole in the middle of the back as shown in the picture (see the middle pins in the picture).
Secure the seams (this helps stop any wrinkles when you turn the right side of the bear)
If you are using a plastic shank and eyes, insert them now
Attach or secure the front and back (wrong side) and then connect everything around.
Step 7
Turn the bear on the right side, you may find it easier to use the handle of a wooden spoon in your hands and feet to push them out.
Step 8
Align along the ear marks as shown. Fill the head of the head with Fiberfill, using enough filling to give the character a snout. This is where a wooden spoon handle comes in handy again.
Step 9
Tie the head area with a strong thread, wrapping the thread around the bear's neck and tying it, this will be vitally invisible later and can be covered with tape. Place both arms and legs (use a wooden spoon if necessary), then draw along the marks as shown. Finally, strain the body cavity and close the hole in the back.
If you didn't use shaded ones, place them on the buttons for the eyes. pull out any fur that gets caught in the seams
Step 11
If you didn't use a plastic nose, you will need to plan out the shape of the nose. You can easily create a natural looking nose by stitching a triangle onto the muzzle and then filling it in with vertical seams. you may find it easier to cut a triangle from a piece of black felt and then glue it onto the bear before stitching it, this will stop any fur poking through your seam and will give the nose a neat finish. Using a (Y) shape for the nose makes it easy to lead to the lips.
LiveInternetLiveInternet
—Categories
- ANIME, GOTHIC, FANTASY, PICTURES, POSTCARDS (23)
- Sewing (1)
- BATIK (60)
- MAKEUP, COSMETICS, BEAUTY SECRETS, HOME RECIPES (122)
- EMBROIDERY (1291)
- BLACKWORK EMBROIDERY (4)
- STITCH EMBROIDERY (11)
- RIBBON EMBROIDERY (8)
- EMBROIDERY EMBROIDERY (16)
- EMBROIDERY ON PLASTIC CANVAS (20)
- RICHELIEU EMBROIDERY (1)
- KNITTING FOR CHILDREN (274)
- KNITTING FOR THE HOME (93)
- KNITTING FOR WOMEN (1659)
- KNITTING FOR MEN (63)
- KNITTED FLOWERS (51)
- PAINTING, GRAPHICS, CONTEMPORARY ART (219)
- ANIMALS (138)
- MAGAZINES, BOOKS (143)
- HEALTH (19)
- NEEDLE CASE (42)
- TOYS (290)
- TILDE TOYS (32)
- QUILING (43)
- DOLLS (169)
- TRAPIENSA DOLLS (22)
- CULINARY RECIPES (1107)
- ICONS, AMAZING PEOPLE (16)
- LANDSCAPE DESIGN, EVERYTHING FOR THE GARDEN (40)
- DIY FURNITURE (1)
- MYTHOLOGICAL CREATURES (27)
- TEDDY BEARS (40)
- FASHION,BAGS,WOMEN (78)
- FASHION TIPS, GIFTS, HOLIDAYS (59)
- ORIGAMI,KUSUDAMA (54)
- PERGAMANO (5)
- CUSHIONS (67)
- HEALTHY PRODUCTS (76)
- HELP FIND A PERSON (1)
- ORDER IN THE HOUSE (10)
- NATURE (233)
- PARABLES,POEMS,STORIES (99)
- DIFFERENT CUTS (291)
- DRAWING (12)
- PAINTING (37)
- HANDCRAFTS (330)
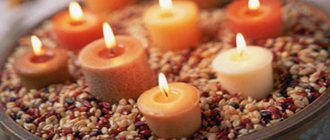
- CANDLES (15)
- SCRAPBOOKING, CARDBOARDING, PACKAGING AND DESIGN (149)
- INTERIOR STYLES, DESIGN, PLANTS IN THE INTERIOR (127)
- BAGS, COSMETIC CASES MK (139)
- MYSTERIOUS (123)
- PATTERNS IN THE COLLECTION (40)
- PHOTO (274)
- HARDANGER (101)
- COLD PORCELAIN,POLYMER CLAY,SALT DOUGH (105)
- FERRETS (6)
- FLOWER KANZASHI (43)
- FLOWERS (91)
- FLOWERS MADE OF PAPER AND PLASTIC BOTTLES (43)
- FABRIC FLOWERS (135)
- HUMOR, POSITIVE (63)
—Quote book
Sweater for toys. 1. 2. 3. 4. 5. 6. 7. 8.
Jumpsuit for a doll. 1.
50 models of dresses without patterns for every taste. A selection of master classes. Part 1 MODEL No. 1 How.
Knitted jacket. TATYSIY
Book: BEARS. We sew exclusive models with our own hands. Manufacturing technology, original patterns.
How to sew outfits for wedding bears with your own hands
Using teddy bears as decorations is not only original, but also practical. These cute toys will become your future children's favorites in the future. You can create your own unique wedding decorations yourself, spending a minimum of money and getting an excellent result. When choosing costumes for bears, think through several design options and draw sketches on paper. After making a decision, choose colors that should fit the overall theme of the wedding.
Necessary materials
What you will need in the process of creating dresses for wedding bears does not have to be purchased. Look, perhaps you have some scraps of fabric, remnants of tulle, ribbons from a bachelorette party, beads, beads, bright accessories. Broken jewelry will also come in handy (earrings or a necklace will be an excellent decoration for the bride’s teddy bear dress). Show maximum ingenuity and use your imagination. In addition, for work you will need:
- teddy bears or other toy animals (look in children's toy stores);
- artificial flowers, such as orchids;
- tulle;
- glue gun;
- fabric scraps;
- threads;
- sewing machine (optional);
- scissors;
- little things for decoration.
Patterns and stages of creation
We cut off all the extra details on the bears that we won’t need. Using patterns, we make a tuxedo and a skirt for plush newlyweds. Using the attached patterns, cut out the clothing details. The sleeves for the toy groom will be rectangles sewn lengthwise. Satin ribbon will become the material for creating a butterfly. We fasten all the parts with pins and sew the seams.
To create the groom's top hat, we cut out the cardboard parts according to the patterns and duplicate the same in a fabric version. Using a hot gun, we connect the cut out parts, and glue a satin ribbon to the crown of the hat above the brim. We dress the groom-bear: we attach the jacket to the toy with pins. We sew it on by hand in several places, as well as buttons, a bow tie and a top hat. Glue the rose onto the costume.
We start making the bride's outfit with the skirt. We cut it out according to the pattern, stitch it and tighten it, then try it on for the bride-bear. From the middle of the waist we sew 2 straps at an angle of 45 degrees, like a sundress. We sew and gather the lace ribbon, then attach it to the edge of the skirt. We put a dress on the toy, tie the straps and secure the product with a hand stitch.
To make wedding accessories for the teddy bear-bride, we cut out a rectangle from tulle and, having assembled it, hand sew it to the toy’s head. Fold a strip of fabric to make a rose. We repeat this process several times, forming a bouquet to which we will subsequently sew a veil. We use an old boutonniere as a bridal bouquet. If there is none, we make a few more roses and sew them together. We fix the resulting “bouquet” to the foot.
The bears will be attached to a heart, for the manufacture of which we cut the branches of artificial flowers into pieces, do not throw away the long stems, they will be useful for the frame. Cover the work surface with something so as not to smear it. A piece of old tulle will serve as material for the heart, and tulle for the frill. We sew the last one along the perimeter in two lines, retreating 1 cm from each other for the drawstring. We insert the stems, which contain wire inside, into it. We try on the cut pieces of inflorescences to the shape of the heart and fix them with a glue gun. We attach the bears and sew them on by hand.
Traditions of movement
A wedding cortege is a string of cars decorated with wedding accessories, which follows the following route: the groom's house, the bride's house, the registry office, a photo shoot and a restaurant. Previously, this role was played by a wedding train, consisting of carts and harnessed horses, which began its journey from the home of the hero of the occasion, after which it went to the bride and to the church.
As a rule, all cars in the motorcade are decorated with balloons, ribbons, wedding figurines and other details, but the first car, according to legend, must be decorated in a special way. It is advisable to fix a figurine of two wedding rings on the roof, and place glasses inside them (so that the house is a full cup) or ringing bells (to scare away evil forces).
What you shouldn't decorate cars in a motorcade with is rubber decorations. It is believed that inanimate figures can bring misfortune to the newlyweds’ firstborn. In addition, you should not use a pair of swans in any of their manifestations to decorate the cortege - according to legend, if even a small piece of the figurine separates in the wind, then the life of the newlyweds will be windy.
There are the following signs about the wedding procession, which apply from the bride’s house to the registry office.
- The groom, who is leading his beloved to the car, should not look back, otherwise in his married life he will regret his decision to get married.
- After the bride has left her father's house to go to the car, she needs to at least quickly wipe the floors. It is believed that this symbolic gesture will help the girl join the groom's family.
- The groom gets into the first car of the line, as the future head of the family, and the bride gets into the second. This symbolizes that from now on the girl will be with her husband, that is, married.
- After everyone is seated in their cars, the bride’s parents come to the fore. The father should carry the icon, blessing the motorcade, and the mother should sprinkle grain on the cars. It is believed that such a gesture unites the participants in the procession, and their destinies are intertwined, ensuring friendly relations.
- The tuple must be a single whole, the cars follow each other in the same order. If a stranger wedges into the line of wedding cars, this promises the appearance of a “third wheel” in the newlyweds’ family.
- Wherever the cortege arrives - to the bride's house, to the registry office or restaurant, it must move clockwise around the building until each car has a parking space.
- If on the way to the registry office the cortege encounters a funeral procession, you need to take a different road so as not to attract misfortune to the newlyweds.
- Usually the cortege leaves after delivering the guests to the restaurant, but according to legend, it should finish the route where it started, that is, at the groom’s house.
There are also several signs that begin to take effect when legally newlyweds leave the registry office. It is believed that after this the spouse must carry his beloved to the car in his arms.
The bride is the most vulnerable person at the wedding to evil entities , since they do not like her happiness, and she is temporarily left without the patrons of her father’s house, since she left it.
Expert advice! According to legend, if the groom carries a girl in his arms, he hides her from the eyes of evil spirits. The same principle underlies the tradition according to which a husband must carry his wife across the threshold of a common house in his arms.
On the way from the registry office to the restaurant, the road should be winding. This is again necessary to confuse evil spirits and take them away from the trail of the newlyweds. For this purpose, in some European countries, empty tin cans are tied to the rear bumper of the newlyweds’ car, which scare away unfriendly entities with their ringing on the asphalt. To consolidate the result, the newlyweds’ car must honk its horn loudly and protractedly when they arrive at the place where the wedding is celebrated.
There is one more sign that stands apart, since it does not apply to either the bride, or the groom, or generally to any of the participants in the ceremony. According to popular belief, if an unmarried girl accidentally sees a wedding procession moving along the street, then she needs to stand on her left leg and barely noticeably jump on it. It is believed that in this case the girl will soon have her own wedding, leading to a happy family life.