On the wedding day, sincere congratulations and kind words never cease to be addressed to the newlyweds. But no matter how hard the bride and groom try to remember everything that their relatives and friends wished for them, over time it will be forgotten. The team of the wedding portal Svadebka.ws knows a great way to preserve all your holiday greetings for many years to come. A wedding wish tree will help the newlyweds with this.
Wishing tree as a gift
The tradition of decorating a “wishing tree” came to us from the Netherlands. In the country of blooming tulips, the “tree of wishes” is an indispensable attribute of the wedding ceremony. Trees, their branches and foliage symbolize the strength and durability of relationships and the infinity of happiness at wedding celebrations.
Over time, the “wishing tree” has become a wonderful and original alternative to a wedding wish book. Event organizers liked the idea of the accessory so much that the modern “wishing tree” accumulates and preserves the kind words of loved ones not only at weddings, but also at celebrations on the occasion of anniversaries, birthdays, etc.
Story
Belief in wish trees originated in ancient times, when people believed that every tree, blade of grass or flower was endowed with a soul. The oldest or most bizarre trees that stood out from the rest were endowed with magical properties. The ancestors believed that the spirit of such a plant was able to fulfill a wish.
What if you always have such a spirit nearby? How to do it? Plant a tree at home. Or better yet, make a totem figurine. This is how small symbols of the wishing tree appeared, made by a person with his own hands. A personal guide to a dream, charged to its owner, eventually replaced living trees. It is convenient, because you don’t need to go anywhere, and it is also a stylish piece of decor.
Are you impressed? Then we bring to your attention the most creative ideas for making a homemade wish fulfiller.
Tree of wishes made from branches
Necessary materials:
- dry branches 50-100 cm long. Hazel (hazel) branches look very good
- plastic flower pot of suitable size
- spray paint for painting branches and pots
- alabaster (building gypsum)
- construction ties
- pieces of padding polyester
- artificial flowers for decoration
- decorative elements: pebbles, beads, moss, hay (sesal)
How to make a wishing tree from branches:
- Selected branches need to be painted using spray paint. The color can be any. Classic wedding ambience - white accessories
When coloring branches, do not forget to paint the pot in the same color
- Form a tree trunk from several fairly thick branches. Construction ties will help secure the branches together. The tails of the ties are cut off during operation
The diameter of the formed trunk must correspond to the diameter of the selected pot, and the height must exceed the height of the pot by at least 2-3 times
- In a pot, dilute a mixture of alabaster (construction plaster) and water in a 1:1 ratio. Stir well. After 4 minutes, as soon as the mixture begins to set, lower the tree trunk into the mixture. Leave until the alabaster has completely set
- Form the crown of the tree from the remaining branches. The branches are attached to the trunk using construction ties
- When the crown is formed, you can start decorating. Artificial flowers that need to be glued to the branches of the crown are perfect as decoration. Beads are used to decorate thin branches
- The plaster is covered with pieces of padding polyester. You can sprinkle beads or decorative stones on top. The composition will also be decorated with decorative moss or decorative hay (sesal)
- All that remains is to set the composition in place, prepare the cards and wait for the guests
You can make vintage leaves as wish cards
And for a children's tree of wishes made from branches, these funny cards are suitable
Looking for easy ways
The current basis for completing a wedding wish book is a folder with a binder. In this case, you won’t need to glue the sheets, worrying that the edges will be even. You can buy such a folder at any office supply store. To decorate it, use any decorations that are in the box. These can be bright rhinestones, beautiful decorated flowers, thin ribbons, small pearls.
To create an interesting book in which guests can leave their wishes, you can familiarize yourself with a detailed master class.
When choosing a folder, it is important that it can freely accommodate sheets of A5 paper. Holes are made in the sheet, place it in the required place
Lines are measured on the folder with a pencil, and any excess is cut off with a knife. Using the same knife, the glossy layer is removed from the folder. The clamping area is marked with a pencil, i.e. album binder. Carefully clean the surface without touching the side and outer surfaces. For the cover of your future idea, you can use decorated paper or interesting material. A copy of the same size + 2 cm is cut out to tuck it inside. The cover must be pasted over as evenly as possible, without unnecessary bumps or gaps (except if the accordion is not part of the idea). The material or sheet is glued with glue, the edges are wrapped. You will need 4 satin ribbons. 2 x 9 cm, 2 slightly longer. Short strips are glued to the edges of the book, long strips to the edges of the folder, they will serve as ties. White sheets are cut out along the inner surface of the cover and glued to the binding. This way, unsightly paper folds will be hidden. Decorative elements are used to decorate the book. Next, you need to start preparing sheets on which wishes will be written. These can be small drawings in the corners, a painted sheet using paints in a different color palette. A good option for decorating pages would be beautiful sayings about love. Inside, along the edge, glued lace or gathered strips of satin ribbon would look good.
The photo shows an interesting design of a writing pen intended for pleasant wishes to newlyweds.
Video on the topic of the article
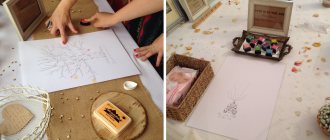
Wishing tree with fingerprints
The undoubted advantage of such a wish tree: after the ceremony, it can be decorated as a picture that will remind you of a happy day. Decorating a tree can be a wonderful experience for guests of all ages. Each invitee should leave their own colorful imprint by participating in the creation of the bright crown of your tree. On the imprint sheet (or next to it) you should write the name of the guest and a wish for the newlyweds.
To create a tree you will need:
- printed tree template
- frame of the appropriate size
- sets of special stamp inks in pads for creating prints (sold in stationery and art supplies departments)
An A3 sheet can hold up to 60 adult fingerprints. If there are more guests, you should increase the size of the template
Necessary additions to your souvenir
Take care in advance about the right place for it - in some random corner, guests may simply not notice it, and you will have to work as a guide to the tree throughout the celebration;
Letters for a wedding - welcome, congratulatory or special words for a photo shoot + 69 photosChest for a wedding - 87 photo ideas for a stylish and harmonious element of marriage
- Wedding inscriptions - symbolism and basic ideas for implementation + photos
Be careful about the writing utensils your guests will use.
Pencil writing is short-lived, the pen can smudge, and if your tree is made in subtle colors, bold orange markers are unlikely to be suitable here.
Wishing tree with colored leaves
A wonderful panel that will fill the newlyweds’ home with warmth and wisdom, because loved ones will not wish anything bad to the young family. Making such an accessory is very simple. You will need:
- frame
- thick colored cardboard to fit the frame for the background
- colored paper
- thick double-sided colored paper
How to do:
- Cut out a tree trunk with branches from colored paper. Glue it in the center of the background cardboard
- Cut out leaves (hearts, butterflies) from thick double-sided colored paper.
- Fold each leaf in half along the longitudinal axis
- Glue the leaves to form a round tree crown. Glue is applied to one half of the leaf!
- Frame
- Guests write wishes on each piece of paper
Another interesting option for decorating a wish tree in the form of a panel
Children's wish tree
A three-dimensional wish tree for a children's party can be made from paper. Decorating such a tree with leaves will undoubtedly appeal not only to kids, but also to older children.
Necessary materials:
- printed color templates or black and white templates in duplicate
- colored double-sided paper (if the templates are black and white)
- a thick sheet of cardboard or plywood for the base of the composition
- PVA glue
- Double-sided tape
- scissors and stationery knife
Templates for wood are designed for A3 format:
Progress:
- Cut out all the details of the future “wishing tree”
- Collect wood
- Flowers are formed by twisting and glued together
- Place small strips of double-sided tape on the leaves. Guests take a leaf, write a wish, remove the protective strip from the tape and attach the leaf to the crown of the tree
- Assemble the entire composition, securing it on a thick sheet of cardboard or plywood
Master class on making a guest book with soft cover
To create an album with a soft cover you need:
- One-color paper folder.
- Sintepon.
- Textile
- White cardboard or designer paper (2 pcs.).
- Sheets for filling out the album.
- We select the same stationery as for decorating a guest book using the scrapbooking technique.
- Decorative elements: small satin ribbons, decorative ribbons, decorations.
The first step in making a guest book is preparing the folder. You need to decide on the size of the product. Using a utility knife, trim the folder to the desired size.
In order for the materials to be better fixed, the top paper covering must be removed from the inside of the folder, except for the area near the metal clips.
We glue padding polyester to the outer sides of the folder and secure it with two strips of double-sided tape, as shown in the photo below.
Cut the fabric to the desired size, leaving 2-3 centimeters for the hem.
To make it easier to glue the edges of the textile, you can cut out corners on each side.
We fix the material with glue. How to properly fix the edges and corners of the fabric is shown in the photo.
On the inside of the guest book (in the places where the paper covering was removed) you need to stick narrow small satin ribbons to hide the joining seams at the top and bottom of the folder.
The cover is ready, you can start decorating the front of the album. Glue the ends of the decorating ribbons to the opposite side of the book. We fix the remaining design elements (hearts, bows, figures or flowers) on the surface.
We decorate the back of the album with white cardboard or designer paper.
We fill the finished folder with sheets. The guest book is ready!
You can also watch a master class on making a wedding wish book on video.
You can see how a wish tree is created in the following video.
Ready-made wish tree forms for a child
In addition, children will be happy to put their fingerprints on a funny picture for the birthday boy. Only they will form not the crown of a tree, but balloons and dandelion fluffs. After all, the main task of children is to grow, rising higher and higher.
Anniversary wish tree
Each of the above options can be a wonderful gift for an anniversary or wedding anniversary, including for older people.
What it is?
Usually, a tree of wishes for the newlyweds is an imitation of a real plant (made from wire or real branches), on which guests can place postcards or cards with congratulations for the newlyweds. This is an original way to replace the classic book of wishes.
A wedding wish tree with fingerprints is a drawing of a tree on canvas or thick paper, on which instead of leaves there will be colorful fingerprints of your friends and loved ones.
The advantage is that the painting is much more compact and easier to transport and store. The fingerprints can be signed (so that the bride and groom know who exactly left the mark), and your wishes or congratulations on your wedding day can be left next to them.
Golden wish tree
This amazing tree is the easiest way to make a loved one happy. 365 notes wrapped in gold foil should be attached to the branches of the tree. Golden leaves will form the crown of the tree.
Unfolding another leaf every morning, a person close to you will find a small recipe for happiness. Your love, care and support will be felt in each such note.
Here are some recipes for happiness for the “golden tree of wishes”:
- Keep faith in yourself even when no one believes in you
- Remember: Winners do what losers don't want to do.
- What you cannot achieve today, you will achieve tomorrow
- You say, this life is one moment. Appreciate it, draw inspiration from it. As you spend it, so it will pass. Don’t forget: she is your creation. (Omar Khayyam)
- How I want to say good words... Let the snow fall, and with it renewal. What a beautiful and kind life! Appreciate all these sweet moments! After all, our life is made up of moments like these. And if we believe in such a miracle... The soul sings, and the heart rushes upward... And the evil blizzard is not afraid of us! Envy and lies do not exist. But only peace, warmth and inspiration. We are on earth for happiness and love! So let this moment of glow last! (Omar Khayyam)
- If you don’t pay attention to difficulties, they will get offended and leave
Photo of a wishing tree
A wish tree made of plywood can be a wonderful gift for a Wooden wedding (5 years)
Wishing tree in rustic style
Great idea for a transparent tablet
Whatever wish tree you choose, the main thing is that it contains only happy memories.