Today, one of the wonderful wedding traditions has become a book of wishes , where guests leave their congratulations, and some even give advice to the future newlyweds based on the experience of their family life. And many years later, in moments of nostalgia, you will be able to open this wonderful wedding accessory and read the words of loved ones, filled with love, tenderness and care. And if you add photographs of guests, friends, and beloved parents to your wish book, then the wonderful events of your happy wedding day can easily be recalled in your memory.
Decor
If the book of wishes is made in a standard format, then after creating the cover, the process of its design begins.
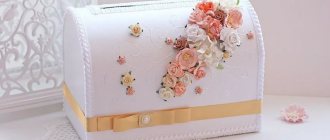
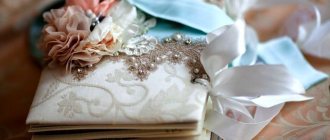
To do this, you can use the scrapbooking technique, but without many layers of decorations. It is best to use lace, openwork napkins, burlap, buttons, beads, dried or artificial flowers and herbs. A strip of lace is glued or sewn onto the fabric cover, and a frame with the inscription “Book of Wishes” and the names and surnames of the newlyweds is placed in the middle. The surrounding space is decorated in random order with the remaining elements according to the intended sketch. You can create a mini-copy of the bride's bouquet as a basis for the design and add small details to complement the style.
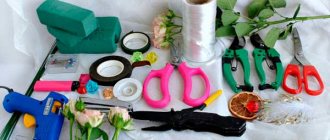
Materials for work
Not all materials for a wish book can be found at home. To make a classic album you will need: • thick cardboard, such as beer or bookbinding; • a sheet of paper for scrapbooking; • white cardboard; • crinkled, corrugated paper, fabric or wallpaper; • hole puncher; • eyelets (optional); • metal rings for fixing pages; • figured corner punch; • glue moment Joiner; • glue gun; • stationery; • artificial flowers; • lace; • any decor.
How to make a book using scrapbooking technique?
This technique is very easy to work with, we will provide a step-by-step master class, depending on your preferences, you can change some nuances to suit your partner.
To make it you will need:
- Whatman paper 2 pcs;
- cardboard;
- A4 sheets;
- colored and crinkled paper for interior pages;
- lace, ribbons, beads and other decorative elements;
- figured hole punch;
- scissors, ruler;
- glue;
- scotch.
After the pair is determined with a color scheme and style, you can begin the actual production.
- It is necessary to cut a sheet of cardboard of the selected format.
- The selected format is cut out of the crumpled paper, but a few centimeters more on all sides so that the page can be wrapped in cardboard.
- You need to wrap the cardboard with crumpled paper and secure it with glue.
- Using a hole punch, we make holes, thanks to which the diary will be easy and convenient to leaf through; rings are inserted into them.
- It is advisable to decorate the cover with different elements; you should not follow any requirements; you should stick on those elements that will highlight your individuality.
- To make it denser, you can attach thick decorative paper to the back side using double-sided tape.
- To create a masterpiece, use not only light colors, add zest with some dark elements.
- Everyone chooses their own name.
- The inner pages are made slightly smaller than the cover, they need to be done in the same style, there should be as many pages as there are invited people, additional sheets are also added, in case someone writes a very long congratulation.
- Then on the first page you can sign the names of the newlyweds.
- If all the pages are ready, they can be assembled - on the cover, in the place where the holes are made, you need to install eyelets, thanks to which the pages will turn easily and not tear.
Expressions that are not recommended by etiquette or can be understood in two ways
- For the long haul, the expression is “clichéd” and more hints at a funerary version of the inscription.
- Despite the fact that you are already over..., you are still dear to me - an indecent hint of age.
- For my plump little girl, it’s a hint of excess weight.
- To a beloved silent person - an indication of a character trait.
- From the entire team, and from me personally - an unpleasant attempt by the donor to put himself above the team.
- For a wonderful doctor - not very appropriate for a birthday or other holiday not related to the profession.
- To my dear wife, mother and grandmother from my husband, children and grandchildren - the epitaph for the monument is ready, but not the inscription for the book.
- Internet clichés. They are felt immediately. At least dilute them with your own words.
And a few words about the possibility and necessity of making dedicatory inscriptions on religious literature. The question is ambiguous. Probably, if it is transferred from an organization, foundation or philanthropist to the church, such a neat inscription on the flyleaf is acceptable. But if you are giving a “basic” religious book such as the Bible, Koran or Torah as a personal gift to a clergyman, it is better not to do so. After all, he addresses God (in the broad sense) through the book, and it’s not a matter of seeing your inscription first and then the religious text. If you really want to, write a small inscription on the flyleaf at the end of the book.
Religious literature for children is a completely different matter. Seeing your wishes on the book, the child resurrects in his mind the words that were spoken to him when he was given the gift. And he tries to live up to good expectations.
Whatever you write to a person of any age and position in society, different interests and hobbies - remember that you are writing wishes for him, and not for yourself. Then the text will literally line up on its own, and the recipient will feel with all his heart that the words were written sincerely and from the heart!
To other articles
Types of wedding wish books with master class
Large folder with plain sheets
The essence of the book of wishes is clear without additional explanations. However, there are several ways to complete such a book. This could be a large folder with plain sheets. In such a book you will only have to tinker with the design of the cover - everything else will not require much effort.
A small master class on how to design such a cover.
To work you will need:
- Ring binder
- Glue Moment “Crystal”
- Stationery knife, pencil, ruler, scissors, stationery clips
- Satin ribbons, candle
- Scrapbooking paper or wallpaper
- Decorative elements - flowers, semi-beads, chipboards, corners for a folder, etc.
- Wish sheets, hole punch
The first stage is preparing the inside of the folder. To do this, you need to peel off the top smooth layer of cardboard, to which it is almost impossible to stick anything. You can leave an untouched field around the block with rings. After the inside of the folder is prepared, measure out a piece of scrap paper or wallpaper that corresponds to the unfolded size of the folder. Add 2 cm on each side for gluing allowances. Lubricate the outer sides of the folder with glue and glue the paper (wallpaper). Smooth it out tightly; this can be done with a small clean cloth. After the main area is glued, fold and seal the edges. If you have metal corners at your disposal, they can perfectly hide flaws.
Second phase. Divide the satin ribbons into pieces. The two parts are glued on top, masking the junction of the outer paper with the inner side. The other two tapes will be the ties of the folder, they need to be glued in the middle of the two parts of the folder.
Third stage. From plain or decorated paper (or the same wallpaper), cut out two pieces for the interior decoration of the folder and glue them.
By and large, all that remains is to design the cover. You can do this yourself, guided by your imagination, or you can do it using special sketches:
All that remains is to punch the sheets and put them in a folder! Ready!
Book of wishes on rings
The second option is similar to the first - a book of wishes on rings. Two thick covers, between which there is a block of sheets, the whole structure is held on by rings and ribbons. The front part of the book is decorated, the sheets are optional.
For a master class of such a book of wishes you will need:
- Cardboard, glue Moment “Crystal”
- Ruler, scissors, pencil
- Paper for scrapbooking, fabric for cover
- Rings for albums of suitable diameter
- Metal corners for decoration, paper for scrapbooking, ribbons, flowers, chipboards, cuttings, lace.
- Eyelets and tools for their installation
- Wish sheets, hole punch
The first stage of work. First you need to decide on the size of the book. A full A4 sheet is too big for such a thing, but half of it is quite suitable. Cut out two rectangles measuring 21.5 cm by 14 cm from thick cardboard. The sheets for the wish book should be the same size. Cut two pieces of fabric, taking into account a fold allowance of at least 2 cm.
Second phase. Cover the pieces of cardboard with fabric, as shown in the photo.
Cover the inside of the cover with scrap paper. Place metal corners on the edges and secure. Mark two points at a distance of 3 cm from the top and bottom edges with an indentation of 1.5 cm from the left edge. Insert the eyelets and secure them. The arrangement of holes and, accordingly, sheets in a book can be either horizontal or vertical.
Third stage. Decor. Here, again, you can use sketches, or be inspired by someone’s work. Afterwards, punch holes in the sheets and assemble the entire book onto rings. Ready!
Video master class for addition
Book of wishes on real binding
The third option is the most complex - a book of wishes on a real binding. There are several variants of the binding itself, the most common and complex of which is Coptic. A simpler option is stitched sheets. By and large, such a book is a large scrapbook.
Video master class on such bindings:
Colleagues
We write positively, with dignity and respect for the individual, without servility. In publications on self-development and career growth, it is pleasant to wish financial stability and career growth. If you choose a work of fiction, you can compare your colleague with a worthy main character, but the plot must end positively. You can slightly dilute the wish with humor. So on the book “Dreaming is not harmful” you can write: “Who said that dreaming is harmful?”
It is very important to know the hobbies and passions of those who work nearby. After all, if you are interested in cooking, you can write: “...I give you the most wonderful collection of dishes of oriental cuisine, with the hope of tasting them at a common table.” For a connoisseur of good wine, sign: “In vino veritas” - the truth is in wine. Or for a lover of a healthy lifestyle: “Fate helps the brave - Virgil.”
The most important thing is not to make a mistake in choosing a topic and maintain an even tone of the message.
Wire tree?
This option is as simple as paper. To create it you need a minimum of materials that can be found in every home. In addition, the process of creating a product will not take much time.
Necessary materials
To make such a tree, you will need a small glass or vase, where the tree structure will subsequently be placed. The composition is created using a bundle of thin golden fishing line and pieces of wire. Also purchase corrugated cardboard, double-sided tape, artificial glass flowers or birds for decoration. Additional materials are scissors, rice, stapler, colored paper - all of them will help you bring your idea to life.
Stages of creation
Step-by-step instructions will help you make a craft using wire for a wedding yourself:
- Fill a vase or glass with rice. Wrap the container in a rectangular piece of corrugated cardboard and secure it with tape or a stapler.
- Next, create sheets of paper where those present at the wedding will write their wishes. Cut out cardboard and paper hearts, the number of which should be equal to the number of guests at the wedding.
- Attach cardboard and paper hearts to each other using glue. In the upper part of the heart, make a small hole through which you need to thread a piece of wire. Thanks to it, the heart will be attached to the tree structure.
- Place decorative ornaments such as birds or flowers on long pieces of wire. They should be attached to the wire using tape or glue.
- Insert a bunch of golden fishing line into the vase, which will serve as the basis and decoration of the composition. Next, insert a wire with decorations at the end. Hearts for wishes must be hung on fishing line or wire.
As you can see, a DIY wire wish tree for a wedding is easy to make; you just need to acquire the necessary materials and be patient.
How to make a postcard using scrapbooking technique: step-by-step photo master class
For such a postcard you need to prepare:
- scrap paper;
- wavy scissors;
- stationery knife;
- decorations;
- glue;
- threads with a needle.
- This is the plan we sketched out for the postcard.
- The base will consist of 2 sheets measuring 10×20 and 11×20.
- Glue two sheets together so that the smaller one overlaps the larger one by 1 cm.
- Cross-stitch the sheets by hand or on a machine, using threads that match the paper.
- Cut out the photo backing and three different rectangles. Arrange according to the composition.
- Place all the cut out elements on glue or double-sided tape.
- Glue the decorative elements, only so that they do not pile up on top of each other.
- Decorate the bottom part by securing the card with brads.
- Cut out four small squares from cardboard and the same from scrap paper, glue them together and place them according to the composition. Afterwards, decorate as in the photo, or as you like.
- Cut out an oval with the title and a slightly larger oval to add dimension. Stack them on top of each other, then glue them in the top left corner. Add a curl to the bottom left corner of the backing.
- Design the backing by gluing a suitable photo and sign the card. Your card is ready.
Book of wishes
For those who have not been able to figure out how to print, the option with blank pages is suitable. In this case, you will have to make a book of wishes with your own hands. This means that all the creativity can be directed to the cover of the page.
You can use a graphic editor or draw it manually. If you don’t feel like drawing, this doesn’t mean that the main cover will be empty.
You can use the following ideas:
Wrap the cover in crumpled colored paper. Make it completely white and ask the child to write the word “Dream” in childish handwriting - minimalism is at the peak of popularity today; such a book can bring more inspiration to the owner than the bright image of Madonna. Textiles are used - if the book is pleasant to the touch, the owner will pay attention to it more often.
The book of wishes, first of all, should be unusual, have a high-quality hard cover and pleasant material. The master also needs to take care of the choice of paper; by the way, you can find out about this below.
What to write to your boss?
A boss is a leader on whom your future future, the very possibility of working in the desired position and salary, depends. At the same time, this is a person with his own character, preferences, hobbies or dislikes. All this is very important to consider when choosing a gift and, especially, the inscription on it.
It’s understandable to want to distinguish yourself and make sure your manager remembers you. But it is important to consider that if he likes the book, the boss should also be impressed by the inscription. To do this, there must be a clear sense of goodwill while maintaining social distance.
Whatever your relationship with your boss, you should not address him in writing only by name and with a touch of familiarity. It doesn't matter what age your boss is. You must observe subordination. Moreover, the boss may allow some closeness in oral communication, but will definitely evaluate it negatively in written form.
Provided the boss is completely “democratic,” you can address him by name, but “poking” will be completely unacceptable even in this case. With the exception of some naively narcissistic people, worthy leaders do not respect outright flattery. Accordingly, so does the person who wrote it. And if a wonderful book is spoiled by such a “message”, the boss will remember for a long time the one who gave him such a “surprise”.
It is better to give a book on your boss’s hobbies. But if you don’t know them exactly, choose something neutral, such as business literature, classics or libraries. It would be appropriate to sign the book in a language that the boss knows. Or use a phrase in eternal Latin, which will also make an impression.
The main thing is moderation in everything, respect, lack of ambiguity and noting the real positive qualities of the boss. This is where engravings and luxurious inscriptions made in workshops will look great.
Inscription options:
— To our helmsman and business authority.
- A strict but fair leader.
— Positive attitude and high flying.
— Dear...with sincere gratitude for your optimism, determination and high ethical principles.
- Our hope, guiding and guiding force.
- Bonum factum! - For good and happiness.
- Vestra salus - nostra salus - Your good is our good!
How to make a wedding wish book with your own hands?
Of course, you can buy a wedding book in a store without any problems. However, it is no less pleasant to do it yourself in a calm home environment, along with tips from a loved one or close friend.
Photo of a handmade wedding wish book
Below you will find a short master class on how to make a wedding wish book with your own hands in the easiest way. And also some tips that will help you imagine the scope of the upcoming work and tell you how to complete the task easily and simply. You will need the following:
- sheet paper;
- stationery folder;
- glue;
- decorative elements of the book (beautiful wallpaper, satin ribbons, rhinestones, stones, etc.);
- stationery knife;
- scissors;
- hole puncher.
Wedding wish book cover design
Step-by-step instruction:
- Take a stack of A5 sheets (half a landscape sheet), make two holes in it and insert it into a stationery folder. Trim the edges of the folder to fit the sheets. Next, it is recommended to remove a thin layer of paper from the inside of the folder in order to decorate your book. This can be easily done with a sharp clerical knife.
- If the layout of the wedding book is ready, then you can start decorating. According to the size of the folder, cut a piece of wallpaper so that there is 2 centimeters left for the hem along the entire edge. Next, wrap the folder with wallpaper, fold the edges on all sides and glue it. Unsightly gluing areas can be decorated with satin ribbon or braid.
- For the interior decoration of the book, sheets of cardboard, thick fabric or gift paper will do. Cut the trim material to fit the book sheets and then glue it to the inside of the folder.
- All that remains is to add a little “gloss”, for example, decorations made of ribbons, flowers or stones.
Instead of a regular stationery folder, you can use other materials. For example, buy an arched fastening mechanism (a mechanism for fastening paper) and attach wooden murals to it, on which you order to engrave the names of the bride and groom and, of course, the wedding date. And between the pieces of wood, insert several sheets of paper on which you can print markings for writing down wishes.
If the bride loves handicrafts, then you can attend several scrapbooking master classes (making and decorating photo albums with your own hands). This activity will not only bring a lot of positivity, but will also distract you from the pre-wedding bustle for several days.
DIY wedding wish book
What to write in general?
It all depends on the degree of warmth of the relationship with the person. Be sure to apply. It is acceptable by first name or patronymic name only. The best relationships can be ruined if you address a person by a nickname - “bunny”, “Watson”, etc. You should not be familiar with your boss, calling him only by name, “poking” him or using epithets appropriate for a loved one.
If you are addressing a work colleague who is much older than the donor, it is better to address him by his patronymic name, although someone who is older can address a younger person simply by his first name.
Affectionate addresses to children are acceptable: “darling”, “angel”, “sun”. But definitely with a name. The child must subconsciously feel respect for himself. It would be appropriate to indicate a diminutive name, for example: Lenochka, Serezhenka. But it is important to consider the age of the child. Such treatment will definitely upset a teenager, especially a boy.
Next come words about the reason for the gift, for example “on a birthday”, “on a solemn anniversary”, etc. Good wishes are a must. Below them is the full date of the event, preferably indicated in numbers, and the name of the donor.
Master class on making postcards. Wishes for the bride and groom
To create a postcard you will need the following materials:
- white cardboard (thick);
- A 4 size paper;
- lace ribbons;
- hole puncher;
- regular and curly scissors;
- satin ribbons;
- glue;
- greeting text for a postcard;
- lighter;
- ruler
Step-by-step instructions with photos:
We make a rectangle from cardboard with an allowance of -0.5 cm. (this is the base of the postcard), the size of the rectangle is at your discretion. Whatever the size of the rectangle, this will be the format of the finished product. Punch a hole in the center of the second half of the rectangle with a hole punch. It will be needed for decoration. On the front side of the envelope you need to make a cutout in the form of a triangle or rectangle.
Postcards with wishes for the bride and groom are ready.
Master class on making a postcard for your wedding day using scrapbooking technique or for your wedding anniversary.
How to make a postcard in the scrapbooking style (one of the types of needlework that consists of creating albums, photo frames, photo albums decorated with various objects) is shown in the video:
Purpose
Not everyone has time to follow wedding traditions, especially those borrowed from other countries, so not everyone understands what a wedding wish book is.
This is an album or notebook with several dozen pages in which friends and relatives leave congratulations, wishes, parting words, etc. for the newlyweds.
This accessory will surprise guests, but its main purpose is different. The book of wishes is designed to preserve in memory as many moments as possible associated with the happiest day in the life of the newlyweds.
By reviewing the pages with the warm words of their loved ones, the spouses will be able to relive the solemn moments of their marriage.
This accessory can be made not only in the form of a book; there are several original versions of it:
- wooden tiles in the shape of hearts, which are then placed in a box or frame of a certain shape;
- guests' fingerprints in the form of foliage on a pre-drawn tree;
- a globe or map where each guest will write a congratulation at the place where the newlyweds want to visit;
- a quilt on which guests can write wishes with permanent fabric markers;
- a jar in which wishes will be placed on sheets rolled up in the form of scrolls;
- a vinyl record on which kind words will be written with a white marker;
- decorative tree without a crown, on which leaves with congratulations will be attached;
- a frame with a photo of the newlyweds, around which guests’ addresses to the bride and groom will be placed in random order.
If the future newlyweds decide to make a book of wishes in a standard format with their own hands, then in this case they can create a unique accessory. Various techniques are used for design, such as scrapbooking, applique or quilling. The cover can be made from cardboard, fabric, wood and any other materials.
It is not difficult to make such an accessory as a wedding wish book with your own hands; a master class can be found in this article below. The process captivates and unites future spouses, allowing them to spend interesting time together.
After this, the book or its substitute is hidden until the designated time and is revealed only on the anniversary. The newlyweds will be interested to know what they got from what they were wished for on their wedding day.
You want to know what your friends wish for you on the happiest day of your life?
And how interesting it will be to re-read this in a few years: you have become different, your friends too, someone wished you to “always live separately from your mother-in-law and mother-in-law” - and you, it turns out, are in perfect harmony with them...
But someone advised “to quickly give birth to a girl, as beautiful as the bride,” but she turned out even more beautiful, and her older brother was fine too...
But we never went to France, but we visited India... So many emotions, so many memories! But this is in the future, but for now the book of wishes will be needed not only by you, but also by your guests.
A wedding is a crowded and noisy holiday, and your friends, whose opinion you would really like to know, may be:
- shy and unwilling to speak out sincerely, knowing that they are in a crowd;
- For those who don’t know how to say something truly heartfelt out loud, it’s much easier to write.
Well, it will be very difficult for you on this day - or rather, it will be impossible to be alone with each of the invitees to listen to him. This is your wedding, and you will be the center of attention of all guests at once!
A book of wishes will not only solve this problem: a little imagination, and it will decorate your celebration or make it more fun - whatever you want!
If you immediately imagined a separate table on which lies a plump Talmud in lush pink lace, looking like a forgotten and dried-out cake, and your friends scratching with sour faces:
“I wish you success in your family life,” then we don’t want to deceive you: everything can be like that.
And the result is that Chekhov’s “Book of Complaints” is more fun to read than such voluntary-compulsory amateur creativity.
Design of sheets
The cover of the wish book is, of course, one of the main items that will be decorated. However, in a closed position, the book of wishes will lie, at best, half of the time, but guests will approach it and write something on the sheets throughout the entire evening.
Therefore, the sheets themselves can and should also be designed and decorated. You can limit yourself to beautiful fonts and digital page design. On such pages they usually leave a column “from” and “wishes”, sometimes a small place for a photo.
Simple lined pages with a patterned corner sometimes work best to subtly highlight the rest of the design.
You can also design simple office paper if you have suitable stamps and ink pads at your disposal. Stamps are placed in the corners of the pages, and the sheets themselves are tinted on all sides with an ink pad.
A simpler analogue
If the newlyweds do not want to decorate the panel, but only want to read the wishes, then they can make a simple tree by drawing it with markers or paints on a sheet of whatman paper. A paper applique made of multi-colored leaves will look beautiful. Simple, fast and creative. After reading the wishes after the wedding, such a panel can be thrown away or stored rolled or folded.
Instead of leaves, you can plant butterflies on twigs or add flowers. Instead of a tree, you can depict a bush by attaching real branches. You can continue to fantasize.
The difference between a photo book and a wedding album
A photobook is printed photographs on printing paper, bound or collected into rings. The advantages of storing memorable photographs in this way are:
- The ability to collect and edit photos, create collages, increase and decrease photo size
- Using different fonts and additional images in the design
The advantage of the photo album is its small size. A photo book is a minimum of 30 spreads with a large number of photos. An album consists of a maximum of 10 spreads with the best photographs, the inscriptions for which are made by hand.
Creating a photo book is an opportunity that newlyweds received thanks to new technologies. Today, there are several software programs that easily and simply allow you to create your own unique book of memories without resorting to the services of a professional. After completing work on the layout, the book is usually sent for printing. Modern printing houses offer low prices for this type of service. The average price is 2000 rubles.
For those who decide to make a photo book with their own hands, we offer several options for lightweight programs.
What to write to a teacher or lecturer?
Nowadays, they are given the same books as their colleagues, with the exception of literature on finance and business activity. When inscribing, etiquette requires an indication of the important role of the teacher in the education of the donor or his child.
A wonderful option for an inscription on a book for a teacher is a quote from a great man. As an option: “The teacher influences eternity: you can never be sure where his influence ends.” This is a quote from Henry Adams. You can take a quote in Latin with a translation, order an engraving in a workshop, or simply write from your heart.
Any inscription by profession requires the presence of three components: addresses by name and patronymic, expression of gratitude and good wishes.
Options by profession:
- Good luck in all your endeavors.
— To the Golden Doctor with gratitude.
- In gratitude for our health.
- The luminary of science.
— Business shark.
Making a photo book with your own hands
The first stage is preparation. Conventionally, it can be divided into 4 steps.
- All photographs taken on the wedding day are selected. Sometimes photographs taken before and after the celebration are included in the book.
- Photos are sorted in chronological order.
- Each block is then sorted according to the quality of the photos taken.
- Only high-quality photos are selected to be used in creation.
The second stage is choosing the program with which to work. Today, a photo book layout can be created in Photoshop, FotoFusion and the Cyfrobook editor program. All of these programs are equipped with a main window and an additional panel for working with size, color and fonts.
The algorithm of actions is as follows:
- Select book size, title, number of pages, cover
- Selected photos are transferred to the layout
- If desired, add captions to each photo
- After the work is completed, a print order is left.
- When receiving the book, be sure to check and compare with the layout to avoid annoying misunderstandings
Layout errors that can affect print quality:
- The photographs are not of very good quality and professional photographs alternate. The difference will be immediately visible on the pages.
- Excessive photo stretching. Please note that a finished print measuring 2.54 cm must contain at least 250-300 pixels in digital format. Otherwise the photo will turn out blurry.
- Shredding pictures for more capacity on the page. A book is a product that is pleasant to pick up and look through more than once. Therefore, you should not increase the number of shots. It is better to add several spreads if all the selected photographs do not fit.
- If, after all, only unprofessional photographs captured important moments, then you can make a separate chapter only from such prints.
- The best design option is one font. You should not use different colors and fonts - this will cheapen the effect.
There is another way to create a photo book with your own hands. To do this, buy a photo album with pages made of thick cardboard. Selected photographs are printed on self-adhesive paper. After that, they are carefully pasted on the page according to the plan. The main thing is to carefully distribute the photo on the page so that there are no blisters or bubbles. Once completed, the pages are laminated.
Inscription on a children's book
Depends on age and hobbies. When presenting a popular science book or encyclopedia, it is permissible to wish success in your studies, write about the importance of knowledge or a particular science. It is important for a teenager to celebrate his achievements. For example: “To Alexey, an expert in geography and a future famous navigator.”
In a book of fairy tales, you can highlight the main moral and frame it with a quote. A younger child will respond well to a poem, especially one written personally for him or her, or a short, kind phrase. You can draw a picture next to the words.
Some inscription options:
- With confidence in your hidden talents.
— The day you were born is a big and bright holiday for our family.
- Let your life be like this fairy tale. Parents who love you.
- Dear daughter! Let the wizards you will recognize on the pages of this book teach you how to work miracles. With love, mom and dad.
What is scrapbooking technique and what is it used for?
- The scrap technique is to convey information through a visual image. For example, using this technique, the author can talk about a memorable day on one sheet of paper or present information about a much larger period of time in his life in this way.
- Initially, scrap was used to decorate personal and family photo albums. Nowadays, scrap masters use the technique to design notebooks, postcards, boxes and other things.
- The scrap technique is very interesting and addictive. Products made in the scrapbooking style are quite expensive. But young craftsmen are cleverly coming up with alternatives to expensive accessories.
- Currently, scrap can be used everywhere, not only in the design of albums and notebooks, but also in the workplace and in the room in general. The main thing is that the fantasy works well.
DIY passport cover using scrapbooking technique
You need:
- cardboard;
- textile;
- machine and thread;
- glue;
- scissors;
- pencil;
- ruler;
- cards for decoration;
- Velcro or button.
Procedure:
- Mark the dimensions of the passport on the cardboard and cut it out.
- Place on fabric and mark borders.
- Make a strap for closing.
- Place all the cards on the right side of the fabric and sew.
- Sew the second part of the snap or Velcro closure to the outside of the endpaper.
- Align the fabric with the cardboard and stitch so that the tab coincides with the closing point, and there are areas on the inside of the cover for the passport to fit into.
- Next, design the front cover to your liking in a distinctive style.
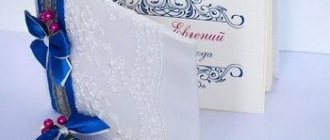
Master class on making a postcard and an envelope for money (with lace)
It's easy to make your own greeting card and money envelope card. Just half an hour - and it will delight not only the creator, but also its owner.
Weddings are always decorated in delicate, soft colors. And therefore, postcards and an envelope for money, made in the same color, will look great.
In order to make a postcard and an envelope for money, you will need the following materials:
- rectangles of watercolor paper 19 X 29.6 and 20 X 29 cm;
- scrap paper (blue or turquoise color) 2 sheets measuring 30X30 cm;
- cuttings of pictures on a wedding theme: newlyweds, swans, rings (all 2 pieces) 1 bottle of champagne, wine glasses;
- die-cut elements: 4 hearts - mint color, and 2 - white pearl color (if such colors are not available, you can choose similar colors);
- White flowers;
- stamping “Happy Wedding Day”, a pad with ink to match the color of the card for tinting;
- mint lace;
- organza and satin ribbons 2.5-3 cm wide;
- decorative chiffon roses on a ribbon (2 pieces);
- latex roses, stamens;
- text for congratulating the newlyweds;
- glue stick, ruler, double-sided tape, lighter, pencil, glue gun;
When you have all the necessary materials, you can start working:
The basics of the card are rectangles made of watercolor paper.
Paper wish tree
A paper souvenir is the best option for a wedding. It can easily fit on a banquet table, where all guests can leave their wishes to the newlyweds. Plus, you don’t need to put in a lot of effort to give this priceless gift.
What materials will you need?
To make a paper craft, you need to purchase high-quality paper, as well as a frame into which the template will subsequently be inserted. The size of the frame depends on the sheet format. You will also need bright plug pillows, a pen and napkins in the future. It is worth saying that ready-made templates for this paper souvenir are now available for sale.
Stages of creation
Follow the step-by-step instructions to help you make a wonderful paper product:
- Draw the trunk, as well as the branches, let the plant symbolize the newlyweds who are creating a young family. It is advisable to sketch with a black pencil or felt-tip pen. In addition, you can buy or print the plant templates you like.
- Insert the template into the frame. It would be nice to decorate the finished craft with beads, artificial flowers, and ribbons - this will make it original.
- During the celebration, guests take turns writing their wishes on a branch, after which they leave a fingerprint using stamp pads. Don't forget to place napkins nearby so guests can wipe off any remaining paint from their fingers.
If you have difficulty creating a paper tree, watch the video master class, which clearly describes step-by-step instructions for creating a wish tree with your own hands:
To ensure that this special moment remains in the memory of the newlyweds for life, take a photo or video during the process of guests leaving wishes. Viewing wedding photos and videos is a great way to refresh your impressions.
What to write to parents and grandparents?
For parents, any kind word spoken to them by a child is important. And it doesn't matter what age he is. Therefore, do not hide your emotions! While you are at the age when you have parents and grandparents, write them as many warm wishes as possible. Any words expressing love and gratitude will give them genuine joy. And don’t forget to wish you long life and good health. It may seem commonplace, but that doesn’t make it any less important.
If it also sounds beautiful, the parent or elder ancestor will be proud of such a gift all his life! Under no circumstances take clichés from the Internet. Relatives will feel in their hearts that their child did not find even two personal offers of congratulations and this hurts them painfully!
Cover Design Ideas
Many ideas, from the simplest to the incredibly creative, can be found on the Internet, or you can come up with them yourself. We meet a book by its cover, and if you have taken on independent work, we offer options for its design.
"Brevity is the soul of wit"
The cover will be simple and concise. For example, choose two colors. One will represent the bride, the other the groom. You can start from the characters of the young people. The passionate and temperamental bride is red, the courageous and brutal groom is blue. Or a gentle and sophisticated bride – ivory, and a calm and thoughtful man – green. The variety of color palettes knows no bounds. You can also choose a color based not on the qualities of the newlyweds, but on the color scheme of the wedding, which the newlyweds will probably communicate when sending out invitations.
The cover will be divided into two parts with the chosen colors, and the wedding date will simply be written in the middle. Both parts will have the opposite color. This will create a mirror effect. There is no need to do any edging; the most important thing is already clear.
Cover with “props”
This option is especially suitable if the wedding is taking place in a certain style. Nowadays, rustic, vintage, Provence, boho and others are especially popular. Take the rustic style for example, it is an eco-friendly design filled with natural attributes. If this is what is chosen, then the cover of the book itself can be covered with burlap and filled with hay inside. The work is painstaking, but the result will be amazing. Also, attach the date or initials of the newlyweds, carved from wood or laid out from cereal, to the top of the cover.
You can make a book using additional materials even if the wedding does not have a specific style. There are many techniques in which you can create a similar thing, for example, decoupage, scrapbooking, quilling, furoshiki and much more. It is difficult to study everything at once, but you can take one that is more interesting for yourself and try to make a simple design.
How to write to a friend, loved one, spouse or spouse?
There are practically no restrictions. The only difference is the level of intimacy of wishes. But with all the excitement of love, you shouldn’t display them brightly in the inscription. After all, the book will be in the library, where other people or family members can go.
It is best to wish for success, wealth, fame, love or career growth. It is great to note some personal qualities of a person. For old friends, the inscription can recall the times of childhood and playing together. A humorous phrase or a good joke will be well received. The main thing is to know when to stop.
When congratulating your spouse, it is important to note the joy of living together and the positive qualities of your “other half.”
Some examples of inscriptions on books:
- With love and confidence in your capabilities.
— Svetochka for the gift of warmth and cheerful communication.
- Olechka! I love you very much and want all your dreams to come true.
- To the best man from the best woman.
“You have all the love and wisdom.”
- To the most sincere and sincere person.
- May the one who is given this book be happy.
Do not skimp on tender epithets for your loved one. There are never too many of them. You can write a few lines from your favorite poem into a poetry volume, compose your own, or pre-order an individual poetic congratulation to the poet. If your loved one knows a foreign language well, a love quote in that language would be a great option. This will once again emphasize how much you value his/her intelligence, plus the phrase itself will be pleasant. Feelings and emotions are the main thing in love wishes.