The bigger the wedding, the more hassle. At each stage of holiday preparation, more and more details arise that need to be calculated so that everything turns out perfectly. If first you need to solve global issues, such as the venue, the outfits of the bride and groom, then small ones arise. But these are the things that make up the organization of a wedding.
For example, such a thing as the seating arrangement of guests is often overlooked by newlyweds. But if 40, or even 100 people will be present at the celebration... In this case, it will be useful to prepare a framed seating list for the wedding guests. He will help both during preparation and at the event itself.
Guest seating rules
There are a number of rules that can significantly simplify the task of planning a landing. They are optional, but take into account the psychology of people and help ensure a comfortable stay for guests.
- Close relatives sit closer to the bride and groom.
- Single guests are seated closer to people of the same age. It is better to do the same with relatives - if there are different tables, it is best to seat the elderly with the elderly, children with children, etc.
- You should definitely organize a separate table for children. Or sit next to the parents, if there are few of them.
- It is better to seat a single guest with other single guests, and married couples next to other couples.
- Men and women should be alternated unless there is a compelling reason to break this order. Traditionally, the woman sits on the right hand of the man.
- Colleagues or close friends will feel more comfortable nearby.
- It is better to seat foreigners with those who can communicate with them.
- If you are well acquainted with the interests of the guests, then this is also worth taking into account.
If the layout of the hall involves several tables, then the newlyweds, as a rule, are given a separate table in the most visible place. In this case, it is also useful to make a beautifully decorated stand, which will list who should sit at which table. Then guests won’t have to wander from table to table, looking for their name.
Place the text in a mirror image in the adjacent cell
Step 1. Move to the adjacent cell (click LM in the adjacent cell).
Step 2. Change the direction of the text and align it centered to the left:
Step 3. Copy the text, go to the adjacent cell (just click LM) and paste the text into the adjacent cell.
Pay attention to how the text should be highlighted. The end of cell symbol is not included in the selection area
If you select the entire cell, then when copying you will copy exactly the cell with all the attributes. And when you paste from the clipboard, you will paste exactly the cell. So when selecting text, be careful - select only the text:
Hooray! Happened!
Step 4. View all entries (Mailouts ribbon → View results group of commands → view entries button):
Table decoration ideas
If you need to do everything yourself, without the help of wedding planners, be inspired by the ideas of the best designers. Any of the options can be easily implemented with the support of friends:
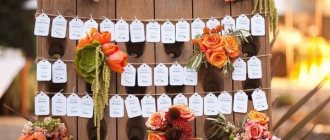
Stand with clothespins.
Order it from a craftsman or ask your future spouse to make it yourself from cork or plywood.
Stretch thick threads wide and fasten cards with table numbers and the guests' initials on decorative clothespins. All materials can be purchased at a craft store, and you can set any background for the stand if desired. After all, you can always cover it with decorative paper.
After securing them on skewers, arrange them in cupcakes, oranges, decorative mini-jars, vases, or wherever you like. In this option, everything depends solely on imagination and the desire to surprise guests.
If you know a culinary specialist or know a good confectionery shop, order gingerbread cookies or gingerbread cookies with the initials of the guests. Colorful sweets with names will look unusual and beautiful. And the table number next to it will indicate exactly where the invitee should go for a mini-present that they can take with them.
If you can turn to a craftsman for help or make crafts yourself, use pine cones, wreaths made of fir branches or twigs of ordinary trees painted with acrylic paint as stands for cards. Such decorations will resemble a fairy tale and will evoke inspiration and good mood among guests.
And in order to surprise and show your awareness of wedding trends, use poster frames as decoration. It is in them that everyone who is invited to the celebration of the birth of a new family will be able to see the seating plan for the guests.
Card design
Any decor at the celebration must correspond to the style chosen in advance. There can be no exceptions if you want to have the perfect holiday. Therefore, the frame for the seating plan should match the theme. It will be the first thing guests see at the banquet.
Placement cards can be ordered from printing companies. They are often similar to wedding invitations but have a different format. The font is also important: for an elegant wedding in the style of old Hollywood - capital letters with an angle, for a rustic style - simple block letters, etc. Discuss all this with the designers: they always have ready-made and proven options.
Placement cards can also be beautifully decorated: for example, place each card in its own mini-frame of a certain shape or color. This original design is suitable for vintage style. There is another option: attach the place cards to wooden clothespins, which you secure to the frame. This design looks original at a rustic wedding with a banquet on the veranda or in the open air.
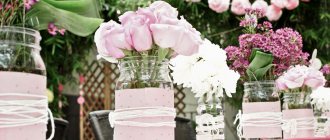
The frame itself is decorated in different ways. A chic variation - decoration with fresh flowers. In this case, it is better not to overload the cards with details.
Attention! A frame for a seating plan in the form of a board is suitable for democratic weddings. On it you need to write the table numbers and the names of the guests with chalk of different colors.
Seating tickets for guests
Cards for today's weddings are no longer a novelty. Every newlywed wants to improve them
It is important that they blend gracefully with the wedding theme. Color scheme, style, all this affects the form and content of the element
Most often they are tied to a glass, placed on napkins, and glued to a chair.
When filling out a card, its readability is important. The font should not be small and have different curls. The guest should not have difficulty reading the text.
Many newlyweds prefer to place small souvenirs on the table along with the cards as a keepsake.
Cards are most often purchased in stores or ordered from wedding agencies. Magical brides prefer to do everything with their own hands. Add a little bit of yourself to each card. Homemade cards look perfect on juicy and ripe fruits. Most often the following are used as tasty gifts:
- apples;
– pears;
– lemons;
– strawberries;
- peaches.
To prevent painstaking work from taking up all your time and energy, a template will help. With its help, it is possible to complete a sufficient number of cards in a matter of hours.
Even something as small as a card must be made in the same style as the wedding theme.
Master class on making place cards
https://youtube.com/watch?v=16-fh2eix2U
Choosing a table layout for a banquet
Nowadays they use several basic schemes for arranging tables at a banquet. What matters is the number of guests invited, how large the banquet hall is, and how the bride and groom prefer to do it.
When you look around and choose a hall in a restaurant for a wedding, then immediately see if there are columns in the hall, if there are many steps, if the floor is level. This will introduce its own nuances into the process of arranging tables.
At a common table
This is the most traditional and common seating arrangement. Suitable for weddings with a small number of guests.
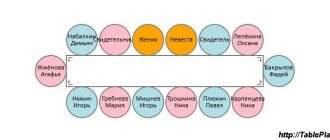
In the banquet hall, several tables or one long table are placed close together. And guests are seated around him, usually alternating men and women.
The groom sits in the center of the table and the bride to his right. Next to the bride are her parents, to the left of the groom are his.
Even more often at weddings, their friends-witnesses sit next to the newlyweds.
Place the table in a T shape
If you have a guest list of no more than 30 people and a small banquet hall, then you can arrange the tables in the shape of the letter T.
A young couple sits at the head of the table, and guests and relatives are seated further from them, alternating at their discretion or depending on age and gender.
We place the tables in the letter P or W
If the number of guests is more than thirty, but not more than fifty, and the size of the banquet hall allows, then the tables can be arranged in the letter P.
If there are more than 50 guests, then we add another line of tables and get the letter Ш.
Similarly, the newlyweds are seated in the center, followed by guests and relatives.
How to arrange tables in European style
This arrangement of tables involves placing separate small tables in the hall, where several people sit. And they arrange the tables in a checkerboard pattern so that guests can see the newlyweds.
With this method of seating, guests are seated according to interests, age, marital status, so that it is easier for them to communicate and talk.
At the same time, the toastmaster organizes competitions and involves people from different tables so that the guests also get to know each other.
They use square tables for 4 guests, round tables for eight guests for comfortable communication.
We arrange tables in the form of a herringbone
The newlyweds sit at a separate table, the guests are located at several tables, which stand diagonally, parallel to each other. So everyone should have an optimal view of the young people, and there is a place in the center.
Buffet option
In the West, sometimes they use this seating option, where there is a buffet. Along the walls there are tables with drinks and dishes with treats; all guests choose their own food according to their taste. The guests are sitting at long tables.
There remains room for guests to move freely. The bride and groom have a separate table set.
Seating of guests at a wedding
You have already decided on the list of guests, who you invite to the wedding celebration, you have chosen a restaurant and how the tables will be arranged in the hall.
No less important is the question of which of the guests and where exactly will sit
It is important to seat everyone in such a way that no one gets bored and everyone can communicate
So, what should you pay attention to?
- It is necessary to alternate between men and women, it is advisable that the man sits to the left of the women.
- Make sure that everyone can clearly see the table of the young people and the toastmaster.
- The closest relatives of the young couple should be seated in the closest places.
- We focus on age; it will be more interesting for older people to sit with the elderly, and for parents to sit together.
- Those who came without a partner should be seated separately so that they can communicate freely.
- If among your friends there are those who are already divorced or are not getting along well, then it is better to seat them at different ends of the room.
- A group of friends or colleagues can be seated nearby for closer acquaintance.
- Married couples should also be seated next to each other, so they will be more comfortable than with a single company.
- Among the guests there are always calmer people and cheerful people, it is advisable to dilute the calm ones with cheerful ones.
- If children are present at the wedding, they can be seated at a separate table. This will make them seem more independent.
After you have decided who is sitting where, order cards with the names of the guests. With their help, guests will find their seats. As a rule, numbers are placed on the tables, they are also indicated in the seating chart.
https://wedly.ru/svadba/banket/rassadkahttps://vplate.ru/svadba/rassadit-gostej/https://isvadby.ru/tradicii/kak-rassadit-gostej-na-svadbe.html
Master class: SEATING PLAN (frame, stand, decoration)
Hello everyone! My name is Alexandra and I want to present to your attention the creation of my fiance and I! I hope MK will be clear and useful!
Let's start in order! Part 1. Frame. 1. We prepare the boards by treating them with sandpaper and making them the desired size, we took the size 80 by 90.
2. For convenience, you can sign “Left-right”, “bottom-up”.
3. Shade the unnecessary part.
4. We use a miter box to saw off corners.
5. We hammer the nails as shown in the photo. It is advisable to add Crystal glue for greater strength.
6. We make holes with a stapler.
7. You can make the holes deeper.
8. This is what happens on all sides.
It turns out this is the frame!
The time spent on the frame is about 2 hours.
Part 2. Stand. 1. 5 pieces of 2-meter boards were purchased in advance. 2. The boards remain at their original size, select the desired angle and connect them with a small board.
For convenience, you can draw lines where it will pass.
We do this from above and below, choose your size between the boards. 3. Make holes with a drill, and then tighten the screws. Here's what happens:
4. We measure between the boards and mark the center.
5. We attach a middle board in the center, secure it also, and sand it with sandpaper.
6. Making a shelf for the frame. We also fix it.
7. We fix another board perpendicularly to the shelf.
8. A mount for the third leg of the stand was attached to the back of the stand. The third leg was secured to the stand with a screw.
Please note that a leg has already appeared.
9. We make a hole in the center, just above the shelf, to secure the rope and the same hole on the back leg (the rope is needed to prevent the back leg from moving backwards).
It turns out to be such a stand for the frame!
How it all looks together:
The time spent on the stand is about 3 hours.
Part 3. Design. Here we need plywood or fiberboard, we used plywood measuring 75 by 85. We used the design to a minimum, but you can do everything your own way, as your imagination dictates! 1. The first point is painting, we painted everything 4 times. We used white paint from a can, white because our wedding is classic, but you can use paint of any other color, for example, similar to your wedding palette. Start:
First painting:
We painted the plywood silver (paint from a can) - you can choose a different color yourself:
Then there was the 2nd and 3rd coloring and here is the final final one:
The plywood is well painted silver:
2. So everything is dry and we begin to attach the white guipure to the plywood. I want to say that guipure can also be any color you want and it doesn’t have to be guipure.
3. Using a construction stapler, we secure the guipure to the plywood along the edges. We measure the distance between the brackets by eye.
4. On the back side of the plywood you need to bend the staples and hammer them in so that they do not stick out.
5. We take a screw 15 mm long, with a wide head, and screw the plywood to the frame.
6. Cut off excess fabric at the edges. We get this decorated frame and stand.
How it all looks together:
The time spent on decoration, not including painting, is about 1 hour.
If anything is unclear, I will be happy to answer your questions! Thank you for your attention! **Love to you and a Magical Wedding!**❤️?
Types of table arrangement at a wedding
In the European and American version of the wedding buffet, it is assumed that the guests will be assigned to their seats in advance. To number tables, they use not only numbers, but also the names of favorite groups, TV series, films or cities. This option is especially relevant for a themed celebration.
Having decided on the number of guests and the room, choose the type of table arrangement:
- The classic option is good for a small wedding. Guests are seated at one long table. If more than 20–25 guests are expected, it will be inconvenient for them to communicate with each other;
- In the shape of the letter P - one of the most popular options when the newlyweds sit at the head in the company of witnesses. Ideal for a large number of guests in a small room;
- In the shape of the letter T or G - suitable for a wedding with the number of guests from 30 to 40 people;
- To accommodate guests at a large, noisy wedding of 50 people or more, tables are arranged in the shape of the letter W. It is best to seat closely familiar guests nearby or group them according to their interests;
- Buffet tables. They will allow the bride and groom to communicate more closely with each guest. So that the newlyweds are visible from any corner, their table is placed in the center of the hall;
- Banquet in European style. The tables are arranged in a checkerboard pattern. A separate podium is created for the table of the heroes of the occasion.
Some tips for seating guests:
- The parents of the bride and groom, as well as witnesses, should sit next to the newlyweds;
- The table at which the newlyweds sit is set in the most visible place;
- Men and women are seated alternately;
- Colleagues at the table are arranged according to age and interests;
- No more than ten people should sit at a separate table;
- If there are many children at the wedding, they are given a separate table;
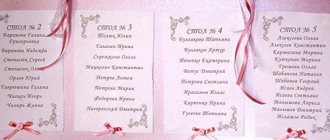
- In addition to seating cards, there should be a large general plan for seating guests at tables;
- People who come together cannot be seated at separate tables;
- Former spouses should be placed away from each other.
As a rule, guests at a wedding are greeted by the manager. People turn to him for help if they have difficulty finding the right place.
European style templates
How well the wedding guests' seating is planned will determine how quickly they can find their seats without confusion. To simplify the task, use printable card templates, choosing stylish options to match the theme of the room decoration:
- Black and white intrigue. They are simple and elegant and will go well with any wedding style. It is enough to fold them in the form of a tent and place them on the tables in the desired order.
Banquet seating cards with names
Often, for a large celebration, the arrangement of tables and the number of seats are planned in advance. It must correspond to the number of invitees. And in order not to create confusion at the very beginning of the celebration, when everyone begins to sit down in random order, you can simply use place cards. For a banquet, they are the best solution, since each invitee will immediately see his place, preferably, and the table number, which must be communicated in advance. To do this you should:
- Make a list of guests, distribute it into groups according to the number of tables.
- Make a list indicating the names of invitees and table numbers.
- Prepare cards and place them on the tables.
- When the invitees arrive, an administrator can meet them at the entrance with a list and ask for their name. If it is on the list, the guest is informed of the table number.
- Everyone finds their place at the table according to their card. It is placed on the top plate of the entire serving set.
You can do without an administrator with a list, but this way you can also protect yourself from those who were not invited to the holiday and are not even friends or relatives of the organizers.
Determining the type of seating
Depending on the list of guests and the features of the venue, you should decide on the type of seating:
- — European seating: round tables of 8-10 people. This is the most popular seating arrangement and most wedding venues offer this type of seating. If the seating at such tables is too dense, there is a chance that some of the guests will not see the newlyweds during the evening. Therefore, if possible, seat your guests not along the entire perimeter of the table, but only in those places from which you and the groom can be seen.
- — Rectangular individual tables: designed for 6-10 people. A great option for those who want to make a less formal dinner and use non-standard table settings. Here you can place the composition along the entire table, seat the guests so that everyone can see the heroes of the occasion. But you should remember that such seating takes up a lot of space in the hall, so plan the space carefully so that there is room for the dance floor and free movement around the hall.
- — Long common table: 1 or 2 common tables without a separate table for the bride and groom. This type is used for small, home weddings, where the number of guests is small, which means there is no need to set up separate tables and separate guests.
- — The letter “P”: the seating arrangement, familiar to many from the time of our parents, has not lost its relevance, having been slightly adapted to modern standards. The newlyweds' table can be placed a little separately and leave 2 tables for guests. You should avoid dividing guests into two camps: from the groom's side and from the bride's side. This type of seating arrangement is used less and less at weddings: with it, guests from the same company do not have the opportunity to communicate with each other freely, since they can only clearly see the guest sitting next to them and the guests opposite.
Save Saved
Save Saved
Save Saved
Seating Charts and Planning
When the templates for printing are ready, you need to correctly distribute how guests will be seated at a wedding on 4 tables or more, use the diagram. She will help distribute the space in the hall so that everyone feels comfortable. With its help, you can create a visual representation of how the tables will be located and which of the guests will be closer to the newlyweds and who will be further away.
When you plan to seat guests at a wedding on 2 tables, you can pay more attention to the design of the place using bright, stylish and colorful printable templates. With their help, you can save time when all the invitees gather in the hall. They won’t have to look for where and how best to sit. Everything will be decided and thought out in advance, taking into account the character traits of each guest.
If you want to create a cozy atmosphere at your wedding and make it truly chic, stylish and interesting, don’t be afraid to experiment and try to put European trends into practice.
Use stands, posters and cards that suit the style of your celebration as decor. This is what will set the theme of the wedding and make it especially stylish.
Seating plan
We figured out how to make place cards for a wedding with our own hands, and in conclusion, some tips for seating guests:
- the table for the bride and groom is set in the most visible place so that any guest can ask for a toast;
- after the newlyweds and witnesses, the second most important people are the parents of the newlyweds, which is why they should sit next to each other;
- It is also not recommended to remove other first-degree relatives - brothers, sisters;
- Colleagues and distant relatives are located taking into account age, status, interests;
- if there are a lot of children at the wedding, they need a separate table - it’s more fun together.
As a rule, guests are greeted at the entrance by the wedding director and escorted to their place.
A place card is a souvenir, not a boring business card, so the choice of materials for decoration is limited only by the wedding budget and your imagination. In order for guests to want to take a personalized card as a souvenir, they need to be decorated beautifully and sincerely, because it is these little things that make up the overall impression of the holiday.
Useful video: how to create it yourself
To make a frame for seating guests with your own hands, you will need:
- frame;
- cardboard cards with table numbers and names;
- card with the names of the newlyweds and the wedding date;
- Whatman paper is the size of a frame;
- glue and scissors;
- decorations and details at your discretion.
Steps are below.
- Cut cards with names of the same size from the base. It is better to leave free space at the top to glue the decor.
- Use glue to secure the necessary details, for example, satin bows, beads, rhinestones, etc.
- Make an additional outline if desired. Glue the card onto contrasting colored cardboard. Leave 0.5mm on each side.
- Glue the finished cards onto whatman paper.
- At the top, attach the names of the newlyweds with the wedding date.
- At the end, attach the Whatman paper to the frame.
An idea of how you can make an unusual and elegant frame with your own hands is presented in the video:
How to make it yourself using a template
First, the future newlyweds will need to choose a suitable sketch. To do this, you can find an image of any butterfly you like and transfer it using carbon paper or tracing paper onto a sheet to create a stencil. You can finish this version already or cut out additional patterns in the resulting blank, which will then be made on the main copies.
If this option is not suitable, then you can decorate the butterfly on a stencil with a simple pencil, dividing the wings into segments, so that you can then transfer the drawing onto cards. If you have a printer, the process becomes even faster and easier - the blanks are printed in the required quantity and cut out.
Cardboard or thick paper of the desired shade is suitable as a base. Butterflies can be plain or made from designer sheets with a pattern that matches the style of the wedding. If the butterfly will be attached to a glass, then the belly is trimmed symmetrically in two places so that there is no need to add additional elements.
Paper for work
Whatever element you use, chances are you will have to write the name on paper. These can be small tags, envelopes or cards. House cards are considered a classic option, however, this is not the only thing you can make from paper.
- For a wedding in a nautical style (and not only), cards can be designed in the form of origami boats. It will look very cute and touching.
- On a large stand you can place envelopes, inside which guests will find their names and guest places.
- You can make small air mills out of paper. The guest's name can be written directly on the mill or on a stick to which it will be attached.
- By the way, the skill of origami will be useful not only in the idea with the boat. There are a huge number of instructions on the Internet for making flowers, animals and other beautiful things from paper.
Editor's choice: Dance as a wedding gift: how to organize it correctly?
- Place cards can be made from chalk paper and the names of guests and banquet locations can be written on them with chalk. This option looks very sophisticated.
- Butterflies made from corrugated or plain colored paper will look very cute, especially if the wedding theme is butterflies.
In addition, to decorate paper cards you can use a huge variety of decorations: lace, ribbons, buttons, beads, rhinestones, feathers, sparkles, bows, stickers, confetti, designer paper and much more.
What does it look like
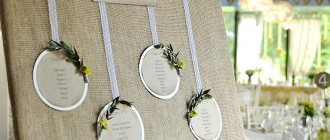
Nowadays there is a large selection of frames on the wedding services market. The classic version is a square shape, like a picture, with colorful plywood or cardboard attached in the center. Place cards with names are attached to the plywood. The frame for seating guests is located on the wall. Typically, this plan is used for a large European-style wedding with a banquet. Therefore, it is suitable for celebrations in a tent, banquet hall, estate, castle and other large places.
There are other types of decor. Oval and round frames for seating plans are becoming increasingly popular. They are suitable for more democratic, rustic style weddings. Handmade masters offer other options at your request. For example, a rustic theme is combined with a wooden frame in the shape of a window, on which the names of guests and table numbers are written with a marker.
Watercolor banquet cards
Watercolor motifs remain in fashion for years to come! They can be used almost everywhere at a wedding: from decor to accessories. In particular, you can create romantic banquet cards with your own hands, which will be useful for simplifying the process of seating guests at festive tables.
Materials and tools:
- thick paper;
- watercolor paints;
- masking fluid for watercolors;
- scissors;
- brush;
- pencil;
- water;
- black pen.
Time: 30 minutes.
Step-by-step instruction:
- Cut out name cards for guests measuring 9*10 cm from paper and fold them in half. Cut out the bunny template (you can choose any other image that would be appropriate for your wedding, such as a heart).
- Attach the bunny template to the card and trace it along the outline.
- Apply watercolor masking fluid to the bunny image so as not to accidentally ruin it in future work. Wait 15-20 minutes for the cards to dry.
- Apply some water around the bunny. Take a paint brush and start painting the area that has been dampened with water. Use 2 different colors to create beautiful combinations.
- Carefully remove the masking fluid film.
- Write the names of the guests on the bunny with a black pen.
- So you have made bright place cards with your own hands!