The important role of place cards
While still a very little girl, the young creature is already dreaming of a fairy tale called “wedding.” Everything is perfect in these dreams. As a groom, there is certainly a handsome prince who loves the bride more than anything in the world. The bride is dressed in the most delicate snow-white dress and the elves carry her train. The ceremony site is decorated with many flowers. Satisfied relatives and friends rejoice and applaud.
To avoid the bustle in the hall and at the table, wedding place cards will come to the aid of the newlyweds. Of course, if there are not many guests, then you can do without pre-seating the guests. But when a large number of people are invited, it is better to worry about such convenience in advance.
Analyzing the guest list
To create a seating plan, you need to analyze the guest list. Make a table in which the first column is the name of the guest; second column - kinship/relationship/family affiliation: for example, friend of the groom or sister of the bride; in the third, indicate the age category. After that, start distributing guests to tables. In this case, you should pay attention to:
- • Age: it is better to seat older guests next to each other so that young people do not disturb them to have a quiet time and relax.
- • With/without a couple: a wedding is a great opportunity to meet interesting people, so it’s better to seat single friends at the same table, but it’s better to seat couples together, so they will be more comfortable.
- • Relationships: if a group of friends have gathered at a wedding and have been together all their lives, regardless of whether they are alone or in pairs, it is better to seat them at the same table. And if former lovers are invited to the wedding, and even with their current significant other, it is worth seating them at different tables.
- • Hobbies and characters: you know your guests and you will certainly understand who will be more interesting with whom at the table: who is quiet, and who will be happy to have fun. Take this into account when creating your seating plan.
But belonging to the family of the bride or groom should be taken into account only when it comes to relatives who will be very happy to communicate with each other. It is better to seat friends together, regardless of which side they are from: in the future they will have to communicate in your common company.
Save Saved
Save Saved
Save Saved
We begin seating guests early
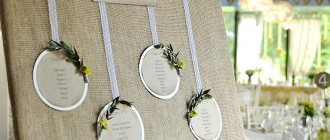
You need to start seating guests at the festive table not on the day of the celebration, but in advance. To do this, young people need to prepare a seating chart for guests. First of all, find out in the restaurant how the tables will be arranged. Draw a small diagram on a piece of paper. And at home, calmly discuss which of the guests will have what place at the table you will give. Write all this down on your diagram. Having prepared such a card in advance, all you have to do is entrust it and the cards to the waiters or organizers of the celebration. And when setting the table, they will also take care of the signs.
The template for seating cards can be downloaded (prepare an archive with templates for downloading) on the Internet; young people will only have to print it out and fill it out. You can find and buy ready-made cards in wedding salons. Or you can entrust this issue to the organizers. All this will simplify and save time for young people. But do-it-yourself wedding place cards based on a template bring special warmth and love to the newlyweds.
What the card will look like depends largely on your imagination. But there are two points that it is advisable to adhere to:
- the style of the cards should be consistent with the theme of the event;
- optimal size of place cards. They should not be too large or take up a lot of space, but guests should still be able to see their name from a short distance.
Choice of services
Outdoor bar - an original way to serve drinks at a wedding
A wedding retreat bar is a great idea for entertaining guests. What is it for? At the exit bar you can take a break from competitions and frequent meals with a cup of tea or coffee, and also enjoy interesting cocktails or cold lemonade.
- 17 photos
How to calculate the weight of a wedding cake?
Calculating the amount of cake for a wedding is not so difficult, but it needs to be done correctly so that all guests have enough treats. Then your family and friends will have only positive memories of the celebration!
- 4502 views
- 17 photos
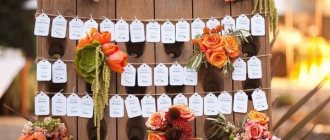
Table number plates
In our tradition, it is customary for all guests to sit at one long table. But with foreign films, we have come to have a tendency to seat guests in small groups at separate tables. This is a fairly popular and convenient way, especially when there are a lot of guests.
If this is your option, then you cannot do without signs on the table for guests; the template can be found here (prepare the material with the necessary archive). In this case, you need to number the tables. The table number can be provided to guests on the invitation. In this case, nameplates are not required.
The second option is a banquet card where the table number and names of the guests will be indicated. Here it is also advisable for guests to know in advance which table they should sit at. This is done primarily to avoid fuss.
Making a seating layout
To clearly see what happened after analyzing the guest list, sorting and seating, it is best to make a layout. What will you need for this? If you do not know special computer programs, then prepare a large sheet of paper and cut out tables and chairs in squares and circles, depending on what kind of furniture you will have.
This must be done to scale in order to see the real picture, so ask the venue manager about the dimensions of the room and all the objects that are in it: stage, bar counter, etc. And it’s best to ask him for a diagram of the hall.
Arrange the cut-out tables and chairs according to the seating pattern and to accommodate space for the dance floor or other areas. If in the process of drawing up the layout you see that there is not enough space, it’s time to come up with a plan “B” and change the seating arrangement or move additional areas outside the hall.
For example, in the summer you can move the dance floor to the veranda or to the street, if the area allows. Or move the photo zone or wish zone to another room. Be sure to discuss the furniture arrangement with the host and organizer to ensure the plan makes sense.
Save Saved
Save Saved
Save Saved
Wedding in a classic style
Couvert cards, in the classical sense, are placed on the table next to the cutlery. Usually these are small cards with the guest's name, folded in half along the short axis. Standard format in a spread is 130x100 mm. Such cards are decorated with the symbols of the event, various bows, ribbons, pearls, lace, and flowers.
Such couvert cards are ideal for a wedding celebration of any style. And for a classic event they will be an excellent attribute and decor.
Master class: step by step with photos
To create one beautiful place card, you will need the following blanks:
Step-by-step instructions for making an accessory:
Beautiful hand-made place cards will help you quickly seat guests, support the concept of the celebration, and create the right mood. Be guided by your imagination, come up with an original style that will reflect your vision of the holiday.
What card ideas did you like? Share your opinion in the comments.
Source
Decorating a napkin
Table plates with name, which are attached to a serving napkin, look very elegant. There are several ways to attach such a card to a napkin:
- on a special ring for serving napkins;
- using decorative pins or brooches;
- tying the napkin with the card with braid, ribbon or twine.
Where to put it?
A hall that does not have clearly defined zones is ideal from the point of view of the fact that it allows you to implement any seating plan for guests - make a single long table, arrange tables with the letters “t”, “p” and “w” or “herringbone”.
You can refer to one of the European “national” table layouts:
- English (separate round tables for 8 people) - convenient from a psychological point of view, since guests feel like equals and more at ease;
- the Italian seating arrangement (square, free-standing tables for 4 people) has pronounced features only within the framework of wedding celebrations, since the newlyweds, according to the Italian seating arrangement, sit together at a separate table on the podium;
- cabaret (a variation on the theme of English seating) - on the side facing the main table (for the hero of the day and those close to him or the newlyweds) or the stage, chairs are not placed, opening up the view for those seated;
- American (the main table and two long ones form a triangle, and snacks and drinks are placed on buffet tables around the perimeter of the room).
For an evening of interests - a corporate event, a social reception or any other event that does not involve gatherings with feasts, you can limit yourself to a buffet table, when there are no seats at all, their number is limited, or they are located in the next room.
It is important to remember that the letter types of seating, like the American one, do not imply close joining of tables to each other - there should be passages between them for the free movement of guests and staff of the establishment.
Decorating glasses
A popular method is when nameplates on the table for guests are attached to glasses. This is quite easy to do. Cut out the cards for the guest table according to the template, sign them and attach them directly to the top of the glass. Most often, cards made in this way are shaped like a butterfly, bird or heart. An openwork figurine placed on thin glass adds airiness, lightness and tenderness to the overall table setting.
Options for designing seating cards:
1.Butterfly
Butterfly cards would be perfect for a summer wedding. To make such a product you will need thick beige paper (or cardboard), colored pencils, gel pens and scissors.
Manufacturing instructions:
– Print the template.
– Trace the stencil with a pencil and cut it out.
– Step back a couple of millimeters from the edge and trace the outline with a pen, enter the guest’s last name and initials.
– Slightly cut the lower part of the wing, bend it and attach the butterfly to the glass.
2.Bow
This card is ideal for brides who cannot devote a huge amount of time to making place cards. To make such banquet accessories you will have to purchase ribbon and arm yourself with scissors. The ribbon is tied with an elegant bow on which the name of the invited guest is written.
Z.Serdechko
Since ancient times, the image of a heart has been a symbol of love. Therefore, a heart-shaped decoration will be ideally combined with a wedding celebration. To make your own heart-shaped cards you will need: heart-shaped templates, scissors, red colored paper, pen, marker, pencils and glue.
Manufacturing instructions:
– Attach the template to the cardboard and trace it with a pencil.
– Cut out this drawing.
– Write the name on the top right corner, cut the heart from the bottom to the middle.
– The left side needs to be overlapped with the right, the heart should become voluminous.
– The paper that protrudes should be cut off.
– You can use a sticker instead of an inscription. The heart can be placed on a plate or attached to a glass with a thread.
4.Postcard
To create this card you will need: paper, tape, scissors, marker, hole punch. The size of the postcard doesn't matter.
Manufacturing instructions:
– You need to cut out a square that will be no more than 10 by 10 centimeters in size.
– You need to bend it in the middle so that you get a triangle horizontally.
– Use a hole punch to make a hole in the top and write the guest’s name.
– You can thread a ribbon through the hole and tie it in a bow.
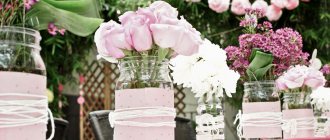
5.Flower
Flowers add a little romance to everything. You can make such a delicate card in several variations.
1.You need to put the flower in a small box. Don't forget to attach a small test tube containing water inside, otherwise the plant will wither. Write the guest's name on the box.
- You can decorate the card in the form of an ikebana postcard made of dried flowers and herbs. This invitation would look perfect for a fall wedding.
6.Applique
Applique is cutting out figures from colored paper or cardboard and gluing them on each other or on a piece of paper to obtain the desired pattern. A place card with an applique will be a highlight.
We recommend watching this video tutorial.
7. Origami figurine
An elegant origami place card is the perfect choice for a Japanese-themed wedding. Making various shapes from paper is not an easy process. It requires perseverance, patience, attentiveness and certain skills.
8.Berries and fruits
To make an edible card holder, you need to select a specific fruit, make a small cut and attach a sign with the guest's initials to it. Cards in the form of leaves on apples or pears look original. Berries can be poured into a small vase. A small toothpick is inserted into this vase and a name plate is attached to it.
9.Lump
The cone can serve as an original stand. It will decorate any celebration that is celebrated outdoors. You can make a winter version of this decoration. To do this, you just need to spray white or blue paint on the pine cones.
10.Sweets
Everyone present will be pleased to receive a small sweet gift before the celebration begins. You can attach a toothpick to a small candy, cupcake or pastry with the guest's name or photo attached to it.
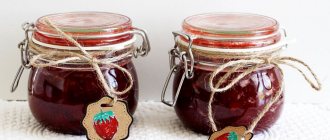
Cards for those with a sweet tooth
For those with a sweet tooth, candy or other desserts are a great way to display guest name signs on the table. And guests will be pleased to start the feast with something tasty.
It’s quite simple to prepare such place cards for a wedding with your own hands:
- download and print the template;
- cut it along the contour and sign it;
- use a glue gun to secure the template to a wooden skewer or toothpick;
- insert the prepared skewer into the dessert.
For sweets, it is best to use truffles, marshmallows, and small cakes. You can also order or bake yourself gingerbread or cookies with the names of your guests.
How to make banquet cards with your own hands?
Some couples want to make their own guest cards. This is a fascinating, creative process that will bring joy to the newlyweds. Do-it-yourself seating cards can be in the form of origami. They are perfect for decorating a celebration in a Japanese or Chinese theme. Place cards can be made in the shape of a butterfly. Such table decoration details are well suited for a summer wedding.
Place cards are simply and quickly made from wide satin ribbon. This option is suitable for brides who do not have the opportunity to spend a long time creating banquet accessories. To make a guest card, take some ribbon and tie it in a pretty bow. And along its edges write the guest’s first and last name. Place these bow signs near each place on the table.
A heart-shaped banquet card will look romantic and beautiful. To make it you need: a heart stencil, red thick paper, glue, pencil, scissors, pen. The work of creating a card begins with tracing a stencil on a colored sheet and cutting out hearts. Next, in the top right of the card, write the guest’s first and last name and use scissors to cut it from the bottom to the center. Glue the left side of the figure to the right overlapping it to create a three-dimensional heart. Remove any excess paper.
To create a banquet accessory, fresh or dried flowers can be used. This will decorate the table and evoke pleasant emotions among guests. To make such a seedling card, take a box with the guest’s details written on it and place a live flower in it in a small container of water. Or create an arrangement using dried flowers and a direction map.
Template and cutting diagram
Making a seating card couldn't be easier. The preparation of such cards should begin long before the wedding day. To make them you will need: cardboard, scissors, tape, hole punch, marker. Choose the postcard size at your discretion. To make a place card, use these instructions:
- Cut a 10x10 cm square from paper and bend it crosswise in the center. The sheet should be shaped like a book.
- Make a hole at the top near the fold line with a hole punch. Pull a ribbon through it and make a bow.
- Write the guest's name on the card.
- Decorate with bright stones or beads.
You can use another interesting and simple master class on making a place card. To make a postcard you will need:
- colored cardboard or colored paper and white cardboard;
- glue stick;
- lace paper napkins;
- rubber stamps in the form of letters;
- stamp pad.
Step-by-step instruction:
- If you don't have colored cardstock, glue the colored paper onto white cardstock.
- Cut a 10×10 square (size as desired) and fold it in half.
- Take a napkin and fold it in half.
- Stamp the guest's name on the outside of it.
- Glue the napkin onto the card so that the fold lines match. During the process, it is better to straighten the card.
- Fold the card.
Theme party
When the celebration is planned in a certain style, it is quite logical to complement the decor with themed signs on the table for wedding guests. For an autumn wedding, you can safely use leaves, acorns, apples, and small pumpkins. In winter - cones. In spring and summer - fresh flowers. For an eco-style wedding - small wooden cuts.
We offer you an example of a do-it-yourself place card for a nautical-themed wedding:
- fold a boat out of paper of the desired color, according to the diagram;
- sign it;
- decorate with shells, small sea pebbles or anchors.
Using your imagination, you can come up with many different options: boxes or envelopes with small memorable gifts, decorative stones, souvenirs, figurines of young people, photographs and much more. You can download seating cards based on the template for free here (prepare an archive with the necessary material).
Wedding invitations
| Paper, card and envelope. Envelope, paper and card. Made by a designer, printed in a good printing house. Additional decorative elements can be ribbons, braid, stamps, wax seals, embossing or laser cutting. But no frills. Forget about countless shiny brooches, large feathers, pendants, beads and other attributes from scrapbooking stores. By the way, it is becoming fashionable again to give invitations to calligraphy masters. Texts written by hand have a special charm and will undoubtedly delight the older generation. And, of course, no one is about. Even within the same city. Envelopes with seals, stamps, stamps are wonderful! | In the invitation, it is customary to address the guest personally and indicate the date, time and place of the main wedding events (ceremony, dinner, photo shoot, etc.), the theme and dress code, if any, and wishes for gifts. And that's enough. Please provide other details in person or in an information card. |
3