A solemn event - a wedding is associated with ancient folk traditions. Bachelorette party, bachelor party, ransom, bride's bouquet, wedding loaf originate in the depths of the Slavic epic .
Wedding bread is a good symbol of every wedding. According to tradition, relatives on the groom’s side should bake a loaf of bread for the wedding. A clean married woman with a strong family and healthy children is selected in advance. It’s great if the groom’s godmother bakes the loaf. The energy of a prosperous person leads to harmony and wealth in the new family. Bread is baked on the wedding day; the married man must put it into the oven. The baked pie is hidden from the evil eye until the moment of serving. The mother-in-law should serve the loaf to the newlyweds after arriving from the registry office or the wedding on an embroidered towel (long towel), giving a parting speech.
According to signs, newlyweds who have tasted bread and salt are not afraid of family troubles and adversity!
Whoever bites off the larger piece will have power in the house
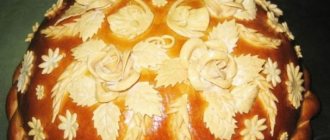
Wedding cake decorations are also traditional. Spikelets symbolize wealth, doves - love, swans - fidelity, braids - fertility. And the round shape of the loaf itself is a symbol of the sun .
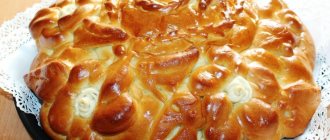
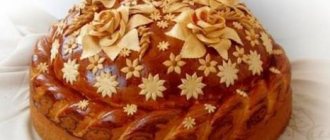
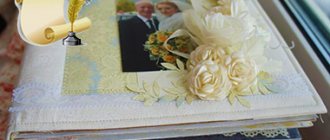
Photo of a loaf at a wedding
How to decorate a loaf?
Let's look at the step-by-step preparation of each decoration element.
The material for decoration is the same dough as for the main pie. To prepare the rosette, roll out five circles with a diameter of about five centimeters. We lay them on top of each other in a step. Then we roll them together into a roll. You will get a small puff roll. Cut it in half. Turn both halves over and place on a flat surface. Fold down the top edges of each layer. We got two beautiful roses.
- To make the ear, roll out a small roll of dough with a diameter of one centimeter. Flatten one end to form a cone. Using small scissors, we make cuts along the entire surface of the roller to create spines. Then we pull out our roller a little, holding its ends. The result was a spike of wheat.
- For the stem, you need to roll out thin rods of dough. Their thickness will depend on the dough, the length is about 30 centimeters.
- We make the branches from thin dough, after rolling it out with a rolling pin. Cut it into strips one centimeter wide. Make a cut at the end of the strips to create a sharp end.
- We connect all the elements together. Place the stem on the loaf. We attach the spikelet to the top part. Along the edges of the stem we attach the branches on both sides in the direction with the sharp end towards the spikelet. The wheat ear is ready.
- To prepare the leaves, we make diamonds of different sizes from the dough. Using a knife, cut out small pieces of dough along the edges of the diamond. You should get jagged edges. The decoration is ready.
- An integral element of the loaf is pigeons. According to tradition, there should be two of them, as they symbolize peace and love. Cooking pigeons may seem like a daunting task, but the process is actually very simple. We make strips of dough about three centimeters long and half a centimeter wide. We tie knots at the ends of the strip. On one of them we make a cut with a knife to form a beak, and on the other several cuts to form a tail. Let's flatten the base of our dove a little. Using a sharp object, draw wings on it. Use small scissors to pinch off the feathers. The pigeons are ready.
Tricks and subtleties of cooking
How to bake a wedding loaf at home so that it turns out not only beautiful, but also tasty - every housewife should know this. There are various tricks and tricks, following which it will be very difficult to spoil the impression of the delicacy.
- To make the decorations on the loaf look contrasting with the main product, after baking, grease the round loaf with yolk and the top with egg white.
- To obtain darker elements, rye flour is mixed into the dough.
- Decorative elements can be made from salt dough. It is pliable and molds well. Flowers, figurines of swans, and wedding rings are created from it.
- In order for the figures to stick well to the product, they need to be lubricated with water, and the surface of the treat is also lubricated with it.
- Large elements, such as roses or swans, can be secured to the base using toothpicks.
Wedding loaf made of grated dough with poppy seed filling
Nowadays it is customary to serve a multi-tiered wedding cake decorated with a variety of decorative elements at a wedding celebration. Previously, at weddings, people were always treated to a wedding loaf. We offer a recipe for a wedding loaf with a poppy-honey layer, which is described step by step below. After all, the poppy symbolizes prosperity, and honey symbolizes a sweet married life.
Number of servings: 12.
Cooking time: 240 minutes.
Calorie content: 307 kcal per 100 g.
Ingredients:
- 0.5 liters of baked milk;
- 8 tbsp. sugar (including 2 tbsp for the filling);
- 8 tbsp. butter (including 2 tbsp for filling);
- 2 tbsp. natural honey;
- 100 gr. poppy;
- 0.5 tsp salts;
- 30 gr. fresh yeast;
- 6 tbsp. flour.
Cooking process:
- Let's start right away with the most labor-intensive process - kneading yeast dough. Heat the milk a little to 40 degrees, dissolve the yeast in it.
- Add salt, granulated sugar (6 tablespoons) and mix. Sift 3 tbsp. white flour, stir well, place the dough to rise in a warm place. It should increase 2 times.
- In the meantime, let's start preparing the poppy seed filling. We wash the dry poppy seeds with cold water, pour boiling water over them, cover with a lid, and leave to steam for 20 minutes.
- If the dough has risen well, add another 2 tbsp. sifted flour, add 2 tbsp. soft melted butter. Mix all ingredients thoroughly with your hands. Place the dough back in the warm place to rise.
- Let's return to the poppy seed filling. Drain excess water from poppy seeds. Dissolve honey and butter (2 tbsp) in a frying pan. Place steamed poppy seeds into the hot mixture. Add 2 tbsp. sugar, mix everything thoroughly. As soon as signs of boiling appear, cook the poppy seeds for 7-8 minutes. Cool the filling completely.
- Place 2 tbsp into the risen dough. a little softened melted butter, we begin to rub and beat it into the dough (hence the name of the dough “grated”). After the procedure, put the dough back in a warm place without drafts.
- When the dough rises for the third time, knead it again and rub in 2 tbsp. melted butter. Also add 1 tbsp. sifted flour, knead well.
- Dust the finished dough ball with flour and melt for another half hour.
- We crush the bun, divide it into 4 parts so that one is slightly smaller than the other. We use 3 large parts for 3 layers of loaf, and 4 will be used for making decorative elements.
- Take most of the dough and roll it out into a round cake. Transfer to an oiled baking sheet. Place a little more than half of the cooled poppy seeds on top, not reaching the edge 1.5-2 cm.
- Take and roll out the next part of the dough into a layer of slightly smaller diameter. Cover the filling with it, pinching the edges.
- Place the rest of the filling on top, again not reaching the edge 1.5-2 cm.
- We roll out the third layer, accordingly reducing the diameter a little, cover the second layer of poppy seed filling, and pinch the edges in a circle.
- From the remaining portion of dough we make 2 braids, with which we cover the seams between the layers. We also cut out and place two hearts and flowers on top.
- Decorative elements also carry a special meaning. Thus, the interlacing of braids symbolizes friendship and mutual trust between spouses, and hearts and doves symbolize fidelity and love.
- Mix the egg yolk with a spoonful of milk, a pinch of sugar, and generously grease the surface of the loaf.
- Heat the oven to 180 degrees, bake the loaf for an hour.
- We place the completely cooled loaf on a towel in front of the young people near the icon.
There is a long-standing folk tradition of breaking a poppy loaf with your hands right above the heads of the young people. Then they looked at the amount of poppy spilled out. The more there was, the better the harvest was supposed to be next year. This means that the young family will live in satiety and prosperity. Bon appetit and happy family life!
Video:
Presenting a loaf to the newlyweds
The tradition of presenting it to newlyweds has not changed over the past few hundred years. The wedding cake is placed on a special towel, and a salt shaker is placed in the middle or salt is poured into a special depression made in advance in the dough.
Most often, the bride embroiders the cake towel herself, decorating it with special symbols of everything she wants to see in her family life.
The pie is served after the wedding ceremony or registration at the registry office. It is usually presented by the groom's mother. Before this, the parents wish the newlyweds a happy family life and prosperity.
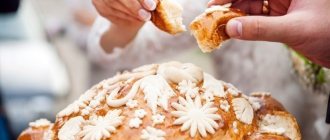
The bride and groom thank you for the rich treat and congratulate you, kiss the loaf three times and take a bite from it. It is generally accepted that the one who bites off the largest piece will be the head of the family.
The remains of the wedding cake are distributed to the guests. It is believed that if someone did not try this treat, then they were not at the wedding at all. As a rule, a two-kilogram pie is enough to feed about 60 invited guests.
One piece of the wedding loaf is left, dried and hidden in the house. It is a talisman that protects the family from various misfortunes and unexpected troubles. It is stored throughout its life in a place inaccessible to other people, children and animals.
Baking a loaf at home can take a lot of time and patience. We remind you that its production should be trusted exclusively to married women who are in a successful marriage and have children. They will fill the wedding cake with the energy of family happiness and prosperity, and will also attract success and prosperity to the newlyweds’ home.
The sacred meaning of this pastry
Since ancient times, the loaf has been perceived not as ordinary food, but as something mystical, containing a sacred meaning. It was used in some rituals and celebrations. To do this, the loaf was made in the shape of the sun, from wheat flour and decorated with certain figures and symbols that carried a certain meaning.
The loaf occupies an important place in the wedding ceremony. He served as a talisman for the young family, protecting them from possible troubles and misfortunes. In addition, it was presented to young people as a symbol of fertility, good luck and future family well-being. Fortunately, the tradition of presenting newlyweds with a wedding loaf has survived to this day.
The best recipes for making loaf for a wedding
Below is a step-by-step recipe for a wedding loaf at home.
Required Products:
- 1.2 kg flour;
- 500 ml milk;
- 5 eggs;
- 150 gr. Sahara;
- 2 teaspoons of powdered sugar;
- 1.5 teaspoons of vanillin;
- 400 gr. butter;
- 3 packets of yeast;
- 4 tbsp. spoons of honey;
- 1 tbsp. spoon of salt;
- grease for golden brown crust: 1 egg, 1 spoon of milk, 1 spoon of melted butter.
Let's start cooking:
- Beat sugar and eggs.
- Combine milk, heated to 36 degrees, with whipped mass, butter and salt, mix. Add yeast, stir again. Add sifted flour. Sifting enriches the flour with air and affects the quality of the future product.
- Knead the dough thoroughly until it no longer sticks to your hands.
- An indicator of good kneading is a homogeneous, smooth dough. Place in a warm place, cover with cellophane or a towel to prevent it from drying out for 1.5-2 hours.
- Knead the risen dough again. Separate a fourth part for decorations, and form a ball from the larger part. Add a raisin or a coin for good luck to the newlyweds.
- Line a baking sheet with parchment paper and place the dough on it. Give it a round shape. Turn on the oven at 200 degrees. Be sure to place a bowl of water on the bottom of the oven. Let the oven preheat and let the dough rest for another 10 minutes.
- Brush the surface of the product with the prepared mixture to form a golden, glossy crust.
- Prepare your decorations. To do this, roll out the dough into a thin layer, cut out swans, leaves, flowers, and berries with a knife or molds. Weave a braid of dough and place it along the edge of the loaf. To keep the jewelry securely, moisten it with water.
- Place in the oven.
- Check the product after 30 minutes of baking. Rotate to ensure even baking. Residence time in the oven is up to 50 minutes.
Take a dish, cover it with a towel, remove the baked bread from the oven onto the dish, cover it with a towel or napkin, and let it cool. Sprinkle with powdered sugar or vanilla sugar.
We invite you to familiarize yourself with a master class on making a loaf of bread with your own hands:
A video of preparing and decorating a loaf for a wedding will help you visually create your own culinary masterpiece!
It is recommended to reduce the temperature to 180 degrees after 30 minutes. Don't forget to place a container of water, adding it if necessary.
Bakeries offer to order for a special event, but it is possible to prepare a loaf of yeast dough at home, the main thing is to follow the proportions of the ingredients and put in the effort to knead.
Here is a simple recipe for baking a loaf with dry yeast:
- Melt 50 gr. natural butter. Separate the whites and yolks of 4 eggs.
- In 6 tbsp. spoons of milk at room temperature, stir 2 teaspoons of sugar, add 10 g. dry yeast (1 sachet), beat 4 yolks thoroughly with 3 tbsp. spoons of granulated sugar, combine with yeast mixture.
- In a separate bowl, beat 4 egg whites with 1 teaspoon of salt until foamy. Combine ingredients: pour 4 tbsp into a dish. premium wheat flour, add egg whites, butter and yeast mixture, mix thoroughly. Knead the dough until it stops sticking to your hands.
- Separate a fifth of the dough for decorations, form the rest of the dough into a ball, and place on a baking sheet lined with parchment paper.
- Make decorations and place them on the base. Sprinkle with water, let stand for 3 hours in a warm place, not allowing it to dry out. Cover with cellophane or a towel, sprinkling periodically with water. After 3 hours the dough will rise. Preheat the oven to 200 degrees in advance, place a container of water on the bottom, bake until golden brown on the bottom tier.
- As soon as the loaf reaches the desired blush, reduce the temperature to 180 degrees, cover the top of the loaf with foil, move it to the middle tier, and bake for another 1 hour.
- Carefully remove the bread, brush the crust with sweetened water, place on a plate, cover the bottom and top with towels.
After the loaf has cooled, meet the newlyweds.
If you follow the rules of kneading, time for raising and resting the dough, the wedding cake will turn out soft.
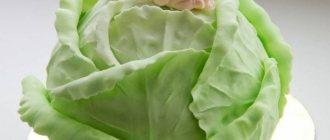
Photo of loaf dough
To amaze the wedding guests, we bake a festive two-tier loaf. Take all the products from the list above in double quantity.
Divide the dough into 3 parts:
We bake both parts at the same time on two baking sheets. After 30-40 minutes, when the crust is browned, use a knife to remove the top from the bottom with a diameter equal to the top part, brush with water, and place the second tier. Place in the oven until done.
Instructions for creating stucco decoration
At home, it is quite possible to make decor for a loaf. It is important to remember the following rule : all molded decoration is created on a separate board and only then attached to the loaf (as mentioned above - before or during the baking process).
It is not recommended to correct already fixed elements on the loaf itself ; you can damage the integrity of other decorations and the base itself. It’s better to remove them and edit them separately from the main composition.
Dough recipe
For moldings, three test options are used :
- Same recipe as the main pie , but a little denser;
- Fresh and dense , similar to that prepared for dumplings or dumplings;
- Tight egg dough , similar in recipe to dough for homemade noodles.
When using the bulk of the dough for decoration, 1/4 or 1/5 is separated from the total volume for decoration and flour is added to this dough. Its amount depends on the density of the base dough, usually 2-5 tablespoons .
It is also recommended to add 1-2 tablespoons of melted butter or vegetable (not flavored) oil for greater plasticity.
For unleavened dough use a recipe:
- 0.5 glasses of water;
- 1.5 cups flour;
- 0.5 teaspoon of salt.
For egg dough, add 3.5 cups (about 500 g) of sifted flour to 1 cup of fresh eggs (the contents are poured into a glass) or egg whites. The version on whites turns out almost white, on whole eggs it turns out golden . Add salt to the dough to taste.
Both versions of the yeast-free dough are thoroughly kneaded , while the liquid is gradually poured into the measured flour. Depending on the humidity in the room, you may need a little more or a little less flour. Prepared dough (yeast and yeast-free) needs to “rest” for 30-40 minutes before cutting .
Below are step-by-step instructions (with photos) for preparing several types of traditional jewelry .
ears
- the dough is rolled into finger-sized flagella ;
- one end of the flagellum (about half) is lengthened and made twice as thin;
- the thicker end is cut with scissors so as to give it the appearance of separated grains .
Leaves
Sequencing:
- Divide the dough ball into the required number of small pieces;
- roll out each piece to the desired shape (alternatively, roll out the dough into a thin layer and cut out the leaves with a plunger using a special form);
- cut along the edges, make veins using a stick or the blunt side of a knife , form a stalk from the flagellum.
Pigeon
To create this element you will need :
- from a lump of dough form the main figure of a bird , highlighting the head and tail;
- mold the wings separately ; a notch is made on them to imitate feathers;
- a beak is formed from a small piece;
- The wings and beak are attached to the finished body , and the figurine is given the desired position.
Secrets of preparing loaf dough for a wedding
Usually the loaf makers started making a loaf for a wedding on Saturday. It was on this day that the rituals accompanying the dough kneading were carried out. Now the wedding day can be in the middle of the week, so you need to start the process of cultivating the dough immediately before the celebration. To do this, you should clean the room, put on a clean apron and start kneading the dough with bright thoughts. It is better to use detailed recipes for wedding cakes.
You can bake a tasty and aromatic, soft and, of course, beautiful wedding loaf using successful dough recipes. The main thing is not to be distracted and cook with love, in a good mood.
How to bake a wedding loaf - important nuances for preparing the dough
Traditionally, creating a loaf requires yeast dough. It will be successful if you follow these rules:
- All ingredients must be at the same temperature (room temperature) and must be fresh.
- No drafts during the preparation of dough and dough!
- It is better to sift the flour twice - this way it will become light and airy.
- While forming the finished product, knead the dough for up to 10 minutes, which will help eliminate excess carbon dioxide and enrich it with oxygen. It is convenient when your hands are lubricated with vegetable oil; as a result, the dough will be more pliable.
The first recipe for a wedding loaf with kefir
For the test you will need:
- 0.5 l kefir
- 4 yolks
- 150 g sugar
- 1 tsp salt without a slide
- 50 g butter
- 10 g dry yeast
- 1 kg flour
- We make the dough - in a deep container, combine heated kefir, yeast, 1 tbsp. sugar and 2 tbsp. flour. Mix all ingredients well and cover with a towel. Leave for half an hour.
- Combine the yolks with salt, sugar and melted butter, mix everything. Combine the prepared dough and egg mass and mix. Next, gradually add flour and knead a soft dough that will not stick to your hands.
- Leave the dough covered with a towel for 1-2 hours in a warm place. After it has doubled in size, knead again and divide into 2 parts.
- Roll one part into a bun and use the other for decoration.
The second recipe for loaf dough with milk
- 300 ml milk
- 5 eggs
- 800-900 g flour
- 100 g butter
- 200 g sugar
- 50 g live yeast
- Vanilla
- 250 g flour
- Whites of 3 eggs
- 1 tsp salt without a slide
- Crumble the yeast in warm milk (100ml), add 2 tbsp. sugar and 4 tbsp. flour. Mix everything and leave in a warm place. When the yeast rises in a cap, you should start kneading the dough.
- Mix eggs, salt, sugar and melted butter in warm milk (200 ml), and add the yeast mixture.
Vanilla sugar will make the loaf more flavorful; it should also be included in the dough.
Add sifted flour in parts to the dough. Knead thoroughly - at least half an hour! And finally, leave it to “rest” in a warm place, covered with a towel.
Prepare dough for decorations from flour and egg whites, as well as salt. It should be smooth and uniform.
Required ingredients for the dough
To prepare dough for a loaf for a wedding, you need the following ingredients:
- premium wheat flour - 1.5 kg;
- fresh chicken eggs - 10 pcs;
- white sugar - 1 cup;
- dry yeast - 20 g;
- cow or goat milk - 0.5 cups;
- butter - 100 g;
- salt - 2 tsp;
- ground cinnamon (to taste).
All ingredients must be fresh and of high quality. The recipe for making the dough is quite simple and does not require special skills. The dough kneading process itself takes approximately 30–40 minutes.
Tribute to tradition
A wedding is one of the happiest days in the life of any person. There are many customs associated with this event that most families enjoy performing. One of them is the wedding loaf, which was baked for newlyweds back in ancient Rus'. The responsibility for preparing festive bread lies with the groom's relatives, who must bring the cake to the bride's house during the matchmaking, and then to the event itself.
It is important not only to bake the delicacy correctly, but also to choose the right person for such an important task. It is recommended to entrust cooking to a married woman who has a strong family and children.
This is often done by the groom's godmother or aunt. The good energy of a person is very important, which will bring the best thoughts into the product.
The loaf is baked directly on the wedding day; it is advisable to ensure that a married, respectable man sends the bread into the oven. When the dish is ready, it must be hidden from the evil eye.
There are several superstitions associated with wedding cakes. For example, it is believed that newlyweds who have tasted bread and salt will calmly go through any obstacles hand in hand. Another superstition says: whoever bites off the largest piece will be the head of the house. Whether this is true or not is unknown, but young people are happy to pay tribute to traditions and take part in biting the wedding loaf.
Wedding cake making traditions
In order for the cake baked for the wedding ceremony to bring prosperity and prosperity to the house, the following conditions must be observed when making it:
- Baking a loaf should be done by married women who are in a happy marriage. Thus, they transfer part of their positive energy to the newlyweds. Therefore, this process should not be trusted to widows, childless or divorced women, since their unhappy fate can greatly affect the life of a young family. In addition, the bride also cannot bake a loaf of bread for her wedding.
- The house should be fairly quiet and tidy while the wedding cake is being prepared. While making the dough, a woman should read prayers, clear her thoughts of negativity and think about the future well-being of her future family.
- Traditionally, the cake was baked at the groom's house on the eve of the wedding. It was always a man who sent it to the oven. This ritual provided the future family with good offspring.
- Particular attention was paid to size. The higher and larger the loaf was, the better and more prosperous the family life of the newlyweds was.
Traditions and signs
Any tradition, just like any custom, has its own amazing history. For example, a wedding loaf. In fact, the true name of this ritual is “bread and salt.” The pie itself was prepared not only on the occasion of a wedding celebration; invited dear guests were greeted with homemade baked goods. Bread baked by the mistress of the house meant wealth. A salt shaker was a talisman against evil spirits. Such an arsenal said that the receiving party was asking for God's mercy for its guests.
In ancient times, a loaf baked for a wedding was a symbol of blessing the new family. When they met, the young spouse's relatives presented the newlyweds with a special cake, thereby making it clear that they were welcoming the bride into their home and would treat her like a daughter.
Few people paid attention, but the shape of the pie was conceived for a reason. Round pastries symbolize the heavenly body - the sun
It is this that bestows the fertility of crops and, accordingly, prosperity to people. This kindness is at the heart of the loaf, and these good wishes are passed on to the young family by the older generation.
In Rus', even the preparation of a wedding loaf proceeded according to custom. A woman who was happy in her own marriage and had several children in excellent health had the right to knead the dough and bake bread. It was believed that the energy and positive attitude endowed with the cook are transmitted to the bride and groom
In addition, special attention was paid to decorating the pie, where each decorative image molded from dough had its own designation. Decorations for the loaf could be made after baking the base or from the very beginning:
- united rings indicate a marriage;
- a spikelet is compared to wealth;
- the image of birds speaks of mutual trust;
- roses are a symbol of beauty;
- viburnum symbolizes a strong union.
In past centuries, one loaf of bread was baked for a wedding, with which the young spouses were greeted. All those invited were to receive a piece of holiday bread. But today, views on this issue have changed dramatically. One loaf will not be enough, so custom allows you to bake two pies for the event. This is especially true for weddings
It should be noted: in the old days, people always paid attention to signs. Even the process of preparing a loaf was treated as something sacred:
- water and flour for cooking had to be taken from seven different containers;
- the preparation of the holiday pie was sent to the oven by a married man;
- a burst loaf was considered a bad sign;
- finished baked goods should be hidden from prying eyes;
- the process of dividing the pie rested on the shoulders of the godparents of the newlyweds;
- Each invitee must taste a piece of the wedding loaf.
Video: master class
An object lesson on decorating a festive cake:
For an inexperienced cook, baking a loaf is a difficult task; it is better to first practice on ordinary yeast pies and pies with decorations.
A solemn event - a wedding is associated with ancient folk traditions. Bachelorette party, bachelor party, ransom, bride's bouquet, wedding loaf originate in the depths of the Slavic epic .
Wedding bread is a good symbol of every wedding. According to tradition, relatives on the groom’s side should bake a loaf of bread for the wedding. A clean married woman with a strong family and healthy children is selected in advance. It’s great if the groom’s godmother bakes the loaf. The energy of a prosperous person leads to harmony and wealth in the new family. Bread is baked on the wedding day; the married man must put it into the oven. The baked pie is hidden from the evil eye until the moment of serving. The mother-in-law should serve the loaf to the newlyweds after arriving from the registry office or the wedding on an embroidered towel (long towel), giving a parting speech.
According to signs, newlyweds who have tasted bread and salt are not afraid of family troubles and adversity!
Whoever bites off the larger piece will have power in the house
Wedding cake decorations are also traditional. Spikelets symbolize wealth, doves - love, swans - fidelity, braids - fertility. And the round shape of the loaf itself is a symbol of the sun .
Photo of a loaf at a wedding
Decoration
Decoration of the loaf includes molded and woven dough decorations.
Sometimes, instead of parts created from dough, natural berries and flowers are used to decorate a wedding loaf, preferably bright ones and corresponding to the wedding symbols - viburnum, ears, grape leaves, roses.
Important! Color decoration (mastic, glaze) is used very rarely.
Depending on whether dough or other finishing options are used to decorate the loaf, the decorating process is carried out before/during baking or after the pie has completely cooled. In this case, the time for fixing the molded dough elements depends on how large the cake is planned and how long it will be baked:
- For small (25-30 cm in diameter and 10-15 cm in height) products, it is permissible to place the decor before baking.
- It is better to bake large pies until half-cooked without decorations, adding molding parts 15-20 minutes before the end. This will allow the decorative elements to bake to the required degree and not burn. They are attached to the hot cake by moistening the top with warm water. The decor can be greased with yolk without touching the main surface of the loaf, or the cake can be completely covered with grease.
- Cut flowers and leaves, berries and ears of corn are placed on or around the loaf immediately before serving.
- Ribbons and bows can be attached in advance, but no more than 2-3 hours in advance, otherwise the dough in the places of attachment will begin to dry out.
To give the baked product a beautiful, rosy appearance, it is brushed with whipped yolk before putting it in the oven. At the same time, decorations attached with whipped egg white (it acts as a “glue”) or water can also be lubricated with egg white or remain dry.
In the first case, the surface turns out to be monochromatic, in the second, the decorations stand out against a saturated background with a paler color.
After baking, the pie crust often feels tough, especially on the decorations. To soften it, use lubricant with melted butter. You can spray the surface with a cooking spray bottle with odorless vegetable oil, light syrup, and milk.
Important! The crust should absorb the grease and dry completely.
Salt shaker
A separate decorative detail for the wedding loaf is the salt shaker. It can be a separate product - carved wood, metal, glass, etc. - or part of a molded decoration of a pie.
If the second option is planned, a small circle of braiding or braiding is arranged on the “top” of the loaf. After baking (when the cake has already cooled), salt is poured into the resulting depression “in the frame.” The molded element is also used as a place to install a regular salt shaker.
Important: According to tradition, ritual bread is served on a towel. What should it be like? Where to buy and how to choose? More details here.
Symbolism of the elements
Any details that complement the main shape of the bread (the circle of the sun) - decorations, a towel, a salt shaker, decor made from natural materials or ribbons - should contain good wishes for the newlyweds and not carry a negative connotation .
The stucco motifs are dominated by stylized ones:
The compatibility of individual figures in decorating a loaf depends on the general meaning of the wishes of the young people. The emphasis can be on wealth, fidelity, love, or combinations of options with different meanings. A decor that harmoniously combines all the good wishes is considered successful.
Secrets of baking loaf at home
- It is better to bake the product in the middle of the oven, then it will bake evenly
- If the bread starts to burn on top, you can put foil on it;
- If you want to make your decorations unusual, you can tint part of the dough with cocoa, and then alternate the figures. You don’t have to grease the decorative elements with egg - then they will stand out against the general background;
- Periodically, the surface of the loaf needs to be moistened so that it does not become weathered or cracked;
- Using dry yeast, molding can be done immediately, live yeast should “play”, after kneading the dough is covered and kept warm for a couple of hours;
- To prevent the bottom of the loaf from becoming damp when cooling from moisture, place it on a towel or napkin;
- It is easier to remove stuck parchment paper when the bread is warm; you will have to soak it from a cold loaf;
- In a gas oven, additionally place a wide bowl with boiling water underneath so that the dough does not dry out. This method is rarely used for an electric oven.
The following decorations are used for the loaf:
- Braids. They are braided from two or three strips of dough;
- Flowers. Take a piece of dough, form it into a flat cake, make cuts along the edges so that the petals appear;
- Leaves. Roll out the dough, cut out the veins with a knife to make the products look more realistic;
- Ears. Form a thin strip, make cuts on both sides, lightly pull each edge to make the product more convex;
- Bird. The elongated oval is the body, then roll out the cake, form the wing and tail. Using a knife, make small cuts to imitate feathers.
Playing with colors
In order for the decorative details to be as different as possible from the background of the base, you need to know when and how to decorate the loaf. You can stick them on at the very beginning, before sending the product into the oven. But then you should not lubricate them with yolk. In this case, the cake itself will come out rosy, and its decorations will be white. You can go beyond such a monochrome “grisaille” and make a colored loaf. In this case, burnt sugar, cocoa, turmeric, paprika powder, and crushed dry tomatoes should serve as paints. Since the decorative details of the loaf are also edible, the dyes should be exclusively food-grade.
Why does the loaf settle after baking?
Cooking tips
:
- Opening the oven early for the first time. Place the bread in the oven; you can open the door no earlier than after 20 minutes.
- Preheat oven 10-15 minutes.
- Be sure to sift the flour. This is 40% success. The point of sifting is to enrich the flour with oxygen, then it will react better with the yeast.
- Don't be lazy to knead thoroughly. It’s hard physical work, but the quality and splendor of the cake depends on the duration and intensity of the kneading.
These are the reasons why the donkey loafs. In order not to lose face on the eve of the celebration, bake a trial version
. This way you will take into account the nuances and on the eve of the event you will bake an elegant baked product.
Wedding loaf at a celebration
How to make a loaf of bread with your own hands
The yolks are separated from the whites and thoroughly ground with sugar. By the way, the amount of sugar can be varied: some will like almost unleavened dough, while others will want a sweet pie. Add yeast: yeast dissolves best in warm milk. If you decide to add poppy seeds, cinnamon, cloves and other favorite spices, they are also added at this stage.
You need to sift the flour thoroughly (to start, take 6 glasses, then you will be guided by the consistency of the dough), add salt.
Make a small hole with your palms, into which we pour the mixture of yeast and yolks with sugar, as well as a little less than half a glass of vegetable oil (butter is fine), mix well.
The whites need to be beaten thoroughly, add them to the dough last, and gradually begin kneading. The mass should be elastic, and to prevent the dough from sticking to your hands, periodically sprinkle it with sifted flour. Knead thoroughly and for a long time, at least 20-30 minutes. This work is not easy, so often our ancestors at this stage called a happily married man for help.
When the dough is smooth and homogeneous, place it in a clean and lightly oiled bowl. Cover with a towel or cling film and leave in a warm place for 1.5-2 hours.
The dough should rise about 2 times, it needs to be kneaded again. We divide the dough into three parts: one will be used for making decorations, the second - for the loaf itself, the third - for the braid. Place parchment paper on a baking sheet, form a loaf, and wrap it in a braid.
Beat the egg and brush the top of the loaf with it. Preheat the oven to 200 degrees, place the base on a baking sheet for 20 minutes. If you put the loaf in an unheated oven, the dough may fall. After 20 minutes, reduce the temperature to 150 degrees, bring the bread until ready. It’s very easy to check: pierce it with a match or a toothpick - if it’s dry, then the loaf is ready. During the baking process, you need to apply an egg to the surface several times - then the loaf will be more rosy. Remove the finished bread from the oven and cover it with a towel.
Preparing the dough
The next step is to prepare the dough for the loaf.
Take ten eggs and separate the yolks. We will put one yolk aside; we will need it for greasing the loaf. The yolks need to be thoroughly ground with sugar. 150 grams of sugar will be enough for this. The ground yolks now need to be poured into the dough.
The next step is to add 6-7 cups of flour to the bowl. The whites that we had earlier must be beaten with a mixer. Next we need 100 g of butter. If you have vegetable oil, you can add it; otherwise, you can melt the butter in a water bath.
We must now add all these ingredients to a container with flour and add a little salt.
After all the ingredients are mixed, the dough needs to be kneaded well for about half an hour. The finished dough should not stick to your hands; to do this, add another half a glass of flour when kneading.
At the last stage, the dough is transferred to another container in which it should stand for several hours. After the time has passed, the dough must be kneaded well and still allowed to rise.
Cooking step by step:
So, let's prepare the ingredients for this excellent homemade bread: wheat flour, sugar, milk, butter, chicken eggs, salt and dry yeast (can be replaced with fresh - 30 grams).
First of all, let's take 150 milliliters of milk, a couple of tablespoons of granulated sugar, yeast and 4 tablespoons of wheat flour. Add yeast and sugar to warm (no more than 38 degrees) milk, mix and add sifted flour. You should get a mass with the consistency of sour cream - this is called dough. We will leave it warm for 40-45 minutes.
In the meantime, let's get to the rest of the ingredients: leave one tablespoon of milk for greasing the homemade loaf, and combine the rest with butter, salt and granulated sugar (3 tablespoons). Heat everything in a water bath or in the microwave until the butter melts.
The result was a milky-oil liquid mixture. Let’s cool it to a pleasant warm state, that is, up to 37 degrees.
During this time, the dough rose - it grew well and foamed. The yeast has woken up and started working - it’s time to start kneading the yeast dough.
Transfer the finished dough to a bowl of suitable size. Beat the eggs a little, leaving 1 yolk for greasing the workpiece. Add barely beaten eggs to the dough.
Then add some of the sifted wheat flour - about two glasses. Mix everything.
Now add the milk-butter mixture to the dough.
Mix and add the rest of the wheat flour.
After mixing, you will get this very sticky, watery and heterogeneous dough, which can hardly be called a dough
Let's move on to a very important stage - kneading the dough for the loaf.
Kneading this dough should be continued for at least 20 minutes. And I advise you to do it by hand! It's hard, right? But it’s worth it - we don’t bake LOAF every day! Gradually the dough will become more and more homogeneous, acquiring smoothness and elasticity. First it will begin to move away from the walls of the bowl, and then it will completely turn into a delicate, but at the same time elastic bun. Now cover the bowl with a towel made of natural fabric (this way the dough can breathe without getting windy). Let the dough rest for 1.5 hours. After 40 minutes (of the total time), gently knead the dough and return to a warm place.
This is how our bun grew - it became three times larger.
Now let's start shaping the homemade loaf. To do this, divide the dough into 2 parts - approximately 2 to 3.
We take the larger part and make a smooth round bun out of it. We transfer it to a baking sheet, which we cover with parchment and sprinkle with flour.
We make decorations from the second (smaller) kolobok. We divide it into 2 parts. We make a braid from one and lay it not very tightly to the base bun.
Next, we make a small braid and place it in the shape of a ring on the top of the loaf. This is a place for the salt shaker - we will insert a ball of food foil into it so that the depression does not grow during the baking process.
We make various decorations from the leftover dough - I have spikelets and flowers. We attach them to the loaf. But this is all optional and as your imagination allows.
We grease the future loaf with a mixture of yolk and milk (remember, we left them). Let the workpiece rest a little - about half an hour. Meanwhile, preheat the oven to 200 degrees. We bake the loaf at this temperature for the first 20 minutes, then turn it to 170°C and bake it for another 40 minutes. If your oven is browning a lot, you can cover the loaf with food foil at the end.
This is the homemade loaf we got! Rosy and delicious.
Cool it on a wire rack and remove the ball from the foil. The loaf is ready.
I also want to show you my second loaf. I prepared it using the same yeast dough, in a mold, but decorated it differently. For decoration, I used a dough based on wheat flour (250 grams) and egg whites (125 grams). This dough holds its shape perfectly and does not deform during baking.
A loaf at a wedding is a mandatory attribute of the holiday. It is increasingly being ordered in confectionery shops and bakeries. But you can prepare such baked goods yourself if you use proven recipes and decoration secrets.
Table of contents
You don't have to be a professional to know how to bake a loaf for a wedding. It is enough to put your soul into the process of making a cake for a wedding, having a few hours of free time and a good mood. And, of course, this wedding dish is prepared with love, as well as prayer.
Decoration of a wedding loaf
We recommend that you make a sketch according to which you will decorate the loaf. To make the decorative elements hold more firmly, you need to grease the bread with water. The dough should be rolled out thinly (up to 5 mm), and the surface should be constantly moistened with a spray bottle. It is better to bake massive items like doves or rings separately, then you can be sure that the surface of the loaf will not sag under their weight.
It is not so difficult to sculpt flat decorations; it is better to make them from unleavened dough without sugar, then they will remain light in color after baking. For the figures, grated dough is used: flour is rubbed into it until the consistency is similar to clay.
You can not decorate the product immediately, but 15-20 minutes before it is ready. It is taken out of the oven, decorated, and then put back into the oven, then the contours of the figures will remain clearer.