A beautiful wedding loaf is one of the main symbols of the celebration. According to the tradition of our ancestors, at a wedding, parents should meet the newlyweds in front of the house with a loaf of bread in their hands. This rich wedding bread represents family happiness and fertility. The richer and more beautiful the wedding loaf, the more happiness the newlyweds will have in their family life. Therefore, great importance is attached to its decoration. Look at our photo gallery of ruddy loaves and decide which loaf for matchmaking or loaf for a wedding you want to buy or bake.
Tradition of loaf baking
Baking a loaf has always been surrounded by various rules and rituals. Only married women with strong families with children were allowed to prepare a loaf for a wedding.
It was believed that through the warmth of their hands, women convey their experience, family life and happiness to the young family. During work, prayers were read and songs were sung.
Once prepared, a good wedding loaf could be so large and heavy that several donors had to carry it.
Saturday was considered the correct day to bake a loaf of bread. On the day off, the women who participated in the baking of bread came to the house with everything they needed.
Previously, special archaic devices were used for baking, for example, ritual millstones were used to grind flour. Today, weddings are celebrated throughout the week, so the rituals of baking a loaf are not observed.
Baking a wedding loaf at home is also a rarity; not everyone has ovens for baking such large bread. At the same time, pastry shops offer a large selection of beautiful and tasty loaves.
Only loving grandmothers of young people, who often pay tribute to traditions, are happy to present traditional holiday bread, made with love with their own hands.
Symbolism of the elements
Any details that complement the main shape of the bread (the circle of the sun) - decorations, a towel, a salt shaker, decor made from natural materials or ribbons - should contain good wishes for the newlyweds and not carry a negative connotation .
The stucco motifs are dominated by stylized ones:
- flowers – roses, daisies, cornflowers, etc. Depending on the type of flowers, decorations “wish” the newlyweds fidelity, passion, purity, joy;
- berries - grapes, viburnum. Viburnum symbolizes mutual understanding and love in the family, grapes symbolize prosperity;
- leaves and shoots . They complement flowers and berries, as if they “connect” the elements of the pattern;
- ears of corn - wishes for fertility, wealth, generosity;
- braids and braids - as a symbol of the unification of families, the unity of husband and wife;
- figurines of birds or animals , always in pairs - symbolism of true love, inseparability of the newlyweds. Most often, figurines of swans or doves are used;
- woven rings - as a sign of a completed marriage. Separate rings are not made on a loaf, with the exception of a salt shaker on the top of the pie;
- hearts are not a traditional element for Slavic symbolism; they indicate wishes for romantic love;
- ribbons and bows are designed as the edging of the product, as a connecting element and symbolize the strong connection between the spouses.
The compatibility of individual figures in decorating a loaf depends on the general meaning of the wishes of the young people. The emphasis can be on wealth, fidelity, love, or combinations of options with different meanings. A decor that harmoniously combines all the good wishes is considered successful.
Loaf at home
Today there are many different flavoring types of loaf. Loaves are baked with lemon zest, poppy seeds, jam and even mastic, which is popular today.
Next we will tell you how you can bake a traditional wedding loaf at home. In order to make a classic kalach, you first need to prepare all the ingredients. We need yeast, eggs, butter, salt, flour, sugar, and favorite spices.
In order to diversify the taste of the loaf, you can put some dried fruits in the dough. Dried apricots, raisins, or nuts will go very well with baked sweet bread.
In order for the loaf to turn out good and tasty, you must bake it in a good mood. All the emotions that a person experiences while doing such work are then passed on to those who will certainly try the bread.
Creative ideas
A loaf in a modern style can be made using food coloring and be of any color, shape or design. You can go beyond this monochrome design and make a colored loaf. Since the decorative details of the loaf are also edible, the dyes should be exclusively food-grade. The loaf itself can be round or oval. An alternative to loaf in the modern world is a baguette with caviar, cream with berries, fortune cookies, and other options.
Preparing the dough
Pour a glass of milk (you can also use water) into a container. The liquid does not need to be heated too much; it should be at normal room temperature, not boiling water.
Wedding day cards - which one to choose? 150 photos, best ideas, new products + instructions for creating a wedding card with your own hands- Wedding in winter: pros, cons and features (+45 photos)
- Outdoor wedding - organization ideas, tips and recommendations (62 photos + video)
Next, you need to dissolve 20 grams of yeast in a container with liquid. This substance must be stirred well so that there are no lumps left. Add a spoonful of white sugar and continue stirring.
Next you need to add flour to the container. If you have a sieve, you need to use it and sift a glass of flour. The dough should not be liquid. In order for the dough to brew well, you need to leave it to “rest.” An hour is enough time to continue working with the dough.
After an hour, the dough needs to be taken out; by this time it should have risen. Now we need to slightly heat the dough in a bowl of warm water.
Secrets of preparing loaf dough for a wedding
Usually the loaf makers started making a loaf for a wedding on Saturday. It was on this day that the rituals accompanying the dough kneading were carried out. Now the wedding day can be in the middle of the week, so you need to start the process of cultivating the dough immediately before the celebration. To do this, you should clean the room, put on a clean apron and start kneading the dough with bright thoughts. It is better to use detailed recipes for wedding cakes.
You can bake a tasty and aromatic, soft and, of course, beautiful wedding loaf using successful dough recipes. The main thing is not to be distracted and cook with love, in a good mood.
How to bake a wedding loaf - important nuances for preparing the dough
Traditionally, creating a loaf requires yeast dough. It will be successful if you follow these rules:
- All ingredients must be at the same temperature (room temperature) and must be fresh.
- No drafts during the preparation of dough and dough!
- It is better to sift the flour twice - this way it will become light and airy.
- While forming the finished product, knead the dough for up to 10 minutes, which will help eliminate excess carbon dioxide and enrich it with oxygen. It is convenient when your hands are lubricated with vegetable oil; as a result, the dough will be more pliable.
The first recipe for a wedding loaf with kefir
For the test you will need:
- 0.5 l kefir
- 4 yolks
- 150 g sugar
- 1 tsp salt without a slide
- 50 g butter
- 10 g dry yeast
- 1 kg flour
Cooking steps:
- We make the dough - in a deep container, combine heated kefir, yeast, 1 tbsp. sugar and 2 tbsp. flour. Mix all ingredients well and cover with a towel. Leave for half an hour.
- Combine the yolks with salt, sugar and melted butter, mix everything. Combine the prepared dough and egg mass and mix. Next, gradually add flour and knead a soft dough that will not stick to your hands.
- Leave the dough covered with a towel for 1-2 hours in a warm place. After it has doubled in size, knead again and divide into 2 parts.
- Roll one part into a bun and use the other for decoration.
The second recipe for loaf dough with milk
Ingredients:
- 300 ml milk
- 5 eggs
- 800-900 g flour
- 100 g butter
- 200 g sugar
- 50 g live yeast
- Vanilla
For decoration:
- 250 g flour
- Whites of 3 eggs
- 1 tsp salt without a slide
Cooking steps:
- Crumble the yeast in warm milk (100ml), add 2 tbsp. sugar and 4 tbsp. flour. Mix everything and leave in a warm place. When the yeast rises in a cap, you should start kneading the dough.
- Mix eggs, salt, sugar and melted butter in warm milk (200 ml), and add the yeast mixture.
Vanilla sugar will make the loaf more flavorful; it should also be included in the dough. - Add sifted flour in parts to the dough. Knead thoroughly - at least half an hour! And finally, leave it to “rest” in a warm place, covered with a towel.
- Prepare dough for decorations from flour and egg whites, as well as salt. It should be smooth and uniform.
Decorating the loaf
A traditional loaf definitely needs to be decorated. This way the appearance of the loaf will be more festive and elegant.
Today you can find many different ways to decorate and photograph a wedding loaf with different decor. But there are traditional designs and patterns for decoration, which we will describe below.
It should also be said that there are two ways to decorate a wedding loaf. We have described a method in which all decorations are attached to the loaf before baking in the oven.
You can also attach all the decorations when the loaf is ready. In order for the figures to hold well, you need to attach them about 15 minutes before the product is completely ready. This way the decorations will have clear shapes.
Good durable decorations can also be made from more pliable shortbread or unleavened dough.
Recipes for a wedding loaf can be very different; you can choose a recipe for baking that will include several types of dough. You can decorate the loaf with various dough designs.
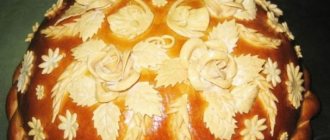
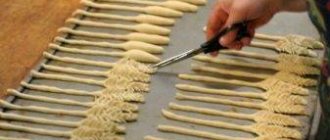
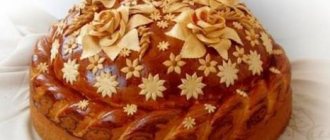
A symbol of fertility, ears of wheat are made from a piece of dough that is rolled into a tight rope. We make one end wide - this will be a spikelet, and the other thin - this will form a stem. This decor is laid in a circle, and then the grains are drawn on the wide part of the piece of dough using scissors.
The traditional decor for loaves is braided braids. A braid of dough is placed along the edge of the loaf, giving it a frame. In order to make a braid, a piece of dough is divided into three strands, braided, and then secured to a loaf.
To make leaves from the dough, which symbolize youth and prosperity, you need to cut out diamonds from the rolled out sheet, and cut the edges of the figures into a herringbone pattern.
You can also place bunches of viburnum on the loaf. These berries, as a symbol of abundance, would look very appropriate on wedding bread. We make thick small balls from the dough, lay them out in clusters and attach them to the surface of the product.
You can also make roses from the dough. To do this, several circles need to be wrapped one inside the other and the edges turned outward. A rosy flower decoration will bring beauty and prosperity.
You can also make swans from the dough. To do this, as for a spikelet, divide the dough into two parts - the thin one will be the neck, and the thick one will be the body of the bird. From the narrow part of the dough you need to form a beak and head, and lay out the wide part and cut through the feathers with scissors, making small grooves on the edges of the dough.
If you decorate a loaf with swans, there must be two birds. This will symbolize the newlyweds' long life together.
Even if you do not plan to bake a loaf of bread with your own hands, in order to pay tribute to old traditions, think in advance where you can order a wedding loaf. A beautiful and lush loaf will be a wonderful decoration for a wedding table.
Design
There are a great many options for how to decorate a wedding loaf. Usually, a recess is made in the center of the loaf into which the salt shaker is installed. Wedding baked goods are decorated with bunches of viburnum (a symbol of love and abundance), a braid, symbolizing the well-being and strength of the family, ears of wheat (a symbol of fertility and the emergence of complete prosperity), flowers, symbolizing love, and other decorations.
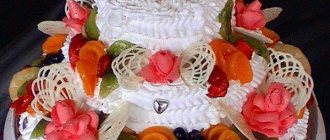
Photo of the wedding loaf
Decoration
Decoration of the loaf includes molded and woven dough decorations.
Sometimes, instead of parts created from dough, natural berries and flowers are used to decorate a wedding loaf, preferably bright ones and corresponding to the wedding symbols - viburnum, ears, grape leaves, roses.
Important! Color decoration (mastic, glaze) is used very rarely.
Depending on whether dough or other finishing options are used to decorate the loaf, the decorating process is carried out before/during baking or after the pie has completely cooled. In this case, the time for fixing the molded dough elements depends on how large the cake is planned and how long it will be baked:
- For small (25-30 cm in diameter and 10-15 cm in height) products, it is permissible to place the decor before baking.
- It is better to bake large pies until half-cooked without decorations, adding molding parts 15-20 minutes before the end. This will allow the decorative elements to bake to the required degree and not burn. They are attached to the hot cake by moistening the top with warm water. The decor can be greased with yolk without touching the main surface of the loaf, or the cake can be completely covered with grease.
- Cut flowers and leaves, berries and ears of corn are placed on or around the loaf immediately before serving.
- Ribbons and bows can be attached in advance, but no more than 2-3 hours in advance, otherwise the dough in the places of attachment will begin to dry out.
To give the baked product a beautiful, rosy appearance, it is brushed with whipped yolk before putting it in the oven. At the same time, decorations attached with whipped egg white (it acts as a “glue”) or water can also be lubricated with egg white or remain dry.
In the first case, the surface turns out to be monochromatic, in the second, the decorations stand out against a saturated background with a paler color.
After baking, the pie crust often feels tough, especially on the decorations. To soften it, use lubricant with melted butter. You can spray the surface with a cooking spray bottle with odorless vegetable oil, light syrup, and milk.
Important! The crust should absorb the grease and dry completely.
Salt shaker
A separate decorative detail for the wedding loaf is the salt shaker. It can be a separate product - carved wood, metal, glass, etc. - or part of a molded decoration of a pie.
If the second option is planned, a small circle of braiding or braiding is arranged on the “top” of the loaf. After baking (when the cake has already cooled), salt is poured into the resulting depression “in the frame.” The molded element is also used as a place to install a regular salt shaker.
Important: According to tradition, ritual bread is served on a towel. What should it be like? Where to buy and how to choose? More details here.
Traditions. How it was before
There are a large number of traditions and signs that must be observed throughout the preparation for the wedding.
Preparing a wedding loaf is no exception. Since ancient times, before the start of the ceremony, the man’s parents met the heroes of the occasion in their home and treated them with bread and salt. This is due to the fact that after the wedding, the newlyweds lived in their husband’s house. Nowadays, newly-made families are buying their own homes, and time is precious, so the tradition has lost its relevance. They began to serve loaf of bread right in front of the entrance to a restaurant or banquet hall.
The loaf is prepared one day before the ceremony, and the parents themselves must bake it. You also need to prepare an embroidered towel on which to place it. Don't forget to take a small container of salt with you; place it on the very top of the bread.
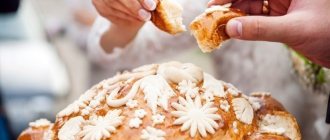
Young parents approaching the house are greeted with joy. One is holding a baked gift, the other is holding an icon. Parents say parting words to their children and offer to eat a loaf of bread, after dipping it in salt. According to legend, the one of the young people who bites off a larger piece will occupy a dominant position in the house.
According to one of the beliefs, after the newlyweds have treated themselves, the groom’s mother must hide the loaf - now no one is allowed to touch it. If, after the celebration, you take it to church as a donation, your family life will be happy.
At modern weddings everything is much simpler; guests can be treated to a loaf of bread. We invite you to hold a fun competition: the bride and groom receive an equal share of delicacies and run to treat those present - whoever succeeds faster will be the breadwinner.
After all the action, the groom took the bride in his arms and carried her into the house. Everyone else was invited to follow them. At the groom's home, guests were offered light snacks and drinks.
Making your own salt dough
In addition to the traditional edible loaf, you can make a replica of this festive dish from salted dough.
- flour – 2 tbsp;
- salt – 1 tbsp.;
- water – 125 ml;
- starch - 2 tbsp. l.;
- PVA glue – 2 tbsp. l.
The cooking process does not take much time:
- Mix the ingredients. Divide the dough into 3 parts - for the loaf, braid and decorations.
- Take a round bowl, turn it over, cover the top with the finished dough, no more than 1 cm thick. Tip: to prevent the dough from sagging when separated from the bowl, the structure can first be placed in the oven overnight, preheated to 70-80°C.
- Decorate the loaf with a braid, leaves, flowers, and build a salt shaker on top from a strip of dough.
- Bake for 1.5-2 hours at low temperature until browned.
- The finished loaf can be painted with watercolors.
A homemade loaf of salted dough is used as a table decoration and can later be kept as a souvenir of the event.
The history of the origin of the loaf in Rus'
The custom of serving special pastries at weddings originated with the ancient Slavs. In Ancient Rus', bread was considered a great gift from the earth's nurse, and the sun was the main patron. Therefore, the predecessor of the holiday loaf was round like the sun and symbolized fertility, abundance and prosperity.
Origin of the word "Loaf"
There are several assumptions about the origin of the name of ritual bread in Rus'. The most common of them comes down to the fact that the word “loaf” comes from the word “cow”, which in Slavic dialects means “bride”. And the suffix “ay” in the word is a symbol of a bull, that is, a man. Thus, the loaf personified fertility, the unity of the feminine and masculine principles.
Cooking step by step:
So, let's prepare the ingredients for this excellent homemade bread: wheat flour, sugar, milk, butter, chicken eggs, salt and dry yeast (can be replaced with fresh - 30 grams).
First of all, let's take 150 milliliters of milk, a couple of tablespoons of granulated sugar, yeast and 4 tablespoons of wheat flour. Add yeast and sugar to warm (no more than 38 degrees) milk, mix and add sifted flour. You should get a mass with the consistency of sour cream - this is called dough. We will leave it warm for 40-45 minutes.
In the meantime, let's get to the rest of the ingredients: leave one tablespoon of milk for greasing the homemade loaf, and combine the rest with butter, salt and granulated sugar (3 tablespoons). Heat everything in a water bath or in the microwave until the butter melts.
The result was a milky-oil liquid mixture. Let’s cool it to a pleasant warm state, that is, up to 37 degrees.
During this time, the dough rose - it grew well and foamed. The yeast has woken up and started working - it’s time to start kneading the yeast dough.
Transfer the finished dough to a bowl of suitable size. Beat the eggs a little, leaving 1 yolk for greasing the workpiece. Add barely beaten eggs to the dough.
Then add some of the sifted wheat flour - about two glasses. Mix everything.
Now add the milk-butter mixture to the dough.
Mix and add the rest of the wheat flour.
After mixing, you will get this very sticky, watery and heterogeneous dough, which can hardly be called a dough
Let's move on to a very important stage - kneading the dough for the loaf.
Kneading this dough should be continued for at least 20 minutes. And I advise you to do it by hand! It's hard, right? But it’s worth it - we don’t bake LOAF every day! Gradually the dough will become more and more homogeneous, acquiring smoothness and elasticity. First it will begin to move away from the walls of the bowl, and then it will completely turn into a delicate, but at the same time elastic bun. Now cover the bowl with a towel made of natural fabric (this way the dough can breathe without getting windy). Let the dough rest for 1.5 hours. After 40 minutes (of the total time), gently knead the dough and return to a warm place.
This is how our bun grew - it became three times larger.
Now let's start shaping the homemade loaf. To do this, divide the dough into 2 parts - approximately 2 to 3.
We take the larger part and make a smooth round bun out of it. We transfer it to a baking sheet, which we cover with parchment and sprinkle with flour.
We make decorations from the second (smaller) kolobok. We divide it into 2 parts. We make a braid from one and lay it not very tightly to the base bun.
Next, we make a small braid and place it in the shape of a ring on the top of the loaf. This is a place for the salt shaker - we will insert a ball of food foil into it so that the depression does not grow during the baking process.
We make various decorations from the leftover dough - I have spikelets and flowers. We attach them to the loaf. But this is all optional and as your imagination allows.
We grease the future loaf with a mixture of yolk and milk (remember, we left them). Let the workpiece rest a little - about half an hour. Meanwhile, preheat the oven to 200 degrees. We bake the loaf at this temperature for the first 20 minutes, then turn it to 170°C and bake it for another 40 minutes. If your oven is browning a lot, you can cover the loaf with food foil at the end.
This is the homemade loaf we got! Rosy and delicious.
Cool it on a wire rack and remove the ball from the foil. The loaf is ready.
I also want to show you my second loaf. I prepared it using the same yeast dough, in a mold, but decorated it differently. For decoration, I used a dough based on wheat flour (250 grams) and egg whites (125 grams). This dough holds its shape perfectly and does not deform during baking.
A loaf at a wedding is a mandatory attribute of the holiday. It is increasingly being ordered in confectionery shops and bakeries. But you can prepare such baked goods yourself if you use proven recipes and decoration secrets.
Table of contents
You don't have to be a professional to know how to bake a loaf for a wedding. It is enough to put your soul into the process of making a cake for a wedding, having a few hours of free time and a good mood. And, of course, this wedding dish is prepared with love, as well as prayer.