Not a single wedding takes place without a photo session of the newlyweds and guests, because all relatives and friends want to leave a small memory of the holiday. If you don’t want to look for a suitable background for a photo shoot, you can order or make a wedding banner that will add zest to the decor of your celebration and save you from unnecessary hassle. The svadebka.ws portal will tell you how a wedding banner can be useful and how to choose the right background for photos.
Photo zone in the style of the night sky
What could be more romantic than a night sky with a bright crescent moon?! Nothing! Therefore, this idea can be successfully transferred to the world of weddings and make an original photo zone in the style of the night sky, making a huge crescent moon with your own hands to create stunning frames against its background.
Materials and tools:
- 2 MDF boards measuring 300*150 cm;
- 6 pine boards measuring 10*15 cm;
- box of wood screws;
- wood glue;
- wood putty;
- pencil and string;
- jigsaw;
- sanding machine or sandpaper;
- screwdriver
Time: 60-90 minutes.
Step-by-step instruction:
- Mark 150 cm from the edge of the board (on the narrow side).
- Drive a nail into the mark. Tie one end of the string to a pencil and the other to a nail in the board. Draw an even circle. Pull the string as tightly as possible to get straight lines.
- Draw a crescent moon. Do the same on the other side, drawing a second crescent.
- Cut out the crescent moon templates using a jigsaw.
- Cut the pine boards into pieces and glue them along the contour of the crescent at approximately equal distances from each other.
- For security, attach the pine boards to the crescent using screws.
- Cut the pine boards into pieces measuring 3*10 cm. Glue them to the “shelves” on MDF.
- For reliability, fasten them with screws.
- Apply wood putty to the screws.
- When the putty is dry, sand down the areas with screws.
- Crescent is ready! All that remains is to paint it. Usually a gold or silver shade is used, which looks beautiful against a dark blue background.
Outdoor advertising
Billboards
Billboards are a good way to promote wedding salons. However, you should remember that the price for placing an advertising poster varies from 10 to 20 thousand rubles per month, which is why you should not order a billboard for a long period. This can be done at the beginning of the wedding season and when the store opens.
Banners
Typically, banners are placed in close proximity to the business or store they are advertising. Wedding salons are an exception to this rule - you can place a banner in a place with the highest traffic, for example, in the subway. The main thing is that the address is written large on it (in large cities you can also mention which metro station the salon is located near). You can read more in the article about advertising banners, types and placements and production costs.
Signposts
Signboards are rightfully considered one of the most effective advertising tools. Order this simple design for yourself, but do not overuse the text - it should show an attractive photo of the wedding dress and the most basic information about the salon. Don’t print a price list or a full range of services—passers-by are unlikely to stop to read it. An interested bride will in any case visit the salon to learn more about all the information about you.
Expensive wine in original packaging
An original wedding gift can be a collectible wine in an unusual package - a wooden box with the wedding date, which you can easily make by following this master class with step-by-step photos and descriptions. You can present such a surprise to the newlyweds with the words: “You should open this wine on your first wedding anniversary!”
Materials and tools:
- boards 1 cm thick and of different sizes (2 pcs. – 13*38 cm, 2 pcs. – 11*38 cm and 2 pcs. – 11*11 cm);
- iron numbers;
- hammer;
- glue;
- self-tapping screws;
- bricks;
- cloth;
- drill;
- screwdriver.
Time: 60 minutes.
Step-by-step instruction:
- Glue all the components of the box together. To make them fit better together, use bricks.
- Clean the surface of glue. This is what the box should look like!
- Drill holes along the contour of the box.
- Place the numbers on the box lid however you like. Use a pencil to mark the locations for the screws.
- Screw the numbers onto the lid (they can correspond to either the wedding date or the first anniversary). Now your original handmade gift is ready!
Photovisi
Photovisi is the simplest service that allows you to create simple collage banners from your photos. You just need to select the template you are interested in and then add your photos to it. This way, you can create a simple banner in just a few clicks. Unfortunately, there is no advanced editing functionality here.
The premium version will only give you access to more templates.
Cost of making a wedding banner
The price of a wedding banner is calculated very simply: we multiply the surface area by the cost of printing 1 sq. m. m and we get the result. The cost of processing the canvas is already included. All other additions in the form of a rigid frame, exclusive design are provided if necessary - we are ready to send a detailed calculation in response to your request.
So, how much does a wedding banner cost?
Payment is possible in any available way!
| Name | Price |
| Fair price for printing on a wedding banner per 1 sq. m, taking into account all necessary processing and fastenings. | 400 rub. |
| Additionally | |
| Rent of a floor stand-frame for tensioning depending on the size of the banner. | from 1600 rub. |
| Creation of a unique design layout based on the client’s wishes and depending on the complexity. | from 1000 rub. |
| Installation of a banner at a wedding venue, depending on the complexity. | from 1500 rub. |
The price is indicated for retail orders; for large projects and large-scale tasks, we can certainly guarantee additional pleasant discounts.
Material. When ordering the production of a wedding banner, you need to pay special attention to the materials; they must be non-toxic, not have a strong odor, and the print quality must be as high as possible without graininess (pixels) and noticeable lines of the print head. We comply with all these requirements, use only time-tested materials, the best printers in the industry, as well as brand new, undamaged structures for attaching the web
Deciding on the size of the banner for the wedding.
Everything is very simple! If you are planning to decorate a wall, then simply proceed from the size of the space; if you want to install a wedding press banner in the form of a floor backdrop, then the most popular sizes are 2X2 and 2X3 meters. However, if possible, we recommend ordering a slightly higher height so that the stand frame does not fall into the frame.
Design!
Adjusting standard layouts is completely
free
. We are ready to correct the content, font, names of the newlyweds, wedding date, etc. Only after all approvals, changes and approval of the design on your part, the final product will go into production. Creating unique design projects according to individual wishes will be a little more expensive, from 1000 rubles. depending on the complexity.
PicCollage
PicCollage is a service that has a well-developed mobile application for creating your own banners and collages. Using this application is as simple as possible - just upload the original photo, then add text and change the fonts in it, add stickers, effects.
An important advantage is that it is completely free to use, but for this you will have to put up with advertising.
How to make a wedding banner with your own hands
To make a stylish wedding banner-garland with an inscription, you will need the following materials:
- white cardboard for background;
- cardboard in blue (or any other contrasting) color for the backing;
- color printer;
- glue stick;
- figured hole punch for processing edges;
- scissors, stationery knife;
- ribbon for hanging.
Step-by-step instruction:
- Select the appropriate font, size and color for the inscription on the computer, write and print the letters on a printer on white cardboard. If it is not possible to print on cardboard, use regular writing paper - in this case, the printed blanks will need to be glued onto white cardboard (otherwise the backing will show through the thin paper). Trim the edges of the letter blanks according to the selected size.
- Cut the blue backing cardstock to the required size (they should be larger than the white letter stock).
- Punch the edges of the backing with a shaped hole punch.
- Glue both parts (white and blue).
- Using a knife, make two slits on each letter for the tape. In order for the letters to stay in place and not move, the holes must be smaller than the width of the tape.
- Thread the ribbon through the letters and hang in the desired location.
How to apply a design or monogram?
You can apply any image to the track in the following ways:
- cut out the original from the oracal and stick it, for example, on fabric
- cut out a stencil from the oracal, stick it on, paint it with suitable paint, remove the stencil
- print on fabric
- print on banner fabric
As you understand, the last option is the least labor-intensive.
Ideas for a wedding banner
This can be a solid canvas, sealed with a background pattern, as well as an original banner made with three-dimensional elements, including a three-dimensional 3D image. The latter type can cause a real sensation and a lot of vivid emotions, although such pleasure is by no means cheap.
Wedding banner idea photo
So, types of banners:
- Traditional
- a banner layout with the names of the bride and groom, the wedding date, images of hearts, rings and other wedding attributes.
Fonts are selected depending on the style and theme. For example, in a retro style you should
use antique inscriptions with scuffs; a pirate or gangster theme requires sharp, sweeping and careless inscriptions. - With photographs of the bride and groom
. You should post photos not in close-up, but in a set of several photos - childhood and youth, the period of acquaintance, the beginning of a love story. There should not be too many photographs, otherwise the newlyweds will get lost in their background during the photo shoot. You can add several large inscriptions that reflect the theme of the celebration, for example, “Happy wedding day,” “New happy family,” the names of the young spouses and the date of the event. Such a banner can be decorated around the perimeter using floral decor, bows, and balloons. - Caricature
.
It is performed in close-up, and the photograph of the young people with their “duplicates” in the background, made in a humorous touch, immediately brings a lot of positive emotions
and liberates the atmosphere of celebration. This banner can be recommended as a gift for young people. This will be a real surprise, will cause a stir and a lot of positivity - after all, you can order a humorous drawing from the artist simply from photographs, without directly posing the “models”. - Press wall
.
This is one of the most common banner canvases. It involves a grid of small repeating inscriptions, for example, with the names of spouses or images that correspond to the theme and succinctly reflect the essence of the event. Such a banner is a universal option
, since the very concept of its construction suggests the best conditions for focusing on people. This is an unobtrusive informative background that emphasizes events. You can order it in a professional studio, providing a preliminary sketch with your wishes. And if you have skills in working with computer graphics programs, make the design yourself and print it in a printing house. The frame can be made from metal-plastic pipes, wood, or rent a ready-made one. - Volumetric banners
.
This is a very effective type of background pattern, which involves overlay elements. There are also 3D printing technologies that realistically recreate the volume effect on a flat canvas. Tantamareskis are very popular nowadays. This is a background made in a specific theme with cutouts for faces or full body. For example, you can play with the castle theme
and decorate the banner with decorative elements that match the season.
In summer it could be a banner with butterflies and flowers, sprigs of berries, in winter it could be snowflakes and icicles. You can make decorative elements from organza, tulle, satin, paper, decorate the composition with fresh
or artificial flowers, gluing them to the finished canvas in several layers. At the same time, printed elements, which are difficult to make by hand, and applied decor will be effectively combined. For example, on special websites on the Internet you can find a beautiful template with flowers that matches the style of the wedding, print it as a base and complement it with decorative or fresh flowers. - Garland banners
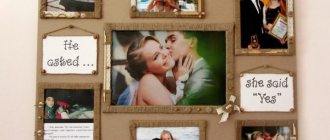
. This type of banner involves stretching it, which you can hold in your hands during a photo shoot, and during the celebration you can decorate the interior.
Quozio
A small service for creating posts with text. You just need to enter the quote into the form and then select the template you are interested in. Now you can download the graphics and use them, for example, on social networks.
The positive aspect of the service is that it is completely free, but there is also a negative aspect - quite old templates, some of which will seem strange in our time.
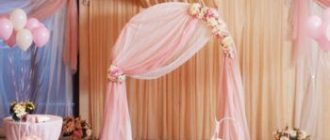
Beautiful decoration of a wedding hall with fabric
A wedding hall decorated with airy transparent fabrics looks beautiful and stylish.
Before purchasing material, you need to calculate how many meters of fabric you need to decorate the hall for the wedding, and also choose the desired shade. For these calculations, it is best to invite a professional who will first measure the room and draw up a decoration plan.
The most popular types of fabrics for decorating the hall are guipure, tulle, mesh and chiffon. They look especially beautiful and gentle as wall decor. You can also decorate the ceiling with them, this will give the wedding an oriental charm.
If you need to decorate the chairs, you can sew elegant covers for them. If the tablecloth is decorated with soft flounces along the edge, then you can tie a bow from the same fabric on the back of the chair.
The combination of white tablecloths and red details in the form of frills, napkins or bows is especially beautiful. This design must be compatible in color with the curtains and walls to avoid cluttering with color.
Particular attention is paid to the place of the bride and groom. You can stretch a regular Christmas tree garland under the fabric decoration
The result will be an unusual, muted glow that will add a feeling of celebration.
Photo of an interesting wedding hall decoration design
Photo of a chic wedding hall decoration with fabric
To ensure that the feeling of celebration does not leave during the entire banquet, the wedding hall needs to be decorated gently and at the same time solemnly, beautifully. Various methods are suitable for this purpose: using balls, fabric or flowers. The main thing is that the decoration does not stand out from the overall style of the wedding.
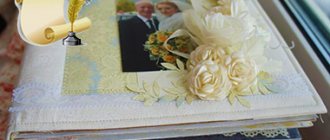
Several wedding album options
On store shelves you will find a variety of photo albums with different types of photo mounting in them. You can find a master class on how to design an album with your own hands on the Internet.
Sheets with “pockets” for photographs.
Plastic transparent envelopes protect the photo from damage and dust. You can easily take out the photos and swap them around. Such mounts are faceless, identical, suitable for photographs of the same format. The album will look like just a series of frames. The cover is chosen according to the tastes of the owners.
Sheets - magnets
This newfangled invention allows you to place pictures from different angles. They are applied to the page and held on it with an adhesive substance. The photographs are covered with a special film on top. This is a convenient, beautiful original option. But over time, you don’t know how the magnetic tape will behave, or whether the adhesive will dry out. In this case, you may simply lose the pictures; they will fall out of the album, no matter how strong the cover is.
Fastenings with “corners”
This, although outdated, is a reliable way to store family photos. Such a tome can be made in the old style. After all, that’s how they used to attach pictures to albums. First, beautiful carved corners were glued onto thick sheets, and then portraits were inserted into them. And as practice shows, such fastenings survived more than one generation, and the history of the family in photo albums was kept without loss.
Look on the Internet for a master class on decorating corners. If the album is stylized in an antique style, decorative elements can be placed on such mounts - lace, sparkles, appliqués. If the cover is tasteful, the result will be a unique vintage - an exclusive work of decorative creativity.
Captions under photographs
A wedding album is not just a series of photographs. Comments, signatures and wishes turn it into a family heirloom. You won’t need a master class on how to design inscriptions with your own hands. Show your imagination. Then the photographs will find a voice and sound. How can this be done practically? On the first sheet place the main ceremonial photograph of the newlyweds. Under it you can write “Congratulations to your beloved (beloved).” Here the bride and groom can leave warm words about their feelings for years to come. Surely there will be photos of parents and close relatives. Under the photos in the album, ask them to write their wishes or parting words. Adults will be happy to do this.
Your DIY wedding photo album can be anti-stress therapy on cloudy days for your family. Warm memories of a happy start to family life will help restore freshness and depth of feelings. Instead of arguing, look at wedding photos together, sitting on the couch head to head. And all problems will disappear.
Decorations
Next we will add some decorative embellishments. To do this, we will use the Free Shape tool. This is not the only tool you can use to decorate your work.
If you have any ideas of your own, you can draw them freehand with the Brush tool as you like. You can also take png pictures with a transparent background and insert them as well. There are simply a lot of decoration options, all you need is your imagination.
From the shapes already created in Photoshop, I chose hearts. Now we place them the way we like.
You can change the stroke and fill of hearts from above in their settings
The drawings against the background of the photo stand out very much and take all the attention to themselves, I suggest reducing their opacity to 10-15%
To make it convenient to edit the opacity of all hearts at once, and not individually, let’s combine the layers with them into one group. To do this, hold down the Shift key, select all the layers with hearts and click on the “Create a new group” button. They will automatically merge into it. You can change the name of a group by double-clicking on the group name.
The function is very useful, because it allows you to edit several objects at once without clicking on them separately.
Hall decoration and wedding cake
Decorating a wedding in red and white opens up endless possibilities for choosing styles and using various decorating techniques. The right shade of red and the appropriate decorative elements can transform a celebration room into a luxurious baroque ballroom, a sunny veranda of a country house, or a romantic living room from the turn of the last century.
Options for hall design and on-site registrationRestaurant design
Baroque. A distinctive feature of a wedding in red and white in the Baroque style is the abundance of luxurious decor. These are lush garlands of red and white large-flowered roses, rich draperies, dishes with floral paintings or gold monograms. Draperies can be decorated with velvet bows embroidered with small pearls. As for the choice of shades for decorating a red and white wedding hall, then it is worth giving preference to creamy tones of white and rich shades of red - garnet, burgundy, cherry.
Country. A light, democratic country style will create a friendly and relaxed atmosphere at a wedding celebration. The optimal color scheme for this style is milky white and strawberry or light cherry shades of red. Red and white checkered napkins, wicker baskets for bread and flower arrangements will organically fit into the decor of the festive table. When choosing floral material for decorating a wedding in red and white in country style, it is advisable to adhere to the principle of seasonality. The charm of the spring season will be emphasized by tulips and hyacinths. In summer, fragrant roses reign. Compositions of white and brick-red chrysanthemums are suitable for autumn decor. And in winter, the decoration of the banquet hall will be organically complemented by bouquets of gerberas, decorated with openwork asparagus branches.
Romantic style. The tenderness and charm of the romantic style will not leave anyone indifferent. When choosing a color scheme for decorating a wedding hall in red and white, it is advisable to focus on light tones of red. Coral shades are ideal. The main element of textile decor is translucent organza, draped with light folds. The choice of flowers for floral arrangements is very extensive. These can be mono-bouquets of half-opened buds of white and coral roses, arrangements of roses and daisies, bouquets of white orchids and red gerberas.
Traditionally, the festive feast is crowned with a wedding cake. Nature itself made sure that red and white wedding cakes delight us with magnificent taste and color combinations. Strawberries with delicate whipped cream, cherries with aromatic vanilla cream, airy meringue with fragrant raspberries - this is a real fireworks display of exquisite tastes. Confectioners will recreate any style when decorating a red and white wedding cake. The confectionery masterpiece can be decorated with flowers, ribbons or filigree ornaments made from sugar mastic. Recently, decor made from natural materials has been very popular: berries and fruits covered with a thin layer of jelly or caramel, candied rose petals, and fresh flowers.
Thematic
Often, photo zones are designed in full accordance with the chosen wedding style, supplemented with accessories that match the theme:
- In rustic style (pastel shades, light chairs, light wooden background, flowers, barrel, straw hat and other attributes).
- Marine style usually involves a blue and white color scheme, and the area itself imitates part of a sea vessel (ship, boat, yacht or separate cabin). Possible decorative elements are a fishing net, ropes, anchor print, inflatable lifebuoy, steering wheel, etc.
- “Breakfast at Tiffany’s” – turquoise color and similar shades (blue, mint, silver), flowers, draperies, vintage font and black/white photographs printed on the banner.
- In nature - just choose a beautiful natural location with a picturesque landscape (garden, park, river bank). The option does not require complex preliminary preparation or high costs, but there are risks - weather and seasonal conditions.
- The autumn photo zone can be decorated in yellow-orange tones (decor - natural materials - physalis, fruit baskets, pumpkins, tree branches, voluminous paper flowers, leaves, etc.).
- Popular winter decorations are New Year's and Christmas themes (red and white shades, a small Christmas tree, candles or garlands, lanterns). An interesting winter option is to use a decorated bright sleigh as a shooting location. In a room, an area with a stylized fireplace is often chosen.
- The summer zone offers the widest choice of options and allows for almost all of the ideas listed. It is in the summer that most outdoor ceremonies are held, so natural locations are often used.
- The spring photo zone involves decorating with delicate fabric draperies and flowers.
In this case, a combination of several stylistic options and appropriate decor is possible.
Additionally: We have compiled for you a detailed list of accessories for on-site registration and recommendations for decorating the ceremony (read).
Where to organize an area for a photo shoot at a wedding
We offer two main options.
Decoration in nature
The idea of decorating a photo zone for a wedding in nature
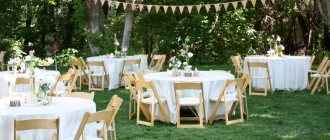
If the wedding is taking place near a beautiful garden, park or forest, you can arrange everything there. This is a great idea for the summer when it's warm outside. In this case, the photo zone should be located under shady trees, sheltering guests and young people from the heat. Between them you can string heart-shaped flags with the names of the bride and groom.
If you plan to decorate such an area in spring or autumn, you need to take care of awnings. They will come in handy in case of rain.
You can also take picturesque shots on the shore of a reservoir. If it is sandy, paths should be laid along it. This will prevent sand from getting into the shoes of visitors to the photo shoot corner.
In the fall or at other times of the year in nature, it will be enough to allocate a 5x6 m area for a photo zone. The best option for placing it is near a candy bar. This way, the newlyweds and guests who are tired from the photo shoot can quickly regain their strength. They will immediately have the opportunity to take bright pictures while waiting for their sweet treat. So that they can navigate in space, it is necessary to take care of installing special signs for them.
How to decorate in a restaurant
In a cafe or restaurant, the best option would be to organize a photo zone closer to the wall. It can be used as a background. Thanks to this, you will be able to save on the purchase of special boards.
This option is not suitable if there will be more than 30-50 guests at the wedding. Thus, constantly moving around the hall, they will not allow young people to be captured properly.
You should choose it carefully in the warm season - the room can be stuffy. In this case, the sweaty bride and groom will not look very beautiful in the pictures.
It is also very important to place the attributes for the photo zone away from the entrance doors and windows. This will allow the photographer not to photograph random passers-by and avoid bright glare in photographs
To avoid the latter, you also need to monitor the lighting design of the hall. The light should not be too bright and not too dim.
This is what a candy bar might look like
Other
Discounts, promotions and bonuses
Give seasonal discounts to customers, offer them small “pleasures” - treat them to drinks, give gifts, for example, bouquets or free garters. Of course, it is necessary to inform customers about discounts and bonuses through all available communication channels. Remember, despite the fact that various types of promotions are a good way to attract customers, do not overuse them - otherwise you may end up at a loss. If you can cooperate with florists or jewelry stores, do so - this will benefit three parties, including the client.
Wedding wall decoration
After the newlyweds have decided on the location of the gala banquet, it is worth taking care of the decoration of the hall. The decor of a room includes many nuances that need to be taken into account when selecting and determining the location of decorations. An absolute favorite in wedding decorations is a wall of fresh or artificial flowers. Such decoration can favorably emphasize the individuality of the interior and create a hospitable atmosphere, filling the room with comfort and warmth.
Fresh flowers
Floral decor will help make the wedding a grandiose and unforgettable event for the newlyweds and the guests present. To create a wall for a wedding with fresh flowers, you will need to select plants in advance that will withstand the event. Carnations, roses, chrysanthemums, and peonies are ideal for this. The panel, which contains fresh flowers, will give an unforgettable aroma throughout the celebration. Although such decoration is expensive, it ensures positive emotions for both the newlyweds and all the guests present.
Paper flowers
A budget-friendly decoration for a wedding wall is the use of paper flowers. This alternative to living plants is available to newlyweds who are limited in their financial capabilities. Although the paper masterpiece has a low cost, the decor created with its help adds charm and sophistication to the room. This original composition will definitely become a unique decoration for your wedding:
- Do you want flowers on the wall to look impressive and unusual? Use a combination of rich shades - this will allow you to get a bright, stylish room decor.
- To add airiness to the interior, professional designers recommend choosing white, milky or cream shades.
- If you use flowers made of mother-of-pearl paper to decorate the wall, then such a composition will shimmer with magical sparkles that will create a mysterious wedding atmosphere.
Additional decorative elements
To make wall decor with flowers look complete, wedding florists recommend using additional elements. If you plan to decorate with fresh flowers, then it will be beneficial to complement the background with the help of green moss, leaves, and branches. You can combine paper decor with crystal garlands that will elegantly hang on the sides of the wall.
It is important to choose the right elements that will help create an unforgettable style for your wedding.
Video: how to choose and order the right accessories
Tips for choosing accessories from a specialist from LEGI ARTIS:
Organizing on-site registration is a troublesome and costly undertaking. To decorate your celebration beautifully, you will need a lot of accessories. You can use their full or minimal set.
Everything you need for a perfect outdoor ceremony is offered by wedding agencies. Renting all accessories will cost 16,000-60,000 rubles. The minimum set costs from 10,000-15,000 rubles.
Source
Wedding invitations (MK)
When preparing for the upcoming fun, the bride and groom certainly think about how to elegantly inform their relatives and friends about this. It’s not difficult to prepare the cards yourself, and the guests will be pleased that time and effort were spent on them.
In order to make crafts with your own hands, we will need:
- sheet of paper and cardboard;
- satin ribbons;
- lace;
- glue;
- invitation printed on a printer;
- scissors (regular and curly);
- hole puncher.
Necessary materials
Registration process:
1. Decide on the size of the postcard and, accordingly, print the invitation. In most cases, white paper is used for this, but you can try other shades. The printed invitation is cut out with curly scissors.
Cut out the edges of the invitation
2. On the top of the card, use a hole punch to make a hole for a satin ribbon bow.
Making a hole
3. Make an envelope from cardboard the size of the invitation. The side edges on one side will protrude slightly, so it is better to bend them right away.
We make an envelope from cardboard
4. Blanks for envelopes are decorated with lace patches, which are secured with glue on the inside. Next, you need to fold the edges along the folds and glue them to the opposite side, resulting in an envelope.
Glue the lace
5. A hole is made at the top, the invitation is inserted into the envelope and secured with a ribbon.
We pass the ribbon through the hole and tie it into a bow
6. Using narrow and wide satin strips, we make a beautiful bow on the envelope. To do this, two pieces of wide tape are folded and secured in the center with a small flap, the edges are processed with a lighter.
Making a bow from ribbons
7. The bow is attached to the center of the invitation. If desired, wedding crafts can also be supplemented with rhinestones and sequins.
Glue a bow to the envelope
On video: how to make simple wedding invitations.