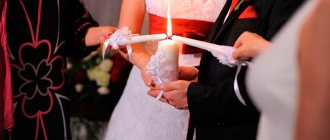
At many weddings, an interesting custom is observed: the newlyweds should have “wedding bulls” on the table - these are a couple of bottles of alcoholic drinks (usually champagne), which are stored and opened during the first anniversary or on the day of discharge from the hospital. According to tradition, the bottles are elegantly decorated . For decoration, satin ribbons, beads, and seed beads are most often used.
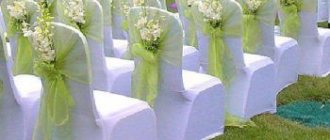
Photo of how you can decorate champagne ribbons for a wedding with your own hands
What materials are traditionally used to decorate a wedding bottle?
It is advisable to decorate both bottles using the same technique so that the paired combination can be seen.
For example, if it's just white spray painting, you can buy one larger bottle and decorate it with a homemade hat and a bow tie for the neck. Then a smaller bottle may have a white veil or skirt with 2-3 rows of flounces.
They can be gathered with elastic or sewn from a beautiful and light white fabric, gathered with a drawstring:
- tulle;
- atlas;
- silk;
- organza;
- tulle;
- veil;
- guipure;
- lace;
- embossed ribbon.
More attention is paid to the design of the “female” bottle; the “male” half of the table decoration looks more restrained. Modest decor can be sophisticated if you think through every detail.
You can spy on other people's ideas or make something from scrap materials that no one has ever had before, when you have such a desire.
Advice. The design of wedding glasses and bottles should not be taken lightly. These attributes will be in full view, so there is another opportunity to surprise your guests.
If the wedding is non-alcoholic, you can arrange any fizzy drink in a beautiful bottle. Some people want to decorate a bottle of cognac or other strong drink. The basis of the decoration is the same - wedding theme:
- he and she;
- rings;
- hearts;
- color;
- elements of the bride's outfit.
You can use beads and stones with a flat base (for gluing), sparkles and beads, small artificial flowers and fragments of jewelry.
If you are ready to do the work yourself, do not put this part of the wedding props on the back burner. It may take longer than expected. To choose something creative and unconventional when you don’t have your own ideas, look at the topic of decorating wedding bottles with your own hands, master classes and step-by-step explanations.
Of course, such a wedding attribute can be bought ready-made or offered to a craftsman to make it to order.
This won’t surprise anyone today, but where is the guarantee that your guests didn’t celebrate another wedding at a table with exactly the same decor? It can get awkward when asked, whose champagne is it? Therefore, it is better to choose something original so that no one around you has this.
An order for a craftsman will cost 2-3 times more, but it’s not even a matter of saving, although everything can be done from scrap materials. No one can put as much warmth into decorating your wedding as the bride and groom themselves or their loved ones.
Important! You can vary the color of the decor of wedding bottles with your own hands, but it should not bring disharmony to the overall design of the festive feast. If this is a wedding in lilac, gold or turquoise tones, then it is better to complement a white bottle of champagne with decor in the agreed upon range.
The original decoration can be made in duplicate and sold to guests at an impromptu auction. Or offer a souvenir as a prize in the most beautiful or original competitions.
Materials and tools
To work with tapes, you will need a set of simple tools that can be found in every home. If this is your first experience in decorating bottles, then it is better to start with simple design solutions to get the hang of it. To work you will need:
- Sharp scissors.
- Glue that adheres well to glass. It's better to use "Moment".
- Braid, lace, scraps of fabric.
- Accessories: beads, beads, buttons, cabochons.
- Tweezers for creating miniature elements.
- Ribbons.
The basic material also has a number of variations:
- Satin. Most commonly used due to its pliability and elegant aesthetic appearance.
- Silk. Thinner and more slippery material.
- Satin. They have a denser structure, and the fiber pattern is visible to the naked eye.
- Jacquard. Decorated with original drawings.
- Organza ribbons. The material is translucent and airy.
- Cotton. They hold their shape well, so they are suitable for creating three-dimensional compositions.
How to make a herbarium: album design and drying plants
Each of the above types is used by needlewomen to decorate bottles, but the most popular material is satin. It combines the optimal ratio of quality and price.
Complex compositions made from combined materials look original. For example, cotton flowers surrounded by satin petals or the same background.
Bottle preparation
Both empty and full containers must be properly prepared for the procedure. First, remove the label and any remaining glue along with it. There are two methods for performing this procedure:
- Soak the label paper in hot water and then quickly tear it off. The method is not considered the most effective, since often the glue remains on the glass and has to be scraped off.
- Heat the label with dry, hot air and slowly tear off one centimeter at a time. A hair dryer turned on at full power can act as a source of flow.
After cleaning the glass, it is thoroughly washed and dried. Then the surface of the bottle is wiped with a cotton pad soaked in alcohol. This way the glass will be degreased, which will ensure good “adhesion” to the glue. Tapes are usually pre-cut after measurements are taken.
Decoration with ribbons
Decorating a bottle of champagne or wine with your own hands is not such a difficult task.
Several master classes with a step-by-step description of the work will tell you about popular techniques and the features of their implementation, and the novice designer can only choose.
The simplest option is to create a fabric covering on the glass in “layers”. Work starts from the neck. A “loop” is made from a piece of tape, which is placed on the thinnest section of the glass container.
Its ends are trimmed if necessary and glued to the surface of the bottle.
Then they take the next strip, create the same “loop”, partially lay it on the previous layer (so that the base does not show through) and attach it in the same way.
In this way, a continuous fabric covering is created with beautiful joints (overlapping). Colors and materials are combined. Then the resulting background is complemented with other decorative elements.
Creating relief
Another technique is creating a relief texture. The effect is achieved by gluing tapes or pieces of textile to the surface and then squeezing them with your fingers.
As a result, folds are formed that most accurately imitate the thin fabric of clothing. It is necessary to glue the entire piece completely, and not its individual parts.
As a base, paper or other fabric of a neutral shade is attached to the glass.
DIY bottle decor with twine + 54 photos
Kazashi technique
To create flower arrangements, they use the Kazashi (Kazashi) technique, which originated in Japan, where girls crowned their heads with similar decorations.
Many have seen complex floral arrangements with hanging “buds” on long threads, adorned on the high hairstyles of Eastern women.
The essence of the method is to specially fold shreds and pieces of ribbon in such a way that sharp and rounded ends of leaves and petals are obtained.
They are carefully collected with tweezers, and the free ends are fixed to the surface with glue. Elements with multi-layered flower buds look the most beautiful. In the Kazakh technique, they collect petals and place blanks of the same type on top of each other, but of different sizes and colors. This way a volumetric effect is achieved. Kazashi flowers are combined with openwork, beads, and braid.
Shibori technique
Another gift from Japan is shibori ribbons. Most often they are used to create body jewelry (necklaces, earrings, bracelets), but they are also suitable for bottles. The ribbon is a “crumpled” piece of fabric that is dyed in different colors with an ombre effect.
When creating the material, it is crumpled and tied into knots so that the result is a rainbow color, opening the way for the artist’s imagination. Shibori tape is usually glued to a fabric base, but in the case of a bottle it is attached directly to the glass.
It is worth noting that material without additional decor looks impressive, but boring. Ribbons are always surrounded by various kinds of accessories, among which beads, cabochons and glass beads to match the main color prevail.
The composition gains volume due to the folds of the material and looks festive and solemn.
Ribbon costumes
On the most “masculine” day, a non-trivial gift for a representative of the stronger sex will be a bottle of cognac, which is “dressed” according to its uniform. Such a gift will be of particular importance for a military man, rescuer or police officer. Satin ribbons are used to make a jacket, which is decorated with miniature chevrons, shoulder straps, buttons and ties with clips.
The costume is created using the technique of overlaying ribbons on top of each other. The first white layers are formed near the neck, which imitate a collar. Then the uniform is decorated with green, black or blue stripes (depending on the type of troops).
Some craftswomen sew it separately from fabric and then simply put it on the bottle. Special attention is paid to the neck and plug. They are decorated with tiny berets, peakless caps, budenovkas, caps or caps.
The elements are sewn separately and the finished miniature of the headdress is simply attached to the neck.
DIY furniture for a dollhouse
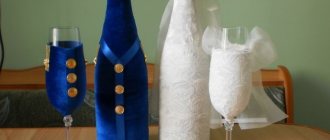
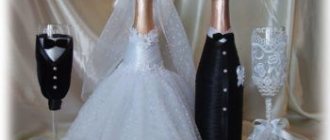
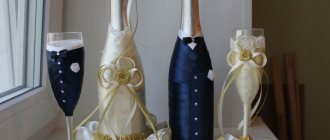
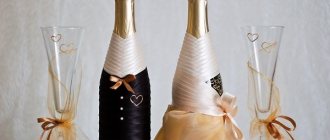
Bottles for a wedding
The bride and groom are always given two bottles of champagne for their wedding. This is an established tradition, the roots of which can no longer be found. At a wedding, they act as decoration on the festive table.
After the celebration, they are hidden and the first one is opened exactly a year later, and the second one is opened upon the birth of the couple’s first child. As a rule, the container is decorated either in the form of a symbolic bride and groom, or to match the general theme of the wedding.
The necks are decorated with doves (symbols of fidelity), rings and satin bows. They try to make the costumes of the “bottle” bride and groom look like the originals.
Men's clothing - a black jacket or tuxedo, with a ribbon, a bow tie, button beads and miniature cufflinks. To imitate a bride's dress, they use lace, openwork, airy fabrics, tulle, and sometimes even wire crinoline.
Bottles decorated in a wedding theme are wrapped in layers of ribbons of beautiful colors, which are combined with artificial pearls, openwork stripes, beads, bows and voluminous flowers.
The neck of the “female” container is decorated with a miniature tiara with a veil, and the “male” container is decorated with hats or top hats.
Types of decor for wedding bottles
Designing and decorating champagne bottles for a wedding can be done using several methods.
Types of decor:
- ribbons;
- photos;
- polymer clay;
- fabric trim;
- engraving;
- decoupage;
- paints;
- rhinestones.
Before carrying out it is necessary to prepare all the tools, as well as the bottle itself. The surface must be cleaned of labels and thoroughly degreased. This will help achieve high quality results.
Note. When decorating, it is recommended to adhere to the general style of the hall in which the celebration is taking place.
How to choose a decor style?
Champagne is the most traditional drink for wedding celebrations; any festive table is abundant with it. Many wedding competitions and games also use bottles of this drink. This is a good reason to make champagne a small highlight of the holiday.
You can turn bottles into real exclusives by showing a little imagination and ingenuity. You can do the decoration yourself, which will save money.
There are a lot of design options for champagne bottles. The most common option is to decorate the sparkling wine in the “bride + groom” style. Such a “couple” is usually placed on the newlyweds’ table. The classic color scheme in this case is black and white.
But if the celebration involves the use of some bright color (this is fashionable now), then the bottles can also have colorful elements.
It is popular to celebrate weddings using bright colors in addition to classic colors (white, ivory, champagne, milk). It can be turquoise, blue, orange, purple and even red.
The holiday will clearly become bright and unforgettable, but then it’s worth thinking about color accents in everything. Including in the decoration of wedding attributes.
There are a lot of design options - decoration with three-dimensional elements, fabrics and lace, pearls, scrapbooking, modeling. The drink looks good in bottles hand-painted with acrylic paints.
The most important thing is not to overdo it and create such decor that the bottle of champagne does not stand out from the overall style of the holiday.
Two beautifully decorated bottles are usually made and it is not customary to open them during the celebration. They remain for the couple for the future: one for their wedding anniversary, the second for the birth of their first child. Here is another reason to make a bottle of champagne beautiful and unusual.
The main rules of decoration are compliance with the given level of solemnity, combination with the furnishings, dishes, and outfits of the newlyweds
. For example, gold and silver engraved bottles would be completely out of place at a boho or Provence style wedding. But delicate floral motifs and lace are an excellent decorative option for a classic wedding with aristocratic notes.
If the wedding takes place under the auspices of a specific theme, for example, maritime, then the decor may include appropriate details. Bottles of champagne can be painted to resemble a sailor’s vest or decorated with anchors and chains, painted with sea waves, etc.
An autumn wedding in the Russian style presupposes the presence of autumn fruits and vegetables in the paraphernalia and the use of a red-red color scheme. Here bottles can be decorated with stylized painting, autumn apples or leaves.
The main thing in decorating is to show your imagination.
You can find many master classes on the Internet, which detail the sequence of actions and the necessary materials for the work. It’s these little things that make up the overall atmosphere of the holiday, so pay due attention to decorating not only the newlyweds, the cortege and the banquet hall, but also small accessories.
Decoration
Lace and fabric
The simplest DIY decoration is to cover the glasses with lace. It looks elegant and gentle. You don't need a master class.
The traditional option is white lace with silver or golden lurex. Beige, cream, vanilla, and ivory look good. But no one forbids you to use bright, rich colors if it supports the wedding in the overall style.
The only condition is to choose a fairly wide, fluffy lace that holds its shape well.
- Cut a strip of the required length and wrap it around the wine glass, stepping back 1.5-2 cm from the top edge so that the glue does not get into your mouth.
- On a tall wine glass, a “skirt” worn on the leg looks elegant.
- You can make a wide “belt” at the base, and stick individual flowers, leaves, and other elements cut from relief lace onto the glass.
- If you additionally use rhinestones, it is important to know when to stop. Otherwise, the product will seem overly luxurious and tacky. Several small rhinestones will add festiveness and elegance to strict lace.
To paint a glass with paints yourself, you don’t have to be a professional artist. You can find wedding-themed stencils at most craft stores. Or just print the picture you like. The drawing is secured with a special varnish. Buy it there.
Next is a small master class:
- Cover the top of the glass with construction tape. Hold it only for this place.
- Take a picture or stencil, moisten the paper and apply it to the intended location from the inside. Or stick with the same masking tape. Draw something traditional for the wedding - the initials of the newlyweds, hearts, rings, roses, white doves. Or it could be something only you two understand.
- From the outside, outline the design with paint using a thin brush. Golden, silver, pearl gray, white and pink, golden beige paint looks best. You can use nail polishes of the same color.
- Leave the product for 18-20 hours for the paint to dry completely.
- Cover it with a thin layer of special varnish.
Decorating with ribbons yourself has many options, from a simple bow to truly complex compositions. Tapes crumbling along the edges look very unaesthetic. Lightly burn them in advance.
If you choose different colored ribbons for the bride and groom's glasses (for example, pink and beige, the color of her dress and pearl gray), they should be the same width. 2-3 ribbons of different textures (satin, silk, nylon) and widths, tied around the leg and tied with a bow, look very elegant. Bows are additionally decorated with rhinestones, beads or beads.
Or take a narrow ribbon and wrap it around the leg in a spiral from bottom to top. Cover the upper end with a small bow or artificial flower placed on glue. Artificial flowers are made from ribbons. The wider the ribbon, the more voluminous the flower will be. Glue several rhinestones onto the petals. The stem will be replaced by a thin green cord made of floss threads.
Master class on making roses:
- Take a narrow ribbon in your non-working hand. With your other hand, start rolling it tightly. After 5-6 turns you will get the core of the rose. Secure it with a couple of stitches. Use threads of the same color.
- Next, continue to roll the ribbon not too tightly so that the rose looks like a half-open bud. Try to make it as flat as possible. When finished, cut off the excess tape and make a couple of stitches at the base.
Master class on making flowers:
- Take a piece of tape 2-3 cm wide and 10-15 cm long and fold it in half lengthwise.
- Sew the edges together using a needle-forward stitch.
- When you reach the end, pull the thread so that the ribbon gathers at one end.
- Roll the flower like a bag, hiding the edges of the ribbon inside and sew at the base. Decorate the middle with a bead.
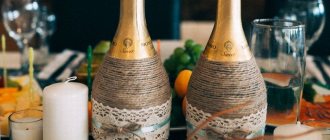
DIY wedding bottles with ribbons
So there are at least two bottles of champagne. Making it exclusive is not at all difficult, the main thing is to prepare well.
To begin with, get rid of unnecessary labels, only carefully so as not to scratch the glass. Then you can start decorating. One of the most popular methods for decorating champagne is using satin ribbons. This method is simple and affordable, but the result is a bottle that looks gorgeous.
Ribbons are needed to wrap vessels with sparkling wine, and also as an additional decoration. The satin ribbon should be the optimal size and color.
ADVICE. It is better to process the edges of the tape (carefully burn it) so that it does not diverge.
Decoupage bottles with napkins
Decoupage with napkins looks especially chic if craquelure varnish - it helps to create the effect of antiquity. So, for this case you will need :
- Bottle
- Acrylic paints
- Craquelure varnish
- Napkins
- Alcohol for glass degreasing
- Flat synthetic fiber brush
Craquelure varnish for decoupage helps create the effect of an old thing.
Let's get started:
- So, first of all, degrease the surface and remove old labels.
- Now coat the bottle with acrylic varnish . Try to make sure the layer is even. Best applied with a sponge
IMPORTANT: Regarding the color scheme, keep in mind that the base should be the color that is planned for the cracks. Therefore, if the bottle itself is white, then it is advisable to make the base black or dark brown.
- Wait for the varnish to dry. You can use a hair dryer
- Now apply craquelure varnish . There is no need to dry this layer
- acrylic varnish is applied with neat strokes close to each other It is important to dry this layer properly
- At this stage, we begin to draw a design from a napkin. Peel off the top layer. Trim off all excess, while trying to avoid smooth edges, which are then difficult to make natural
- Dilute PVA in water. Apply the solution to the surface of the design attached to the bottle. Move from the center to the edges
- Apply varnish to the surface . Work out the details if desired.
This is what things look like after decoupage with napkins
Decorating champagne with satin ribbons master class
The method is simple and universal; satin ribbons can be selected to suit your taste.
Materials:
- tape – 2.5-3.5 m;
- gold brocade ribbon – 1.5 m;
- instant glue;
- champagne with gold foil;
- scissors.
How to decorate a bottle with ribbons master class
1. Let's get started! First you need to measure out enough tape for the first layer.
2. Cut the tape and use glue to mark the points.
3. Wrap a satin ribbon around the vessel, pulling it tightly. Do the same with the other cut, which will be larger as the bottle expands. Make the third and fourth layers in the same way.
4. Now it's the turn of the brocade ribbon. Two layers are enough.
5. Glue the gold ribbon to the bottom of the bottle so that the seam is at the back. And also cut 7-8 ribbons of the same length of the chosen color, glue them in the same way so that the seam is at the back.
6. You can remove a sloppy seam using another tape.
7. Cover empty spaces with gold tape.
8. Carefully trim off any protruding corners.
9. For additional decor, you can use beads, lace, bows - whatever you like, the main thing is not to overdo it.
10. DIY wedding champagne is ready!
Decoupage bottles with toilet paper
So, for decoupage bottles with the most ordinary toilet paper you will need:
- Bottle
- Toilet paper
- Napkins
- Acrylic paints of various shades
- Salty dough
- Various items for decoration - for example, beads
Let's get started:
- Of course, degreasing the bottle is an essential stage of work.
- Now tear the toilet paper into pieces and cover the bottle with these pieces
IMPORTANT: Apply pasting as if you were creating a background.
- Now you should make strips out of paper . It is advisable to select the width within 1.5 centimeters. But the volume should be different - for this, some stripes are created in two layers
- Pour some water onto the surface. Lightly wet each strip in some places and then twist it - this way the liquid will be distributed evenly and the strip will not get completely wet
Rolling toilet paper during decoupage process
- Make toilet paper balls in the same way . However, the idea will only benefit from the use of salt dough. It is recommended to outline the pattern in pencil in advance.
Patterns created using decoupage with toilet paper and salt dough
- Let the work dry. After this, you can coat the bottle with paint.
Coating a bottle with paint during decoupage
- Add additional elements to the decor as desired
This product can be made using decoupage with toilet paper
Decorating wedding bottles with velvet
You can decorate champagne for the newlyweds' festive table using velvet. This luxurious and elegant material looks great.
Even an ordinary container is transformed thanks to the velvet decor.
Decorating champagne for a wedding with your own hands is very easy to do. You only need stretch velvet, thread, paper and a pencil, as well as two bottles and decor.
ADVICE. It is better to lightly burn the pieces of fabric needed for processing along the entire perimeter.
Decoration
Lace and fabric
The simplest DIY decoration is to cover the glasses with lace. It looks elegant and gentle. You don't need a master class.
The traditional option is white lace with silver or golden lurex. Beige, cream, vanilla, and ivory look good. But no one forbids you to use bright, rich colors if it supports the wedding in the overall style.
The only condition is to choose a fairly wide, fluffy lace that holds its shape well.
- Cut a strip of the required length and wrap it around the wine glass, stepping back 1.5-2 cm from the top edge so that the glue does not get into your mouth.
- On a tall wine glass, a “skirt” worn on the leg looks elegant.
- You can make a wide “belt” at the base, and stick individual flowers, leaves, and other elements cut from relief lace onto the glass.
- If you additionally use rhinestones, it is important to know when to stop. Otherwise, the product will seem overly luxurious and tacky. Several small rhinestones will add festiveness and elegance to strict lace.
To paint a glass with paints yourself, you don’t have to be a professional artist. You can find wedding-themed stencils at most craft stores. Or just print the picture you like. The drawing is secured with a special varnish. Buy it there.
Next is a small master class:
- Cover the top of the glass with construction tape. Hold it only for this place.
- Take a picture or stencil, moisten the paper and apply it to the intended location from the inside. Or stick with the same masking tape. Draw something traditional for the wedding - the initials of the newlyweds, hearts, rings, roses, white doves. Or it could be something only you two understand.
- From the outside, outline the design with paint using a thin brush. Golden, silver, pearl gray, white and pink, golden beige paint looks best. You can use nail polishes of the same color.
- Leave the product for 18-20 hours for the paint to dry completely.
- Cover it with a thin layer of special varnish.
How to decorate champagne for a wedding with engraving
Perhaps not everyone can do this work with their own hands. Engraving on glass requires a special machine, so in this case a professional will do everything in the best possible way. The main thing is to decide on the pattern, image, inscription and the master will create an exclusive, impeccable decor.
Engraving is an original design for wedding glasses and bottles; you can add decorations with flowers, ribbons, beads and bows with your own hands.
How to decorate wedding glasses with your own hands
Every couple wants their wedding to be the very best: original, spectacular, memorable! Therefore, newlyweds buy exclusive outfits or even have them made to order, rent an original place for the wedding, order the services of advanced wedding specialists, and also prepare unique accessories and little things for the wedding that reveal the individuality of their couple and emphasize the style of the celebration.
And we are talking, first of all, about glasses for newlyweds, which can be purchased at any wedding workshop, but it is better to decorate them with your own hands, then they will become the center of everyone's attention. In addition, decorating glasses with your own hands is a very exciting activity that will allow you to relax during the pre-wedding rush.
Decorating bottles for a wedding with your own hands: champagne for the bride and groom
The bride and groom at a wedding can be not only at the table, but also on the table. Of course, we mean decorated champagne. You can make a bottle bride and groom with your own hands using bias tape or ribbon.
For two bottles you will need the following materials and tools:
- 10 m of white bias tape;
- 8 m of blue or black bias tape;
- 4 m of bias cream binding;
- 10 cm white lace;
- 3 m of wide lace, bow or piece of tulle;
- glue in a pencil (super glue moment);
- scissors;
- decorative ornaments;
- cardboard for hats.
Below is a step-by-step process for making wedding bottles.
Bottle for a wedding - Bride: step-by-step master class with photos
- Just like a real bride, the bottle of champagne in this outfit should be the center of attention, and this requires perfect execution of the job.
- Initially, use a marker to draw a straight line in the front center, along which you will need to glue the edges of the tapes. Try on the lace at the neck, cut off the required piece. Spread the bottle with glue and glue the lace. Coating the glass of the bottle, glue the bias tape, cutting off its long part after gluing.
- Continue oblique gluing until the middle of the bottle. From the middle, the bias tape is glued in a circle to the very bottom of the bottle.
- Take a wide bow near the subway, use an iron ruler and a hot soldering iron (a knitting needle heated over a fire) to solder the edges of the bow. It should look like this.
- Fold it in half and sew with a cast-on stitch. Put the resulting skirt on the bottle, tighten the thread to its size. Remove part of the skirt and follow the same example to make two more skirts.
- Determine the place where the skirt will be attached. From its upper part you need to mark a place for two petticoats, coat these places with glue and glue two blanks.
- Sew golden bias tape to the overskirt. Glue it onto the bride bottle.
- Fold a piece of a wide bow in half. Using a mug and a hot soldering iron, make a circle (the edges will stick together under the influence of the heat). As shown in the photo, cut out the darts so that the brim of the hat can be glued on.
- Make a ring out of cardboard to fit the diameter of the bottle neck. Cut out a circle with teeth for the top of the cap.
- Bend the teeth, glue the top part of the cap and brim. Glue a white ribbon in a circle on the outside and tie an organza ribbon.
- Glue beads to the bride’s “neck” and put on a hat. The bottle-bride is ready for the celebration.
How to make wedding boutonnieres
We continue to consider the mandatory wedding attributes, which include the so-called boutonnieres. They are performed for the bride, groom or witnesses. In everyday life, boutonnieres can be used as a brooch or hair clip, depending on what kind of fastening you make for it. And now we will try to make a master class that explains the process of creating a boutonniere for the groom from satin ribbons using the kanzashi technique. The boutonniere is a symbol of the groom's belonging to his bride, and therefore should be made from the same ribbons as the bride's bouquet. For the specific boutonniere that we will try to make, we will prepare the following materials:
- pink satin ribbon, two and a half centimeters wide and two meters long;
- white satin ribbon, two and a half centimeters wide and seventy centimeters long;
- special accessories for boutonniere;
- lace for flowers;
- needle and thread to match the color of the ribbon;
- glue gun, lighter and scissors.
We begin our needlework by weaving a rose from a long pink ribbon. As you already understood, the tape is not cut, but folded in half, face up. You need to bend the corner of the tape and start twisting it, periodically bending it and gluing it with a glue gun. Twisting the ribbon allows you to achieve the effect of beautiful pink petals that resemble real ones. The result is a magnificent kanzashi rose, cut off the tail at the back and burn the cut edges with a lighter. After this, from shorter pieces of white tape, you should make four smaller roses with your own hands, using the same technique. Then, from a piece of white ribbon thirty centimeters long, we will make a finishing bow, the center of which is sewn with thread, and the ends are burned and left free.
We begin assembling the boutonniere, and connect the roses to each other, gluing them. We glue a white bow below the large rose, and then decorate it with decor using polymer glue. We mask the back side of the boutonniere with lace flowers. All that remains is to glue the base with polymer glue, and the work is finished. A beautiful boutonniere made using the kanzashi technique can decorate any wedding.
Bottle for a wedding - Groom: step-by-step instructions for working with photos
The bride is ready, now let's get down to creating the groom. The work is carried out identically to the execution of the bride bottle.
First, fold the white ribbon in half and try it on the neck of the bottle.
- Apply glue to one half of the folded tape and glue it to the neck of the bottle so that the upper part can bend.
- Raise the top of the collar of the first tape, glue another 2-3 rows to the bias underneath it.
- Measure out the main color of tape to attach to the bottle. Raise the collar and tie a ribbon tie for the groom.
- Lower the collar and continue gluing the blue ribbons (on top of the tie) onto the bottle.
- When the narrowed part of the neck ends, cover the bottle in a circle with ribbons to the very bottom.
- Glue buttons to the groom's jacket. Decorate the “chest” with a boutonniere.
- Prepare such parts for making a top hat for the groom.
- Glue a cylinder out of cardboard. Cover it with ribbons and decorate it to match the jacket.
- Place the top hat on the bottle and the groom is ready.
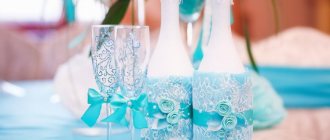
Decorating glasses and bottles of champagne with ribbons
The first master class with step-by-step photos is devoted to how to decorate wedding glasses using the kanzashi technique using satin ribbons and jewelry.
Let's prepare materials:
- thin ribbon (1 centimeter) black in an amount of two meters;
- thin white tape, two meters;
- organza, one meter;
- white satin ribbon, twenty centimeters;
- lace ribbon, twenty centimeters;
- rhinestones;
- glue.
To avoid the adhesive base on the glass from showing through, we will treat its outer part with spray paint, first applying markings and covering the top and bottom where the decoration will not be done with ribbons. After this, we will begin decorating the glass for the groom using satin ribbons. The glass will be made using the kanzashi technique, with an imitation of the groom in a tailcoat, with a bow tie and a white collar. To create a white collar, make a piece of white ribbon with the edges beveled at one corner. Apply glue to the neck of the bottle and glue the collar there. Glue the strip with the satin side inward, and only along the bottom edge, because the rest of the tape will later bend, which is clearly visible in the photo.
Next, you should decorate the glass with narrow black ribbons. Add glue to the entire surface of the glass, up to its stem, and glue the entire tape, making turns. After this, turn the part of the collar that was not glued down. To finalize the glass, we make a butterfly from black ribbon, glue it to the top of the stem, and beautiful rhinestones between the corners of the collar. Now our wedding glass is ready and decorated using the kanzashi technique with satin ribbon decor.
Guided by step-by-step photos, we will decorate the bride's glass using satin ribbons. The top of the glass should be decorated with lace, carefully cutting out flowers on one side. We glue the lace with the flowers facing up, after burning the cut edge with candle fire. Continuing work, add narrow white tape to the glue in turns, without cutting it. Then you need to decorate the bride’s glass with a white nylon skirt, first gathering it with a thread and sewing it with stitches to the edge of a white ribbon. We will disguise the junction of the ribbons and the skirt with a thin golden-colored ribbon. The decoration of the lace top part will also be done with the same gold ribbon, which is best decorated with rhinestones in advance. All details of needlework can be seen in step-by-step photos. Now we can say that the work is completed, and the wedding glasses are decorated using the kanzashi technique.
Do-it-yourself champagne bottles for a wedding using decoupage technique: instructions with photos
Decoupage is a decoration technique based on transferring an image onto a specific object.
To make a wedding bottle using this technique, you will need to spend a decent amount of time, but the end result will certainly please both the newlyweds and their guests. To complete the decor you need to prepare:
- napkins with the image or decoupage cards that you want to apply to the bottle;
- primer for glass of the desired shade;
- sponge;
- acetone;
- fine abrasive sandpaper;
- brush;
- tweezers or clothespin;
- glue;
- acrylic paints;
- clear nail polish.
Initially, clean the bottle from stickers, dry it and spray it with acetone. Apply glass primer to the bottle. If you don't have one, it doesn't matter. Mix acrylic paint of the desired shade with PVA glue in equal proportions. Cover the bottle with the mixture.
Gently secure a piece of sponge in tweezers or a clothespin and apply the composition using patting movements.
The primer must properly matte the green color of the bottle, otherwise the end result may be spoiled by the green color showing through.
- After the primer has completely dried, you need to go over the bottle with sandpaper. The surface of the primed glass must be smooth. Place napkins on the cork and prime it so that the top does not differ from the rest of the composition.
Separate the lower layers of the napkin, leaving only the top one with the pattern. Cut out the selected picture, stepping back from the beginning of the image by 2-3 cm. Use your fingers to carefully tear off the remaining strip so that the edge of the decor is not more than 0.5 cm from the starting line of the image.
The torn structure of the edge will help smooth out the sharp transition of the decor to the background of the painted bottle.
- Place a napkin on the surface of the bottle. Use a brush dipped in glue to cover the entire pattern.
- You need to start from the center, smoothing out all the bubbles and irregularities towards the edges. Wait for the picture to dry.
- If the base of the napkin was not white, then using acrylic paints you need to select the appropriate shade and paint the white spaces between the pictures with a brush. After complete drying, the entire bottle must be coated with clear varnish.
When it dries, if desired, you can glue sparkles to the picture, decorate the composition with sequins or beads.
Decoupage bottles for the New Year
For this decoupage we will need:
- Bottle
- Acrylic white primer
- Decoupage napkin
- Acrylic paints
- Crystal paste
- Finishing varnish for fixing the coating
- Golden red glitter
- Synthetic brushes
- Fine-grit sandpaper
- Foam sponge
- A palette knife used by artists to remove excess paint or apply primer
- Hairdryer
Let's get started:
- The first step is to clean the bottle from labels and traces of glue. To do this, it should be placed in a container with water at room temperature - this is how the labels come off. But it’s easy to get rid of glue residues using baby cosmetic oil.
IMPORTANT: Don't forget to rinse the bottle with dishwashing detergent if you used cosmetic oil.
- Then degrease the glass surface
The bottle should be degreased before decoupage.
- Apply primer with a sponge. It is recommended to make the first layer thin and then dry it with a hairdryer - this way the primer will lie on the glass in the best way. The second layer should also be thoroughly dried.
A primer is applied to the bottle during decoupage
- Tear off the images you want to glue from the napkin. Remove the bottom two layers, leaving only the colorful one.
IMPORTANT: It is better to tear off images rather than cut them out, because torn edges are easier to disguise with the background so that they blend into it.
- The top layer should be placed face down on the file. You need to pour a little water directly onto the napkin. Smooth out any uneven surfaces on a napkin. You can help yourself with a brush. After some time, remove excess water from the paper
- Now attach the file to the bottle so that the wrong side of the napkin is adjacent to the bottle. Gently smooth out creases
- Pull one corner of the file to remove it. The napkin will remain on the bottle
- Smooth out the folds again and cover the bottle with glue or acrylic varnish. Let the bottle dry thoroughly
IMPORTANT: Make movements from the center to the edges.
Smooth out any uneven surfaces on the decoupage napkin
- Small folds that probably still remain should be dealt with separately. They are easy to remove thanks to fine-grit sandpaper. Rub the sandpaper along the unevenness
- It's time for the finishing varnish
Coat the bottle with varnish at the end of decoupage
- Now we need to work on the main background. Apply white and blue acrylic varnish with a sponge, not forgetting to remove excess from the sponge
Drawing a white background during decoupage
- Mix the shades that should be used to work on the edges of the picture - you can’t do without it if you want to achieve a natural look
Work on the edges of the design during the decoupage process
- The plug should also be tinted
The cork also needs to be tinted during the decoupage process.
- Take an unwanted toothbrush and use it to splatter white paint.
Applying splashes during decoupage
- finishing varnish again
- an inscription using a syringe
An inscription made during the process of decoupaging a bottle
- The image should be three-dimensional. To do this, a transparent paste with glass pieces is carefully applied to the bottle - it will imitate ice. Silver acrylic paint will also help.
IMPORTANT: This is where the palette knife comes in handy. It is most convenient for them to apply such a coating.
A special gel for decoupage will help create an ice effect
This is the bottle you will get as a result of decoupage for the New Year.
Another great way to decorate a bottle for the New Year is to sprinkle it with large salt crystals. The technique is simple - salt is attached to glue.
Decoupage bottles with salt
DIY champagne bottle painting for a wedding: painted bottles
You can beautifully decorate bottles of champagne for a wedding using your talents. We offer several options for painting bottles at home.
Painting with decor.
Glue pieces of paper tape in the shape of the chosen decor onto the prepared bottle. Paint the bottle with spray paint. To ensure an even color, the bottle is painted 3 times. Before applying the next layer, you need to wait until the previous one has completely dried.
- Remove the tape from the dried bottle. Decorate the pattern with flowers, butterflies, beads, etc.
- Paint with acrylic paints and tie a ribbon.
- Spot painting. You can beautifully paint a bottle of champagne for a wedding using a glass outline.
- You can apply the design to the glass itself, or by pre-matting the bottle in the desired color.
Decoupage bottles for a woman's birthday
A rather interesting and unusual effect can be achieved if you do decoupage with fabric . You can take some unnecessary tights:
- Degrease the surface of the bottle
- Soak the cut part of the tights of water and PVA.
IMPORTANT: The proportion of glue and water should be 1 to 1.
- After soaking in the solution, the tights are laid out on the bottle in the form of waves, tails. At the same time, do not forget to leave space for gluing the napkin
- Wait for the material to dry completely
- Prime with acrylic paint or a special compound purchased at a craft store.
- All that remains is to tint it to your taste and decorate it
Here is such a sunny bottle with decoupage from tights for a woman’s birthday. Another bottle with decoupage from fabric - laconic and expressive. Decoupage from tights in golden tones. A
very good option for decoupaging a bottle as a gift for a woman - gluing lace. Small chains and beads are also suitable.
. Decoupage as a gift for fans of French charm
Bottle with decoupage made of fabric, beads and flowers
Decoupage from napkins, ribbons and lace Lace will fit perfectly into the decoupage of bottles for a gift for a woman Decoupage of a bottle with lace is a rather elegant gift
Decoration using photographs of young people
Festive bottles of alcoholic drinks, decorated with photographs of young people, look quite original. Photos can even be placed on labels, the main thing is to use your imagination in time and not be limited to standard ideas.
In addition, sometimes images are placed on glass using a special decoupage technique.
You can create such an original decoration yourself. If you don’t have enough time for this, contact a printing company, where they will print a label or a separate photograph on thin paper.
Engraving on bottles
For true lovers of luxury, an excellent option for bottle design is glass engraving. But here you cannot do without the help of a professional. Only a master will be able to apply any pattern you choose, regardless of complexity. Even simple and small patterns will look great on dark green glass.
With this decor you will add luxury and aristocracy to the bottle.
The choice of bottle decoration depends on the personal wishes of the newlyweds. Some people choose patterns in the form of angels, curls, rings, doves, etc. Any version of the design looks great, and you can choose engraving in silver or gold.
But modern experts can offer you images in other shades, even transparent ones.