During preparation for the wedding celebration, the newlyweds pay special attention to all the small details. From original invitation cards to small souvenirs for guests to remember the celebration. Not to mention the design of wedding tables, various signs, selection of the right tableware for a banquet, decor of wedding champagne bottles. It is this solemn glass-alcoholic attribute that carries a certain symbolism.
Wedding attributes as a decorative element or symbols of a long and happy family life
The meaning of champagne
Champagne is a symbol of celebration and carefree happiness , which fits perfectly into the wedding menu and decorations.
A sparkling golden drink accompanies the ceremony from beginning to end. Toasts, the first kiss of the newlyweds to a deafening “Bitter!” Perhaps at the banquet there is a place for a whole fountain or a tower made of glasses.
It is important that the champagne is of good quality, but if you want every little detail of the wedding to be perfect, then you should think not only about the content, but also about the form - about decorating the bottles.
Idea! If you have a themed or colorful wedding, then decorating the champagne with bright paint or other non-standard elements will be an excellent solution.
Champagne bulls
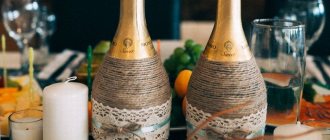
In addition, there is an interesting custom. Two bottles of champagne, for the groom and for the bride, are decorated in a special way and are not opened during the feast. They are used exclusively for decoration and as a symbol of the “full cup”; they wait on the table for the end of the celebration, and then go home to a new family.
This particular pair of bottles is called "bulls". The custom came from ancient times, when instead of champagne, the newlyweds were given a bull and a cow tied by the horns, and on the first anniversary, the new family treated all guests to fresh milk.
Today, the groom's bottle is allowed to be opened on the first anniversary as a symbol of man's patience, love and ability to maintain a long-lasting union. Interestingly, the first glass of drink still goes to the wife.
The bride's champagne is opened for the birth of her first child. For obvious reasons, the mother will not get a drink on this day.
Necessary tools for decoupage
High-quality holiday decoration assumes that the appropriate tools will be used, without which the work will be impossible to complete. Before you start decorating containers containing sparkling drink, you will need to make sure you have the following tools and materials:
- bottle (cleaned of labels);
- paper (white, blue) for creating elements of thematic appliqué;
- satin ribbon in bright colors (it is recommended to give preference to colors associated with the New Year theme);
- acrylic primer;
- varnish for fixing (finishing);
- crystal paste;
- alcohol (acetone) to degrease the surface of the bottle;
- soft foam sponge;
- fine-grain sandpaper;
- paint (white, blue shades);
- a napkin (on which there will be a thematic or three-dimensional design).
Additionally, you will need glue, a set of thin synthetic brushes, and scissors. A regular hairdryer is suitable for applying heat.
Tools for work are selected at the request of the master. The set of colors can be bright and varied.
Decoupage champagne bottles with napkins for the New Year
Ideas
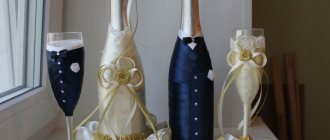
Champagne decor allows you not to limit your imagination at both an unusual and classic wedding. Bottles become a highlight, a decoration, and one of the main accessories of the holiday.
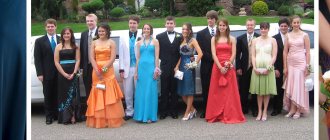
Often in their design they use motifs from the newlyweds’ costumes - the groom is dressed in a formal suit, the bride in a lace dress.
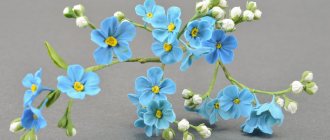
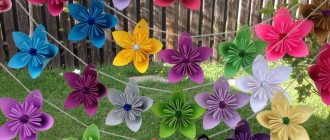
A fresh, interesting option is to decorate the alcohol with fresh flowers, echoing the bride’s bouquet. It looks very romantic, gentle, but, unfortunately, such decor is extremely short-lived. An alternative is artificial flowers made of felt, paper, or polymer clay. Bright and touching, they will never fade, just like the love of spouses.
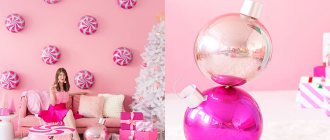
A colorful wedding encourages the champagne not to be in the classic green and gold bottle, but in a more appropriate design. Foil, fabric or paint of the desired color will add the necessary bright accents to the festive table, setting the guests in the right mood.
Polymer clay flowers
Delicate flowers, almost like real ones, but at the same time strong and durable - a wonderful option for decorating special champagne. For craftswomen who know how to create such a miracle on their own, this is also an opportunity to demonstrate their talents to all guests.
However, you can buy ready-made products in the desired color at any craft store. They also sell leaves, twigs, berries and anything else you want to use in decoration. In addition to the flowers themselves, you will need aerosol paint of the required color, usually white, Moment glue and additional decorative elements from lace to rhinestones.
Paint is an optional step, but it makes it easier to stick everything you need on it. We advise you to prepare the bottle for decoration - remove the label, dry it, check the evenness of the glass and coat it with paint. By the way, here you can already play with the design. For example, glue (most importantly, not very durable glue) paper pieces of the original shape onto the glass surface. After you remove them, a perfectly smooth and unusual pattern will remain on the painted surface.
Next, think over the sketch and draw with a pencil the points where you are going to glue the flowers. Now start fixing the buds on the glass. This is where “Moment” or any other quick-setting glue comes in handy.
Advice! If the flowers are too voluminous and bright, then it is better to leave the remaining space between them empty. If decor of a modest design is glued, then the voids can be decorated with ribbons, rhinestones, and beads.
Photos of the newlyweds
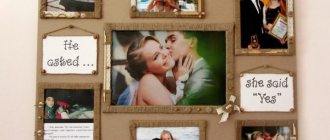
Your happy laughing faces on the label along with the date of the celebration or any other inscription is an original design option that will not leave anyone indifferent. This champagne looks great both at a classic wedding and at a themed one, for example, if you design the labels in the form of a movie poster or a “Wanted” poster.
Making a creative image yourself is easy if you know Photoshop. If a popular image editor is not available to you, you will have to turn to a specialist for help. It is necessary to print labels on thin paper, and then transfer it to glass using the decoupage technique. Remember that the bottle is also pre-prepared before this - cleaned, degreased, dried.
Engraving
For lovers of luxury, decorating champagne with glass engraving would be a great idea. A good master will be able to apply almost any pattern, regardless of its complexity. Even simple and thin openwork lines look great on dark green glass, giving the bottle a flair of aristocracy.
Which drawing or inscription should I choose? It depends solely on your wishes - the names of the newlyweds, vows of fidelity, images of doves, angels, rings, hearts. Any pattern looks great: either a rather restrained one, with a small number of lines, or a stunning one with a riot of curls.
You should not think that the design must be gold or silver in color - a professional engraver can create a colored, transparent, absolutely any masterpiece. Of course, before choosing a master, you should look at his work. It's best to do this in a workshop to get a full idea of what your order will look like.
Decoupage of bottles and glasses
This design method is gaining increasing popularity, as it combines ease of execution and chic results. It is used not only to decorate bottles, but also to decorate newlyweds’ glasses.
Decoupage is the gluing of paper elements onto a glass surface treated with acrylic. The paper must be thin; for example, napkins with the desired pattern are suitable - delicate flowers, hearts, angels or something more original.
Before starting work, remove the label from the bottle, degrease it with alcohol and dry it. Our master class will help you create an original design and enjoy the creative process.
Next, you need a primer for a smooth and uniform surface. You can do it in two ways - buy a special primer for glass in a specialized store or prepare a mixture yourself from acrylic, water and PVA glue. Then apply the mixture to the glass in a thin layer. You can do this with a brush, but it is much more convenient to use a foam sponge. After drying, add the next layer of acrylic.
When the surface is completely dry, we begin gluing the paper elements - in this case, glue can be used either special for decoupage (sold in any craft store), or regular PVA or even a glue stick. The wrinkles that inevitably appear along the edges must be carefully smoothed out with a piece of sandpaper, but be careful, because the napkins are easily torn.
At the end, secure the resulting decor with transparent acrylic varnish. It will have to be applied in several layers, and each one only after the previous one has completely dried.
So, the bottle is ready. Now you can decorate it with sparkles, rhinestones, feathers or any other additional decor. The decoupage technique looks gentle, festive, and allows you to realize almost any fantasy.
Bottle for a wedding - Groom: step-by-step instructions for working with photos
The bride is ready, now let's get down to creating the groom. The work is carried out identically to the execution of the bride bottle.
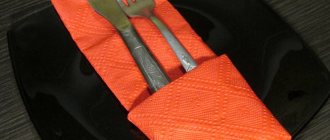
First, fold the white ribbon in half and try it on the neck of the bottle.
- Apply glue to one half of the folded tape and glue it to the neck of the bottle so that the upper part can bend.
- Raise the top of the collar of the first tape, glue another 2-3 rows to the bias underneath it.
- Measure out the main color of tape to attach to the bottle. Raise the collar and tie a ribbon tie for the groom.
- Lower the collar and continue gluing the blue ribbons (on top of the tie) onto the bottle.
- When the narrowed part of the neck ends, cover the bottle in a circle with ribbons to the very bottom.
- Glue buttons to the groom's jacket. Decorate the “chest” with a boutonniere.
- Prepare such parts for making a top hat for the groom.
- Glue a cylinder out of cardboard. Cover it with ribbons and decorate it to match the jacket.
- Place the top hat on the bottle and the groom is ready.
DIY decor master class
If you decide to create a unique design yourself, then first you need to prepare the surface of the bottle.
The easiest way to remove the label is to place the bottle in a basin or large pan filled with warm water, add dishwashing detergent and leave for half an hour. After soaking, removing the paper and glue will not be difficult.
Advice! Be careful with the water temperature, too low will not bring much effect, and too high can spoil the taste of the drink. The best option is a little warmer than room temperature.
Next, be sure to degrease the surface. Any alcohol-containing solution or even regular acetone will be suitable for this. Both alcohol and acetone can only be applied to a completely dry bottle.
Now all that remains is to choose the design for your champagne. There are many options - delicate lace, beads, polymer clay figures, fresh flowers. Below are two of the easiest master classes that allow you to create small masterpieces with your own hands.
Satin ribbons
A shiny, flowing material, beautiful both on canvas and as details , is perfect for decorating wedding bottles. Such decor does not have to be pure white. You can easily add soft pink, blue or lilac, and if the wedding theme allows, then a rich, bright palette.
You will need:
- satin ribbon (or several if you want a combination);
- glue gun (if you don’t have it, a regular Moment will do);
- scissors;
- various decor - beads, rhinestones, lace, brocade ribbon.
Decoration steps:
- Measure and cut the required length of tape. Apply a small amount of glue. You need to start gluing the bottle from the neck, slowly going down. The right end of the tape will cover the left;
- Cut off the next piece - it will be a little larger as the bottle expands. Lubricate with glue and secure, also leaving the right end on top;
- Apply two to five more layers , depending on the width of your tape. When the bottle becomes smooth, the top is ready, and you can move on to decorating the bottom part;
- Cover the bottom with even stripes , leaving a seam on the back of the champagne;
- Mask the joint with another tape glued vertically;
- The champagne is ready , now all that remains is to add details for beauty and disguise the inevitable irregularities. Bows look good both from the same satin ribbon and from a contrasting fabric of a different texture - brocade or lace.
To make the design more solemn, add several strips of brocade ribbon. Usually in the center - the fifth and sixth layers of the top decoration, and at the very bottom.
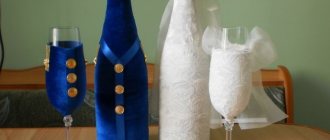
Velvet suits
The velvet design looks luxurious and aristocratic. The material has excellent stretch, which makes it easy to sew the necessary champagne clothes of almost any style from it. The colors can be any, but the classic combination is a white bottle for the bride and a black bottle for the groom.
You will need:
- stretch velvet in the required colors;
- threads matching the shade;
- paper, graph paper is best;
- well-sharpened scissors - cutting velvet is not so easy;
- pencil or narrow piece of soap;
- if desired, additional decor, for example, lace, rhinestones, beads.
Idea! If you have chosen a themed, non-classical wedding, then it is wise to reflect this in the champagne decor. However, in any case, the bottles of the bride and groom should be at least slightly different from each other so that you do not confuse them.
Decoration steps:
- First you need to find a pattern that suits you and transfer it to paper;
- We transfer the pattern to the velvet from the wrong side. You can draw either with a pencil, it will still not be visible, or with a piece of soap - its traces will disappear even faster;
- Cut out the resulting blank. Remember that velvet is an extremely capricious material, so it is necessary to cut it in a slightly stretched state and very carefully;
- We sew the details and get “suits” for champagne . We put them on bottles;
- Now you can start decorating. The groom's champagne is usually decorated with a miniature tie or bow tie; an equally charming option is rhinestones in the form of buttons on a suit. You can also use regular buttons. Another interesting idea is a miniature hat or top hat. For the drink, brides often make a tiny veil from a piece of lace or organza; they also add flowers, ribbons, and any other feminine elements.
Decoration with kanzashi flowers
Kanzashi is a technique that uses pieces of fabric folded in a special way. Most often, holiday flowers are made this way. Creating such decor is relatively simple if you use ready-made flowers. It is better if they are silver or pastel shades with a pearlescent tint. To decoupage wedding champagne you need to prepare the following:
- 7−9 flowers of different sizes;
- silver satin ribbon 2.5 cm wide;
- 1 cm thick ribbon to match the kanzashi elements;
- glue;
- multi-colored beads or rhinestones.
Recommendations
- Be sure to prepare the glass before starting work - remove the label, degrease and dry;
- Remember that too much heat can negatively affect the taste of the champagne;
- When choosing a design, focus on the theme of your wedding , the overall decor of the festive table, as well as the groom’s suit and the bride’s dress;
- Study how much time is needed for this or that stage of work in order to finish everything before the ceremony in an emergency mode. For example, acrylic pre-hardens 30 minutes after application, but remains weak for several more days - this is important to consider if you are going to glue something on it;
- Decorating bottles for the bride and groom allows for a variety of experiments, but it is worth remembering about moderation in order to create a truly elegant design.
Decorating the bottle
Create bottle decor from different materials
It is possible that items are stored unnecessarily in your closet. So today is their finest hour. I use at work:
- beads;
- rhinestones;
- lace, satin and silk ribbons;
- old brooches;
- cones and tree bark;
- cotton wool;
- silver and gold spray paint;
- leg-split.
Wrap the neck with twine and paint it if desired.
I also practice various design options. Today I am pleased to offer them to you:
- Tie colored satin or cotton, colored or checkered ribbons and bows onto the bottle hangers.
- Glue pearls or rhinestones along the bottom contour with super-moment glue.
- Wrap the neck with twine and paint it silver or red.
- Paint the pine cones with gold paint and attach them to the project.
- Artificial rowan or viburnum berries are suitable as decoration.
- Powdered New Year's balls.
I ask you to maintain a sense of proportion. The bottle should be bright, stylish, beautiful. Don't overload it with unnecessary details and decorations.
Red ribbons look great when paired with golden cones, and the romantic motif is ideally complemented by stylish pearls and lace.
Using a postcard
Classic decoupage of wedding bottles involves image transfer. This is a simple method that, in addition to materials, requires only imagination in choosing cards, accuracy in placing the design, and a little practice, so it is best to try your hand at a glass surface several times before you start creating decorations for the holiday. The materials are all from the first method, only postcards are used instead of napkins.
The bottle is cleaned and degreased, after which it is primed and allowed to dry, and any uneven surfaces are sanded.
The postcard is varnished without touching the edges. The dried image is separated from the substrate and glued to the bottle using PVA.
Selected paints that will harmonize and highlight the image are carefully applied to the remaining surface with a sponge.
The finished product is varnished and decorated with ribbons.
From this video you will learn how to make beautiful decoupage of a wedding bottle:
Decoupage for paired bottles is the perfect way to create a traditional wedding decoration. Thanks to the variety of possible designs and methods of applying them, as well as decorative elements, the decoration will look original and solemn.
Using napkins
Decoupage using napkins is a rather difficult process for beginners. It will take several attempts before you get beautiful products. You can use both regular paper napkins and special ones with thematic images printed on them. Profile materials are more expensive, but easier to handle, so it is better to use them for beginners.
- bottle;
- napkin with a picture;
- brushes for glue and paints;
- priming;
- acrylic paints and varnish;
- PVA;
- fine sandpaper;
- sponge;
- decorative elements;
- alcohol or nail polish remover with acetone.
The first step in decoupage is surface preparation. Bottles are completely cleaned of labels, foil and glue.
To facilitate the process, you can place them in cold water for a day. After this, all stickers are removed, the surface is dried, checked and degreased, as in the photo.
The second step is to apply a primer to create the background. Use either construction primers or a mixture of acrylic paints and PVA. The consistency should be similar to honey. After drying, the surface must be checked for unevenness, and if necessary, sanded.
In the third step, the back layers are removed from the napkin, leaving only the one with the image on it. Afterwards, all excess parts are cut off, departing 2-3 cm from the picture. When the excess is separated, the distance to the edge is carefully reduced to 5 mm so that the transition between the backgrounds does not stand out.
The fourth step is to apply a translucent napkin to the bottle and cover it with glue. PVA is applied from the middle to the edges, using light brush strokes. Care will be required to avoid the formation of air pockets, otherwise when trying to flatten, the softened paper will spread.
The fifth step is to coat the dried bottle with varnish, in 1-2 layers.
The sixth and final step is to add outlines of glitter, rhinestones or other wedding decorations to the dry surface.
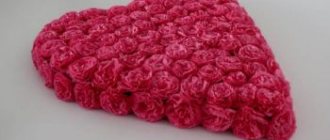
With fabric
It sounds very strange - decoupage with fabric. But it's actually a simple and beautiful way to create holiday bottles.
- Everything from the previous method.
- A piece of cotton fabric 30x40 cm.
- Disposable protective gloves.
- 1-2 liter capacity, a container for construction paint works well.
The bottle is completely cleaned of stickers and degreased. Glue is poured into the container, the fabric is soaked and kneaded with hands.
To protect against PVA getting on your skin, wear gloves.
Afterwards, the fabric is laid out on the table, a bottle is placed in the middle and carefully wrapped, forming artistic folds.
It is important to leave a flat area on which the drawing will be applied. If the material is too heavy and tries to slide, it can be fixed at the bottom with wire and covered with waves.
The fabric will have to dry for at least 24 hours, depending on the thickness of the chosen material. It is important to remember that this is only possible in a cool place, due to the champagne.
Acrylic paint of the desired color is applied to the dried fabric and allowed to dry again.
The image is applied to the prepared area, and the selected decoration (except for rhinestones) is applied to the remaining parts.
The finished bottle is coated with several layers of varnish and, if necessary, rhinestones are glued.