A wedding is one of the most important and exciting events in life. When decorating a formal hall, close attention is paid to every detail, including the attributes of the festive table. 2 brightly decorated bottles of champagne are a must for those who stick to tradition. You can decorate the bottles yourself with a little effort and imagination. There are several ways to decorate.
Without exaggeration, we can say that the most exciting event in life is a wedding.
Types of decor for wedding bottles
Designing and decorating champagne bottles for a wedding can be done using several methods.
Types of decor:
- ribbons;
- photos;
- polymer clay;
- fabric trim;
- engraving;
- decoupage;
- paints;
- rhinestones.
Much of the decor can be created with your own hands, including the original design of bottles for a wedding.
Before carrying out it is necessary to prepare all the tools, as well as the bottle itself. The surface must be cleaned of labels and thoroughly degreased. This will help achieve high quality results.
Everyone wants every banquet decoration to be creative and delightful.
Note. When decorating, it is recommended to adhere to the general style of the hall in which the celebration is taking place.
How to decorate champagne for a wedding with engraving
Perhaps not everyone can do this work with their own hands. Engraving on glass requires a special machine, so in this case a professional will do everything in the best possible way. The main thing is to decide on the pattern, image, inscription and the master will create an exclusive, impeccable decor. Engraving is an original design for wedding glasses and bottles; you can add decorations with flowers, ribbons, beads and bows with your own hands.
What shape of container should I choose?
Champagne bottles are distinguished by the fact that they practically follow the shape of the human body. Therefore, they are convenient to use for decorating figurines of the bride and groom.
From ordinary bottles of champagne you can make a real exclusive that will be the center of attention at your wedding.
Some people use containers with other drinks. For example, cognac can be selected in accordance with the image of the figure of the bride and groom. Elongated bottles with a narrow neck are suitable for decorating a lady. A rectangular or pyramidal vessel is useful when decorating a man. Containers with vodka, martini, and vermouth are selected using similar criteria.
Advice. When choosing an alcoholic drink, it is recommended to select bottles that resemble the outline of the young person’s body. Wide, voluminous containers are suitable for the groom, and narrow ones with an elongated neck are suitable for the bride.
The history of the tradition of decorating bottles for weddings
Sparkling wine and champagne are drinks that a wedding cannot do without. It is the first to be poured into glasses when congratulating the newly-made husband and wife. At the feast, any other alcoholic or non-alcoholic drinks are consumed, but the bride and groom must have two bottles of champagne on the table.
People call them “bulls”. Such a strange name was given to bottles of champagne because previously in Slavic settlements newlyweds were given a bull and a cow tied by the horns. In villages it was a generous gift that allowed a young family to feed itself and laid the foundation for a rich farmstead. And on the first anniversary of marriage, guests were always treated to fresh milk.
In the modern world, gift animals are symbolized by bottles of champagne - one each for the bride and groom. They remain untouched until the end of the celebration, then the newlyweds take them to their home.
Today, bottles decorated for a wedding can look like a real work of art. The decor can depict the traditional costumes of the bride and groom or be related to the theme of the holiday. You can decorate not only with champagne. These can be bottles with any drinks that the newlyweds like or their shape resembles female and male figures. When choosing non-alcoholic liquids, you should take into account their shelf life, because in a decorated form they will need to last at least a year.
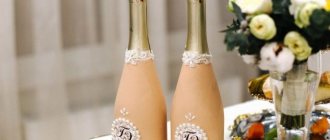
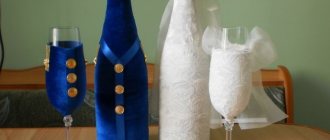
Wedding champagne bottle: trim with ribbons
Using satin ribbons is a simple and optimal budget option. This method of decoration is characterized by fairly simple steps and helps to create a bright and unique decoration for the holiday table.
There are many interesting wedding traditions, including two untouched bottles of sparkling drink.
Tools:
- ribbons of several shades;
- glue;
- scissors;
- lace;
- elements of additional decor (flowers, rhinestones, beads).
Attention! Bottles must be thoroughly cleaned of contaminants - dust, greasy marks, stains.
Pasting begins from the neck where the foil ends. The required piece of tape is glued to the bottle, the excess is cut off. The second layer is glued slightly overlapping the first. This way you can make 3-4 layers. It is recommended to use a white ribbon, then you will get an imitation of the groom's shirt. For subsequent decoration, it is better to take a ribbon of a different shade - black, blue, gold. The entire surface is covered in a similar way. You can place a piece of ribbon in the center to act as a tie. The bottle for the groom is ready. Lace is useful as an additional decor.
Just to the left of the neck there is a small flower made of white ribbon - a boutonniere.
The bottle for the bride is made of white ribbons. The registration process is carried out according to the steps described above. The lid is covered with a small piece of lace, which is a veil. In the belt area you can add a bow or ribbon flowers. Decorate the neck itself with beads or rhinestones.
Tili-tili dough
For decoration you will need:
- bias tape in white (ten meters) and black (eight meters);
- lace stripe - ten cm;
- satin ribbon black (1.3 cm wide (for a bowler hat and bow tie) - one and a half meters and twelve cm; size 5x5 cm (for a bowler hat) - ten cm) and white (1.3 cm wide (for a hat) Bride") - twenty cm; size 5x5cm (for the "Bride's" hat) - ten cm);
- white organza (for the “Bride’s” hat) - a small piece;
- adhesive material gossamer - a small piece;
- white cardboard;
- glue stick;
- glue “Moment” (Crystal);
- wide nylon tape - three meters;
- beads and rhinestones.
Description of work
- Bottle preparation: Remove all labels except the foil on the end of the bottle. To do this, put the bottles in water for an hour, and then use a scraper, knife and sponge to remove the label.
- Decoration of the "Bride".
Basis: using a marker, thinly draw a vertical stripe on the bottle, then try to ensure that the ends of the glued materials meet on it. Determine the exact size of the lace strip, trying it on the “neck” of the “Bride”, cut off what is unnecessary. Then, carefully smear the neck with glue, attach the lace.
Also try on white bias tape, cut it off, stick it on, stretching it a little. Cut off the remaining turns of the tape after gluing it. Watch the ends of the binding, they must be carefully glued.
Each next turn should be slightly on the edge of the previous one. Thus, trim the expanding part of the bottle.
Related article: Crochet a chair cover
Cover the place where the width of the bottle is stable with tape without cutting, trying to attach the bias tape strictly horizontally. Cover the bottom of the bottle in this way.
After pasting the bottle, decorate it with a skirt, jewelry and a hat.
Making a skirt: cut the wide bow into three pieces one meter long. Solder the ends of each segment by folding them together, pressing them with a knitting needle or a metal ruler and holding them with a hot soldering iron.
In the photo there are ready-made blanks for the skirt:
Fold each piece lengthwise, but not in half, but with a difference of about one cm. Fix the fold of each part of the skirt with small stitches, and pull it together.
Place the skirt blank on the bottle, do not tighten the thread too much, as in the photo:
Gather all three tiers of the skirt. Make sure that the fabric is distributed evenly.
The “belt” of the skirt can be decorated with golden braid. The width of the braid is two and a half centimeters, the length includes the circumference of the bottle plus two centimeters for the connection and another half a centimeter for a loose fit. Connect the edge of the braid from the inside to the frill.
After this, fold the golden braid, hide the edge of the frill and secure it with monofilament, a thread reminiscent of fishing line.
Attaching the "skirt". First, try on the bottom frill so that it almost touches the bottom, mark the edge of the frill on the bottle with a dotted line with a simple pencil, raise the frill so that you can apply glue. Apply Moment-Crystal to the dotted line. Place the frill on the glue and press tightly. Similarly, attach the middle frill two centimeters above the bottom one.
Sew the upper part of the skirt with golden braid to the monofilament binding around the bottle.
Neck trim: attach beads and rhinestones to a golden braid half a centimeter wide with thermoplastic glue, without touching the braid with a hot-melt glue gun, since the hot surface of the gun leads to deformation of the braid. Also glue the decoration to the “neck” with hot glue.
Related article: Summer stylish crochet bucket bag
If the braid is wide, it is easy to cut the desired width with a soldering iron using a metal ruler.
Decoration of the “head”: to make the brim of the hat, glue two pieces of organza together using adhesive web. Select a cup or glass that fits its circumference and trace it around the organza with a hot soldering iron.
Use a soldering iron to cut darts inside the brim of the cap.
Glue the darts of the hat brim into the top part and press tightly.
Take a white satin ribbon and make a circle on it along the diameter of the bottom of the hat and a ribbon to decorate the crown from the inside. Glue them inside.
Cut a strip of organza. Attach it above the crown to create small folds.
"The Bride" is ready.
- Champagne “Groom” is made according to the same scheme as “Bride”.
Please note that the first, second, third and fourth turns are made using white binding, and the “suit” is made from black. Decorated with a bow tie made of black satin and beads.
“Bow tie”: the length of the product is two and a half centimeters. Prepare the ribbon based on the following: you will need two lengths of the tie and plus 3 mm.
Fold the edges of the ribbon so that they overlap one another by 3 mm, as in the photo below. Make a couple of stitches in the center of the butterfly.
And tighten the thread, gathering the bow tie. Fasten the thread.
Then decorate the butterfly with a bead or rhinestone by gluing it.
Attach the butterfly to the “neck” with hot glue. Glue three “buttons” to it below: beads or rhinestones. Making a “pocket”: make a “valve” - a rectangle from a narrow black ribbon. Glue a “scarf”, a piece of white tape, to the inside of the “valve”. Then attach the blank in place of the chest pocket.
The creation of the “Cauldron” follows the pattern of the “Bride’s” hat: let’s start from the bottom of the cauldron. Make a circle with a radius of 1.7 cm, stepping back one centimeter from the edge, cut it out, then cut out darts on it.
Related article: Structural knitting patterns: diagrams with descriptions and videos
The “crown” consists of a strip three cm wide and thirteen cm long. Spread it with glue on one side, glue it to the darts of the previous workpiece, and press well. Glue the ends of the strip overlapping.
Bowler brim. We make a circle again, but this time double: the inner one with a radius of 1.7 cm, the outer one with a radius of 3.2 cm. Make darts inside.
Glue the darts of the brim to the crown and press well.
Cover the paper pot with cloth. Cut out a large circle from black satin. Glue it to the bottom and top of the crown, make cuts on the protruding edges of the fabric and also glue it.
Sixteen strips of black satin ribbon, 1.3 cm wide, and cover the margins.
To decorate the crown, glue the ribbon to the top of the bowler with several turns. We cover the inside of the pot with satin according to the size of the bottom.
The result is a cute hat, which can be additionally decorated with a flower.
Decorating bottles of the bride and groom with velvet
Velvet fabric has a special sophistication. The process of creating velvet vessel costumes is more simplified. This will allow you to create original jewelry in a short time.
This indispensable attribute of the wedding ceremony is specially decorated and sealed so that they remain intact.
Tools:
- velvet in several shades;
- cardboard;
- pencil;
- scissors;
- glue;
- threads;
- needle;
- lace;
- white tulle;
- additional decor.
To create costumes you will need patterns. The pattern is drawn on cardboard according to the shape of the bottle itself. It can be made from two parts, and the edges are sewn from the wrong side. The cape for the bride's bottle is made of white fabric, for the groom - blue, purple, black (at personal discretion).
According to tradition, the newlyweds must take them with them from the wedding table.
Tulle is useful when creating a veil for the bride. As an additional decoration, the rim of the cork can be covered with rhinestones. Decorate the surface of the container with lace inserts, flowers or bows. To decorate a man's vessel, rhinestones, several lace inserts, and ribbon flowers are suitable. A small piece of tulle can be tied around the neck. You will get a magnificent butterfly.
You will have to drink the contents of these, in fact, holiday souvenirs much later.
Addition. Instead of velvet, guipure, satin, and silk are also used.
Polymer clay flowers
Polymer clay helps in creating delicate and realistic buds. You can either buy such flowers in a specialized store or make them yourself.
There are no uniform requirements on how best to decorate bottles for a wedding; it depends on the wishes of the newlyweds and the taste of those who decorate them.
Tools:
- clay;
- talc;
- latex gloves;
- stationery knife;
- rolling pin;
- varnish for polymer clay;
- toothpicks;
- dye;
- brushes;
- water;
- soft sponge;
- degreaser.
Callas are one of the easiest creation options. This method is suitable for beginners in working with polymer.
When working, you should use gloves to protect the delicate skin of your hands.
Reference. It is recommended to lightly sprinkle the clay itself with talc to avoid the adhesion of dust and small specks.
It is recommended to divide the working material into small identical pieces. They are rolled into sausages, from which a ball is formed. The resulting ball can be cut into two equal halves to create small flowers. The ball must be kneaded to obtain a round plate. It is necessary to carefully monitor the thickness - too thin petals can quickly break. One corner of the plate is slightly stretched and bent. The lower half is folded overlapping each other. The petal is ready. A toothpick is inserted into the center, which must be covered a little with clay in advance and painted in the required color.
The result is fixed with varnish.
When all the flowers are ready, you can start decorating the bottle. Remove the label from the surface of the container with warm water. After drying, the bottle should be treated with a degreaser. The vessel itself is painted in the desired color. The stems are painted with green paint and flowers are glued around them. For additional decoration, rhinestones or beads, ribbons, and tulle are suitable.
Floral decoration of champagne bottles for a wedding will quickly attract the attention of guests.
DIY decorating workshops
Future wives often decorate champagne themselves, demonstrating their handicraft skills to guests. This is an echo of those times when a girl, walking down the aisle, presented her embroidered tablecloths, towels, and shirts to her relatives. Nowadays, decorated bottles can depict anything: figurines of a couple, candles, flower fountains.
To decorate a holiday accessory, you first need to remove the labels from the bottles. To do this, place them in warm soapy water. After half an hour, the paper will easily come off on its own. For expensive varieties with better quality glue, the labels are wiped off with a metal dish sponge.
After this, the glass is degreased with acetone, alcohol or vodka. Soak a cotton pad in any of these liquids, wipe the entire surface of the bottle and leave to dry.
Next, choose a decoration technique, prepare materials and tools, and create a sketch of the ornament. A test drawing is made on paper in color to evaluate its harmony and balance. Below are several simple master classes with step-by-step photos that are easy to implement.
Decoupage
Decoupage is a lifesaver for those who don’t know how to draw. The images are made in advance by the artist on plain or rice paper. All you have to do is cut them out and stick them on the smooth sides of the holiday bottle. To work you will need:
- thematic drawings printed on a decoupage card or table napkin;
- sharp scissors;
- acrylic primer and foam dish sponge for its application;
- PVA glue (in a 1:1 ratio with water) or special decoupage glue;
- synthetic fan brush – it will not leave hairs on the finished work;
- small soft flaps;
- varnish to fix the design and protect the product from water.
For appliqué using the decoupage technique, pot-bellied bottles for Dom Perignon, Krug or Asti champagne are better suited than others - they have more space to place the design. It is simply cut out of thin paper; thick paper is first soaked in warm water and dried on a cloth.
The degreased surface, stripped of labels, is primed with acrylic paint one or two shades lighter than the main design. After the primer has dried, the selected images are placed on top and generously soaked with glue. Using the same brush, air bubbles are expelled from under the paper and wrinkles are smoothed out.
After the glue has completely dried, the work is protected with three layers of varnish. To achieve an antique effect, use craquelure varnish.
To hold the bottle suspended when applying applique or painting, use two pieces of packaging foam. In one of them, cut a recess for the neck, in the other for the bottom.
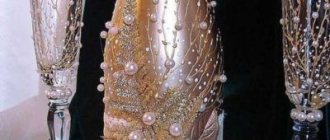
Satin ribbons and beads
Charming champagne decor for a close friend's wedding is made with your own hands from satin ribbons with the addition of all sorts of little things: sequins, rhinestones, beads, half-beads. The easiest way to decorate a bottle with ribbons is to braid it. This requires:
- satin or brocade ribbons 2.5 cm wide in harmonizing colors;
- glue “Moment” marked “Crystal”, which does not leave yellow spots;
- scissors and a stationery knife.
The tape is looped over the neck of the bottle, the required length is measured, and cut off. Several glue dots are applied to the underside of the tape and glued to the bottle. Do the same with the next loop, obtaining a wicker relief reminiscent of rustic masonry.
The bottom of the bottle can be wrapped with horizontal strips of tape. In this case, it is important that the seam is in the middle. It is processed in two ways.
- The seam at the back is left open, but the edges of the tape are lightly scorched with a lighter so that the threads do not fray.
- The front seam is decorated with flowers and bows. A special chic is to use Japanese kanzashi decorations.
A large flower on the front of the bottle can be additionally decorated with strings of beads or a long narrow feather.
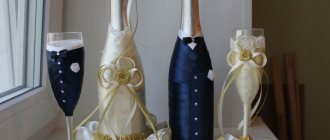
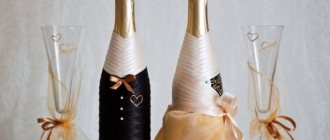
Bride and groom suit
Bottles decorated to match the wedding dresses of the newlyweds look elegant on the table. In this case, it is important to know the style and color scheme of their clothing in advance. Modern brides often choose not white dresses, but pink, vanilla, and mint ones. The groom's suit is also not necessarily black.
You can make copies of the young people’s outfits from:
- bias binding;
- satin or silk ribbons;
- scraps of expensive fabrics: brocade, velvet, taffeta.
- corrugated paper - special paper for scrapbooking that has clear folds.
The groom bottle is braided so that the top two or three layers of tape or paper imitate a shirt collar, and all subsequent layers imitate a jacket. A bow tie is attached to the neck, button beads are in the center, and a rose “in the buttonhole” is on the left side.
The material for the bride's dress is selected as carefully as possible in terms of texture and color. A braid is made on the top of the bottle, the lower third is turned into a fluffy skirt made of organza, guipure, and gauze. If the newlywed chose a tight dress, the outline of the bottle is left strict. Lace, artificial flowers, and small decorative fittings are used for decoration.
Polymer clay flowers
Modeling from polymer clay requires skills or at least watching a thematic video. Having become familiar with the basics of work and instructions for using clay, you can make a simple composition of flowers. To work, you will need gloves, a stationery knife and an oven in which the molded products are baked.
The delicate colors of polymer clay harmonize well with each other, and two or three of the most suitable ones are selected. Prepare a sketch and sculpt each petal, twigs, and leaves. To do this, a piece of material is rolled out into the shape of a stick, cut into plates with a knife and given the desired look with your hands.
Flowers are made from the finished parts, laid out on a heat-resistant base and sent to the oven. The baking temperature (110-130 degrees) is always indicated on the clay packaging. If the temperature regime is not observed, the material either loses color or becomes brittle.
When heated, polymer clay changes structure and releases toxic substances. After its presence, the oven is thoroughly washed and ventilated.
The finished fragments of the flower arrangement are attached to the bottle with superglue. They can be supplemented with beads, pearl beads, and an outline for stained glass.
Painting with paints
Stylish wedding bottles are obtained if dark green glass is simply painted with stained glass paints without adding other materials. In addition to the paints themselves, you need to prepare:
- contour for glass in gold color;
- washable marker of the shade closest to the contour color;
- acetone for rinsing brushes.
The initial drawing is applied to the bottle with a marker, possibly in the form of dashed lines. Draw an outline over the marker. After it dries, traces of the marker are removed with warm water and soap, simultaneously degreasing the surface.
Inside the closed contours, light, bright colors are applied with a brush: green, yellow, red. It is convenient to mix them in an aluminum tartlet mold. Using a pointed match, they draw twigs, stamens, vines, small insects, and make transitions between shades. Some fine details can be scratched with a needle into the dry paint.
The wedding will end, the guests will leave, the toasts will be forgotten, the reception hall will be set up for another holiday, but two elegant bottles will remain. For a whole year they will remind the young people how joyful it was for them to greet the dawn of their family life.
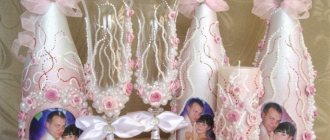
Photos of young people
Many newlyweds use personal photographs to decorate their bottles. This decor option has gained wide popularity recently. Photos are used instead of labels. In order to place the desired photo on the surface, it is recommended to print it on thin paper. The design is carried out with special care. You will need to think about the photo format, its location, and additional decorations.
Inscriptions with wishes (if the bottle is presented from guests), indicating the names of the spouses, the date and time of registration are suitable as decoration.
The vessel itself needs to be prepared for the technological process. The label is removed with warm water and the surface is degreased. The surface can be painted and a photo can be placed in the center. Small rhinestones will come in handy when creating a frame. The neck can be decorated with a ribbon bow, flowers, and a veil and a man’s hat (for example, a paper top hat) can be placed on the lid.
There are a lot of options for how to decorate this table souvenir.
Attention! Many specialized salons provide services for printing labels with the required image. This sticker will be a smart alternative to the real one.
Groom
Let's start with the groom. He needs to make a “shirt” with a collar. Therefore, we measure the required length of the white wide tape from the bottle. Fold the ribbon in half so that one edge is lower than the other, and fasten with needles.
Using an iron, we smooth the stripe and the “collar” of the shirt.
We attach the “collar” to the bottle with glue.
Using a metal ruler, mark the center and draw a line with a pencil.
We glue a wide white ribbon under the collar, securing the ends of the ribbon in the center.
Using dark blue bias tape, we “tie” a tie and put it on the shirt.
Cut off the “tail” from the tie.
Now let's start attaching the bias tape. We measure the tape to the required length, cut it with scissors and glue it to the bottle.
Using the line as a guide, glue the bias tape.
We reach the flat part of the bottle and secure the “side” in order to lower it down in the future.
We wrap the bottle in a circular motion to the bottom, periodically securing the tape with glue.
We lower the “side” and glue it.
We imitate buttons by gluing white half-beads to the “side”.
“The Groom” is ready, now let’s move on to the “Bride.”
Engraving
This method is durable. Engraved inscriptions and images will not lose their attractiveness even several years after the celebration. It is recommended to entrust the decoration to a glass specialist in order not to damage the bottles and to obtain high-quality images.
For decoration, you can use drawings or inscriptions.
The image itself can be either glossy or matte. When choosing a suitable shade for engraving, you should pay special attention to color combinations. For example, on dark bottles images of a golden or silver palette will look especially impressive and attractive.
Engraving on bottles has many advantages compared to the decoration methods described above.
This design is almost impossible to damage or spoil. If minor dirt or buildup occurs, the bottles can be gently rinsed in cool water. The liquid does not have a negative effect on the drawing. In addition, it is worth highlighting its versatility: champagne decorated with engraving will be appropriate at any wedding, regardless of the style.
Decor of bottles using original techniques.
Popular decor options
There are no strict rules on how to decorate a table and the necessary accessories. The design of wedding bottles should suit the overall concept of the holiday. For magnificent ceremonies in a classic style, decorating with gold sparkles, ribbons, and flowers is suitable. A youth holiday in nature, stylized as Provence or a theme party, will be decorated with painted bottles, decorated with jute cord or dressed up in tailored costumes. Before decorating begins, labels are removed from the surface of the glass so that the surface is smooth and neat.
When choosing holiday elements, you can show your imagination. Don’t be afraid that over time, dust will accumulate on the decor and it will lose its attractiveness. For cleaning, use a vacuum cleaner, hair dryer or soft damp cloth.
The main ways to decorate champagne include:
- Decoration with spray paints. The decor can be done by the young people themselves. The cleaned surface of the glass is evenly covered with paint of one or several colors. Next, the necks are tied with ribbons, strands, and braid. This method requires minimal time and money.
- A bottle of champagne can be decorated with a photograph of the newlyweds. It can be stored even after the drink is drunk. Not just any photo is suitable for pasting. The photo should be clear, with the faces of the young people clearly visible. It is advisable that the bride and groom smile on it. The selected image can be taken to a specialized organization, where the image is transferred to self-adhesive film. The presence of a sticky layer makes it easy to stick the picture to the glass. Photos can also be printed on paper and fixed to glass with transparent tape. To give the image solemnity, it is framed and words of congratulations, the names of the newlyweds and the wedding date are added.
- The most relevant today is the decoration of champagne in the “bride and groom” style. Wedding dresses are sewn or knitted onto bottles. Robes can be an imitation of the real costumes of the young people: made of the same materials, in a similar color scheme. Sometimes special corrugated paper is chosen for clothes. A man's bottle is dressed up in a jacket or vest, and there is always a tie or bow tie made from ribbons. To sew a jacket, you can use velvet, brocade, or woolen fabric. The outfit for a woman's bottle is made of lace, organza, and ribbons. The dress is made in white, but any pastel shades are acceptable. An alternative option for making wedding champagne costumes is to glue multi-colored satin ribbons onto the bottle, from which the bride and groom's outfit is made.
- Some creative couples who are organizing their wedding celebration with a themed party may choose folk ones for champagne rather than traditional embroidered dresses of the newlyweds. Ancient Russian robes, which are very beautiful, are very popular. If the party is held in an oriental style, then the outfits can be in the form of a kimono. Some young people take into account their own interests or professions when choosing bottle decor. For example, a woman’s bottle may be in a white coat or a teacher’s suit, while a man’s bottle may be in a military uniform, a sailor’s suit or an athlete’s suit. Such accessories will definitely be remembered by guests; they will be special and unique.
- A separate type of decoration is the production of flowers, rings, and hearts from polymer clay. Modeling requires special materials, knowledge of technology, and skills. Polymer clay is used in white, pink, golden, and silver colors. Cleaned bottles are previously uniformly painted with aerosol or acrylic paints. The stucco decoration is glued on top of the paint to obtain the intended pattern. Decorated bottles look very elegant and are suitable for a luxurious celebration.
You shouldn’t put off arranging champagne for your wedding until the last days before the holidays. With a lot of time left, you can create more complex, stylish decor.
Marine style
In folk style
Bride and groom
With photo
Decor using decoupage technique
The decoupage technique is widely used in the design of various household items and decor. You can also use this decoration method when decorating champagne.
If both the bride and groom have experience in making things with their own hands, you can prepare a surprise for each other.
Tools:
- napkins with themed patterns;
- degreaser;
- soft sponge;
- brushes;
- primer;
- sandpaper;
- acrylic lacquer;
- paints.
Advice. Photos of the newlyweds are also used instead of napkins.
The initial stage is preparation. Bottles must be cleaned of paper labels and wiped thoroughly. Degrease the surface with alcohol. It is recommended to remove the foil from the cork itself.
Primer treatment will help create a suitable background and prepare the surface for further work.
A soft sponge will be useful when processing. The primer must be applied evenly, using patting movements. After the first layer has dried, a second layer is applied. The component must dry thoroughly. After drying, the surface is carefully sanded with fine-grain sandpaper to obtain an even coating.
The required design is cut out from the napkins.
When cutting, you should step back a few centimeters from the ornament. The picture is applied to the selected area and treated with glue. When working with glue, all folds and irregularities are carefully smoothed out. After drying, the edges can be lightly sanded to eliminate any defects and smooth out the contour. Finally – varnish treatment.
Signs
Two decorated bottles of champagne are placed on the newlyweds’ table, which remain sealed. From the festive table they go home to the newlyweds. It won't be long before they get drunk. Today they don’t give a cow or a bull, but the tradition of tying bottles came from there.
Traditionally, newlyweds were not supposed to drink at the wedding, because they were facing their first wedding night, on which the conception of their first child was possible. Over time, the bride and groom also began to drink alcohol at the feast, but the tradition of keeping two bottles unopened remained. They stand at the home of a young family until a certain event.
The groom's bottle is opened on the first anniversary. It symbolizes male strength of character, endurance, and inner core. And the first glass of drink is poured to the wife. The bride opens the bottle for the birth of her first child. The young mother, of course, does not drink this champagne.
During the feast, guests may try to steal (for fun, of course) wedding bottles, so you need to carefully monitor them. If the “theft” does occur, guests will have to pay a ransom. But drinking the contents of the wedding symbol or, even worse, breaking the bottle is considered a bad omen.
Painting with paints
The use of paint is one of the most lightweight decorative options. The choice of colors and patterns allows you to create a bright and unusual decoration for the festive table.
Tools:
- soft sponge;
- degreaser;
- paint (preferably in cans);
- unnecessary newspapers;
- gloves;
- stencils for applying drawings or inscriptions.
The surface of the vessel is cleaned of labels, foil and traces of glue, and degreased.
Spread newspapers on the work table to prevent dirt and streaks. The paint application process is carried out with gloves.
Attention! It is recommended to work outdoors or in a well-ventilated area.
After the background has dried, you can begin painting. If you do not have the necessary skills, you should use stencils. When finished, the bottle must be thoroughly dried.
The result can be sealed with varnish.
Decor with rhinestones and bows
This option can be used either as a single design or in addition to the methods described above. Rhinestones are useful when decorating with ribbons or painting; bows are used in the design of the neck and complement outfits for bottles made of ribbons or fabric.
When decorating bottles only with rhinestones, it is recommended to clean the surface of labels and degrease.
For more comfortable work, contours for gluing are outlined with paint. It is recommended to prepare in advance sketches of the drawings that will decorate the festive champagne.