Materials and preparation Ideas with ribbons Options with polymer clay Decoupage with napkins Decor with fabric Painting
Decorating champagne for a wedding with your own hands is a fun and creative activity that can be done by both the relatives of the bride and groom, as well as the organizers.
Traditionally, these unique bottles are not opened. They stand on the table as decoration, but they can only be opened on an anniversary or during the birth of the first child.
The design of champagne can be anything you want, because its design is in no way regulated by tradition. The scope for the designer's imagination is simply immense. We have collected several ideas with detailed descriptions of how to bring them to life, and also supplemented the text with colorful photos for inspiration, so that a couple of bottles at your wedding will look truly unique.
How to decorate champagne for a wedding: materials and preparation
Source: @wedding_accessories_sarny
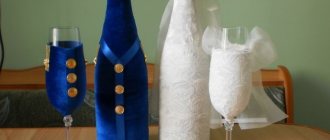
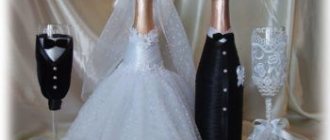
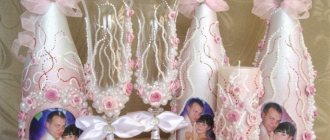
One of the favorite techniques is to draw a parallel between champagne and newlyweds, to “dress up” the drinks in the costumes of the bride and groom.
If the wedding is non-alcoholic, then you don’t have to give up the tradition, but simply replace the alcoholic champagne with an effervescent drink, for example, lemonade. It is important that the bottle has smooth shapes so that its outline resembles the silhouette of a person.
If you don’t want to take two identical drinks, you can take different ones. For example, cognac, wine. But in any case, they should resemble in their shape the silhouettes of the newlyweds and be decorated in the same style.
Typically used for decoration:
- ribbons;
- decoupage technique;
- paints;
- sparkles, rhinestones, Swarovski crystals and other shiny details;
- newlywed photos;
- fabric (organza, silk, velvet, for example);
- lace;
- polymer clay (for three-dimensional figures);
- paper, corrugated or regular cardboard;
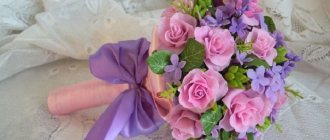
- artificial flowers, pebbles for bright details.
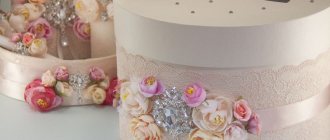
Champagne decoration for a wedding does not have to represent the bride and groom. It can be either a lush style or a more restrained one, but with traditional wedding paraphernalia - flowers, hearts, rings (if it fits into the style of the celebration).
Before decorating, be sure to wash and clean the surface of the glass so that dust does not interfere with the bonding of the material and glue. It is best to think through the design in advance, and not create on a whim.
Santa Claus costume for champagne
In addition to its beauty, such a New Year's bottle is also functional - the ribbon cover is removable and can be used for more than one holiday feast.
To make this bottle decoration with your own hands you need to have:
- a sparkling wine;
- ruler;
- pencil;
- Whatman paper;
- scissors;
- red trim;
- red wide satin ribbon;
- wide silver ribbon;
- silver narrow lace;
- a long wooden skewer to create a staff;
- narrow transparent tape;
- a little cotton wool;
- thread and needle;
- thermal gun and rods.
In what sequence is this New Year bottle decor done:
1. First of all, a removable champagne cylinder is created. For it, a rectangle measuring 14 by 30 cm and another one measuring 8 by 30 cm are measured on whatman paper. The rectangles along the long borders are glued together and applied to the bottle. The edges of the paper blank are overlapped, trimmed, and the base is glued with tape.
2. You can start creating a caftan for Santa Claus - using a glue gun, glue a silver ribbon onto the paper base - this is the collar. If desired, you can apply 2 rows of tape on top of each other with a small space between the rows.
3. Using red bias tape, we begin to lay out the caftan itself. The ribbons are glued on top of each other. The space between rows is a few mm. It is better to glue pieces of tape so long that it is only enough to wrap the bottle and overlap the ends. In this way, the entire space of the walls is filled to the bottom.
4. Cover the joints of the ribbons with a strip of tape glued on top.
5. Glue the lace onto the first row of red trim after the collar, passing it down the vertical red trim covering the seams and wrapping the lace around the bottom of the champagne. We fix the ends and intermediate joints with glue.
6. Let's start creating the staff. To do this, a red ribbon is wrapped around a wooden skewer. Periodically fixed with adhesive. The second layer is a spiral-shaped silver tape.
7. Sew the bag - a piece of wide red ribbon, fold it in half, stitch the edges with a needle and thread. We fill the internal space with cotton wool. We tie the top with a silver ribbon and tie a bow from it.
8. We fasten the bag by the edge with a staff and fix the structure on the side of the caftan.
9. All that remains is to make the hat. To do this, measure a rectangle according to the size of the corked champagne cork. Glued into a cylinder. The top is covered with a circle of paper.
10. Using a glue gun, the cap is covered with bias tape. Narrow silver lace is glued along the bottom border. If you wish, you can decorate everything with beads. Take silver and golden colored balls; New Year's decorations in these colors are always bright and festive.
Knitted New Year's outfits
If you have basic knitting skills, use them to create a unique outfit for New Year's champagne. You can knit a cover in the shape of an elegant Christmas tree - with balls and a bright star on the top.
You can use knitting needles to knit a “sweater” in the shape of a snowman or Santa Claus. Knit the main part in stockinette stitch, and decorate the top in the form of a stand-up collar, tying it with an elastic band. A pom-pom nose, beady eyes, a little jewelry and imagination - here we have a charming guest at the feast.
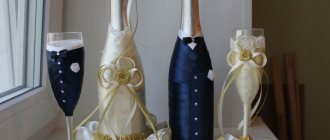
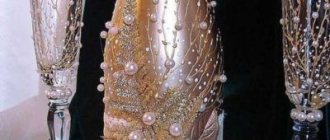
Bride
Mark the center of the champagne bottle, measure out a narrow white satin ribbon and glue it to the bottle at an angle of 45 degrees.
Thus, we decorate the “corset” with white thin ribbon.
We cover the rest of the bottle in a circle with a wide white satin ribbon.
Glue stretch guipure on top of the satin ribbon.
We cut out elements of flowers and leaves from guipure fabric.
We glue the cut out elements to the bottle.
We glue a ribbon to the top of the bottle and decorate it with half beads.
We glue half beads and rhinestones to the cut out elements.
You can add an additional decoration to the “bride” - a veil.
Adding a festive sparkle
There can't be too much sparkle and shine for the New Year 2022! The first way to decorate New Year's champagne is to stick a large amount of sparkles. Doing this yourself is quite simple. You will need:
- a bottle of champagne, or better yet more than one. By the way, you can find mini bottles with a volume of 0.33 liters in the store. Several of these vessels, picturesquely displayed on the festive table, can surprise guests. For information on how to choose champagne, read the link;
- glue. The best option would be glue in a can - it’s most convenient to apply, but if you don’t have one, don’t worry, take any and apply it with a brush;
- actual sparkles. Glitter powder is available in craft stores. You can find any shade according to your design;
- additional decorative elements upon request: ribbons, cocktail tubes, Christmas tree decorations.
Step-by-step instruction:
- Cover the bottle with an even layer of glue. It’s convenient to do this over an unnecessary box so that splashes don’t fly in all directions.
- While the glue is still wet, you need to apply glitter. You can scatter them on a sheet of paper and roll the champagne. The remaining unused particles from the sheet can then be shaken back into the jar. Additionally, glitter can be applied pointwise with your fingers.
You can decorate New Year's champagne with sparkles. To do this, treat the bottle with glue and until it dries, roll it in glitter and sprinkle it with it. The colors of the “powder” can be very different.
You can decorate with ribbons, bows, or attach a small greeting card with a wish. If you add a paper or plastic straw, this bottle of champagne will turn into a charming gift.
Golden decor in the New Year looks very stylish and appropriate.
Champagne glitter can be any size and color.
Braided bottles
There are two fundamentally different types of weaving:
- Creating a stand in which to store the bottle; if desired, the bottle can be removed from the wicker and replaced;
- Making a decorative non-removable “shirt” for containers.
You can weave using the macrame technique from suitable yarn. It should not stretch or fluff while working. Original ideas for decoration can be realized by familiarizing yourself with the technology of creating newspaper tubes.
Other champagne decor options
Read: Interior design of an apartment in loft style (70+ photos)
Let's discuss this article together:
Click to cancel reply.
Sequins
Glitter decorations can be considered a form of decoupage. Before decorating a bottle of champagne using this method, it is advisable to cover the work surface with oilcloth and remove carpets and textile tablecloths.
The decoration technology is the same. The glass surface is removed from the label, primed, and after drying, covered with a layer of PVA. Then the container is generously sprinkled with glitter (or dumped into it).
After complete drying, the surface must be varnished in several layers, otherwise everything and everyone will shine.
It is worth noting that this decoupage of bottles for March 8 is easiest to do with your own hands. It is one of the fastest and safest.
When decorating champagne for the New Year, decoupage the bottle with salt in the same way. The result is the effect of a frost-covered surface.
Decoration from the inside
If you plan to bring to life the idea of decorating the bottle from the inside, then you need to choose a container with transparent glass and a non-standard shape.
A bottle decorated with various irregularities on its surface looks interesting.
Paint with an acrylic base of any color is poured into the prepared bottle for decoration.
The contents of the vessel are shaken so that the paint evenly covers its walls.
After this, the bottle is turned upside down and left in this state for some time until the excess paint pours out of the bottle.
If, however, the walls are not evenly covered with a layer of paint, then the procedure must be repeated several times.
Engraving
This method is durable. Engraved inscriptions and images will not lose their attractiveness even several years after the celebration. It is recommended to entrust the decoration to a glass specialist in order not to damage the bottles and to obtain high-quality images.
For decoration, you can use drawings or inscriptions.
The image itself can be either glossy or matte. When choosing a suitable shade for engraving, you should pay special attention to color combinations. For example, on dark bottles images of a golden or silver palette will look especially impressive and attractive.
Engraving on bottles has many advantages compared to the decoration methods described above.
This design is almost impossible to damage or spoil. If minor dirt or buildup occurs, the bottles can be gently rinsed in cool water. The liquid does not have a negative effect on the drawing. In addition, it is worth highlighting its versatility: champagne decorated with engraving will be appropriate at any wedding, regardless of the style.
Decor of bottles using original techniques.
Decoupage on bottles
Several paper napkins, PVA glue, a brush and a huge supply of patience. Here is a list of components necessary for decoupage.
The choice of designs on napkins is large, which means the range of ready-made crafts is also wide.
Preparing containers for this method of decoration is identical to painting. Bottle needed:
- Wash;
- Dry;
- Degrease;
- Cover with white (or another color depending on the design) acrylic paint.
Stages of work:
- Then the drawing is prepared. The selected fragment is carefully cut from the napkin with sharp scissors.
- Some needlewomen claim that it is best not to cut out the pattern, but to carefully tear it off with your hands.
- The top, brightest layer is separated. Glue is applied to the area of the bottle. The napkin sticks.
- Folds and creases are smoothed out with a brush. A layer of glue is applied on top with a brush. You can apply PVA in several approaches.
- This makes the bottle invulnerable to water and mechanical damage. But acrylic varnish is also used for these purposes.
Instructions and methods for beginning needlewomen are not limited to napkins. Excellent decoupage can be made from old music books, geographical maps, newspapers and magazines. Botanical and anatomical atlases from the last century will become an inexhaustible source of vintage pictures. In addition, you can glue on flaps of thin fabrics.
If you don’t have any suitable images at home, you can always purchase a set of ready-made decoupage cards.
Bottle painting
Having creative abilities, you can try yourself as a bottle artist. Acrylic paints work best in this case. They are bright, dry well and remain unchanged for a long time.
Painted bottles of champagne will become an original wedding or New Year's gift.
Stages of work:
- Carefully remove the label without shaking the bottle too much;
- Wipe the entire surface with degreasing alcohol;
- Cover the bottle with white acrylic or primer; It is better to use not brushes, but a sponge or a regular foam sponge;
- Paint according to a sketch or without preliminary sketches;
- Cover with varnish.
In addition to creating thematic scenes, you can paint the bottle more simply. Single-color bottles are quickly achieved with spray paints. Drinks in red or gilded containers look great on a wedding table. For the latter, you can use not only golden paint, but glitter and sparkles.
If you wrap a clean transparent bottle with masking tape or electrical tape before painting, then translucent stripes or circles will remain in the finished product. In the same way, you can make memorable inscriptions or dates on the bottles.