The general concept of the celebration design largely determines how to paint a bottle of champagne for a wedding so that it organically fits into the style, becomes an effective decoration and is remembered as an original design solution.
Options for work largely depend on the thematic focus: for modern high-tech styles and colored weddings that emphasize status, metallic shine is perfect; shabby chic or Provence require soft tones, ostentatious aging in conjunction with decoupage; country, Hawaii, vintage - contrast and brightness. In all styles, it is appropriate to match the image of the bride and groom.
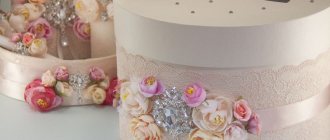
Universal decor
The combination of white and gold colors is considered wedding and is suitable for a celebration decorated in any style. This range gives positive emotions and emphasizes a joyful atmosphere. Decorating champagne bottles with gold and white ribbons is relatively easy. For this you will need the following materials:
- foam sponge;
- glue;
- gold paint;
- acrylic paint;
- primer mixture (can be replaced with white acrylic);
- rhinestones;
- white ribbons;
- gold leaf;
- twigs and leaves cut from gold paper;
- 5−7 polymer colors for each bottle.
Before the creative process begins, the artist coats both bottles with white acrylic or a primer mixture. Leave them until they dry, after which they begin to decorate. Instructions for decoupaging wedding champagne bottles with your own hands:
- The neck and stopper are decorated with gold foil.
- Golden branches with leaves are glued diagonally to the bottle.
- The elements are placed taking into account the fact that later there will be polymer flowers in these places.
- Glue the flowers so that the leaves are visible from under them.
- The surface, free of decor, is painted with a thin layer of gold acrylic paint, scooping it up with a foam sponge.
- The lower edge of the foil covering the neck is coated with glue, then wrapped with tape.
- The edges of the ribbon are tied with a bow, and to hide the knot, a large semi-precious stone or several beads are attached.
- A pattern of rhinestones is made on the neck.
- The entire bottle is treated with a fixative.
You can also come up with other options for placing decor.
Photo selection of various decorating techniques for beginners
It is possible to use various techniques in order to make interesting and original decoupage; the photos below illustrate this perfectly.
For example, ribbons, beads, roses and rice paper. Roses can be made from ribbons or other suitable materials.
Here the bottle is given a base coat of paint and draped with fabric. Satin ribbons and guipure nobly decorate the product.
The following image illustrates how beads can be used in jewelry. The photo below shows the volume of the texture.
And this is an example when the decor confirms the stylistic unity with the glasses.
A single style in decorating glasses and bottles of champagne is considered an integral attribute of a festive celebration. When starting to design wedding bottles, it is worth considering their stylistic unity with the glasses. Will the image on the bottle and on the wedding glass also look impressive? Will these decorative items fit into the overall design of the newlyweds' banquet hall? What color scheme prevails in the clothes of future spouses? The answers to these and other questions will help you create an overall image of decorating wedding accessories that will truly fit into the framework of the celebration.
It is worth noting that it would be nice to familiarize yourself with a master class on creating a wedding album, which will differ from banal store-bought albums in its originality and beauty!
The meaning of champagne
Champagne is a symbol of celebration and carefree happiness that fits perfectly into the wedding menu and decorations.
A sparkling golden drink accompanies the ceremony from beginning to end. Toasts, the first kiss of the newlyweds to a deafening “Bitter!” Perhaps at the banquet there is a place for a whole fountain or a tower made of glasses. It is important that the champagne is of good quality, but if you want every little detail of the wedding to be perfect, then you should think not only about the content, but also about the form - about decorating the bottles
Champagne bulls
In addition, there is an interesting custom. Two bottles of champagne, for the groom and for the bride, are decorated in a special way and are not opened during the feast. They are used exclusively for decoration and as a symbol of the “full cup”; they wait on the table for the end of the celebration, and then go home to a new family.
This particular pair of bottles is called "bulls". The custom came from ancient times, when instead of champagne, the newlyweds were given a bull and a cow tied by the horns, and on the first anniversary, the new family treated all guests to fresh milk.
Today, the groom's bottle is allowed to be opened on the first anniversary as a symbol of man's patience, love and ability to maintain a long-lasting union. Interestingly, the first glass of drink still goes to the wife.
The bride's champagne is opened for the birth of her first child. For obvious reasons, the mother will not get a drink on this day.
Champagne decor allows you not to limit your imagination at both an unusual and classic wedding. Bottles become a highlight, a decoration, and one of the main accessories of the holiday.
Often in their design they use motifs from the newlyweds’ costumes - the groom is dressed in a formal suit, the bride in a lace dress.
A fresh, interesting option is to decorate the alcohol with fresh flowers, echoing the bride’s bouquet. It looks very romantic, gentle, but, unfortunately, such decor is extremely short-lived. An alternative is artificial flowers made of felt, paper, or polymer clay. Bright and touching, they will never fade, just like the love of spouses. A colorful wedding encourages the champagne not to be in the classic green and gold bottle, but in a more appropriate design. Foil, fabric or paint of the desired color will add the necessary bright accents to the festive table, setting the guests in the right mood.
Polymer clay flowers
Delicate flowers, almost like real ones, but at the same time strong and durable - a wonderful option for decorating special champagne. For craftswomen who know how to create such a miracle on their own, this is also an opportunity to demonstrate their talents to all guests.
However, you can buy ready-made products in the desired color at any craft store. They also sell leaves, twigs, berries and anything else you want to use in decoration. In addition to the flowers themselves, you will need aerosol paint of the required color, usually white, Moment glue and additional decorative elements from lace to rhinestones.
Paint is an optional step, but it is easier to stick everything you need on it. We advise you to prepare the bottle for decoration - remove the label, dry it, check the evenness of the glass and cover it with paint. By the way, here you can already play with the design. For example, glue (most importantly, not very durable glue) paper pieces of the original shape onto the glass surface. After you remove them, a perfectly smooth and unusual pattern will remain on the painted surface. Next, think over the sketch and draw with a pencil the points where you are going to glue the flowers. Now start fixing the buds on the glass. This is where “Moment” or any other quick-setting glue comes in handy.
Photos of the newlyweds
Your happy laughing faces on the label along with the date of the celebration or any other inscription is an original design option that will not leave anyone indifferent. This champagne looks great both at a classic wedding and at a themed one, for example, if you design the labels in the form of a movie poster or a “Wanted” poster.
Making a creative image yourself is easy if you know Photoshop. If a popular image editor is not available to you, you will have to turn to a specialist for help. You should definitely print labels on thin paper and then transfer it to glass using the decoupage technique. Remember that the bottle is also pre-prepared before this - cleaned, degreased, dried.
Engraving
For lovers of luxury, decorating champagne with glass engraving would be a great idea. A good master will be able to apply almost any pattern, regardless of its complexity. Even simple and thin openwork lines look great on dark green glass, giving the bottle a flair of aristocracy.
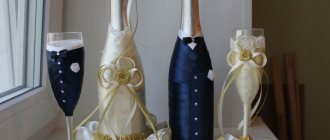
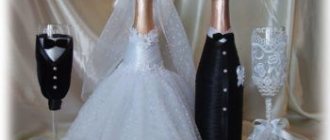
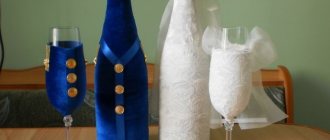
Decorating bottles for a wedding with your own hands: champagne for the bride and groom
The bride and groom at a wedding can be not only at the table, but also on the table. Of course, we mean decorated champagne. You can make a bottle bride and groom with your own hands using bias tape or ribbon. For two bottles you will need the following materials and tools:
- 10 m of white bias tape;
- 8 m of blue or black bias tape;
- 4 m of bias cream binding;
- 10 cm white lace;
- 3 m of wide lace, bow or piece of tulle;
- glue in a pencil (super glue moment);
- scissors;
- decorative ornaments;
- cardboard for hats.
Below is a step-by-step process for making wedding bottles.
Bottle for a wedding - Bride: step-by-step master class with photos
Just like a real bride, the bottle of champagne in this outfit should be the center of attention, and this requires perfect execution of the job.
Initially, use a marker to draw a straight line in the front center, along which you will need to glue the edges of the tapes. Try on the lace at the neck, cut off the required piece. Spread the bottle with glue and glue the lace. Coating the glass of the bottle, glue the bias tape, cutting off its long part after gluing. Continue gluing the bias tape until the middle of the bottle. From the middle, the bias tape is glued in a circle to the very bottom of the bottle. Take a wide bow near the subway, use an iron ruler and a hot soldering iron (a knitting needle heated over a fire) to solder the edges of the bow. It should look like this. Fold it in half and sew with a cast-on stitch. Put the resulting skirt on the bottle, tighten the thread to its size. Remove part of the skirt and follow the same example to make two more skirts. Determine the place where the skirt will be attached. From its upper part you need to mark a place for two petticoats, coat these places with glue and glue two blanks.
Sew golden bias tape to the overskirt. Glue it onto the bride bottle. Fold a piece of a wide bow in half. Using a mug and a hot soldering iron, make a circle (the edges will stick together under the influence of the heat). As shown in the photo, cut out the darts so that the brim of the hat can be glued on. Make a ring out of cardboard to fit the diameter of the bottle neck. Cut out a circle with teeth for the top of the cap. Bend the teeth, glue the top part of the cap and brim. Glue a white ribbon in a circle on the outside and tie an organza ribbon. Glue beads to the bride’s “neck” and put on a hat. The bottle-bride is ready for the celebration.
Bottle for a wedding - Groom: step-by-step instructions for working with photos
The bride is ready, now let's get down to creating the groom. The work is carried out identically to the execution of the bride bottle.
First, fold the white ribbon in half and try it on the neck of the bottle. Apply glue to one half of the folded tape and glue it to the neck of the bottle so that the upper part can bend. Raise the top of the collar of the first tape, glue another 2-3 rows to the bias underneath it.
Measure out the main color of tape to attach to the bottle. Raise the collar and tie a ribbon tie for the groom.
Lower the collar and continue gluing the blue ribbons (on top of the tie) onto the bottle. When the narrowed part of the neck ends, cover the bottle in a circle with ribbons to the very bottom. Glue buttons to the groom's jacket. Decorate the “chest” with a boutonniere.
Prepare such parts for making a top hat for the groom. Glue a cylinder out of cardboard. Cover it with ribbons and decorate it to match the jacket. Place the top hat on the bottle and the groom is ready.
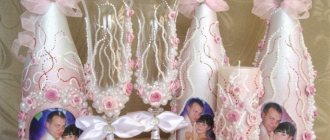
Decoration with photographs
The bottle can be covered with photographs of the bride and groom. The shots are chosen at personal discretion: beautiful, funny, collaborative and childish. However, photo paper is quite thick and is not suitable for such decoration, so you should select the printing material in advance. Plain paper, on the contrary, will be too thin and will show through due to the glue.
A good solution would be medium-thick paper, gloss or film. Old-fashioned pieces of film strip will look very authentic, as will black and white photographs. Young people will want to keep such a gift, and with its black and white design it will suit any interior.
Decorating bottles with photographs
You can paste the entire photo or create a collage from cut out fragments. After the paper has completely dried, a protective layer of varnish is applied, or preferably several. This way the composition will be protected from water and time. On top you can attach thin lace ribbons and craft threads intertwined with them. Such accessories will make the design more delicate, airy and individual.
Decorating bottles with photographs of various accessories
You can do it in the reverse order, first wrapping a couple of circles of thread around the bottle, or wrapping it completely, leaving a few looser circles. Small photos are attached to the threads using miniature wooden clothespins or beautiful carved pins (do not use needles - their sharp ends can injure guests if they decide to pick up a bottle), the size of which is ideal for those printed by machines from Instagram or portable cameras with instant printing function. In the interior, bottles in this style look beautiful and very cozy, wrapped with a garland on top.
A few more examples of champagne decoration with photos of the newlyweds
Photos can also be attached to the inside if the walls of the bottle are transparent (white wine or pink champagne). Photos are inserted inside using tweezers and secured with tape.
It is important to ensure that no traces of glue or tape are visible from the outside. At the end, you should also put a garland with a battery inside (it won’t fit through the narrow neck) and close the gift with a cork on top to prevent dust
Garlands inside bottles
What is decoupage?
The French word découper translates to “to cut.” Using this technique, you can decorate any objects, including furniture and lighting fixtures. Its essence is that a drawing, painting, piece of fabric, thread and other original objects are cut out to size and shape, and attached to the base (in our case, to a bottle of champagne), that is, an applique is created.
The glued elements must be varnished for durability and a special visual effect.
There are 5 types of decoupage that can be combined on one item.
- Direct (classic) is the basis with which beginners start. This is where you can learn how to properly glue decoupage napkins, pictures on cardboard, and photographs onto a smooth surface. The surface will remain smooth but renewed. The drawing will cover the entire area, and the previous background will no longer be visible through it.
- The reverse look is used on transparent glass , so this option looks great on bottles of sparkling wine. Here the design is glued face down onto the glass, after which the entire bottle is decorated. You can view the picture through a window left specially for this purpose. That is, the drawing always remains behind the glass.
- Smoky (artistic) decoupage is not for everyone , because you need to know and be able to do shading, color stretching, and shadows. But having mastered this skill, you understand what unique works of art can be created from an ordinary thing. Artistic decoupage is most similar to a real painting with halftones and shadows, but it is also drawn around the appliqué.
- Volumetric 3D technology allows you to make the work come alive and emphasize individual elements. For this purpose, modeling pastes, putty, fabrics, 3D decoupage cards, threads, twigs, flowers, glitters, decoupage contours, beads, rhinestones, eggshells and much more are used. Yes, even ordinary salt will make the drawing three-dimensional.
- Decopatch is a method of decoration by gluing small pieces of paper onto a surface. These can be color and black and white newspapers, magazines, posters, sheet music. There is also special paper for decopatch. Depending on the style of gluing (adjacent or overlapping), the item will look completely different, but the illusion of cracking of the surface will certainly be created.
Several methods are used to create decoupage.
Wet
The technology will depend on the thickness of the picture. Includes 3 methods.
- The napkin can be placed on a file or plastic bag, with a design from yourself. Moisten generously with a spray bottle and place another bag on top. Squeeze out excess water and air with a sponge, remove the top bag and carefully attach the file with the picture to the surface. Flatten and carefully remove the file, leaving a napkin, then coat with glue and let dry.
- The drawing on ordinary printed paper or cardboard is coated with several layers of transfer varnish and dried well. The reverse side is moistened with water and the white layer of paper is carefully removed by thinning it. The remaining thin layer with the pattern is glued to the surface.
- The design is cut to size, coated with glue on the front side and glued to the surface. After complete drying, the reverse (white) side is moistened with water and the layers of paper are rolled up by hand.
Dry
The design is covered with several layers of varnish, allowing each layer to dry thoroughly. Place double-sided tape on the back side and carefully peel it off along with the paper.
The thicker the paper, the more times you will have to apply the tape.
Hot
Should be used on a flat surface. Neither glass nor plastic is suitable for this method. Apply 2 layers of PVA glue to the surface, allowing each to dry well. A dry paper or fabric picture with a motif is laid out on the surface and covered with parchment (cooking paper) on top. Use a hot iron to iron the surface, especially the corners. The excess of the picture is cut off, and after cooling it is fixed with varnish.
Professionals give a few tips to beginning decoupage artists:
- any surface must be thoroughly cleaned;
- fragments that should not be touched by paint are sealed with masking tape;
- each layer of paint or glue must dry well;
- torn edges are much easier to disguise than cut ones;
- expels excess water and air bubbles from the center to the edges.
Why champagne and is it possible to use other drinks?
Decoration variations depend only on the imagination of the newlyweds. Often the bottles are dressed in costumes similar to those of newlyweds. An honorary witness on the part of the groom is responsible for the inviolability of the “bulls” during the celebration. If guests manage to steal a valuable souvenir, they will have to fork out for ransom.
The custom of beautifully decorating wedding champagne bottles dates back to ancient times. The couple were presented with a bull and a cow tied at the horns with a red ribbon for their wedding. Such a gift was considered especially valuable; not everyone could afford to purchase a couple of animals. Relatives cared about the prosperity of the new family, so a year later they came to find out about the well-being of the couple. Prosperity was evidenced by a jug of milk from the young housewife, drunk by the guests in turn with wishes of wealth and happiness.
Small villages gradually became a thing of the past, but the tradition of giving “bulls” remained. They were replaced by decorated bottles of alcohol, which should be stored until the next anniversary. Instead of champagne, decoration with cognac, wine or vodka is allowed. You can take one container for stronger alcohol, and the second for sparkling wine.
First, they open the “groom’s” bottle, and the young wife is trusted to be the first to sip the champagne. With the birth of the baby comes the turn of the “bride’s” bottle, but this time the wife will have to abstain from the alcoholic drink.
A wedding is an unforgettable moment for a couple in love. The celebration will quickly end, and the spouses will be left with decorated wedding bottles as a souvenir, as evidence of the beginning of a happy future.
Champagne bottle decoration! ! (+ photos and lots of tips)
Of course, I didn’t buy this paint to paint window frames, radiators or anything else. And in order to paint the bottle! Yes, yes, I was not mistaken. I needed to paint a bottle of champagne.
And so the most wonderful event in the girl’s life was approaching - the wedding!
It was necessary to make two bottles. Everyone probably knows the tradition - two bottles of champagne are placed on the table for the newlyweds, which the newlyweds take away after the banquet and drink the first bottle on their first anniversary, and the second on the birth of their first child. Therefore, the bottles should be beautiful and original, they should stand in the wall for a whole year and delight you. So .
First, soak the bottles in basins for 10-15 minutes (the water should not be hot). Then you can easily remove all the paper - leave the foil. After this, we wipe the bottle with an alcohol solution to degrease it and begin the painting process. We take a sponge and paint the bottle with point movements. It doesn't take long. Then leave it for 10-15 minutes and apply a second layer of paint and leave the bottle until completely dry.
You need to think in advance about how you will decorate the bottles. You can decorate with ribbons, you can draw, write, stick on stickers, or just leave them white and dress the bottles in special outfits that are sold in any store.
I didn't look for easy ways. Having molded a large number of roses from polymer clay of different sizes in pairs, baked them in the oven, you can use self-hardening clay, but I prefer to work with this one. Then I applied glossy gel and left it until completely dry.
Now, armed with glue, let's start creating. You can arrange the flowers in different ways, but that’s how I wanted it. I added half beads and this is what happened)
We also made a rose from ribbon, tied the bottles and decorated them with a rose.
You can also decorate the bottle with roses made from ribbons. The roses were made using a glue gun and using a simple pattern, although it was a little inconvenient to sculpt the roses, since the ribbon was narrow. But you can also buy similar roses in stores that sell fabrics, although you can’t always find the right shade, but there are a lot of ribbons, it’s better to make it yourself. Well, we added sequins, and that’s what happened.
Well, just recently, a bottle was also made for the New Year. We take a napkin, separate the excess parts, cut out the design, and glue it onto the bottle; you need to make cuts or tears in the corners to glue everything evenly. We wait for it to dry, apply a glossy gel and then do as your imagination pleases. I took blue paint and a sponge and applied it to the bottle and the edges of the napkin so that they were not visible. Then I took a glue gun and drew snowdrifts and flowing snow near the neck) Then, using a sponge and the same enamel, we painted over the glue! This is what happened)
For any occasion, you can decorate your table with a beautiful bottle or make an unforgettable gift! If you are good at drawing, you can draw any picture, make a beautiful inscription, or use decoupage napkins, rhinestones, beads, seed beads and whatever comes to hand!
Do you dream of having a beautiful wedding? Then our 4 master classes on how to unusually paint a bottle of champagne for a wedding are definitely for you! Economical, hand-made decoration will not leave guests indifferent and will significantly reduce spending on trifles. But a beautiful bottle, painted with safe acrylic paint, is also pleasant to open and pour into glasses!
Do you want to know how to paint a bottle of champagne for a wedding so that guests exhale in admiration? Then hurry up to prepare the necessary tools and let's get started!
How to paint a bottle: 5 painting techniques
Glass and plastic bottles are an excellent material for making various original crafts that you can easily make with your own hands. With such unique, stylish and very beautiful things you can decorate the interior of any apartment or house, making them even more comfortable:.
And such crafts will be a wonderful gift for loved ones. To create various original gizmos from glass or plastic bottles, you can leave them in their original form, but they will look much more advantageous if the bottle is pre-painted.
What can be made from these bottles:
When will these beautiful bottles come in handy:
Following all the links you will find Master Classes on how to do this!
Using the same technique you can paint any glass: glasses, jars and wine glasses.
Candies
If the gift for March 8 includes not only champagne, but also sweets, the usual set can be combined into an original composition.
The most common design options for a bottle of champagne on March 8:
- bouquet. This design method includes a standard set of components. But if the banal three tulips and a box of chocolates with a bottle of champagne in a gift bag are perceived as boring routine, then champagne decorated with sweets will be a fresh idea that will make the giver stand out. When designing a composition, both the bottle and the candies can occupy any position. Champagne can be hidden behind the decor of sweets, or, on the contrary, brought to the fore. For a more finished look, the bouquet can be supplemented with ribbons, bows, flowers and other decorations that match the color and style;
- cake. In this case, a bottle of champagne is placed in the chocolates, becoming the central element of the composition. It functions as a kind of candle rising above the candy cake. In the classic version, long and narrow varieties of candies are chosen for the “cake”. They are evenly placed around the champagne (in circles), fastened together with glue. To make the composition more stable, it is permissible to form it on a cake base, or fasten it with beautiful ribbons or lace. A bow or flowers from the same braid can decorate the neck of the champagne. Such a gift is suitable not only for personal presentation, but also as an element of congratulations to a large group of women;
- a pineapple. If “cake” and “bouquet” are classic decoration options, then “pineapple” refers to more daring and original types of design. This finishing method turns a bottle decorated with candies into a kind of “Kinder surprise”. Under the layer of sweets, the base is completely invisible, and the secret contents of the “pineapple” can only be found out by picking it up. For this type of decoration, choose round candies in golden or yellow packaging. If the color of the wrapper of your favorite sweets does not correspond to the canon, they can be additionally wrapped in wrapping paper of the desired shade. Smooth glass and glossy wrapper do not always stick together well. To ensure that the champagne in the candies is hidden securely, the alcohol must first be covered with a layer of corrugated paper. And then attach the sweets to the paper base. The neck of the bottle is hidden under green paper “leaves”. If the joint is not very neat, it can be covered with original braid, lace or ribbon.
Such decoration options are among the simplest. In this case, all that is needed to decorate bottles with your own hands for March 8 is:
- champagne;
- candies. For a “bouquet” – from 0.5 kg, “pineapple” – about 1 kg, “cake” – from 1 kg and above (depending on the selected diameter);
- glue. Superglue works best (PVA won't give the desired adhesion, and a glue gun can melt the candy). Due to the harmful substances contained in superglue, when working with it, you need to ensure that the glue only touches the candy wrappers and does not get inside the wrapper. If the packaging is not foil, it is advisable to cover the candy with an additional layer of paper before use;
- additional decorations (optional).
When making a bottle with candy decor with your own hands, you should not get hung up on standard options and finishing schemes. Fresh design ideas have always been valued higher than repeated ones.
New Year's decoration of champagne made of organza
From organza, a thin and at the same time rigid transparent fabric made from silk, polyester or viscose, you can make with your own hands the most delicate-looking decor for a bottle of champagne, which will resemble a real New Year’s “dress”. Decorating in this way is not at all difficult, but, on the contrary, it is even very interesting. Moreover, such beauty, which is depicted in our photo, will certainly charm you and you will want to decorate your festive table with it for the New Year 2022.
To work you will need:
- a bottle of champagne;
- organza of any color;
- a sheet of white thick paper A4;
- satin ribbon;
- decorative elements: rhinestones, beaded ribbon and much more, to your taste;
- scissors;
- scotch;
- hot glue.
Progress:
- At the beginning of the work itself, it is necessary to make “petals” from organza, from which we will subsequently assemble our elegant “dress”. And to do this, take a small square of organza, measuring 7.5 X 7.5 centimeters and fold it in half, but slightly beveled, to form four sharp corners. Then we fold our product again so that the right side, bent to the middle of the flap, is covered with its left part. We fix the base of the resulting volumetric “petal” with a drop of hot glue. We proceed in this spirit with the rest of the scraps, having made the required quantity.
- We take a bottle of champagne and, without removing the label, wrap it in a sheet of thick white paper, A4 format. To prevent it from unfolding, we secure it with two strips of tape.
- In order for the paper to fit tightly to the neck, it is necessary to cut its upper edge in a circle into strips 2 centimeters thick, to the point where the expansion of the sparkling drink container begins. After this, we should collect our strips on the neck, folding one on top of the other, and securing them with tape along the entire circumference. Having removed our paper frame, we trim it with scissors, cutting it to the very expansion of the container and once again carefully treat it with tape. The side of the frame will be a satin ribbon placed around the circumference with hot glue.
- We put the finished paper cover on our glass container. We take a satin ribbon and, having measured the required length, glue it tightly to the neck in a V-shaped manner, also capturing the base of the side of the frame. In this way we need to decorate the entire product, right to the very bottom.
- Let's start creating our New Year's “dress”. We fix the previously prepared organza “petals” on top of each other with hot glue, starting from the bottom of the product and reaching the very top - the neck, the border of which we also make from a satin ribbon, preferably golden in color.
- We decorate the finished “dress” with our own hands using beads, iridescent stones, rhinestones and, if desired, beautiful sweets.
In order to create several options for such elegant products, you should use your rich imagination, which we will help you expand with the help of our interesting photo ideas.
For the New Year 2022, you should definitely make such a craft, because with it your home will be significantly transformed and sparkle with bright, cheerful colors. And to complete such creative work without problems, you should watch our training video, which will provide you with detailed step-by-step instructions.
Master class on decorating a bottle of champagne with organza
https://www.youtube.com/watch?v=pW4oyrcMRs8
Preparing the image
Decoupage begins with preparing the image. A suitable option is a regular paper napkin with a thematic picture on it. You can also select a drawing and print it using a color printer or color the black and white version yourself.
Decoupage champagne bottle with glitter
Decoupage champagne bottle with holly
If the image is printed on plain paper, you will need to make it thin and soft. The preparatory stage begins with applying varnish to the surface in 2-3 layers. Then the coating should dry completely. You can then choose one of the following actions:
- Place the prepared paper in warm water for 3-5 minutes (wait until the top layer softens). Then blot with a soft cloth or towel and roll the bottom layer by hand. As a result, only the top layer with the image will remain, which will be transferred to the bottle.
- Cover the paper with dried varnish with tape (on the back side). Press and hold for 5-10 seconds. Then peel off the tape, removing the top layer of paper. The result is a subtle image that can be transferred to the bottle.
In any case, the base will be thin and pliable enough to carry out all the necessary decoupage steps.
Themed napkins are the perfect way to decorate your sparkling wine bottles. They provide a wide selection of ready-made pictures and are the basis for your own creativity.
We recommend reading: How to make a large Kinder Surprise with your own hands, a giant egg at home
Silver decoupage of a champagne bottle for the New Year
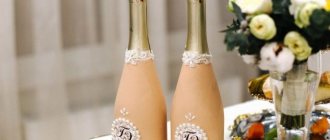
DIY wedding champagne bottle decoration in gold tones
If the prospect of working with acrylic paints does not cause much excitement, then it is better to get acquainted with a simpler technique using paints in aerosol cans.
The next master class is dedicated to decorating wedding champagne bottles with your own hands for a golden or autumn wedding.
We buy two bottles of champagne of any type and manufacturer. You can even take different types of drinks. The main thing is that the bottles are of the same type in appearance.
The only tools we need are a heat gun and tweezers. But for materials you will have to go to a specialized store for needlewomen. There you will need to purchase champagne-colored satin fabric measuring 30*350 and peach-colored fabric measuring 40*250. You will also need 1 m of peach satin ribbon and 15 cm of champagne color. Buy white beads of various sizes there.
To paint bottles, we purchase golden-colored paint in an aerosol can.
Before decorating the bottles, remove the factory labels. This can be done using a soap solution or a stationery knife.
After this, degrease the glass by wiping it with alcohol. When the alcohol evaporates, we begin coloring.
Shake the aerosol can vigorously. We place the container with paint at a distance of 40 cm from the surface to be treated. We begin to spray the golden solution, carefully turning the bottle itself.
Keep in mind that when working with an aerosol, drops of paint will fly apart. It is better to work outside or cover the work surface with newspapers. You also need to build a cardboard wall behind the work surface to avoid painting the walls.
After the first staining, leave the bottles to dry for 15 minutes.
In total, you will need to repeat the staining at least 4 times. Leave the fully painted bottles to dry for 1 – 1.5 hours.
In the meantime, let's start making decorative roses. To do this, we cut the pieces of fabric into long strips 5 cm wide. The result should be 8 peach-colored strips 25 cm long and 6 champagne-colored strips 35 cm long.
We burn the edges of the resulting ribbons with a lit candle to prevent the threads from fraying.
Each strip must be folded in half and connected securely. They can be easily stitched on a machine or simply sewn by hand. It will be easier for someone to use a heat gun.
We begin to form roses from voluminous ribbons. First, twist the edge and secure it with glue.
We continue to twist the fabric, not forgetting to treat the edge of the base with glue. Using this method, we twist the entire strip.
The result should be 8 peach roses and 6 more voluminous light ones.
We begin decorating the dried bottles by gluing ribbons. First, glue a wide, light satin ribbon at an angle, as shown in the figure. On top of it you need to attach a narrower peach one.
In this way, you can cover defects and uneven edges of the foil.
Now you can move on to attaching the roses themselves. To do this, apply glue to the base of the flower and attach it to the surface of the bottle in the right place.
Think about the order and angle to place all the buds.
Let's move on to decorating the bottle with beads.
Scatter them over the entire empty surface, along the neck.
Place small beads on some of the buds, as well as a large bead on the joint of the ribbons at the neck.
Our wedding champagne is ready.
If desired, the bottles can be tied with a light transparent bow.
You can decorate glasses and ring cushions to match the golden bottles. This design of wedding paraphernalia will fit perfectly into a peach, gold or autumn wedding.
But even if you choose a different color scheme for the holiday, you can easily replace gold with a suitable shade, and also choose contrasting or shading ribbons for roses.
Painting with gold and glitter
Champagne bottles covered with gold paint
To make wonderful gilded bottles we will need the following tools:
- Newspaper/fabric that you don’t mind getting dirty;
- Decorative gold sparkles (gold glitter) - you can buy ready-made ones, or you can work a little and cut them yourself;
- Aerosol gold paint;
- Empty bottles/alcohol bottles;
- Glue – you can use both aerosol and special liquid for decoration;
- Paper towels;
- Gloves;
- Shallow bowl.
Step 1
Let's start by cleaning the bottles from the labels - you can rub them with dishwashing detergent, soda, or try heating them with a hairdryer, from which the label should easily come off the bottle.
Paint bottles with gold spray paint
Lay out newspapers or unnecessary fabric, arrange the bottles. Wear gloves so you don't have to worry about scrubbing paint off your hands later. We begin to paint the bottles with gold spray paint.
To prevent the paint from flowing and to apply evenly, spray it at a certain distance, without coming very close to the bottles.
Apply 2 layers and let the paint dry. If this is your first time painting, then you should read in detail the technique of painting a bottle with spray paint in this article.
Painted bottles in 2 layers
Step 2
- Place decorative glitter in a bowl.
- Spray/coat the bottles with glue and sprinkle them well with glitter.
- If you notice that you missed areas of the bottle, don’t be afraid, add glue and sprinkle more.
To make sure the napkin holds better, secure it with tape
STEP 3: how to cover only part of the bottle with glitter.
- To decorate part of the bottle, take a paper towel and wrap it around the bottle a few centimeters above the bottom.
- Make sure the paper line is straight. Cover the rest of the bottle with glue and sprinkle with glitter, wait for it to dry and remove the napkin.
This way you can decorate a variety of bottles and build your own collection!
Also, based on this master class, you can experiment with color and texture. For example, champagne in red or covered with colored glitter looks chic at a wedding.
Also, don’t forget to decorate the glasses for the newlyweds in the same style. You can also use glasses to make chic candlesticks for table decor - just click on the button!
Candlesticks made from glasses for a wedding - 30 ideas
What paint to choose for a plastic bottle
How to paint a plastic bottle for crafts? For decoration, you can use exactly the same paints as for glass. It is best that they are not aggressive.
- Acrylic paints are perfect for painting plastic bottles, but to protect the surface, you need to coat them with colorless acrylic varnish.
- Colored acrylic varnish is an ideal way to paint plastic bottles for crafts.
- Spray paint is also suitable for decorating a plastic bottle.
- The most durable and beautiful effect is produced by car paints ; plastic bottles painted with this paint will not change their color for several years.
- You can also paint with regular enamel paints.
Master class on decoupage of bottles for a wedding. A few steps to unconventional design
Creating a unique bottle decor is easy and simple. Learn a few simple steps and repeat each step. As a result, you can easily achieve your goal and create a unique memorable gift.
Unique commemorative decor in a gentle way
To decoupage a wedding bottle of champagne using a napkin, take the following materials:
- a bottle of champagne;
- napkins with a themed pattern;
- scissors;
- nail polish remover or alcohol;
- sponge, brushes;
- white acrylic paint (primer);
- PVA glue;
- sandpaper;
- cotton pad or piece of cotton wool;
- paper towels;
- newspaper or scrap paper;
- container with water;
- acrylic lacquer;
- glitters;
- ribbons and other decorations to suit your taste;
- glue for additional decorative elements.
Before getting started, prepare your work area. Cover the surface with newspapers or scrap paper.
Step one - preparing the glass surface of the bottle for use
To do this, remove all the stickers and some of the foil, after lowering the bottle into a container of water. Be careful, the water should be lukewarm, not hot (no more than 20°C!) Otherwise, the bottle will easily explode due to the high temperature.
Soaking the bottle in water to remove labels
When the labels become wet, remove them. Wipe the product dry using paper towels. If the stickers do not come away from the glass, use a little force to remove them. It happens that traces of glue remain. Wipe it off using a cotton pad and nail polish remover or alcohol. There is an option for the lazy – not to remove the labels at all. When painting, simply apply several coats of paint.
If you are decorating for the first time, then remove only part of the foil up to the cork or do not remove anything at all.
After the procedures, degrease the bottle, cleared of wrappers, using a cotton pad and alcohol. This must be done so that the primer paints everything evenly and adheres better to the surface.
Step two - priming the surface
It is needed to prepare the surface for further work - this is the background of the composition.
The easiest way to do this is with a regular sponge and glass primer. If there is none, mix acrylic paint with PVA glue. The mixture should be like sour cream - not liquid and not thick. Apply the substance evenly to the bottle. Paint the entire surface, including the bottom and plug. Cover the cork with several layers of napkin so that the edges smooth out the transition. Prime it too.
Creating a background to match the color style of the event
After applying the first layer, let the surface dry thoroughly. This will take approximately twelve hours. Once completely dry, apply a second coat of primer. Lightly sand the completely dry surface using fine sandpaper. In this way you will give a smooth surface.
How to paint: sponge, brush or spray
- In order to paint a glass or plastic bottle, you can use a nylon brush , but in this case it will be very difficult to achieve a perfectly flat surface.
- You can use a sponge and dip it into the paint using point movements to apply it to the surface. This way the marks will not be visible, but you will have to cover the bottle with several layers of paint, each of which must dry, and this will take some time.
- The fastest and easiest way to achieve an even paint job is to use spray paint, which dries very quickly.
But you shouldn’t spray paint in an apartment, because it has a strong smell and takes a long time to air out.