|Wedding brooch-bouquet|
– a fairly new trend in the world of fashion for brides. This worthy alternative to a wedding bouquet was invented and first created by American florist Amanda Heer. This is not a brooch instead of a bouquet, it is a bouquet of brooches, ribbons, beads or rhinestones.
There are a lot of variations, so thanks to this bouquet, the image of any bride will become unique. You can even decorate it with jewelry.
What indescribable tenderness:
Here are several options and colors for the brooch bouquet
The color scheme of the bouquet should match the bride's dress or the general style of the wedding celebration. This is an innovation at Russian weddings, and not every bride decides to take this step; preference is given to fresh flowers. But abroad this is a fairly common tradition.
If the bouquet is made with high quality and by a professional, it will fade without playing with the fresh flowers.
What are brooch bouquets made of:
- artificial flowers (from foamiran, satin ribbons, silk fabric, etc.),
- brooches,
- rhinestones,
- beads - pearls.
The ball is used as a basis and is decorated. You can also create a bouquet of artificial flowers on wire stems. The leg can be of any length, it must be tightly wrapped with ribbon and decorated with beads or rhinestones.
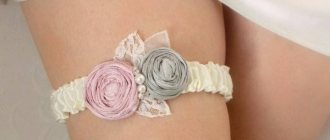
Bouquet of rhinestones and brooches
The main rule is not to overload the bouquet with accessories. When choosing brooches, you must not forget about combinations with other details of the entire composition. You can use several color combinations in one bouquet (but no more than five).
Advice: mono bouquets are still more suitable for the bride, they look more delicate.
A bouquet of rhinestones and brooches without other components is attached to wire stems and tied into a bundle, after which the stem is decorated with a color-matched ribbon.
Don’t forget that the brooch on the bouquet should be duplicated on the groom’s boutonniere to make the wedding images complete.
Bouquet of beads. Master class » DIY Design & Decor
Bouquet of beads. Master Class
Such a stylish bouquet can become the highlight of a wedding celebration, and if you do not risk choosing it as the main bouquet of the bride, you can use it for a photo shoot or for the tradition of throwing it to your bridesmaids.
To make a bouquet of beads you will need:
- 10 mm. shamballa beads (about 150 pcs.),
- pieces of wire (about 150 pcs.),
- satin ribbon, organza.
The process of creating a bouquet of beads:
First, take the wire and put a bead on it (photo 2). Then, as if bending around the bead, press the wire along the contour (photo 3). Next, you will need a mixer with a hook attachment. The bead needs to be secured to a wire (photo 4).
Wrap the wire once around the hook at the nozzle (photo 5). Hold the reverse end of the wire with pliers and pull (photo 6) (which will be explained below). Twist the wire - to do this, simply turn on the mixer at any speed, and do not forget to stretch the wire by pulling the pliers and the mixer in different directions. The twisted wire with the bead must be removed from the hook. As a result, you will get a rather large ear, which you carefully twist (so as not to spoil the appearance of the bouquet of beads). Hold the bead with your left hand, hold the pliers with your right hand and continue twisting the wire in the direction where the entire winding is directed (photo 7-8).
Use wire cutters to cut through the end of the wire to get identical ends (as the winding process usually results in different ends). Now we will explain why you need to tighten it when winding and why it is better to use a mixer (some people twist it with a drill). Photo 9 shows different winding processes. The first option is the neatest - the wire is twisted using a mixer. In the second case, also with a mixer, but the wire was not tensioned. Well, the third one is wound by hand. Thus, you will need to make about 150 branches with beads (photo 10).
Start assembling a bouquet of beads, for which you collect several branches with beads, secure them with tape (construction tape), then begin to evenly add more “twigs” until you reach the desired size and splendor of the bouquet (photo 11).
When the bouquet is ready, lift the wire from the edges up to the tape wound on the handle. This should be done gradually, moving in a circle, distributing the wires evenly. And wrap the stem of the bouquet again with construction tape (photo 12). The bouquet of beads needs to be fluffed on top, and also begin to bend the wires to the sides from the edges and the middle.
Hide the tape under the satin ribbon (photo 13). Wrap the finished bouquet of beads in organza or decorate it as you wish. You can tie a beautiful bow.
Such a bouquet can be made from Swarovski crystals, pearls, etc.
Author MK: Belokon Nadezhda
www.tutdizain.ru
Advantages of a brooch-bouquet
The main advantage of a bouquet of artificial flowers is the ability to decorate it in every possible way so that the bride truly shines. It is impossible to decorate fresh flowers, since when glue or other chemicals are used, the flower will simply wither and by the end of the evening will lose its appearance.
Another plus... you can order it in advance and not worry about it wilting. Or you can even do it yourself, just buy the most beautiful accessories or create a composition from antique brooches from your grandmother’s box. This handmade accessory will be the pride of the bride at the holiday.
The bouquet brooch will not cause allergies. And it will become a wonderful interior decoration after the wedding, reminding you of the celebration. You can take it with you on your honeymoon and have an unforgettable photo session.
Photo for example... Tenderness:
Tips for creating a brooch-bouquet with your own hands
- We choose accessories to create, making sure to understand what the result of the creation will look like.
- The combination of color and style not only with the groom’s boutonniere, but also with the flowers on the bridesmaids’ hands.
- The size of the product also needs to be determined in advance.
Naturally, creating an accessory will not take a day or two. It is necessary to think through everything carefully, take high-quality components, and do it carefully and with love.
Here are a few must-have tools to create a masterpiece:
- Thermal gun, working with it is not difficult, but the result is durable,
- Floral wire, minimum skein,
- Scissors, be sure to be very sharp, so that the cuts are smooth and neat,
- Wire cutters,
- Small beads, beads,
- The remaining decorations are individual for each creation.
Get creative, the results will exceed your expectations. Guests will watch with admiration!!
From orchids
Materials and tools:
- orchids - 5 pieces;
- salal - 2-3 branches;
- ostrich feathers - 3 pieces;
- lace fabric;
- long floral flasks - 5 pieces;
- tape;
- coconut fiber;
- thin wire;
- skewers - 6 pieces;
- plastic floral ribbon to match the color of the lace;
- knife;
- pruner;
- scissors;
- stapler
Master Class:
- Pour water into the flasks and close the lids.
- Wrap the flasks in coconut fiber and secure it with wire.
- Trim the stems of the orchids and insert them into the flasks.
- Cut ostrich feathers 6-7 centimeters long.
- Attach the feathers to the skewers with tape.
- Cut the plastic tape into 2 pieces of 50 centimeters each.
- Use wire to attach the feather pieces to the ends of the plastic tape.
- The bouquet is based on orchid flowers, place skewers with feathers just above the buds, on different sides, attach salal branches with tape.
- Use plastic tape to tie all the stems at a distance of 6-8 centimeters from the buds, trim the stems with pruning shears to a suitable length.
- Wrap the lace around the stem of the bouquet and secure the fabric with a stapler.
Traditions, pros and cons
According to traditions, the bride's bouquet should be made of fresh flowers, and superstitious brides prefer these. But if you look at it, flowers that have already been cut are not alive. And after the wedding, it’s a pity to throw it away and the dried bouquet stands there, disturbing the energy of the apartment. But eastern traditions do not prohibit artificial flowers, but withered ones are not welcomed.
Another reason for not accepting a bouquet of brooches is the tradition of throwing a bouquet to girlfriends. Of course, catching a flying pile of jewelry is not the most pleasant and traumatic experience. But there is always a way out; you can order a bouquet - a duplicate, which will be similar to the original. It will look much neater than a disheveled “live” bouquet.
The only negative is the price; purchasing all the accessories for it is not cheap. The average cost of such a bouquet is from 3 to 5 thousand rubles. Of course, fresh flowers are cheaper, but don’t forget, they cost a maximum of 3 days. But a designer brooch-bouquet will last at least three years without losing its visual appeal. And then you can hide it and save it as a reminder of the happy moments of your life.
Peculiarities
The bouquet should be fresh, from hardy fresh cut flowers. After all, he will accompany the bride from the registry office to a photo shoot, a ride around the city, to a restaurant. Therefore, you need to approach the choice of colors from a practical point of view. You need reliable, durable, seasonal flowers, ordered in advance from a flower company. There should be no strong aromas, dirty stamens, or bulky stems.
It’s also important to try to collect a bouquet in advance and see how it sits for a day or two. This way you will practice and be able to make adjustments to your order in a timely manner.
For a wedding in a rustic style (in the lap of village fields), wild and garden flowers of bright colors will be relevant. A classic wedding is bouquets of roses, tulips, peonies with due modesty in color. A wedding in glamor style involves an abundance of floral arrangements of luxurious rare varieties, cascading bouquets.
In florist shops you can pre-order flowers for a bouquet. The country of delivery and storage conditions are important. The lifespan of flowers can be extended by using chemical ingredients in watering liquids.
It is important to pay attention to the country of delivery (the closer the better), storage conditions (refrigerator at recommended temperature), freshness of leaves and petals
Resin preparation
Well, all preparations are completed, we can begin. First, read the instructions for your resin - mixing proportions vary from brand to brand. Personally, I use Crystal resin, 4 ml of resin per 1.2 ml of diluent.
We take both the resin and the hardener with syringes without needles, naturally different ones. It’s better to throw them away after using them; they cost pennies. It is better to carefully lower the hardener along the wall of the cup so that it does not splash.
After this we begin mixing. There’s nothing phenomenal here: you can stir it with your finger for 3-4 minutes. Don't be embarrassed by the abundance of bubbles in the resin, let it sit and they will go away.
Stir the resin periodically. The ready-to-use mixture should have a consistency similar to honey. It is difficult to explain with your fingers exactly how much to mix; it naturally depends on the number of prepared petals, their size and, notably, the thickness of the resin. Fresh ones instantly spread and it turns out that you have tarred the tray itself rather than the petals. So it’s important to seize the moment here.
While the resin is settling, prepare your work area. Clear the table, take out the tray and flowers. It is advisable to do a wet cleaning, because there is nothing more offensive than a potentially beautiful piece of jewelry stained with dust.
From tulips
Materials and tools:
- tulips - 25 pieces;
- a foam ball with a diameter of 10 centimeters;
- glue "Oasis" - 1 tube;
- wire - 20 centimeters;
- A4 paper - 4 sheets;
- a vase or glass with a diameter of 8 centimeters;
- wooden skewer;
- adhesive tape with rhinestones;
- glue gun;
- stationery knife.
Preliminary work:
- Leave the tulips in cold water to soak for a day.
- Leave one half-opened tulip on the stem, disassemble the rest into petals and arrange them by size on damp sheets of paper, covering with another damp sheet on top.
Master Class:
- Cut off part of the ball and make an indentation with a skewer.
- Twist a ring with a diameter of 5 centimeters from the wire onto a leg 4 centimeters long, pierce the polystyrene foam on the back side of the cut with wire along the entire length of the wire leg and secure with glue.
- Coat the stem of a whole bud with glue and insert it into the recess in the foam.
- Place the ball into the vase.
- Cover the main bud with petals in a circle, starting with the smaller ones.
- Remove the “bouquet” from the vase and continue gluing the foam with petals from the bottom.
- Decorate the junction of the ring and the foam with beautiful adhesive tape.
How to make a bouquet of kinder surprises yourself https://woman-l.ru/buket-iz-kinder-syurprizov/
Recommendations
The good thing about a natural bouquet is that you can make it yourself, saving significantly on the services of professional florists.
Some wedding styles, such as country or rustic, encourage the use of homegrown plants. Daffodils, tulips, peonies, gerberas, and roses bloom beautifully in the gardens of the middle zone. Thus, the bouquet will turn out to be both budget-friendly and sincere. If you want to use imported flowers, be sure to consult with a florist you know to purchase a quality product. Place your order in advance, at least a month before the wedding. This way you will definitely get exactly the plants you dreamed of.
Take into account some negative nuances of a bouquet of fresh flowers:
- Fragility - not all petals will withstand numerous touches, frost, direct sunlight and drought, so carefully read the characteristics of the selected plants and, if necessary, place them in a vase immediately after the ceremonial procession and photographs.
- For a winter celebration, it is wise to choose from frost-resistant flowers, since there are quite a lot of them - carnations, tulips, ranunculus, chrysanthemums, and some types of roses.
- An important point is the smell and pollen. Some buds, for example, lilies, have a powerful aroma that will overpower your perfume and cause headaches or allergies. The same lilies are “famous” for their stamens, which can leave an orange mark on a dress.
Advice! To prevent lilies from staining your dress, remove the stamens or choose a bouquet shape so that pollen does not spill on the dress. Decide what exactly you want from the composition - shape, shades, specific plants. Be sure to take into account both your own external data and the theme of the wedding. Classic celebrations love strict lines, thematic celebrations love asymmetry, cascade, and unusual execution. Tall brides should choose a larger bouquet, short brides should choose a miniature and neat one.
List of everything you need:
- Epoxy resin, two-component
- Two syringes without a needle (sold at any pharmacy)
- Container for mixing resin and hardener (plastic cup)
- Stick for this mixing (wooden)
- Ceramic tiles or cardboard (in general, any flat, hard surface, preferably on a flat table)
- Scotch tape (wide, single-sided)
- Accessories for jewelry (connectors, earrings, connecting rings, bases)
- Mini drill (sold in almost any construction store, take the cheapest one, I personally use DREMEL 300)
- A set of attachments for it (a small drill and an emery head for turning)
- Good mood for yourself
 Well, gloves with a respirator would be nice
Tip: Before you shop, make sure you have a suitable workspace. If you live in a one-room apartment with your grandmother and mother, you will have to wait a little while making jewelry from resin. At a minimum, you need a separate room where you can inhale harmful resin vapors (if you don’t take care of ventilation) in splendid isolation.
This work is dirty, noisy and generally not conducive to health, but a few simple manipulations will help reduce the negative influences of creativity to a minimum.
Signs associated with a wedding boutonniere for the groom
A huge number of superstitions are associated with a wedding, as with other important events in life, and some of them relate specifically to the groom’s boutonniere:
- The groom's boutonniere is attached to the side of the heart, that is, to the left;
- The bride and groom will need safety pins, which are attached to the clothes with the metal head down. This will serve as a kind of protection against the evil eye. The girl can attach it anywhere on her wedding dress (the main thing is from the inside), and the groom can attach an artificial boutonniere or a fresh flower. The main condition is that no one sees the pins.
- During the traditional ceremony of removing the veil from the bride, a couple of young people must be chosen from among the guests present - the girl will put the bride’s veil on her head, and the guy will “inherit” the groom’s boutonniere. If lovers in love with each other are invited for this procedure, they will soon also get married.
- A very important condition is that neither the veil nor the boutonniere should be given to anyone. After reading the above tradition, this may seem absurd, but in reality everything is a little different.
In case of “transferring” their items of clothing, they order an alternative veil and boutonniere.
You should keep your own things throughout your entire life and act as a kind of relic. Let's say, if your child gets sick, you need to cover him with a wedding veil or hang it over the baby's crib (from the evil eye).
Sources
- https://womee.ru/butonerka-iz-zhivyh-tsvetov-stilnoe-ukrashenie-svadebnogo-naryada/
- https://psvadba.ru/butonerka.html
- https://marry.guru/zheniham/butonerka/iz-zhivyh-tsvetov
- https://tvoja-svadba.ru/butonerka-dlya-zhenixa-svoimi-rukami-iz-zhivyx-cvetov/
- https://weddingadvice.ru/butonerka-iz-zhivyh-tsvetov/
- https://odezhda.guru/aksessuary/1532-butonerka-svoimi-rukami
- https://odezhda.guru/dlya-svadby/1698-butonerka-dla-zeniha
- https://isvadby.ru/ykrasheniya/chto-takoe-butonerka-dlya-zhenixa-i-kakuyu-vybrat.html
What kind of women are they suitable for?
Ribbon bouquets will appeal to girls who want to add a unique touch to their look. A non-standard, exquisite accessory will enliven the entire celebration, making even a traditional classic wedding original. Such a choice will emphasize the good taste of its owner, and if done independently, it will also highlight the talent of the needlewoman.
For brides who attach great importance to signs, an artificial bouquet is also a real godsend, because it is believed that the longer the bouquet stands, the longer the happiness will last. Tapes can be stored without deterioration for an eternity.
Satin roses will also be a real salvation for young ladies who suffer from allergies - there is no need to put yourself in danger on your happiest day by using natural flowers.
A huge palette of ribbon shades allows you to choose suitable options for both warm and cold types of appearance. A fabric bouquet should be created taking into account the materials from which the dress is made. It can either be the same or very different in texture. The matching details on the dress and in the wedding bouquet look very cute, for example, the same pattern of colored lace. But keep in mind that the same material requires a different shade for the bouquet, otherwise the accessory will simply blend in with the outfit in the photographs.
Materials
Most often, such compositions are made in a round shape - a classic solution, quite easy to execute and looking great in the hands of both short and tall young ladies.
For the base you need a ball - it can be either a special piece of foam, sold in any art store, or the most ordinary crumpled newspapers, carefully wrapped with twine or floss.
You won't need the whole ball - unless you decide to make a completely round pomander on a ribbon - so about a third will need to be cut off with a sharp knife. Most of it will become the basis, while the smaller part will be useful later. The bouquet also requires a stem. As a blank for it, use a sleeve from cling film or foil, a plastic tube, and sushi sticks glued together. If you opted for a hollow cardboard option, then it is advisable to fill it with the remaining polystyrene foam for greater reliability.
Roses: luxury in your hands
Roses are considered the most popular ribbon flowers. There are many design options and different techniques for making roses.
Option #1:
- Make rectangles of approximately 8 cm from satin ribbon. We will need about 25 such pieces.
- Wrap the corner of each rectangle and sew with small stitches, covering the entire length of the piece.
- Repeat the same action for the opposite side and for each rectangle.
- Roll the last piece into a tube and tie it with a thread at the bottom.
- Alternately wrap the tube with the finished petals and sew the bottom with stitches.
- If desired, you can add a leaf of green ribbon.
If after the instructions for creating a rose you still have questions, we suggest you watch the step-by-step video tutorial:
Option #2:
To form the rose you will need a satin ribbon and a glue gun. Watch the manufacturing master class right now:
Step-by-step instructions with video
What we need:
- foam ball;
- foil sleeve;
- scissors and knife;
- satin ribbon 6 cm wide;
- needle and thread;
- beads;
- glue gun;
- lighter.
So, let's start creating a bouquet:
- Cut off about two-thirds of the circle and glue the sleeve to it. If the handle is too long, cut off the excess with a knife. Usually the stem of the bouquet is 20 cm, but be guided by your own taste and the width of your palm;
- Wrap the base with satin ribbon, and do not forget to burn all the cuts , since satin is an extremely free-flowing material;
- Let's start creating roses. To do this, the tape must be cut into rectangles of about 90 cm and folded in half, with the wrong side inward. Using large stitches, we gather the ribbon along its entire length, while stitching the edges at a slightly angled angle. Then pull the thread while twisting the ribbon - and you will get a lush bud. Next, you should sew the flower at the base - and the rose is ready;
- We attach a pearl to the center of each rose. This can be done with glue or also with thread if there are holes in the stones;
- Now we place the roses on the base using a glue gun.
Once one rose is made, it will not be difficult to make all the others and carefully place them on the base.