Honestly, I'm obsessed with this cake! :) And considering that I assembled and decorated it late at night with my daughter suddenly waking up and not wanting to continue sleeping in my arms, I think I'm doing great!^.^) We're both doing great! You can’t praise yourself, as they say!
Now let's get down to business.
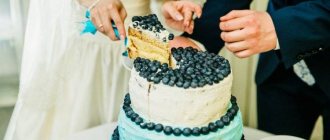
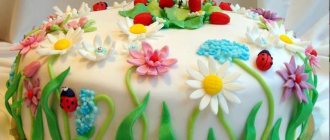
As a rule, children's cakes are associated with mastic. It is bright and only from it can you create the characters that children love. But not everyone likes the taste (especially parents). That's right, what's there to like about it? Basically, it's just sugar. I am by no means opposed to mastic and cakes with it! On the contrary, I sometimes experiment myself, and by the way, it’s not so easy - to cover the cake beautifully and evenly, to mold figures... And how much time it takes! By the way, very often no one eats mastic, but perceives it solely as decoration. And that's right, I think! But it happens when mastic just doesn’t work, but you want a bright and unusual cake! This means you need to make a children's cake without mastic . Today, cream cakes with drips of icing or chocolate ganache are very popular. They are decorated with fruits, shortbread cookies, painted gingerbread, meringue (in common parlance - meringue :)), various confectionery toppings, and mastic figures, in the end, you can also sit on such a cake, if you really want! This is the cake I made.
Ingredients: classic sponge cake soaked in pineapple juice, delicate white chocolate yogurt mousse, pineapple pieces, cheese cream coating, and streaks of mirror glaze on top. The cake is decorated with gingerbread cookies, painted with icing, meringue, finely ground nuts and confectionery beads. Well, and a congratulatory inscription on the skewers!
I'll tell you how to do it.
I used an 18 cm mold. The cake turns out tall and is quite enough for a company of 10 people.
We bake a classic sponge cake with the addition of butter for 4 eggs
- Preheat the oven to 180 degrees.
- Line the bottom of the mold with baking paper.
- Melt 40 g of butter and leave to cool.
- Separate the whites from the yolks, avoiding the yolk getting into the whites.
- Beat the yolks with 60 g of sugar until they increase in volume, become creamy and almost white.
- Wash the mixer beaters, wipe them dry and beat the whites with a pinch of salt until stiff foam, add 60 g of sugar and beat until stiff. The whites should not fall out of the inverted bowl.
- Using a spatula, carefully fold the whites into the yolks. The movements should be folding, from bottom to top. The main thing is to preserve the airy structure of the proteins as much as possible.
- Sift 120 g of flour and carefully mix into the egg mass with the same folding movements. Mix thoroughly but carefully. There should be no islands of flour left in the dough, but the airiness must be preserved!
- Carefully pour in the melted and cooled butter along the edge of the bowl. Mix again.
- Pour the dough into the mold, level it, try to make a depression in the center with a spatula (it will level out right away, oh well!) so that the top does not rise too much.
- Place in the oven for about 35 minutes. We try not to open the oven for at least the first 15 minutes, otherwise the dough may fall.
- We check readiness with a torch. And yet, the baked biscuit springs under your fingers.
- We take out the biscuit, cool it a little in the pan, then take it out and turn it over onto a wire rack. I place a sheet of baking paper and place the sponge cake on it.
TIPS: If the oven is baking too hot on top, cover the pan with foil, shiny side up. If it burns at the bottom and the middle is raw, place a heat-resistant container with water under the grill with the mold.
An ordinary classic biscuit needs to stand for at least 8, or even 12 hours. Then it is better cut into cakes, breaks less and retains its shape after impregnation. But we added butter to the traditional recipe, which means our sponge cake is a little moister than usual and more comfortable to work with! You don’t have to let it stand, but just let it cool completely.
How to make a decoration out of strawberries
You can decorate a cake with strawberries in a simple way: cut the berries into small pieces and form an inflorescence, then decorate with cream or chocolate icing.
To make a bud, you can make small cuts and bend the edges. For children's decoration, you can make strawberry snowmen and decorate with airy cream. In order to make a large flower over the entire surface of the cake, the strawberries are cut in half and placed cut side up. It is better to lay it on the cream to give it a beautiful position.
Another decoration option: strawberries in a basket. For this, mastic or marzipan is used. A basket is made from them, and whole strawberries are laid out on top.
For no-bake cakes, use strawberries in jelly. You can leave it whole or cut it into slices, arrange it beautifully and fill it with jelly (it must be poured in a mold).
Preparing the mold for assembling the cake
While the mousse is setting a little (don't worry, this won't happen too quickly at room temperature), prepare the pan for assembling the cake. It is best to use a sliding ring; you can use it to adjust the size well and press the biscuit tightly, which after cooling shrinks a little and becomes slightly smaller than the shape in which it was baked. And it is important for us that there is no gap, even minimal, between the biscuit and the walls of the mold, because our filling is mousse, it is poured in a liquid state, and if there is no density, it will leak out around the edges. Alternatively, you can bake in a larger pan and assemble in a smaller pan. Walls of any shape must be lined with thick, even film or special border tape for cakes, which is sold in specialized confectionery stores. It is, of course, the most convenient, but when I didn’t have it, I used very dense polyethylene, after thoroughly washing it and drying it. And this cake is actually very tall, 10 cm, so my border tape didn’t fit, it was too narrow, and I had to go back to good old polyethylene. We need the film in order to then carefully release the cake from the mold without damaging the sides. We need smooth and beautiful sides!
Decor using fruits
You can decorate the cake with berries for any celebration. First, you will have to choose the juiciest and most beautiful fruits; they should not have any visible damage.
Confectioners advise using:
- raspberries;
- blackberries;
- black and red currants;
- blueberries/blueberries;
- apples;
- citruses;
- grape;
- kiwi;
- peaches, etc.
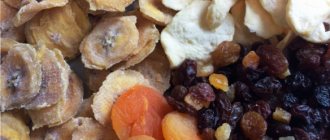
If you don’t have the opportunity to use fresh fruits/berries, it doesn’t matter. You can use canned products, just dip them in a dry towel before using. In order to give the fruits a gloss, they are poured with a small amount of jelly. Decorate the cake at your discretion, as you like.
Let's collect the cake!
We put the cake on the bottom of the mold, heartily, with about 10 full tablespoons, soak it with syrup (in my case, juice from canned pineapples), put fruit on top (I used pineapple pieces), pour in half the mousse (if you have a scale, it’s better to weigh it so that the cut turns out more beautiful later, I didn’t weigh it and the layers turned out to be different), put the second soaked cake layer, again fruit and mousse and cover with the third cake layer, the smoothest one. Usually the third one I have is the one that was the base of the sponge cake. And in the refrigerator overnight!
While the cake is freezing, we...
Purpose of dessert
At a wedding, it is customary to treat guests not only to the main course, salads and appetizers, but also to dessert. This tradition is as old as the world, but it was only four centuries ago that sweet cake began to be used as the end of the evening. Before this, the newlyweds treated friends and relatives to bread, loaf, flatbread and other baked goods.
Not everyone loves sweets, so some couples decide to give up this custom. However, in this matter you should not focus purely on your tastes, because many guests will want something sweet after the main menu, competitions and dances. The problem is solved if the celebration has a candy bar - a separate table with small portioned desserts, but if it is not there, it is still advisable to order a confectionery product.
Interesting! Be sure to consider ordering the cream cake. This dessert will be both delicious and beautiful. You can make decorations even if you are a novice pastry chef - you only need fresh flowers...
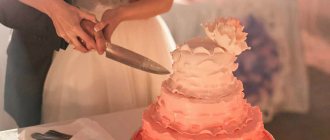
A masterpiece of confectionery art is served at the end of the banquet, when the main menu has already exhausted itself, but the general fun continues. The wedding cake without mastic is taken out into the hall to the accompaniment of ceremonial music, and then the newlyweds cut it into portioned pieces and distribute it to the guests. It is believed that such a conclusion to the banquet attracts good luck, happiness and positive events into the life together of the spouses.
leveling the cake.
To be honest, it may not turn out well right away. Although there is nothing complicated, you just need a little practice and understanding of the essence :) And if practice depends on you, then I will help a little with understanding!
In fact, this cake is ideal for leveling. It is assembled in a mold with film and, when you take it out, it will be even on its own. All you need to do is carefully cover the top and sides with the cream cheese. For leveling tools, it's great to have a special rotating table and scraper. I don’t have the first one, and I somehow adapted to do it without it, I just turn the dish on which I collect the cake counterclockwise with my hand, and with a large scraper - that’s what I have! — I distribute the cream in a motion “toward me.” If you are going to make cakes for all your family holidays, I highly recommend at least purchasing a scraper. Unfortunately, I haven’t seen these in regular stores, nor in hardware stores, much less in supermarkets, but today everything can be ordered online. They cost differently: professional metal ones are more expensive, while plastic ones are very affordable, but at the same time they also serve excellently! However, size matters here, so take a larger one :)
About the process. Apply a small amount of cream to a scraper (or a wide silicone spatula, in a pinch!) and work it down the side of the cake in a "toward" motion, rotating the cake counterclockwise. Usually the cream is applied in two stages: the first thin layer removes the crumbs, then the cake is cooled a little and the second layer is applied. It is also important to constantly remove the “used” cream from the scraper on the edge of the bowl. Many people find it convenient to apply cream to the sides and top of the cake from a pastry bag. I sometimes do this too, but this time I didn’t because of saving time. And this is a good way.
Covered the cake with cream. We put it in the refrigerator.
Decoration with whipped cream
Protein cake decoration is one of the most original confectionery ideas.
You will need:
Note!
Amigurumi for beginners - photos of the best toys, a master class on knitting items with your own hands step by step
DIY bear costume: step-by-step master class for DIY sewing. Costume design options for the New Year
Bead weaving patterns for beginners - step-by-step instructions with photos and descriptions
- Powdered sugar
- Eggs
- Vanillin
Cooking method:
- 1. Separate the whites from the egg yolks;
- 2. For 25 minutes, beat the whites into a dense foam, adding sugar;
- 3. Add a pinch of vanillin;
- 4. Place the protein cream for decorating the cake in a pastry bag and decorate the product.
Let's make mirror glaze!
However, it can be made in advance, even a couple of days in advance, stored in the refrigerator, and then reheated. I described how to cook it in a separate post. Just use a third of the ingredients. For a cake with a diameter of 18 cm, not completely covered with icing, this is enough. And also IMPORTANT . To cover the mousse cake, the glaze is brought to a temperature of 30-35 degrees. That's a lot for drips! Frosting that is too warm drips off the cake, leaving unsightly puddles on the plate. In order for the drips to be convex and not reach the very bottom of the cake, the temperature of the glaze should not even reach 30 degrees. It seemed to me that the optimal value was 28. But you also need to look at the consistency. The temperature of the cake itself is also important. It must be well cooled. You can apply the glaze with a spoon, first making drips and only then filling the middle. On the finished cake it looks like it has spread on its own, but in reality everything is different! :) There are illusionists all around, right! :)
Oh yes! I completely forgot about
Cream recipe
- All products must be at room temperature. Beat the butter with a mixer until soft peaks form.
- Gradually add condensed milk. Beat until the mixture lightens in color and acquires a very delicate structure.
- The cream is ready to use. All you have to do is add a little coloring and you can start decorating the holiday treat.
Summary
Future newlyweds don't have to choose something for their own wedding just because it's fashionable. Mastic looks beautiful and elegant, but cakes with this design may not suit your taste. To please the majority of guests and get pleasant emotions, you can use the classic method of decoration, supplementing it with your own creative ideas. Wedding cakes without mastic in the photo turn out to be the most beautiful, as they have an original decoration.
admin 115
Previous article
No hassle, no worries - a wedding in a hotel: features of the event
Next article
Features of the treat
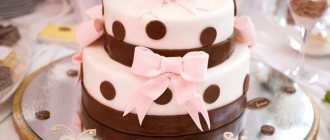
Ready-made cakes, coated with filling and adjusted to the same size, are in most cases covered with either mastic or cream. The second option began to be used much earlier, and has recently begun to be regarded as banal and tasteless. Cream roses and patterns looked the same, so they killed any individuality of the holiday.
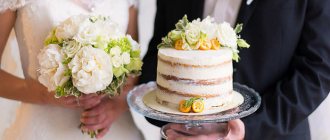
Gradually, confectioners adapted to the requirements of modern couples and learned to create sweet masterpieces without the use of mastic. Nowadays, many sponge wedding cakes without mastic, decorated with cream, look rich and solemn, and the light structure of the decor makes the appearance delicate and airy.
The quality of this dessert has also changed: when mixing the cakes and cream, you can add various ingredients that improve the taste. Fruit, berry, cream, curd, yogurt, honey - and this is not a complete list of cakes that can be made for a wedding.
As for the decor, the cream base is less capricious than the mastic one. Elastic confectionery paste melts on contact with a wet filling or cakes soaked in syrup, but this will not happen with cream.
To create a beautiful wedding cake without mastic, you can use the following methods.
- Cream. The decoration in this case fits perfectly with the base. The decor is made in the form of a relief surface or ornate patterns on the side and top of the dessert, and the top can be covered with flowers.
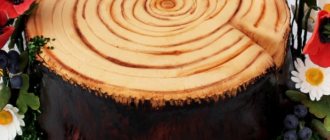
- Chocolate. Flat decorations in the form of abstract curls, butterflies, flowers or birds are cast from it. This decor is placed on the top, but in addition it is advisable to use other design elements.
- Natural flowers. The stems of the buds are placed in floristic flasks and then placed in the desired order in the dessert. Decorating a wedding cake without mastic, as in the photo, turns out bright and unusual, although inedible.
- Berries and fruits. Fresh fruits are decorated with the top of the cake and the edges of the tiers. If the base is made of cream, then the berries and fruits can be arranged in a cascade from top to bottom.
- Glaze or syrup. The dessert is poured over the melted mass, which then hardens into fancy patterns.