Every couple strives to make their wedding the most vibrant and unforgettable event in their lives. Therefore, a large role in organizing a wedding celebration is given to various traditions and rituals. Very often, newlyweds decide to hang and lock the lock in a designated place.
Even after a long time, lovers can easily find their own among hundreds of castles, since they are not similar to each other. In this article we will talk about how to prepare a wedding castle with your own hands.
Lock selection
First of all, you need to purchase a suitable padlock from the store. It is worth noting that locks are not only ordinary square, but also, for example, heart-shaped. The solution to this issue depends on the cost of the product and the financial capabilities of the couple.
You can look for an antique lock with a hinged shackle, it looks great after the appropriate decoration.
The texture of the surface of the castle is also of great importance. If you intend to apply an inscription to the surface using engraving, then it is better if it is smooth.
If the inscription is made with paint, then there is not much difference between a smooth surface and a rough one.
Editor's choice: Wedding in peach color: organization and decoration
The next characteristic you need to pay attention to is the size of the lock. A large castle is more noticeable, but it also costs more. In addition, it will require more decorative elements and time for decoration. Therefore, when choosing the size of the lock, you should carefully weigh the pros and cons.
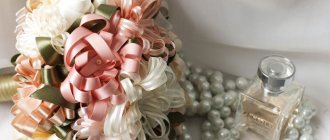
Champagne
Well, what would a wedding be without champagne! It must be of high quality and have a shelf life that will not expire soon. According to tradition, two bottles are supposed to be beautifully decorated - for the bride and groom.
But they won’t be drunk right away, since the newlyweds leave the table sober. A bottle designed for the groom will be drunk in exactly one year. It symbolizes patience, endurance and loyalty. The first glass is offered to the wife, after which the rest can drink. The bride drinks a bottle for the birth of her first child. Since mom can’t drink alcohol, they buy her another bottle of champagne. She can drink it with her friends when the baby grows up.
Coloring a lock and key for a wedding
Before deciding how to decorate the castle, you need to decide on the main color of this accessory.
Having prepared waterproof spray paint of the selected color, you can get to work by studying the detailed master class below.
- First, the surface of the lock to be painted and the key must be degreased. This can be done by thoroughly wiping them with a piece of cotton wool soaked in solvent, acetone or alcohol.
- The next step is to plug a small piece of cloth or tape over the keyhole to prevent paint from getting inside and damaging the locking mechanism.
- After completing all the preparatory procedures, you can proceed directly to painting the castle. First you need to apply paint to one side and wait until it dries completely. After this, the other side is also painted. The paint must be applied in two layers to ensure an even coating. The key needs to be painted in the same way.
Editor's choice: Summer wedding hairstyles: examples and advice from stylists
Luxury invitation
You will need: sheets of white and turquoise paper, a printer, a glue gun, scissors, a ruler, a white openwork napkin, decorative elements - beads, flowers, satin ribbons.
Master Class
- Print the invitation text onto a white sheet of paper, then trim the edges of the sheet so that it is smaller than the turquoise.
- Glue the text sheet diagonally onto the turquoise base as shown in the image.
- Glue 3 beads to the bottom left side of the invitation.
- Take an openwork napkin and fold it to the size of the invitation using a ruler.
- Place the invitation in a lacy napkin.
- Glue 3 flowers to the upper right corner of the invitation.
- Attach a satin ribbon and tie a bow.
- Make the required number of invitations in the same way.
- This master class was provided by the talented craftswoman Liliya Getman.
A luxurious wedding invitation is ready!
Inscription on the lock
At the next stage, the question arises: how to make a neat inscription consisting of the names of the newlyweds? It is advisable to first practice on a regular sheet of paper, drawing the outlines of the castle on it. This is the most difficult process you will have to complete.
It is very important to correctly calculate the placement of letters and their size so that it all looks neat and is easy to read. It is better to choose a paint that is contrasting to the main color of the castle, and apply the inscription with a thin brush. You can use nail polish of a suitable color.
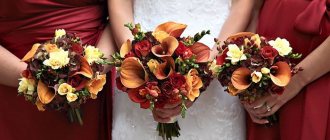
DIY wedding accessories for a photo shoot
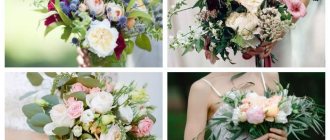
Photos are captured important moments that will revive any memories. Wedding photos are memories that will last a lifetime, so these photos should be original and interesting. To obtain such photographs, additional accessories are often used. Typically, letters made of flowers on a wire frame or large letters made of paper are used (usually the names of the newlyweds or the phrase “I love you”). A lace umbrella or flower will also be an excellent accessory for taking wonderful photographs. To make such an umbrella, you will need an old umbrella. Using a glue gun, glue lace, feathers or flowers the way you like.
Decorating the castle
The final step is decorating the wedding castle. The photos below will help you decide on the solution to this issue.
You can use a huge number of different items as decorative elements, for example:
- beads;
- glitter;
- rhinestones;
- satin or silk ribbons;
- bows;
- fabric flowers;
- shells, etc.
In order to securely attach decorative elements to the metal surface of the lock, you need to use special glue. The quality of this glue should ensure that the decor remains in place for as long as possible.
First you need to glue the decorations to one side of the castle, and you need to start with larger pieces, and then glue the smaller ones. After the glue has dried, decorate the other side of the castle in the same way.
Editor's choice: Silk wedding, tips for holding it with photos
To make your jewelry look voluminous, you can sprinkle it with glitter. To protect against moisture, an already decorated castle can be coated with colorless varnish.
Having selected a narrow satin ribbon to match the color of the lock, you can wrap it around the bow, gluing the ends with glue.
You can decorate the key with the same ribbon, folding it into a bow and securing it securely. To prevent the key from being accidentally lost, you can make a loop from the same tape.
The lock, smeared with glue and sprinkled with beads of various colors, looks very original.
In general, there are many ideas for decorating castles, you just have to show your imagination and get to work in a good mood.
Decorating a castle is a very exciting activity, although it will require patience and perseverance. But the effort is worth it, because not a single purchased wedding lock can compare with one made by yourself.
DIY wedding: everything you need to organize it yourself
During the preparation of the celebration, you need to think through many important issues: from renting a banquet hall and motorcade to purchasing outfits and accessories
It’s hardly possible to implement everything from this list on your own, but some accessories and little things for a wedding can be made with your own hands, just take into account the following tips:
- Before you start implementing your ideas, decide on such important points as the style and palette of the wedding, budget, number of guests, place of celebration, your priorities (decide what you definitely want to have at the wedding and what you can do without). Then you will be able to choose ideas for the celebration that will not only fit into its theme and budget, but will also be easily implemented in practice.
- You can find many DIY wedding ideas online. Which ones should you choose? Think about what you do best. For example, if you are good at drawing, prepare fashionable watercolor invitations for your guests; if you know the origami technique, make original banquet cards and elements of festive decor from paper. Take on what you are really good at, then you will not only make truly unique and beautiful things, but you will also be able to relieve stress before the celebration.
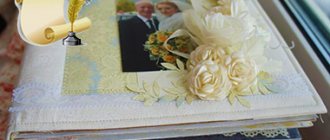
- Keep a diary in which you can write down all the DIY wedding ideas that come to mind. This will not only allow you to structure all the information, but also not to lose sight of anything, because it is simply impossible to remember everything.
- Distribute responsibilities. You should not try to do everything yourself, this will turn the preparation for the wedding into a continuous marathon, which will not bring you pleasure, but will make you nervous. Delegate some tasks to your family and friends, but only if you are sure that they can handle it. If your friend can make wedding accessories with her own hands, because... she knows scrapbooking techniques, then why not ask her for help.
- Don’t leave making accessories and little things until last, because... Before the wedding, you may have a lot of additional concerns. It’s better to do everything in advance and enjoy the beauty of the items made, anticipating the approaching holiday.
Preparatory work
If you have already decorated glasses or bottles of champagne by hand, then you know that the work should begin with cleaning the surface. In the case of a castle, this is no exception. It is absolutely necessary to degrease the work surface using alcohol or acetone. It is enough to wipe the lock with a cotton pad. This is required so that the spray paint can easily and evenly lay on the iron surface. In addition, it is worth noting that not only the lock, but also the keys need to be degreased, since they will need to be decorated in the same style as the lock itself.
What are toppers?
Cake toppers are words, unique symbols or pictures that are cut out of plywood and covered with acrylic paint - a completely safe substance that is actively used in the food industry. Typically, these products are installed and secured directly on the dessert itself.
- Wedding: you can choose a wooden inscription “Happy Wedding Day” or order products with the common surname of the new family or the initials of the newlyweds. Such decorative elements can be kept as souvenirs until the golden wedding.
- Birthday: in this case, you can order the phrases “Happy birthday,” “Congratulations,” “To the best daughter,” etc. For children’s birthdays, phrases with the child’s name and number of years are often purchased: “Svetlana is 1 year old!”
- Corporate party: for such events, wooden toppers are usually ordered with the name of the company, number of years or year of foundation, for example, “Roshen - 1996”.
- New Year.
- International holidays (March 8, February 14, February 23).
How to choose music?
There are several important criteria when choosing a musical background for a ceremony:
- the music should be without words, otherwise they may confuse the leader of the ceremony (even if the song sounds quiet);
- there should be no differences in volume, the track should sound evenly;
- the music should sound in the background, complement the speech, but not interrupt it in volume.
The best option would be compositions that feature solo violin, piano, and flute.
Also, it is worth preparing the audience 5-10 minutes before the lighting of the “family hearth”: from fast compositions (if there were dances before) you should delicately switch to more moderate ones, and immediately before the ceremony, turn on a slow song.
Thus, the transition to the substrate for the ceremony itself will be smooth. After completing the ritual, it is also worth maintaining a slow tempo in the music for some time.
The registry office planted a tree...
“Tree of happiness” at the Bogorodsky registry office (photo: @kirill_kolos) A special variety of “wedding” trees is planted near many district registry offices in Moscow - and to hang a “lock for good luck” you don’t have to go to the center of the capital. As they say, immediately after painting you can “hang yourself”. And near the building of the Shipilovsky registry office, a monument was erected to the “Castle of Love”: literally, such a hefty castle that it would surely and with a guarantee “live until the golden wedding.” The employees of the Bogorodsky registry office are sure that everyone is the architect of their own happiness, and therefore in the park across the road they installed a forged sculpture in the shape of a heart - the “Tree of Happiness”, which is steadfastly awaiting new locks on its body. Opposite the Ryazan registry office there is the picturesque “Newlyweds Square”, where immediately after registration the newlyweds sit on special “marriage” benches, drink a glass of fizzy drink and, no, no, and even attach a padlock or two to the leg or back of the bench.
Alley of Love in the park near the registry office in Nagatinsky Zaton (photo: AGN “Moscow”)
The Chertanovsky registry office department is proud of the symbolism of its “Newlyweds Alley”: a decorative bridge is thrown across two large wedding rings, which the Chertanovsky newlyweds, of course, decorate with symbols of eternal love - “until rust and utility workers separate them...” The tallest grooms hang locks on the “Nest” stork” – a stele with that name stands here, next to the children’s playground.
Newlyweds Square in Izmailovo (photo: Anton Belitsky)
Newlyweds Square in Izmailovo (photo: Anton Belitsky)
Newlyweds Square in Izmailovo (photo: Anton Belitsky)
And in the “Newlyweds Square”, which is not far from the Izmailovsky registry office, you can lay a personalized tile, take a memorable photo on a bench in the shape of a heart, and hang a hardware symbol of your choice: on the railing of the “Bridge of Love” or on the branches of the “Tree of Love”. By the way, love is also evil, and in the end those fictional Italian lovers who laid the foundation for the gallows-castle tradition broke up anyway. In general, this is all bitter... Bitter!
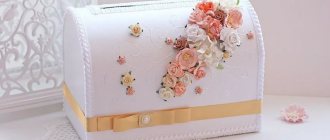
DIY wedding money box
A few years ago, money given for a wedding was collected in jars or bags. In the modern world, for these purposes they use a beautiful box that will look stylish and fashionable. You can make such a chest yourself; it will be more economical, because you need very few materials: satin, ribbons, jewelry and a box. You can see what options for boxes can be made in the following photos, or perhaps you will come up with a unique design and execution of the box.
How to make such a box, watch the video master class presented:
Work from scratch
So, you come to the store and choose the simplest lock. Even if its appearance is unsightly, you will soon change that! The only thing we recommend paying attention to is the shape. Some newlyweds prefer regular locks, which were mainly used in barns. Other, more romantic couples opt for heart-shaped items.
In addition, when choosing a lock, you should consider its size. The larger it is, the more noticeable, but at the same time it is heavier and more expensive. A large castle is not always a winning option. Processing a larger area will require much more time, effort and consumables. Therefore, it is worth calculating in advance how much time you plan to spend on work.