A fairly old tradition is to give gifts to newlyweds. But, unfortunately, not every person is able to fully guess the wishes and tastes of the bride and groom. Moreover, such large-scale events are often attended by strangers who know absolutely nothing about the couple in love.
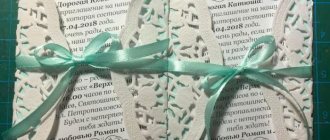
Therefore, there is an optimal gift option - money. But such gifts do not look at all solemn and many people are even embarrassed to give them in a regular postcard. Therefore, we recommend creating a special chest for wedding money with your own hands. It will contain all the donated funds, which the lovers can later spend on their needs.
Types of wedding chest design
In order to make your life easier, you can, of course, order a ready-made box. But this is decor into which you have not invested your own strength and emotions. The design can be absolutely anything.
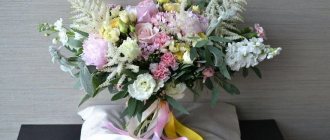
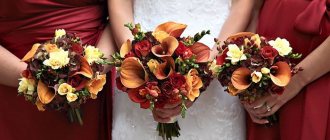
Some people create a box in a classic style, covering it with white satin fabric and adding artificial pearls. But you can choose fabrics to match the wedding, which will also look harmonious. The main thing is that all this is arranged as neatly as possible. Therefore, for the outer part, buy beautiful ribbons. An excellent solution is to decorate with fresh flowers. To complement the composition, choose dried berries and various plants. Delight your guests with your own piece of art.
Treasury box
As a base, you can take any box you like from shoes, dishes, equipment, or sweets. The size is selected depending on the number of guests. It should be noted that many people give money in envelopes, sometimes handmade, which are much larger than a regular postcard. All this should go inside easily.
To prevent the hole for money from looking too big and ugly, you can cover it on both sides with lace.
If the box is too small, but you like its shape, you can increase its size, for example, in height, using thick cardboard. It will not be noticeable behind the decorations. If the box is too large, then you can make it smaller by cutting off the corners and changing the shape. As a last resort, use it as a material and simply cut out the parts according to the template.
The treasury from the box can be covered with corrugated paper, fabric, or painted. To give volume and soft relief, you can lay padding polyester between the box and the fabric. It is not the stretched fabric that looks interesting, but the glued, wrinkled one. To do this, grease the sides of the box with glue, do not pull the fabric tightly, and use your hands to chaotically create a pattern with tucks as in the photo:
This way you can not design the entire box, but, for example, only the sides or the roof.
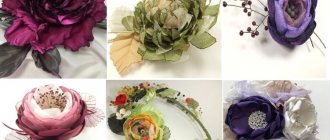
Further decoration as desired. These can be photographs of the newlyweds, ribbons, bows, flowers, lace, half beads, rhinestones. Design example:
Such a treasury can be opening from the top or bottom. This is especially important if it will later be used to store memorabilia from the wedding.
How to make a chest from a regular cardboard box
In order to make a bright wedding chest without much difficulty, you should use the following recommendations:
- preview a detailed master class;
- prepare all materials;
- decide on the design.
The easiest way to create a ceremonial box is to use any box, maybe from shoes or some other wardrobe items. To do this, you will need to first purchase accessories, a stationery knife, glue and a box of suitable size.
Start by cutting a hole in the lid of the box. Do everything according to the principle of a classic piggy bank. Once the hole is made, you can complement the appearance with a special dome. The entire product should look like a real “grandmother’s” chest in which jewelry and money will be stored.
After the necessary structure has been created, the final stage follows - decor. Here you need to show your imagination. The panels on the sides can be decorated with ribbons or delicate lace. You should not skimp on additional decorations that will emphasize the solemnity of the box. They will highlight the appearance of the chest. If you want to make a unique box, decorate the side panels with photographs of the newlyweds.
Treasury in the form of a house
Options with a box or casket may seem too simple to some. A good way to make the treasury more original is to make it in the form of a house. For this you will also need cardboard, colored paper, glue, scissors, pencil, ribbons, and paper tape.
So, a master class on making a treasury-house.
- The pattern of the house is applied to the cardboard; remember that the upper part of it opens, so the roof of the house is cut off.
- The pattern is glued together, the roof is secured with tape, which will serve as hinges.
- Windows are cut, you can also make shutters and paste a photo of the bride and groom into the windows.
- The product is covered with colored paper and decorated with ribbons, from which you can make bows and roses.
Making a chest with your own hands
Most couples use standard trays where guests place all their gifts and envelopes. But this option is completely unsafe and not original. Therefore, we advise you to work a little and create a box with your own hands. Choose a design in the form of a rectangle or a suitcase.
The casket can be decorated with various decorative elements. If you want to create a box that is as close as possible in appearance to the chest, then paint it white, black or brown. In order for the product to look original, we recommend decorating the casket in an unusual shape.
Even products with complex shapes do not need the help of a craftsman; everything can be done independently.
Choice of color and shape
Regarding the shape, options in the form of a fairy-tale casket or a magic chest look especially harmonious. All this will resemble a cozy family “nest”. Regarding color, we recommend choosing fabrics in the same color as the wedding. Nowadays, most couples create a wedding in one color. Therefore, even small decorative elements must be in the same shade.
Materials used
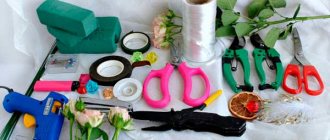
To create a unique casket, you will need the following materials:
- high-quality glue;
- cardboard box of suitable size;
- stationery knife;
- stapler and tape.
Of course, buy various beads, ribbons, and stones in advance. Velvet fabric may also be required for the external and internal decoration of the box.
Money chest diagram
To create a chest, you cannot do without a special diagram. It is not needed only if you are creating a casket from a shoe box, since it already has the required format. If you haven’t found a suitable box, you will need to take a large sheet of cardboard and select a suitable diagram for the box. Then draw it on the surface and cut it out. Once completed, you will need to connect each element to each other using high-quality glue, a stapler or tape.
Patterns for such chests are not at all difficult to find. The main thing is to choose the appropriate size option so that guests can throw not only bills, but also envelopes with money into the casket.
Wedding box
Such a treasury is easy to make due to the fact that the improvised means from which it is made are very common in everyday life.
To make such a treasury, you can use an old cardboard box of good quality. These usually come from expensive dishes or electronics.
Also buy special paper for packaging, which is sold in stationery or packaging stores and studios.
Stock up on decorations. They will be various beads, bows and other decorative elements. You can choose them to suit your taste.
KNOWLEDGE BASE: DIY butterfly for the groom and images with a butterfly
Master class on creating a wedding treasury
If you don’t have a ready-made box, use a template to cut a blank out of cardboard, then glue it together and proceed to further work.
- Use a pencil to mark a semicircular outline on the side edges and cut off the excess.
- Cut the front edge flush with the bottom point of the round part.
- Using a ruler, crumple the lid every centimeter so that it takes on a semicircular shape. The length should be such that it slightly overlaps the top of the front edge. If the length is not enough, then it can be “increased” using cardboard and glue.
- Using masking tape, glue cut-out cardboard elements, semicircular on one side and straight on the other, to the sides of the lid.
- Tape all edges of the chest with masking tape.
- Make a hole in the lid for money approximately 5-7 mm wide and no more than 15 cm long.
- No matter how beautiful the base is, in its original form it is not suitable for a wedding, so the box needs to be covered. Leather, any textiles or designer paper are suitable for this. Here the flight of imagination is not limited.
Decorating a money chest
Particular attention will need to be paid to decorating such an attribute. Here you should not save and choose the cheapest; on the contrary, if you buy ribbons, then choose the most expensive and widest. In addition, we recommend combining satin ribbons with beautiful velvet. If joints or glue are visible somewhere, take a glue gun and decorate the seams with beads.
If you are worried that you won’t be able to make the money chest for your wedding as luxurious as you would like, invite your relatives and your significant other to create it.
Money box
The treasury in the form of a box looks quite original, in addition, it is the easiest to put and take out money from, especially paper bills.
- Make a pattern of the desired size
- Transfer the parts onto the prepared cardboard
- Glue the sides with a glue gun
- Cover the box with decorative paper
- Handles can be made using durable tape, tightly attaching it to the drawer door
You can also use your own photos as decorative material. Like here:
This will give the product uniqueness and style; such a piece of furniture can be used not only at a wedding, but all the time as a piggy bank or just a safe for storing something.
Materials used
A wedding chest can be made from the following materials:
- Thick cardboard is the most commonly used material for making DIY wedding accessories. You can easily make wedding boxes from it. However, such material is short-lived, as it is highly susceptible to moisture and time.
- Tree. Wedding accessories made from this material are durable and reliable. They have an attractive and noble appearance, especially if you decorate the tree with artistic carvings. Such a money chest can last for decades. However, only a person who has special skills in working with wood can make it from this material with his own hands.
- Plastic. This material is characterized by many color schemes. Most often, to make a wedding accessory for fundraising, a ready-made plastic box is purchased and then decorated.
- Glass. Wedding boxes made from this material are quite beautiful, but fragile.
To decorate wedding chests, the following materials are needed:
- colored paper, thick foil, etc.;
- satin ribbons, tulle, braid and lace;
- gold and silver strong threads;
- drapery fabric;
- beads, stones, shells, rhinestones and sequins.
Additional materials you will need:
- scissors;
- needles with strong thread;
- stationery knife;
- a simple pencil;
- high-quality glue;
- transparent tape;
- ruler.
In addition, the whole process requires inspiration and a good mood.
It is worth paying attention that the appearance and durability of the wedding accessory for raising funds directly depends on the quality of the selected materials.
For example, high-quality glue will allow you to securely fasten the decoration to the box, thereby preserving it not only for the duration of the celebration, but also for a longer period.
Treasury cake
This option can be made from 2-3 round boxes of different diameters. To do this, they are placed one on top of the other in the shape of a cake, glued, and a hole is made in the bottom and lid in the middle of the layout, connecting the boxes into one.
If there are no suitable boxes, you can make a cake from whatman paper. To do this, cut out the parts according to the diagram, glue them and decorate them as you wish.
Design options in the photo:
Whatever type of treasury it is, it must have strong walls and a stable, dense bottom. If necessary, you need to consider a special solid stand. For example, a beautiful tray is suitable for a treasury cake.
Where to begin?
To make a chest with your own hands, you will need your own imagination and some free time. Such an attribute must be done carefully and with love, as it will become the central element of the celebration and will symbolize the future treasury of the newlyweds. By putting your whole soul and good intentions into its production, you can attract financial well-being to the family.
Before you start making a money chest, you need to determine:
- The shape of the future wedding chest: square, rectangular, barrel-shaped, heart-shaped, etc.
- Product color and size.
- What materials will be needed to make this holiday attribute with your own hands?
- Related decor.
Wooden money chest for wedding
In order to make a wooden chest for money, you need to be able to hold a woodworking tool in your hands. This can only be done by wood craftsmen. Ordinary imagination is not enough. After all, one awkward movement of your hands can ruin the whole job.
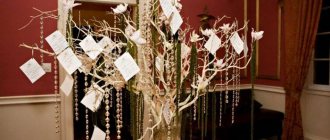
Below see examples of the artists' work:
Original chest for a wedding ceremony made of wood Crafts Fair - treasury for newlyweds (handmade) Openwork chest for newlyweds made of wood
Chest diagram
Once the desired shape of the future wedding box has been chosen and all the materials have been prepared, you need to move on to the next stage - finding a pattern. It can be easily found on the Internet on specialized sites. Here are presented both diagrams of standard rectangular wedding accessories, as well as very unexpected and interesting options.
To save time, you can purchase a ready-made box from the material you like or simply use a regular small shoe box. By making a slot for banknotes and decorating it with ribbons, flowers and rhinestones, you can get a very attractive family bank for a wedding.
MK Wedding Bank. Part 1. Construction.
to making the wedding bank - almost all members of our family participated in this process. The house was built, of course, by the father, since this is the most masculine work, the design was ordered by the daughter (she is the bride), and I (the bride’s mother) decorated and decorated it. And, of course, not a single stage of this grandiose work was complete without helpers - our little son Antoshka (aka the bride’s brother) and his new girlfriend, the beautiful kitty Asya (aka model Vasilisa Kuzminichna). So, let's remember all the stages of this grandiose construction.
First, a drawing of the future house was developed and drawn
From shoe boxes and very thick cardboard we cut out the Roof (1 piece), the front and back of the house (2 pieces) and the Sides of the house (2 pieces).
From chipboard (can be made from plywood or very thick cardboard) we cut out the bottom of the house (backing) and begin gluing the side parts of the house onto it
For gluing this type of structure, it is best to use liquid nails (Mounting Glue, Moment brand)
In order for the walls of the house to stick well, it is best to let the glue dry well for several hours after gluing the next part.
We glue the roof. In order for the newlyweds to be able to get gifts and congratulations from our bank, it is necessary to either leave one side of the roof completely unglued, or only lightly grab it in several places
Cutting out the bases for the skylights
We decorate the roof of the front part of the house with attic windows
And the back part of the roof, the one that is not glued and can be opened, was left without decorations
We prime the entire surface of the house - paint it with water-based or acrylic paint. It is better to repeat this stage several times so that the paint lays evenly and nothing shows through. Dry each layer of paint well
Cutting, gluing and painting roof windows
There were 4 of them (there are also 2 such windows on the sides of the house)
We cut out the windows and the front door from less dense cardboard. We come up with the size and shape to your taste
We got 18 windows. We mark the windows and door with a simple pencil and glue
On the facade of the building, so that the windows do not interfere with further decoration, they can be glued later
At this stage, the construction process ended, and my husband gave his hand-made creation into my caring hands :). Then the decorating process began - in my opinion, the most interesting and creative.
Source
Treasury-heart
Such a treasury is made from a ready-made box or glued together from cardboard or whatman paper according to a template. The slot for money can be placed on the lid or on the side, it can also be glued with lace or half-pearls can be glued around it. Decor as desired. Ribbon bows, paper flowers, beads, rhinestones, and lace look beautiful.
Treasury pattern:
Manufacturing step by step on video:
Design examples:
Chest decoration
A homemade wedding box can be monochromatic or combine several colors that look harmonious with each other. Among the most popular design options: the bottom of the product is made monochromatic, and the top is bright, with various decorative elements.
You should start gluing the box from its sides, smoothly moving to the lid. To do this, you need to take high-quality glue that can reliably attach fabric, metal and plastic to a cardboard or fabric surface. Do not neglect the quality of the glue, since a part of the chest that is not securely attached can fall off at the most inopportune moment.
When decorating a chest, you can use the following tips:
- It is recommended to decorate the sides and joints on the chest with satin ribbons, the color of which matches the shade of the fabric for the lining.
- To decorate the chest, you can use ready-made options that are offered by wedding salons and handicraft stores.
- The lid of the jewelry box should not be too heavy, otherwise it will begin to sag inward.
- A winning option would be to use contrasting colors and shades, for example, white fabric for lining the product and red ribbons for decoration.
- The sides of the box can be decorated with photographs of the happy newlyweds.
- For decoration, you can use original decorations: small tree branches, dried grass, flowers, leaves and berries. Thus, you will not only get an interesting composition, but also be able to surprise your guests with your skillful handicraft.
Popular articles Stained glass made on glass
You can make a beautiful and original chest for money for a wedding with your own hands. To save your time and protect yourself from possible failure, you can make a wedding accessory from a cardboard shoe box and decorate it with blanks purchased from a specialized store. It will take no more than two days to produce and decorate such an attribute.