The greatest minds on the planet have been looking for the answer to the question “what is love?” for centuries, and only the famous chewing gum Love is has always given hundreds of accurate answers to it. Having become one of the most recognizable symbols of love, it began to be used as an element of wedding themes. The Love is wedding cake looks very cute and bright. It is baked in the shape of a huge bubble gum or simply decorated to resemble its wrapper.
Newlyweds also decorate entire weddings in the Love is style, decorating everything with hearts and figurines.
Choosing a form
In order to decide on the shape of the cake, you must first calculate its weight. This is usually done at the rate of 150 grams per person. If the filling is heavy, the cake is covered in chocolate or is thickly soaked, then allocate about 250 grams for each guest.
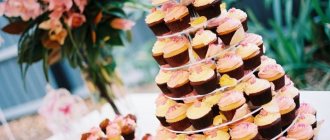
It makes sense to order a multi-tiered cake if it weighs at least 7 kg. Otherwise, the lower tier will be too small and will collapse under the weight of the upper layers. An exception is multi-tiered cakes on a special stand. This way of serving the dessert makes it easier to transport, eliminates the possibility of collapse and looks a little more solemn.
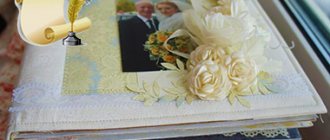
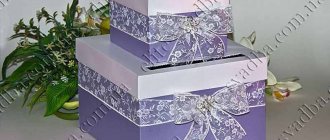
Interesting! You can also design a wish book and stylish invitations for guests in the “Love from” style.
Wedding cake recipe, without mastic
Recipe No. 1:
- Separate 4 whites from the yolks. First we will work with the yolks, and at this time the whites need to be placed in the refrigerator.
- Add 90 g of sugar to the yolks and beat everything with a mixer until you get a homogeneous mass (the sugar should completely dissolve).
- Beat 4 egg whites until fluffy. As soon as foam begins to form, add 90 g of sugar and continue beating until stiff peaks form.
- Combine the whipped whites with the beaten yolks, pour in 190 g of sifted flour, mixed in advance with a pinch of baking powder. Mix everything with a spatula to form a homogeneous dough.
- Pour the dough into a baking dish. Bake the sponge cakes at 160° for 20 minutes until fully cooked. When the biscuit is ready, let it sit for 5 hours.
- During this time, you need to prepare the impregnation for the cakes. In this case, it will be sugar syrup, which is prepared simply - 0.2 kg of sugar is boiled in 140 ml of water. After the syrup has cooled, a little cognac is added to it (the amount is taken to taste), a pinch of vanilla and some kind of liqueur.
- Prepare the cream: whip 0.4 liters of heavy cream until it turns into foam. Separately, beat 0.2 kg of sour cream mixed with 0.2 kg of powdered sugar. After this, the cream and whipped sour cream need to be combined and mixed with a spatula to form a single cream.
- Cut the sponge cake into 3 layers, soak each one in syrup and spread with cream.
- Decorate the top of the cake with cream and berries. To make the cream look beautiful, fill a pastry syringe with it and use special attachments.
Recipe No. 2:
- First you need to prepare the meringue, because this is what will be used to decorate the wedding cake in this case. Beat 4 egg whites, gradually adding 500 g of sugar. Pour the resulting cream into a pastry syringe with a special nozzle. Pipe meringue onto parchment paper. There should be no more than 5 meringues on each sheet, because they will increase in diameter during cooking. Place the meringues in the oven for 2 hours to bake at 140°.
- Bake a sponge cake. It is prepared according to the same principle as in the previous recipe.
- To decorate the cake, prepare the buttercream while the meringues are baking - beat 0.8 liters of heavy cream with 80 g of powdered sugar and 2 g of vanillin. You also need to prepare 350 g of red and white currants. The berries should be washed and dried.
- Prepare the filling for the cake: mix 350 g of raspberries, strawberries and blueberries, pour 2 tbsp. cherry liqueur. Mix half of this filling with the buttercream for a variety of colors when decorating the dessert.
- Cut the sponge cake into several layers (at least 3). Soak each one with coffee liqueur and spread with berry cream.
- Decorate the top of the cake with currants, meringue and cream. In this case, the cream should cover the entire surface of the cake, so for the beauty of the dessert, use a pastry syringe with a “Rose” attachment.
Recipe No. 3:
Preparing a biscuit
The recipe for its preparation is standard (we described it in detail in recipe No. 1)
Particular attention is paid to the preparation of other components for this wedding cake. Boil a glass of blueberries in a saucepan, mixing them with a third of a glass of sugar and a pinch of lemon zest
Cook for 15 minutes over low heat. In a separate container, mix 2 tbsp. water with 5 tsp. corn starch. Pour the resulting liquid into the blueberries and boil it again for 1 minute. Cool the berry preparation and place it in the refrigerator. This will be the impregnation that will need to be used to lubricate the sponge cakes. Beat 340 g of cream cheese with a mixer with 100 g of butter and 2 cups of powdered sugar. This way we will get cream for decorating and filling the cake. Lubricate each cake with impregnation and cream. Decorate its entire surface with buttercream, leveling it so that the cake has an even surface. Decorate the top of the cake with blueberries and cream designs, which can be made using a pastry syringe.
Color and filling
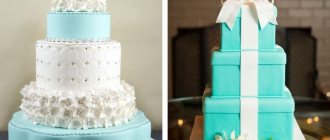
The only limitation when choosing the color design of the cake is that it must be combined with the overall wedding palette.
Otherwise, he does not exclude either bright colors, or contrasts, or a calm color scheme. The bright combination of blue, yellow, red and green looks especially good, as in the classic design of chewing gum.
Take one of your favorite cakes as a base:
- honey;
- walnut;
- biscuit;
- sand;
- yoghurt;
- meringue;
- Napoleon;
- tiramisu.
Add a juicy layer:
- curd mass;
- souffle;
- chocolate spread;
- fruit or berry filling;
- boiled condensed milk.
Choose cream to decorate dessert:
- yoghurt;
- custard;
- sour cream;
- creamy;
- protein.
Consult with the pastry chef on how best to combine these components with each other and ask for a tasting.
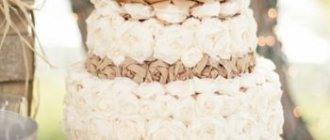
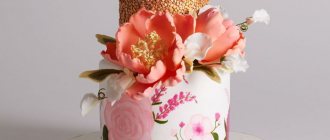
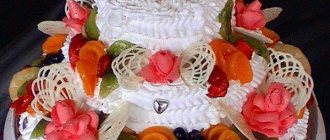
Photos of wedding cakes with cream decor
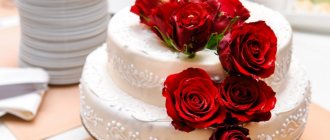
There are many options and technologies for decorating wedding cakes. When ordering a dessert decorated with cream, you need to know exactly what result you want to get in the end. Only in this case will the decor of the main wedding meal perfectly match the decoration of the entire wedding. The design of such a cake can be developed by you yourself, or you can take a ready-made idea, for example, from those proposed below.
A wedding cake decorated with your own hands will be the main decoration of the celebration. There are a huge number of ideas on how to decorate a wedding cake. You can learn about them from this article.
In addition to the fact that the wedding cake must be delicious, it must also be beautifully decorated. The beautiful design of the delicacy will be an excellent decoration for the holiday table. The easiest option would be to place an order at a confectionery factory or bakery. But it's best to do this at home. And that's why.
Firstly, to make a cake at home you will have to choose the ingredients yourself. Of course, only natural and fresh products will be used.
Secondly, the design of the cake will be unique. You can decorate the dessert to your liking. The design can also match the style of the wedding.
A wedding cake can be decorated with a variety of decorative elements. You can also add various inscriptions to it, words of gratitude to the guests and all kinds of wishes for the newlyweds.
So how can you decorate a wedding cake? Before doing this, you can look at photos of cakes on the Internet, which you can take as a basis or completely copy the design of one or another option.
As for the cake layers and cream for the wedding cake, you can use any recipe. Alternatively, you can make tiers for the cake in different flavors.
Before you start decorating your wedding cake, you need to decide on its style.
It is important to think about the color scheme in which the dessert will be decorated. To get started, it’s better to write down your ideas on a piece of paper or even draw a sketch of the finished cake. This will make it much easier to work in the future.
This will make it much easier to work in the future.
The second step is to prepare the necessary ingredients and culinary tools with which you can decorate the cake. How can you decorate it?
Decoration of the dessert “Love from”
The taste of the main dish of the holiday table is, of course, important. But its appearance also plays a significant role. Therefore, the outside of the Love is wedding cake is usually covered with colored glaze or mastic, and also decorated with figures and designs made of mastic or marzipan.
Cake decorations in the Love is style are images of a cute couple from that same bubblegum.
Quotes from candy wrappers are also popular. Love is…
- waking up in the morning from your kiss;
- support each other in everything;
- just being together;
- be part of a common future;
- thank her for coming into your life;
- a dream in reality;
- find happiness in each other;
- when the ground disappears from under your feet;
- two people sharing one heart.
Nine tips
People choosing a Love from style cake should pay attention to the following tips:
- Designing a product in the Love genre should take into account the color decoration of the celebration.
- Place a figurine of lovers on top of the Love genre product.
- For baked goods with numerous tiers, it is permissible to choose a variety of creams and layers.
- It is important to taste in small pieces and make the required adjustments to the love is mastic cake in a timely manner.
- When calculating the number of Love is products for a wedding event, keep in mind that among the guests there will be sweet lovers who will want another piece. For this reason, take a treat with a reserve.
- Please worry about delivery in advance.
- Arrange for a drink to be served with the treat in a timely manner.
- Knives, spatulas and forks should be made in a single theme.
- The most common type is devices decorated with reddish hearts.
The Love is wedding cake, as in the photo presented in the article, will be an excellent treat for the people you love most.
My own pastry chef
Making a cake based on Love is does not require special skills. You can use any dough as a basis, and its decor is so simple that decorating the dessert will not be difficult. Below is a tutorial on how to create a Love Cake from.
For the test we will need:
- 2 eggs;
- can of condensed milk;
- a pack of baking powder for dough (10-12 grams);
- 160 grams of flour.
Step-by-step instructions are below in the list.
- Pour eggs and condensed milk into a bowl, stir with a whisk.
- Add baking powder to flour. Pour into a bowl, stir. The mixture should not be very thick and should have a consistency similar to pancake batter.
- Make markings on parchment paper. Draw a heart of the required size.
- We distribute the dough on the parchment in a thin layer, without going beyond the intended boundaries.
- Place in an oven preheated to 180 degrees for 8 minutes. Then take it out, remove the paper, and let it cool.
- We make 4 more cakes in the same way.
For the cream you will need:
- 100 grams of powdered sugar;
- 3 tablespoons coconut flakes;
- 250 ml homemade heavy cream;
- 300 grams of cream cheese.
Attention! We have collected other interesting ideas for holiday desserts in this article. Enjoy reading!
Cooking - next.
- Mix cream cheese with powdered sugar. Add whipped cream to the resulting mixture and mix thoroughly. Now mix it all with coconut flakes.
- We place the cakes on top of each other, grease them with cream between layers.
- Place the cake in the refrigerator.
- After the cake has cooled and hardened slightly, cover it with egg white custard and blue food coloring. To decorate the sides of the cake, use a special nozzle. Our long sides will be blue, the short sides will be yellow.
- Let's outline a sketch of the drawing using a toothpick.
- Let's outline the outline using decor gel, and then use it to paint the inside of the picture.
- Let's complete the cake decor with a neat edging. For this we will need a nozzle again.
A cake based on Love is is quite simple to make, but at the same time a very original solution for a wedding table. This theme opens up space for creativity and adds personality to the main dessert of the wedding. Choose your favorite toppings and a touching quote, order unusual figures, and enjoy the holiday. If you choose wedding cakes from Love, the photos from the celebration will turn out beautiful and original.
admin 115
Previous article
Nature in postcards: how to make a wedding invitation in eco-style
Next article
Delicious wedding cake, step by step with photos
- Separate 20 whites from the yolks. First, beat the protein component by adding a pinch of salt to it. When you get a thick foam, add 10 tbsp to the whites. sugar and a few drops of vanilla essence (to taste). Beat until you get a thick and stable foam.
- Beat the yolks with 10 tbsp. sugar, then pour the whites into them and beat everything with a whisk, moving it in one direction smoothly.
- Add 20 tbsp to the resulting mass. sifted flour, which must be mixed in advance with 1 tsp. baking powder.
- Pour the dough into a baking dish and place it in the oven for half an hour. The biscuit should be cooked at a temperature of 180°.
- When the biscuit is ready, you need to let it cool and rest. It is better to allocate at least 10 hours for this.
- Beat 200 g of butter with 50 g of condensed milk - you will get a cream.
- Cut the sponge cake into 3 layers. Level each of them and soak in syrup from canned peaches (you will need a 1 liter jar of this product). Soak carefully so that the biscuit does not get soggy. Its edges must remain dry.
- Brush each cake with cream and place a few peach slices on top of the cream. Form the cake in this way.
- Grease the entire cake with cream, aligning all the edges. Place the dessert in the refrigerator for 3 hours to allow the cake to firm up.
- Roll out 5 kg of mastic in a 5 mm layer, and then cover your cake with it, leveling the mastic over the surface using a pastry iron.
- Make fondant decorations for your cake. They can be anything. In this case, you can also use fresh flowers.
Rules for working with mastic
The mastic layer is best applied to a leveled, dry surface of the biscuit. To prevent the layer from showing through, the cake decorated with sugar mastic should be stored at low humidity, in hermetically sealed boxes or plastic bags. It is better to roll out the mastic on a table sprinkled with starch or powdered sugar. The optimal thickness for covering that will not tear should be 2-3 mm. The size of the surface of the “blanket” must exceed the area of the cake, then the mastic under its own weight will lie flat, without folds.
To prevent the mastic sheet from tearing when applying it to the cakes, use the original method:
- Place the mastic between two large sheets of dense polyethylene, which are greased with vegetable oil.
- Roll out to 2-3 mm thick.
- Remove one sheet of polyethylene, carefully transfer it to the cake layer, place it evenly on the surface of the cake layer, then separate the second sheet of film.
To give the mastic a shiny look, after finishing the decoration, use a soft brush to cover it with a honey-vodka solution (1:1): the vodka will evaporate, and the figures and the covering will have a mirror-like varnished surface. You can store mastic prepared for future use in the refrigerator for a long time. The main requirement is that the container be hermetically sealed, without air access, which will prevent the mastic from drying out and not letting in moisture, which will cause the mastic to “float.”
Icing
Icing or ice pattern is another great way to decorate a homemade cake. This technique is usually used in the confectionery industry when decorating wedding cakes. However, no one bothers you to decorate a cake with icing, for example: for New Year's Eve. Icing is rightfully considered a universal method of decoration, since such patterns do not spread and adhere well to any confectionery surface. This decoration looks like an ice pattern on glass. To make this decoration you will need to take:
- powdered sugar – 500 g (usually it takes a little more);
- egg whites – 3 pcs.;
- lemon juice – 3 teaspoons;
- glycerin – 1 teaspoon.
First, all the ingredients need to be cooled. Then carefully crack the eggs, separate the whites from the yolks and place in a clean, fat-free bowl. The last procedure can be carried out by simply wiping the inside of the dish with a slice of lemon. Beat the egg whites with a mixer at the lowest speed. There is no need to beat for a long time - two minutes is enough. Now you can add the remaining ingredients to the whites and continue beating the mixture until it turns white. Cover the bowl with the prepared “ice” mass with film and put it in the refrigerator for an hour. During this time, all the formed bubbles should burst. Ready! However, it will not be possible to work with this material without special equipment. You will have to purchase a pastry syringe with special attachments. The icing needs to be transferred into a syringe. In this case, you need to put the narrowest nozzle on the tool. This material can be used to draw lace, make various inscriptions, decorate borders, etc. The only limitation is that the surface of the confectionery product should not be sticky or prone to dripping. But the icing fits perfectly on mastic or hard glaze.
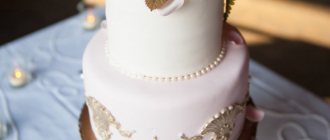
Wedding cakes made from mastic. Photo. Nuances in preparation
These mastic cakes are especially popular. They are very beautiful, and there are a lot of ideas for their design. But it’s not at all necessary to come up with grandiose bouquets of flowers. A simple design that even a beginner can handle is by no means the worst thing.
Perhaps the easiest, but no less beautiful decoration for a wedding cake can be ordinary mastic balls or confectionery sprinkles.
Bows of various sizes can also serve as a simple but elegant solution. You can play with colors, because no one said that wedding means it has to be white.
The most ordinary stripes on a cake can add real zest and elegance to a sweet dessert. A wedding cake made from mastic is actually not so much difficult to decorate as it is to “assemble”. The main difficulty in cooking is attaching its tiers if there are several of them. If there are two tiers, then usually the second is simply placed on the first. But in this case, the sponge cake should not be too soft or with a delicate filling, otherwise the lower tier threatens to be crushed under the weight of the first.
Everything becomes much more complicated when there are three or more tiers. Then a substrate of the required diameter is purchased for each of them, and each layer of the cake is placed on it. In addition, each tier is strengthened with special wooden sticks. They are used to pierce all layers (except for the very top) in several places and cut them so that their height exactly matches the height of the tier itself. Thus, the upper tier on the base will lie not just on the lower ones, but also on wooden sticks that will not bend and will firmly hold the weight of the entire cake, preventing the dessert from deforming.
Now you know how to make a mastic cake with your own hands. The master class revealed in detail all the stages of preparing this delicious dessert. And if before reading our article the task seemed impossible for you, now you are probably excited about this idea and will delight your loved ones with a wonderful, incomparable cake! We believe in you! Everything will definitely work out!