How to make inscriptions?
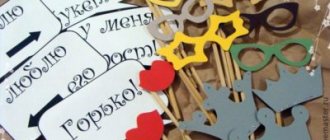
There are several variations on how to purchase such an attribute - create it yourself or order it from a special company for printing on various materials; all this can be clarified with the photographer. As experience shows, you can create more original and, most importantly, unique inscriptions with your own hands. Here are the top photo prop caption ideas.
- On paper or cardboard is a great idea for making inscriptions. The main advantage is that it is inexpensive, since you can implement the idea yourself, and the picture will look no worse than the purchased one.
- Slate boards - quality is guaranteed, with the help of such tablets the photo shoot will be cool. The big plus is that at any necessary moment the inscription can be erased and a new one can be applied.
- Wooden - this type is not suitable for all wedding styles, but, nevertheless, it looks chic.
- Plywood is a material in which there are no boundaries - you can cut out whatever your heart desires, the only question is the accuracy of the idea.
Next, it is recommended to come up with the color and shape of the picture in advance; there are also no restrictions; you can fantasize endlessly. And in the final, final stage, the question is about the holders; these can be skewers or ropes.
Labels for speech clouds
Let's move on to the main details - these are the inscriptions on the attribute itself, slogans or phrases. They can be presented in any way - romantic, comic, serious. Such accessories are suitable for a photo shoot not only for young people, but also for guests; they can perfectly display a sense of humor.
Each couple has its own zest and history; you can make an individual inscription for everyone - these could be lines from songs that connected their relationship, or inscriptions with jokes about their future family life. The main purpose of speech clouds is to highlight the life of the bride and groom, to display the feelings that float between them. The most popular and used phrases:
- "Sweet love..."
- "Forever together"
- "Happiness is near"
- "Love of my life"
- “We will have a beautiful continuation”
- “Maybe you’ll change your mind?”
- “Finally got it”
- “Well, I’m stuck...”
- "Yes!"
Inscriptions for signs and signs
The type of inscriptions provided is in great demand. Such signs can clearly highlight the mood of the wedding and convey it to the guests. There are two purposes for these signs: the first are those that serve solely as attributes, and the second are that they help you navigate the area.
The materials for the signs can be wood or metal, depending on the style of the wedding. Also, the inscriptions are applied according to the theme of the celebration; if it is a classic wedding, then the signs should be in an official style, without any endearing or humorous words. If the wedding does not have a special character, then these can be free words or comic ones.
- "Wedding".
- "Marriage"
- "Banqueting hall".
- "Wedding".
- "Dancing"
- "Overseas dishes."
- “A treat from the family...”
- "Liquor and vodka table."
- “The most fun celebration is here.”
Ideas for flags and garlands
As already mentioned, decor at a wedding is far from the last component. You shouldn’t put everything off until later, since photo props are the mood of the holiday and a reflection of the spirit of celebration. Flags came to us in the last century, but never went out of fashion. Today it is important to use such decorations at a wedding, instead of boring posters. The flags can be interpreted in any way you want, the size can be from tiny to huge, the letters are in different styles, the material can be various cardboards and fabrics.
- Names of the bride and groom.
- Significant dates.
- Statements about this day.
- Words about love.
- Humorous overtones.
- Wedding terms.
Wedding lettering for banners
First of all, if such an idea has crossed your mind, you should pay attention to a couple of nuances so that the banner suits you and fits perfectly into the style of your wedding. What you should pay attention to:
- Decide for what purpose you are ordering a banner - for a photo zone or a screen near the newlyweds’ table, this point plays an important role. The function of the banner reflects its style.
Often, there are certain parameters for the width and length of the banner. The correct size will allow not only the bride and groom to fit into the photo, but also the guests.
- Colors - for a wedding these are soft and pastel colors, all so that people do not blend into the background.
- The material from which the banner is made must be resistant to humidity, dirt and sunlight.
- Design is the most difficult factor, since it is difficult to mix everything you want on your own and for the result to be satisfying. It is recommended to review the examples on the sites and choose the appropriate option for yourself.
- The inscriptions are an arbitrary choice; you can write whatever you want. Or transfer an image: hearts, doves, angels, rings, and so on. Photo cards are ideal against this background.
- It is possible to print photographs of young people, but this method is quite rare and is not popular.
- Decorations on the banner - attaching flowers or various images.
Accessories for themed hen parties
To make the bachelorette party a success, you can decorate it in a certain style and select appropriate accessories for the bride and her bridesmaids, as well as decorate the room where the party will take place.
A set of accessories for a bachelorette party in style:
- The film "Breakfast at Tiffany's" - design in turquoise-blue color, in outfits and hairstyles of the 60-70s. Decorate the table with small cakes and cookies, cupcakes with turquoise cream.
- Oscar ceremonies - in outfits with furs and feathers, shiny tiaras and bright makeup, where Oscar statuettes are used as souvenirs for participating in competitions.
- Evenings with a themed dress code , for example, for a pajama party, wear nightgowns, pajamas or shirts, for a bachelorette party in a nautical style - vests and caps, short striped skirts.
- Coco Chanel - dress up in small, tight dresses and apply sophisticated makeup, while treating yourself to various croissants, eclairs and pastries.
- In denim style - dress in overalls, denim shorts and shirts, white T-shirts, take tableware - glasses, glasses or cutlery - wrap in pieces of denim and tie with lace or ribbon.
Accessories for a party in the style of Coco Chanel
Volumetric inscriptions
The type of lettering provided is a great idea for wedding decor. As a rule, these are giant-sized letters placed in the banquet hall. These inscriptions are an excellent reason to draw the attention of invited guests to one or another fact related to the newlyweds. These props will make your photos lively and original, and the abundance of materials for creating unique accessories will allow you to experiment with the appearance, size and type of decor.
You can make three-dimensional letters for a wedding with your own hands, but most newlyweds entrust the important work of creating letters to decorative artists from special companies and wedding salons. A nice present awaits those who want to test their strength in an unknown matter: even those who have never in their lives created and assembled devices of various configurations and dimensions can create an original mention of the wedding day.
Ready-made inscription templates for a wedding photo shoot
- Inscriptions in English. The very idea of signs came to us from Western traditions. Particularly famous signatures are the initials of the bride and groom or the designation of gender characteristics, or words of love.
- Signatures declaring love for each other. It looks original and touching. Perhaps these will be quotes from books or favorite songs.
- Photo props in the form of individual body parts or hearts.
- Humorous captions, but with love. Such a photo shoot will look original and funny.
You can create a wide variety of captions for a wedding photo shoot in any style. The main thing is your desire and imagination.
Applying a design to the surface of the sign base
The easiest way to apply a design to a sign is to use a template printed on a laser printer. In the printer, the toner is fixed to the paper by melting the powder applied to it after heating to 200°C. When reheated, the toner becomes liquid again. This property of the toner is used to transfer the design from the surface of the paper to the plate. I note that a printout from an inkjet printer is not suitable for these purposes, since the design is applied in ink.
I will not dwell on the technology of drawing a picture, since it is described in detail in the article Printed circuit boards - making them yourself at home.
When printing, modern laser printers apply a very thin layer of toner to the paper, and to obtain a high-quality image on a plate, you need to print the image three times on one sheet. Due to inaccurate positioning of the paper in the printer tray, the edges of the character pattern will be slightly blurred, but in this case this does not matter much, since the width and height of the letters and numbers are large.
When making a template for a sign, you can use any water-soluble paper, for example, for office printing. But I prefer tracing paper, since the design is clearly visible through it, and therefore it is convenient to position the template on the base of the plate, and tracing paper lags behind the toner better.
To ensure high-quality transfer of toner from paper to the surface of the plate base, you need to ensure its uniform and tight fit. To do this, five layers of newspaper were placed on the template, then pressed with a plate similar to the base of the sign. The plate was made at the same time as the base of the tablet to secure it to the cross. The plates were pulled together using screws.
Next, this sandwich was placed in an electric oven and, when the temperature reached 200°C, was kept for an hour, followed by cooling. To ensure that the template fits securely, a weight of several kilograms was placed in the center of the plate.
After cooling to room temperature, the tablet was placed in water to soften the paper for several hours and then the tracing paper was removed under a stream of water. The quality of the drawing turned out to be quite high. In case of unsuccessful application of the inscription, you can easily remove the toner using a rag soaked in acetone and, taking into account the experience gained, reapply it.
The idea was to apply the inscription with toner and etch the metal around it using an etching solution. Then remove the toner with acetone and leave the mirrored letters. But when the paper was removed, it turned out that the sign looked great and the black letters were quite appropriate for a funeral sign. If desired, you can coat the top of the toner with paint of any color. Therefore, all that remains is to apply a thin protective waterproof layer in the form of epoxy resin.
A small amount of epoxy was applied to the center and then smoothed over the surface in a thin layer using a card. A few hours later the sign was ready for installation.
Before transferring toner and covering the plate with a protective layer, it is imperative to degrease the surface.
To do this, just wash it with a brush and laundry soap or any dishwashing detergent.
How to make it yourself
You can make absolutely any shape of signs with various cool inscriptions. Choose phrases and text from those we offer or come up with your own.
The simplest and easiest way to make, for example, a speech bubble is using Word (Microsoft Word), all the necessary templates are already there.
- Open a new Microsoft Word document.
- Click on the “Insert” tab -> “Shapes” -> Select the desired template.
- Select the desired format and insert the phrase of your choice.
- Print on a color printer and cut out.
- We glue our cloud to a wooden stick with glue. All is ready!
Some ready-made templates can be downloaded here.
Master class on creating a sign with faces with your own hands
Wedding decorations for a photo shoot in the form of signs with faces look unusual. When taking photographs, the newlyweds or guests of the celebration hold up an image of a portrait of a celebrity or other character to their face. So, a staged photo in which the bridesmaids will be captured with a sign with the bride’s face or friends with portraits of the groom will turn out to be funny. For a youth wedding photo shoot, signs with portraits of popular cartoon characters (Winnie the Pooh, Cheburashka, The Simpsons) are suitable.
Necessary materials
- large size portrait (A3 format);
- cardboard;
- scissors;
- PVA glue.
Stages of creation
- Find a hero portrait you like online or take the desired photo of the bride and groom. Print the selected image on a printer. If you do not use a ready-made template, but create it yourself, then, cutting out the picture, give it the shape of a tennis racket. That is, the layout should have a handle and an oval.
- On thick cardboard, outline the cut out photo layout. Lubricate it generously with glue.
- Glue the photo blank to the cardboard.
- Cut off any irregularities. Let the sign dry. The original props for the wedding photo shoot are ready.
Speech bubbles for a photo shoot
Let's continue the topic of an interesting photo shoot, in the last article we talked about glasses, lips and a mustache on a stick, the article also contains templates that can be downloaded .
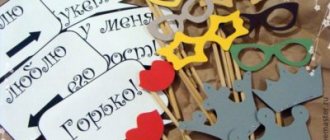
Here's another interesting idea for a photo shoot - speech bubbles . They are often used at weddings, but this idea can be used for any occasion. Here is the best example found on the Internet:
- Such accessories for a photo shoot can be ordered and purchased at photo prop stores.
- 2nd method, do everything yourself.
How to do
In general, these are signs with various cool inscriptions; the signs can be made in any shape, for example in the form of a cloud or in the form of hearts. See the phrases and text that can be written on the clouds below or come up with them yourself.
The simplest and easiest way to make a speech bubble is Word, it already has the necessary templates. Here are examples:
Attaching the sign
Since the cross was an ornate structure, and I did not want to drill holes in it, it was decided to secure the sign with an additional aluminum plate of the same size as the sign.
The fastening was done using four M5 screws 50 mm long. To make it impossible to remove the sign without a tool, two nuts were used, tightly tightened together.
You can learn about methods of fastening objects on a brick, concrete, plasterboard or wooden wall from the series of articles All about wall mounting
The photograph shows a tombstone cross with a ritual tablet attached to it, made with one’s own hands at home. As you can see, the sign looks quite decent and is clearly readable from a distance of several meters.
Wedding signs - save the emotions of the holiday in the photo!
A wedding is a long-awaited day that will forever remain in the memory of its owners, their relatives and friends.
Photos will help you preserve memories of the most interesting moments of the holiday. Signs for a photo shoot will help make them original and fun. Photo props can be purchased in specialized stores, ordered according to your own sketch, take advantage of the offer and advice of a professional designer, or make it yourself.
Wedding photos will be truly vibrant and creative if they show intricate signs for the photo shoot.
What types of wedding signs are there for photos: examples
There are many different wedding accessories, among which nameplates occupy a special place. With their help, any photographs look especially fun, making it easier for the hosts of the holiday to cheer up the guests and help them express their thoughts and desires. Particularly popular are the so-called speech clouds , which make wedding photographs look like pictures from your favorite comic book.
Signs should be distributed to guests near the location of the wedding banquet layout, so that each invitee is not left empty-handed.
A photo with an interesting sign can not only amuse, but also surprise both the participants in the photo shoot and those who were not able to attend the festival; they get to know its participants and the best moments by looking at the pictures. Wedding signs for a photo shoot are plastic or cardboard products of various sizes and shapes, among which the most popular are:
- Flags on a string or cord stretched around the entire perimeter of the hall or in any other convenient place chosen by the organizers of the holiday. In most cases, this is a garland, the inscriptions on the elements of which encourage guests to take certain actions. "We are married! Where are your congratulations?
- The speech clouds seem to speak about what the participants in the ceremony are silent about. “The bridesmaid is the most beautiful,” “This guy will be mine,” “A friend’s wedding is the best reason to meet someone.”
- Mask signs will decorate everyone.
- Funny inscriptions and pictures on the doors and walls of the banquet hall will become a fun background for the photo.
- Signs will help you find the right direction.
The material for making such signs can be not only cardboard or plastic. Funny signs for a photo shoot are made from wooden planks, colored paper or other available materials, using bright colors, tinsel, and felt-tip pens.
Modern equipment allows you to take high-quality photographs yourself, but photographs will only be interesting and truly unforgettable if you take care of the correct design in advance.
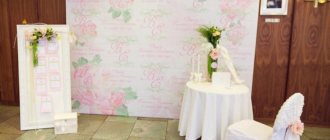
You can organize a photo zone at the wedding venue , decorating it with bright signs with funny inscriptions .
Photos of signs with funny inscriptions for a wedding photo shoot
Stick-mounted message boards will add fun and originality to your wedding photos. The shooting process will turn into an exciting game in which all guests present at the celebration will want to participate. Come up with bright and funny images, use comic props, and then your photos will turn out individual and unique. Participants in the shooting must interact with each other and express strong feelings. Only those photographs in which comic props are complemented with sincere emotions will be successful.
Wedding sign templates for a photo shoot
When choosing a way to decorate a banquet hall and thinking through the nuances of the upcoming photo shoot, you should make sure that the place where the photo shoot is planned is especially decorated. You can make the signs yourself by coming up with your own shape and the texts that will be written on each of them. However, it is easier to use templates, especially since the range of such attributes is quite large:
- The first samples are a kind of calling card for the heroes of the occasion.
- From this you can understand what the guests are thinking about.
- Express your attitude to everything that is happening.
- Show your wishes to the young
- Take an unforgettable photo
- Share the joy.
Making a template for a sign
To create a ritual tablet template, you need to download one of the files below into Word and edit it. To produce a sign using the proposed technology, it is necessary to mirror the image. Some printers allow you to set the print mode to Mirror Image in the Properties. If you have such a printer and are happy with everything, then you can print the template and start making a sign.
| Ritual Sign Templates for Free Download | ||
| Number of buried | Template type | Download link |
| 1 | positive | |
| 1 | negative | |
| 2 under the same name | positive | |
| 2 under the same name | negative | |
| 2 under different names | positive | |
| 2 under different names | negative | |
The latest versions of Word also have this option, but much better results can be achieved when converting the image using Photoshop, since it allows you to change the size and placement of the inscriptions, which is impossible to do in Word.
The easiest way is to transfer a picture of a sign from Word to Photoshop via your computer’s clipboard. To do this, in Word, click on the Preview icon, zoom in so that the plate occupies the maximum area of the screen, and press the PrtSc key on the keyboard.
Next, launch Photoshop and click File/New. In the window that opens, click OK. When the window pops up, press Ctrl+V. The image from the buffer will be copied to Photoshop to continue editing.
The next step is to crop the image to cut off everything unnecessary, using the Frame tool in the vertical panel on the left.
To change the size of the inscriptions, you need to sequentially select each word with a rectangular frame, as shown in the photo, and select the Edit / Free Transform tool.
In the next step after editing, you need to mirror the image and set the dimensions of the sides. To perform a mirror reflection, you need to select the entire image of the sign with the rectangular area tool and select Image/Rotate Image/Display Canvas Horizontally.
Now all that remains is to set the required dimensions of the sign. To do this, click on the top menu Size/Image Size and enter the required dimensions in centimeters in the boxes, and save the ritual tablet template prepared for printing.
The photo shows a mirror positive of a self-made template. If desired, the olive branch can be replaced with any other design, such as an asterisk or cross, drawn by yourself or taken from the Internet.
How to make wedding signs yourself: step-by-step instructions
Both the future newlyweds and their friends will be happy to take part in the process of making wedding signs for the photo shoot.
Everyone will be able to show their imagination by creating their own masterpiece. There is no need to buy expensive components for this.
Paper and wood, foam and plastic, satin ribbons and lace can be used as manufacturing materials:
The lightest signs are made from colored paper and cardboard (left over from making place cards). It is enough for the master:
- come up with a sign shape;
- draw it on a sheet of cardboard;
- carefully cut out (if necessary, the inner part);
- use the resulting product as a stencil;
- using a ready-made stencil, transfer the image onto a sheet of colored paper and cardboard;
- Having cut out the image, glue it onto one of the cardboard blanks;
- glue a wooden skewer to the wrong side;
- apply glue to the surface of the second cardboard blank and cover the part with the skewer with it;
- Place the almost finished sign under a press and leave until completely dry.
No less popular are speech clouds, which are quite easy to make with your own hands:
- you need to prepare as many sheets of cardboard as there are signs of the same shape that are supposed to be made;
- one of them will serve as a template;
- transfer the outline of the card created on the template to the remaining sheets;
- cut carefully;
- Place a wooden skewer between two cardboard plates and glue both sheets together.
You can design such signs to your liking and in accordance with the inscription that will be applied to the surface or in accordance with the design of the numbers on the table. In this case, a wand is definitely needed; speech clouds are raised above your head, silently expressing your thoughts during a photo shoot.
Large letters from which the most cherished words are composed can be cut out with a plywood jigsaw or a sharp foam knife. It is important to follow the form exactly and do all the work carefully:
- draw the outline of a letter onto the surface of the selected material with a felt-tip pen;
- if you have to cut it out of a sheet of plywood with a jigsaw, then after completing the work you need to sand the edges of the product and its entire surface with fine sandpaper;
- The finished letter is painted and varnished.
Letters cut from polystyrene foam do not need to be painted; their surface is decorated with ribbons and flowers, it all depends on the preferences of the hosts of the holiday.
A photo session is required for every celebration, and for a wedding this event has special significance, which is why decorating the photos is so important.
Grinding and polishing the base of the sign
As a base for a sign, you can use almost any sheet material that can withstand heating temperatures up to 200°C. Aluminum is best suited, as it is easy to process and is resistant to weather conditions, which is important if the sign will be installed on the street, for example, as an address or number of a house or cottage.
To make a ritual tablet from sheet aluminum 2 mm thick, a plate measuring 148 × 200 mm was cut out using a hacksaw for metal and four holes for fastening with a diameter of 6 mm were drilled in the corners, at a distance of 8 mm from the edge.
The surface of the sign's base was covered with scratches and had other mechanical defects. Therefore, before applying the inscription, the surface was sanded with fine-grained sandpaper using a surface grinder. To prevent the base of the table from moving during sanding, it was secured to a sheet of plywood using four self-tapping screws screwed into the holes in the corners.
After sanding, the surface of the base of the sign acquired a uniform matte surface on which a design can be applied, but I wanted a mirror shine, so I decided to polish it further.
To do this, instead of sandpaper, felt rubbed with GOI paste was attached to the sanding machine. There are many brands of polishing pastes available and you can use any that are designed for polishing metal.
In order to spend less force on pressing the grinding machine, you can put a load weighing a couple of kilograms on it.
After an hour of grinding and polishing, the surface of the base for the sign acquired a mirror surface and surrounding objects began to be reflected in it.
What to write on signs for a photo shoot: 10 options
The inscriptions on signs for a wedding photo shoot are not only words of love and wishes for happiness. Here you can write:
- Names of the newlyweds.
- Proverbs and sayings. “Where there is a needle there is a thread”, “A husband and wife are nearby - there is joy in the house.”
- Wishes: “Be happy!”, “100 years together.”
- The secret thoughts of the guests: “Will there be beer?”, “I want that too!”
- Your desires: “I want to catch the bouquet,” “I’m afraid to catch the garter.”
- Impressions: “The best day”, “The most fun wedding”.
- Introduce yourself to the guests: “Best Friend”, “Bridesmaid”.
- Push guests to action: “We got married! Give gifts!
- Joking: “He always gets the best, this time I do.”
- Congratulate everyone - “Happiness to everyone!”
If there is a group wedding photo, guests can also hold signs with humorous inscriptions.
If the bride and groom in most cases hold signs in their hands indicating their names, then the guests receive humorous inscriptions that can cheer up even those who, after a long time, will look at the photographs. The words written on the signs will surely make those who decide to look into the photo album smile.
This video will show you how to decorate your most special photo shoot:
