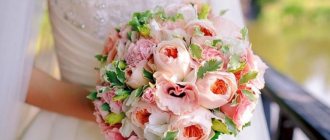
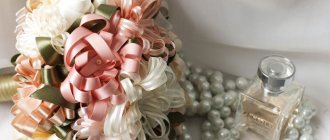
Modern brides strive to add some zest to their image, finding a wide variety of original solutions that make them stand out from other girls. One of the modernizations of the wedding style is the kanzashi wedding bouquet, which is made by hand from satin ribbons and decorations. You can not only order such an attribute from a master, but also make it yourself, even if you have never mastered this technique, you just need to carefully follow the instructions.
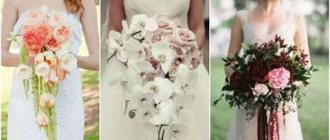
Photo for inspiration
Features of the technology
The kanzashi tsumami technique originated in Japan; its discoverers are considered to be artisans who tried to create flowers from satin ribbons. Gradually, this skill developed, and geishas began to resort to it in order to decorate their hair with bright colors even in the cold season. Today, the kanzashi technique has spread far beyond the borders of Japan; not only combs, hairpins and hair clips are created; artificial fabric flowers can be used to decorate household and interior items. Not so long ago, bridal bouquets in the kanzashi style became widespread, as such a composition looks gentle and laconic.
Using this technique, you can make both the main wedding composition for the bride and a backup that the girl will throw to her unmarried friends at the end of the celebration. Bouquets using the kanzashi technique have several advantages over fresh flowers:
- In any weather, the composition will retain its original appearance.
- The bouquet can be preserved for many years, leaving it unchanged or dividing it into individual flowers, which can be used to decorate photo frames and other interior items.
- In any season, you can choose the perfect combination of shades of the bouquet and the bride’s outfit.
- Flowers made from ribbons look unusual, delicate and feminine.
- A composition made with your own hands from fabric ribbons will be much cheaper than a living bouquet ordered from a florist.
What kind of women are they suitable for?
Ribbon bouquets will appeal to girls who want to add a unique touch to their look. A non-standard, exquisite accessory will enliven the entire celebration, making even a traditional classic wedding original. Such a choice will emphasize the good taste of its owner, and if done independently, it will also highlight the talent of the needlewoman.
For brides who attach great importance to signs, an artificial bouquet is also a real godsend, because it is believed that the longer the bouquet stands, the longer the happiness will last. Tapes can be stored without deterioration for an eternity.
Satin roses will also be a real salvation for young ladies who suffer from allergies - there is no need to put yourself in danger on your happiest day by using natural flowers.
A huge palette of ribbon shades allows you to choose suitable options for both warm and cold types of appearance. A fabric bouquet should be created taking into account the materials from which the dress is made. It can either be the same or very different in texture. The matching details on the dress and in the wedding bouquet look very cute, for example, the same pattern of colored lace. But keep in mind that the same material requires a different shade for the bouquet, otherwise the accessory will simply blend in with the outfit in the photographs.
Basis for composition
Before you start making flowers from satin ribbons in the kanzashi style, you need to prepare a base for them. Using this technique you can make a spherical bouquet, so the ball should act as the basis for the fabric buds. It can be cut from polystyrene foam or hardened polyurethane foam. If these materials are not available, you can crumple up several newspapers, shape them into a ball and wrap them tightly with strong woolen threads soaked in glue.
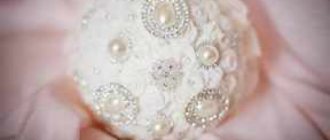
To make it more convenient to attach the base to the handle, you can cut off a small section of the sphere to get a flat side, in which you need to make a recess with a diameter of 2-4 cm approximately to the center of the ball. It is necessary to glue a handle of the same diameter from wooden sticks; disposable sushi sticks are well suited for this purpose. The inner surface of the hole made in the ball must be generously coated with glue and the handle placed inside. When the structure dries, the handle must be tightly wrapped with twine, and on top of it - a wide satin ribbon of the desired shade, not forgetting to glue it to the base. You can secure the satin with a pin, a decorative pushpin or a massive brooch with many rhinestones or beads.
Budget option for a stylish wedding
This DIY ribbon wedding bouquet will not put a strain on your finances, but with due effort, it will look no less beautiful. To create the product you will need the following:
- Ribbons.
- Wire.
- Special tape.
- Sharp scissors.
- Glue gun.
- Special stilettos with pearls.
- Fatin.
First you have to prepare the flowers. To do this, prepare a ribbon one meter long, cut the edges at a certain angle. Thread the needle and put it away, you will need it later.
Slowly take the squares and insert the large end of the piece into the hole between the layers of material. Pull it out onto the wrong side of the flower. While holding the structure, slightly pull one end of the ribbon. The petals will gradually curl. Once the first layer has its shape, release the second one and start curling it a little. When the flower is made, prepare a thread and a needle and sew it together so that it does not fall apart. We leave unnecessary parts of the products.
How to make flowers
It can be difficult for beginning needlewomen to master the kanzashi technique at a high level, so they are recommended to start with simpler options. Flowers made in this way will be no less beautiful than those created using complex manipulations, but you can spend less time on the process.
To work, you will need ribbons 2 and 6 cm wide in the shades from which you want to make your composition, beads, rhinestones and other decorations, thick linen fabric. All materials must be prepared in advance so as not to interrupt work in case of a shortage of ribbons or fabric and not to look for a suitable shade of material if it runs out in the store. The tools you need to prepare are scissors, a compass, a pencil, a ruler, good transparent glue, thread and a needle.
First type of flowers
Calculate how many colors you will need for the composition, and using a compass, draw the same number of circles with a diameter of 3 or 4 cm on linen fabric, usually no more than 20 blanks are required. Draw a small segment in each circle, cut out fabric blanks and cut them along one side of the segment. Roll each circle into a cone, aligning the cut edge with the second side of the segment, and sew this area with thread.
Take a 2 cm wide ribbon of the desired shade, bend the cut slightly so that the threads do not unravel, and attach it to the cone so that the corners do not reach the edge of the fabric blank. Sew a ribbon to it along the contour of the square, and then proceed to forming the petals. The first 4 of them are applied at a right angle, you can only increase it a little, each individual overlap is sewn on. The next petals must be sewn at an acute angle until they begin to protrude beyond the edges of the cone, after which the free edge of the tape must be trimmed and the petals sewn to the wrong side along the contour of the workpiece.
Second type of flowers
To make a kanzashi wedding bouquet look more complete and colorful, it is recommended to make it up from several types of fabric flowers. In the first case, a more collected bud is obtained, similar to an unopened peony or rose, and a flower made by the second method is a fully opened inflorescence.
To prevent the ribbons from unraveling, you can scorch the cut edges with a candle flame.
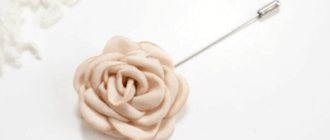
To make a flower, you need to take a satin ribbon 6 cm wide in the chosen shade and fold it twice lengthwise, bending it 3-4 mm at a time, secure the base of the bud with a pin. Then the bent part of the ribbon must be folded across at any angle and begin to wrap the bud until the bent part ends. After this, you need to bend the tape again at an angle of 30 degrees and continue folding. These steps must be repeated until the tape runs out or the required bud size is reached. After this, the flower needs to be stitched from the wrong side so that the petals hold firmly in place.
Flowers with stamens
To make these flowers, in addition to the usual materials, you will need cotton swabs and, if desired, pastel-colored nail polish. Buds with stamens turn out to be very delicate and unusual, they do not require additional decorations and can dilute a composition of open or closed roses.
To create a flower, you need to take a 6 cm wide ribbon and bend it at a right angle to form a square, then fold it in the opposite direction and secure it with a pin. Thus, you need to make a large square from four small ones, without cutting the tape, and sew it along the contour. After this, you need to tighten the thread and remove the pins, resulting in an open bud with a wide hole in the middle.
The next step is to make the stamens by bending cotton swabs in half and coating the cotton wool with transparent glue. When it dries, you need to cover it with pearlescent, white or colored nail polish, which will resemble the shade of the stamens. The fold of the sticks must be cut and their edges trimmed, then wrapped in fabric of the same color as the flower, coated with glue, and sewn to the bud.
DIY wedding accessory
The first step is to create the base. To do this, the papier-mâché ball is carefully wrapped with threads of a certain color. Then a wooden stick is inserted into the base. For greater stability, it can be secured with glue. After complete drying, the flower stem is wrapped with satin ribbon. This is the basis of the bouquet.
The next step is to make the flowers. The easiest way is to create buds with pointed petals. To do this, a square with a side of five centimeters is cut out of satin and folded once. The corners of the resulting triangle are bent on both sides. Then the same action should be repeated.
The petal is fixed with tweezers. The excess piece of fabric is cut off with scissors. The cut must be burned with a lighter. Using thin tweezers, slightly move the edge of the petal so that the workpiece can stick together. For a wedding kanzashi bouquet you will need about 105 of these petals.
The blanks are fixed to the base using a glue gun. Craftswomen recommend gluing the petals in a circle, observing the following sequence: the first, second and third row of the composition consists of 20 petals, the fourth - 19 pieces of such blanks, the fifth row - 15 petals, the sixth - 9 petals, and the seventh row has only two petals. The result is a very effective composition. The final step is to decorate the kanzashi bouquet for the bride with lace, beads and feathers.
Assembling a bouquet
When all the components are ready, the easiest part of the job remains - putting them together. To secure the buds on a spherical base, you need to stock up on pins with beads at the end to match the color of the satin ribbons. Each bud created is pierced in the middle with a pin and attached to the base, serving both a practical and decorative function. When the bride's bouquet is assembled, you can further decorate it with beads, rhinestones, decorative butterflies and other elements.
Comments (0)
List of materials and tools
Before you start creating a bouquet of artificial flowers, you need to determine several parameters. These will influence what fabrics to use as well as the size of the bouquet.
Adviсe:
- If the bride's dress has many decorative elements, then the bouquet should be small or light. When the outfit is formal, you should use more jewelry or increase the size of the composition.
- The ribbons for the buds should be at least 1-2 tones different from the color of the dress, otherwise the bouquet will not stand out.
- The texture of the dress fabric directly affects what ribbons will be used and what flowers should be created. The more airy the dress, the lighter the composition should look.
- The younger the bride, the more variety of shapes the bouquet can have. Most often, such girls choose elongated compositions.
When the size of the bouquet has been decided, before starting to create it, the girls must buy the necessary materials. The better the selected ribbons, the more authentic and beautiful the flower will turn out.
Moreover, unlike living plants, you can accurately select the shade you like with artificial ones, especially if it is rarely found in nature.
A rose can be blue or purple and still look gorgeous. The same cannot be said about painted buds.
Materials:
- foam sphere or cube;
- glue gun and rods for it;
- cardboard sleeve 5 cm in diameter;
- satin ribbons (red, white);
- scissors;
- sheet of cardboard;
- tweezers;
- stationery knife;
- buckles;
- beads or rhinestones;
- tailor's pins;
- a set of threads matching the color of the ribbons.
To make work easier, you need to choose tapes of the same width. This will not only make it easy to mount them, but will also make the bouquet more even, which will have a good effect on its appearance.
Base for kanzashi to hair
As a rule, women want to hide large hairpins and leave only a flower on their hair, so they attach them to hairpins. If there is only one flower, it can be glued into hairpins, for example, for bangs.
When the composition includes one or more flowers, it is better to attach the flowers to the comb. Since the comb is more stable, it will withstand many flowers on the hair and maintain a natural look.
Note!
Kinusaiga technique - TOP-140 photos of the best ways to create crafts using the Kinusaiga technique with your own hands + instructions for beginners
Do-it-yourself passe-partout - a master class with step-by-step do-it-yourself schemes. Making tips + photos of the best examples
Decoupage with napkins: TOP-150 photos of ways to decorate with napkins. Simple instructions for beginners at home
Kanzashi flowers also look great on a hair hoop, especially if they are located along the entire hoop from small to large.
Style Description
Translated from Japanese, kanzashi means hairpin. In the old days, they served not only as decoration, but also as a means of self-defense, thanks to their sharp end. The jewelry is based on origami technology, but the material used for production is fabric. It is folded in a certain way, ribbons are added and incredibly beautiful floral products are obtained.
Wedding jewelry of this kind requires a carefully thought-out image of the bride. Satin, silk, jacquard go well with kanzashi. Length and style do not play a role in this case. But a lush lace dress does not suit this style at all.
You can complement the outfit with oriental elements, for example, a wide bow, which was worn by geishas.