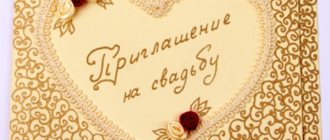
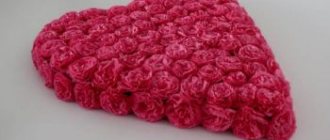
Luxury invitation
You will need: sheets of white and turquoise paper, a printer, a glue gun, scissors, a ruler, a white openwork napkin, decorative elements - beads, flowers, satin ribbons.
Master Class
- Print the invitation text onto a white sheet of paper, then trim the edges of the sheet so that it is smaller than the turquoise.
- Glue the text sheet diagonally onto the turquoise base as shown in the image.
- Glue 3 beads to the bottom left side of the invitation.
- Take an openwork napkin and fold it to the size of the invitation using a ruler.
- Place the invitation in a lacy napkin.
- Glue 3 flowers to the upper right corner of the invitation.
- Attach a satin ribbon and tie a bow.
- Make the required number of invitations in the same way.
- This master class was provided by the talented craftswoman Liliya Getman.
A luxurious wedding invitation is ready!
Invitation Card Maker
Download: Android / iOS
This application is suitable for Apple smartphones and tablets. It can be used to create invitations for various special events - a wedding, reception, birthday or even a tea ceremony.
Ready-made offers are divided into thematic categories, and the user can navigate to the one that suits his needs. For example, a set of designs and styles for designing wedding cards is located in the “Wedding” tab. You can choose either a classic template with thematic patterns or make an exotic invitation with an unexpected design.
Once the user selects a basic layout, they can set custom options for their image. When the final result is ready and approved, the file can be saved to your device or sent by email or via social networks.
Advantages and disadvantages
Creating Unique Invitations
Quickly create invitations
Possibility of sending invitations on social media. networks
Reviews
Charming invitation
You will need: scrapbooking paper in blue and pink shades, a simple pencil, scissors, a pink ribbon, a glue pencil, white acrylic, PVA glue, a brush, decorative elements - flowers, beads, a lock, glitter...
Master Class
- Fold a sheet of blue paper in half.
- Secure the ribbon around the sheet in the center with a glue stick.
- Make the following blanks: using a simple pencil, draw a figured square on blue scrap paper, the size of which is less than half a sheet, then cut it out. Trace this piece onto pink scrap paper, then cut it out.
- Cut out a small blue snowflake.
- Draw leaves and the word invitation on pink scrap paper, then cut them out.
- Glue the curly squares together so that the pink square is at the bottom and its side and bottom parts protrude.
- Glue the snowflake, twigs and the word invitation as shown in the image.
- Glue flowers, beads and a lock, sprinkle with glitter and decorate to your taste.
- Mix white acrylic and PVA, then cover the composition.
A charming wedding invitation is ready! I recommend watching this video!
Elegant invitations
You will need: white cardboard, a figured hole punch, burlap, white lace, white flowers, twine, scissors, glue.
Master Class
- Print the invitation text on sheets of cardboard.
- Fold the sheets in half like a card and decorate using a shaped hole punch.
- Glue a strip of burlap down the center of each invitation.
- Glue the lace and flower.
- Attach a tag to the twine and sign who the invitation is addressed to.
Elegant wedding invitations are ready!
Classic wedding invitation
You will need: thick photo paper, printer, templates, scissors, knitting needle, red satin ribbon.
Master Class
- Download the cover and interior template.
- Print your invitation text on the inside template.
- Print the invitations on thick photo paper, then cut them out.
- Run your knitting needle along the folds of the invitation.
- Fold the invitation, tie it with ribbon and tie a bow.
The classic wedding invitation is ready!
Original invitations
You will need: cardboard in white and primary colors (for example: beige, pink or blue), decorative stamp and ink, scissors, hole punch, 1 cm wide ribbon.
Master Class
- Trim the edges of a sheet of white cardstock.
- Print the invitation text on white cardstock.
- Decorate with decorative stamps on cardstock in your primary color.
- Place 2 sheets of paper together and make 2 holes using a hole punch.
- Tie the ribbon.
Stylish wedding invitation
You will need: white and brown cardboard, wide brown satin ribbon, glue gun or double-sided tape, scissors, decoration (decorative buckle with rhinestones).
Master Class
- Trim the edges of a sheet of white cardstock.
- Print the invitation text onto a white piece of cardstock, leaving a blank area in the middle without text.
- Measure a piece of tape to go around the sheet.
- Place a buckle or other decoration in the center of the ribbon.
- Apply glue to the edge of the tape and adhere to the back of the white sheet.
- Pull the free edge of the tape, then glue it to the back of the sheet.
- Glue the white sheet to the brown piece of cardboard.
Stylish wedding invitation is ready! I recommend watching this video!
Wedding invitations in classic style Master class No. 2
Difficulty – suitable for beginners
Operating time – 20 minutes
Material for one invitation:
- Thick designer cardboard (from 200 g/m²)
- paper for printing text (milky or white)
- tracing paper for printing the inscription “Wedding Invitation” (you can use the paper indicated above)
- satin ribbon 12mm wide
- satin ribbons 25mm wide
- openwork lace
- double-sided tape 5 or 10mm wide
- double-sided tape 2 mm wide
- PVA glue
Tools:
- glue gun
- scoring board (if you don’t have a board, use a ruler to make the fold)
- ruler
- pencil
- scissors with straight edges
- scissors with curly edges (optional without them)
- hole punch with figured flowers
Creating an invitation card step by step
- Cut out a rectangle measuring 30x15 cm from designer cardboard.
- On the scoring board we make a straight groove exactly in the middle for subsequent folding of the cardboard. Fold the card in half and get an even fold.
3.Make a bow from a 2.5 cm wide satin ribbon. Attach the bow to the card with a glue gun.
4.Next we print the text for the inside of the card. We trim the edges with curly scissors. If you don’t have such scissors, then scissors with straight edges will do.
5. Attach the text to double-sided tape 2 mm wide.
6.On paper or tracing paper, print the inscription “Wedding Invitation” and cut it out. Using scissors, wrap the ends into a tube. Using double-sided tape 5mm or 10mm wide, we glue the inscription on the title page of the wedding invitation.
Ready!
Fast, easy and original. Is not it? These handmade wedding invitation cards carry positive energy, even if they are all the same.
You can make them personal if you pay attention to the composition of the text. Tip: Add small details to some of the invitations - “hints” so that family and friends understand that this was done especially for them
Tip: Add small details to some of the invitations - “hints” so that relatives and friends understand that this was done especially for them.
Delicate wedding invitation
You will need: beige cardboard measuring 26x13 cm, white sheet, curly scissors, beige lace, beige satin ribbon 1 cm wide, double-sided tape, ruler, glue pencil, knitting needle.
Master Class
- Take a sheet of cardboard, mark the center, attach a ruler and draw a knitting needle.
- Fold the workpiece in half along the marked line.
- Prepare a 13 cm piece of lace.
- Attach a strip of double-sided tape, 2 cm from the edge of the card, and secure the piece of lace.
- Place a strip of double-sided tape over the lace, then place the tape and gently smooth it out with your fingers.
- Make a bow and tie it to the ribbon at the top.
- Print the invitation text onto a white sheet of paper and decorate the edges using curly scissors.
- Glue the sheet of text inside the invitation.
- Prepare a strip with the name of the bride and groom, decorate the edges using curly scissors, then glue it to the cover.
Your delicate wedding invitation is ready!
Scrapbooking technique
Scrapbooking is an art form that involves decorating family albums using photos, newspaper clippings, books, etc. A great variety of objects are used as decoration in this technique, for example, buttons, artificial flowers, ribbons, and others.
Let's consider the option of a wedding invitation using the scrapbooking technique, and step-by-step instructions will help with this. Using this technique you can make a simple but attractive invitation:
To make it you will need:
- sheet of white thick cardboard 7x12 cm;
- several paper flowers coated with silver;
- thin silver thread, fishing line;
- pearl beads of different sizes;
- small metal beads (metallic colors);
- colorless or silver beads;
- a small piece of white ribbon for a bow;
- 2 metal rings imitating wedding rings;
- glue, scissors, foam or double-sided tape, beading needle.
The number of tools does not mean the complexity of the job. Making a card is quite easy.
First, measure a piece of silver thread so that it is enough for 2 turns around the workpiece in width. Next, using a beading needle, string beads and seed beads in any order.
Punch a hole in the fold of the blank and pull one end of the thread inside the card, securing it with glue. When the glue has hardened, wrap the prepared piece of thread twice around the top flap so that the beads remain on the front side, and secure the other end of the thread with glue inside.
On the left side of the card we glue silver flowers one at a time, forming a bouquet.
The bouquet will be twice as cute with a bow at the bottom:
Make the inscription “invitation” in the form of a scroll. To do this, you need to print the inscription and cut it into a thin strip, which you twist along the edges using a knitting needle.
To add volume to the inscription, cut 2 pieces of foam or double-sided tape and stick it on the back side.
Then glue it to the upper right corner, where it will look organic. Next, glue 2 metal rings slightly overlapping under the inscription.
The last step is decoration using “antennae” made of fishing line and small beads, which must first be glued onto it at a short distance from each other. We attach them to the bouquet with glue. The invitation card is ready!
These cards can be used not only for weddings, but also for other holidays.
How to Create an Invitation in Word
The almost limitless possibilities of Word allow you to use it to create not only dry documents or complex tables, but also to dilute them with graphics, beautiful text labels and other elements. Based on such tools, you can easily create an invitation using only Word.
The fastest and most convenient way to make, on the one hand, a simple, but, on the other hand, high-quality invitation is to use the templates that are in the program. To do this, go to the “ File”
" and open the "
Create
" item.
Then enter “ Invitation
” in the search field. In this case, the Internet on the device must be turned on. By clicking on the template you like, you can read a short description and download it for further work.
Text pre-entered in templates is used for example purposes only. You can simply rewrite it, change the design settings, choose a different font, and so on. The same goes for graphics that may be present on these templates.
The number of templates specifically for creating invitations is quite large, so there is an option for any event and purpose.
But if you still need to create something truly unique, then you can use the full potential of Word.
The following option is just one of many possible for creating a high-quality and attractive invitation to Word.
First of all, you should create a blank document by going to “ File”
» à «
Create
».
Then we go to the “ Design
” tab. You can put a backing there. A simple but very attractive tool. Use either your own images or images found using Bing. You can also fill the page with solid text or a gradient. And finally, add borders. In the settings, you just need to select the design style, thickness and color of the borders.
Next, you can work on the design of the invitation itself. Add a welcome banner to the top of the page. To do this, either find your own image or on the “ Insert”
» Click “
Images from the Internet
”, and then enter the desired query in the search field. The same can be repeated at the bottom of the page. After this comes work with the text.
Modern WordArt styles are perfect for our purposes. These can be found on the Insert
" in the "
Text
" section.
Click on the letter “ A
” icon and select the style you like. Less important text can be entered simply by changing only the color, style or font.
see also
How to create an auto-assembled table of contents in word 2010
How to set margins in word 2010
How to undo hyphens in word 2010 How to undo page breaks in word 2007
How to disable word wrapping in word 2007
How to make a formula in the middle in Word and the formula number on the right edge
How to make a page in word according to class=”aligncenter” width=”600″ height=”238″[/img] How to make a heading in word on each page
How to convert word to presentation
How to enable automatic spell checking in Word 2010 How to find a word in Word
How to make wedding invitations in Word with your own hands - instructions
Word is a common computer program that is used everywhere in study or work. Many people don’t consider it when it comes to making invitations, although it has all the necessary tools.
And despite the fact that it specializes in creating text files, the invitations made in it turn out beautiful. Unlike specialized image processing programs such as Photoshop, the Word interface is extremely simple and does not require deep study of instructions.
How to use templates in Word
Word samples are rarely used in everyday life, so they are difficult to find on the Internet.
Most of them are on the official website, where you can find stamps for any special occasion for free.
To make your own invitation template, you need:
- Word from 2007 (earlier versions do not support the dotx extension);
- invitation text;
- 2–3 hours of free time to find the required workpiece;
- 30–60 minutes to enter text.
- After the required blank is found, it is downloaded and opened using the program. It contains all the necessary formatting and pictures, so there is no need to look for anything else.
- If the file was downloaded from the official website, then the window that opens contains all the necessary explanations, so you only need to transfer the invitation text.
- Once the text entry is completed, the entire postcard is reviewed for errors or places where anything needs to be changed.
- When everything is ready, you need to remove the explanations.
- Save file.
It is important to monitor the format in which the text is inserted when copying. Simply dragging will change the font and alignment.
Therefore, it is necessary to use the Paste Special function, in which you select unformatted text - in this case, template formatting will be used. Conventionally, we can call a template an image that contains all the design and main text.
When this format is preferred, it can be inserted as a background image and a font can be selected in which the individual data will be printed.
- addressing the guest by name;
- the date of the;
- time spending;
- place of registration;
- address of the restaurant where the banquet will be held;
- wedding style;
- names of newlyweds;
- signature of the bride and groom.
In this case, there are two options for entering text.
The usual way is to try to fit the text to the fields using spaces. This will take a lot of time and may not be effective if the line spacing in the image differs from the file spacing.
Through the “inscription” function - a more difficult to implement, but reliable method. Individual text is placed in a special area, which is moved with the mouse to the desired location.
To insert an inscription, you need to enter the “insert” menu and select the required sub-item. You can also open the drawing panel, where there is a shortcut button for this function.
An additional advantage of the "letter" menu over manual text substitution is that after all the insertions are completed, you can combine them with the background image. To do this, you need to select all graphic objects, right-click on one of them and select the required item from the list.
After this, all elements will be fixed in relation to each other and will change simultaneously when stretching or changing the margins.
Personalization of cards
Making significant changes to the layout
You may want to make changes that affect the entire post. For example, you may want to try different color or font schemes. You can make these changes at any time, but it's best to do so before inserting text and pictures.
Working with drawings
Replacing replacement pictures with your own
Adding a new picture
hover over Drawing
, and then select the source of the new picture.
Click the Insert
Perform one of the following actions:
To resize the picture, hover your mouse over one of the corner handles and drag it.
To change the colors of a picture, right-click it and select Format Picture
, open the Drawing
and select the
Recolor
.
If you've already created a business content package that includes a logo, you can quickly add the logo to your greeting card. In the Insert
select Business Information
, and then in the
Business Information
, double-click
Logo
.
Work with text
Replacing alt text with your own
If you've already created a business information set, your organization's information and logo will be automatically inserted into the placeholder text area.
Alt text in templates downloaded from Office Online is not automatically replaced with business information. To replace placeholder names, addresses, and logos with business information, click the smart tag button for a business information item, such as a company name or address, and then select Update from the Business Information Bundle
. (The smart tag button appears when you click the text or logo.)
Adjust the text size. Perform one of the following actions:
Adding new text
select Text field
.
Place your pointer where you want the corner of the text to appear on the card and drag diagonally until the frame is the size you want.
Click inside the field and enter text.
Replace alt text with a signature
in the section Suggested inscription options
Click the
Select Label Option
.
select the desired message category.
In the Available messages
select the message you want, and then view the two parts of the message.
If you're using a template you downloaded from Office Online, or you've changed the page size or format (for example, changing from a side fold to a top fold), the text box options won't be available.