Wedding cake made from mastic is very popular. It deserves such a high rating due to its advantages. It is easy to sculpt with because it feels very much like plasticine. Therefore, any, even the most bizarre figures are easy and simple. In addition, mastic is sugar. And there are hardly people who don’t like him.
And to conclude the list of advantages, I would like to note the rich color palette. To create a material of a different color, just add a couple of drops of the desired tone to the white mastic, and you will get an amazing result. As a result, you can embody the most unsurpassed fantasies of a young married couple.
How to make a ring, a wedding ring, two wedding rings from mastic?
How to make a ring from mastic to decorate an engagement or betrothal cake?
How to make a wedding ring, wedding rings from mastic with your own hands, step by step, recipe, master class?
How to beautifully decorate a wedding cake with rings?
In completely different ways, it is imperative to decorate a wedding or engagement cake beautifully, and often the cake is decorated with a ring or wedding rings.
You can, of course, put real rings or plastic imitation ones, but real professionals make the entire cake edible, including the rings, no matter how realistic they look.
Below are examples of what a professionally designed wedding or engagement cake looks like.
But the last photo shows how you can make a beautiful transparent crystal for an edible ring.
If you do not have a special mold for casting a crystal, then you can remove a suitable crystal from an inexpensive ring and cast a silicone mold over it.
Next, isomalt is poured into it. You can also pour caramel, but it will not give such perfect transparency.
Isomalt must be melted and tinted to the desired color, then poured into the mold.
Isomalt also doesn’t stick to your hands much and is not affected by air humidity.
We also need to make gold-colored wedding rings for the wedding cake.
Cake rings can be made from either regular mastic or more elastic gelatin mastic.
The mastic must be squeezed out of the extruder to obtain an even round rope, then cut the rope in half with a scalpel, form rings according to the pattern, connect them and leave to dry.
It is best to immediately take the mastic in a yellow or ocher color so that the gold paint adheres to it better.
Then the rings can be painted.
The golden color on the mastic is obtained using kandurin.
This is powdered food coloring.
It is applied to the rings dryly using a brush, coated with oil, or wet. slightly diluted with vodka.
Traditional wedding cake utensils
If the cake is large, then you will need a special cart so that you can effectively roll out the main decoration of the wedding celebration. Or place it on a separate table, and place a stack of dessert plates next to it.
To cut and lay out the cake you will need:
- knife with a blunt end;
- special spatula.
In addition, it would be a good idea to place a container of warm water next to the cake to wet the knife to make the cutting process easier.
Decorations for a wedding cake made of cream, cream, glaze, meringue
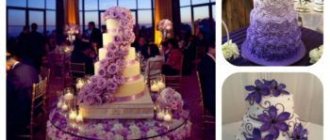
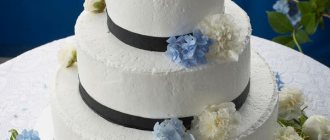
The king of desserts must be decorated in an original, impressive way and be remembered for a long time not only for its appearance, but also for its excellent taste. For this purpose, decorative elements for the most part are made edible and appetizing in appearance.
Cream designs - either white or lightly colored with food coloring - are easy to cut (while maintaining their shape) in any direction. Airy islands of meringue, icing or cream allow you to pre-determine the division into portions.
For the first time, creating decorations on your own using unfamiliar cake recipes or using new flavors/dyes, you need to practice on trial versions so that the result does not exceed your expectations for the worse.
Cream and cream
At home, you can easily decorate cakes with cream and whipped cream with your own hands. To do this, you will need a pastry syringe and a set of several special attachments.
Each type of cream flower has its own types of tips, which form their own unique shape from the squeezed mass.
Inscriptions, patterns, three-dimensional figures require holes of a different profile in the tip. They can be purchased in advance or made independently from dense material. For the simplest options, cut off one corner of a plastic bag or roll it into a paper bag. Every cook has a favorite buttercream recipe.
The simplest method of preparation is to mix a pack (200 g) of melted butter with 10 tablespoons (tablespoons) of condensed milk in a mixer.
It is better to color the creamy mass with ready-to-use food coloring. You can create the desired shade yourself using the following ingredients:
- brown – cocoa, coffee;
- yellow – saffron diluted in water;
- shades of red – cranberry, cherry, beet;
- salad - spinach;
- orange – carrots.
The trend is to paint cakes in the ombre style (cream of the same color, but of different shades, turning into a white field). It is prepared in 2 ways: in portions for each tone, or as work progresses, it is saturated with color from the lightest shade to the full color.
Mirror glaze
Of all types of glaze (soft, creamy, chocolate, milk, multi-colored), mirror glaze looks the most impressive and modern.
You can cover a whole cake with this beauty, or you can decorate a group dessert in the same style, consisting of individual cakes and cookies.
Mirror glaze (glaze) is prepared from the basic components:
- gelatin;
- glucose syrup;
- sugar;
- chocolate;
- water.
According to various glaze recipes, you can add cocoa, molasses, vanilla, dyes, and condensed milk.
The surface of shiny glaze is a decoration in itself, but compositions (no frills) and individual elements of marmalade, fruit slices, berries, chocolate, as well as inscriptions on the cake with powdered sugar, look impressive on it.
Crispy meringue details lay beautifully on almost any surface. Sweet, snow-white decorative elements are pre-baked from protein mass in the form of hemispheres of the desired shape/size. They are carefully laid out on top of the finished product or on the side around the perimeter.
Ingredients for preparation are as follows:
- sugar (powdered), 1 cup;
- chilled egg white, 5 pcs.;
- vanilla (optional).
In a deep bowl, beat the whites with a mixer or whisk for 10 minutes - 15 minutes until fluffy foam, then gradually add sugar (1-2 teaspoons at a time), adding vanilla at the very end. The formed parts are dried in the oven for 1.5-2 hours at a temperature of 100°C.
The cooled balls are laid out on a layer of cream, chocolate or jam.
Wedding mousse cake
This dessert has a very delicate texture and delicate aroma. It will surely appeal to most guests.
Mousse cake consists of several layers: a dense base, mousse, sponge cake, filling and coating. Berries, fruits, and jelly are usually used as filling. Sometimes crunchy ingredients are added, such as praline or crumble. The cake is usually covered with icing or velor.
Ingredients:
- butter – 400 g;
- nuts – 300 g;
- chocolate – 250 g;
- sugar – 160 g;
- flour – 110 g;
- freshly squeezed orange juice – 800 ml;
- orange for filling – 1 pc.;
- chicken yolks – 6 pcs.;
- gelatin – 3 tsp;
- starch – 45 g;
- peeled orange - 1 pc.
How to cook:
- Soak gelatin in 100 ml of cold water.
- Dry the nuts in a frying pan. Grind half in a blender.
- Mix nuts, flour and 100 g of sugar, add 100 g of butter and grind to form crumbs.
- Spread the crumbs over baking paper and bake in the oven until golden brown at 200 degrees.
- Grind the cooled crumbs, 150 g of chocolate and the other half of the nuts in a blender.
- Place the resulting mixture on a plate in a large springform cake pan, forming the future base. Its thickness should be approximately 1–2 cm. Place the dish in the freezer to harden.
- In a ladle, mix sugar, starch, yolks, orange juice and zest. Bring to a boil, stirring continuously.
- In a bowl, mix gelatin, remaining chocolate and 100 g butter. Pour in the hot orange mixture and stir until smooth.
- The mixture should cool, then beat it with 200 g of butter.
- Assembling the cake: place orange slices on the base and pour mousse over it, place in the refrigerator to set.
- The finished cake can be decorated with fruits, icing, and sprinkles.
Mousse cake should not be decorated with weighty figures. It is so soft and airy that heavy parts can fall inside and ruin the entire composition. To decorate this dessert, light sugar roses, butter cream, and melted chocolate are suitable.
To prepare a mousse cake, you need to have sufficient skill, so it will be useful to practice beforehand. But this amazing taste is worth it.
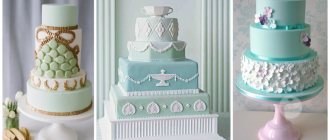
How to decorate a wedding cake with fondant, icing, chocolate
Mastic, due to its ability to maintain the shape of even the most delicate reliefs, is the most popular way to decorate wedding cakes. It is not difficult to master the skills of working with such plastic material.
There are several main types that are used to create the intended design: sugar mastic, its variety icing (sugar glaze), marzipan, chokomastic.
From such material, painted in bright or delicate colors, you can decorate the cake with a bow, fountain, pearls, angels, macaroni, crown, newlyweds, rings, swans, ribbon or heart.
Mastic
The simplest recipe for edible modeling mass consists of 3 ingredients: powdered sugar; condensed milk; powdered milk, mixed in a ratio of 1:1:1.
Marshmallow mastic is made from chewing marshmallows (heated in a microwave oven), butter, powdered sugar, water and citric acid (to taste). Appropriate dyes are added to add color. The resulting mass is rolled into a flat cake and carefully covered with a crust base.
The creative execution of such an operation can also be a design decision.
Having the skills to sculpt from plasticine, you can make themed figures and decorative elements yourself. Thin details, such as flower petals, work well from mastic.
You need to work quickly with the prepared mastic, as the material dries quickly in the open air. If you immediately cover the raw mass with cling film, you can store the raw material in the refrigerator for up to 3 months.
You can attach voluminous decorations to the surface of the cake by gluing them onto sugar syrup, a sugar-protein mixture, or by placing them on hard skewers made of toothpicks.
Icing
A type of sugar paste called ice pattern. The icing looks delicate, but it is very durable (crispy), adheres well to the cream coating of the cakes, and does not spread in heat, therefore it is considered a universal coating when decorating a white wedding cake.
To prepare it you need the following chilled ingredients:
- 450-600 g of powdered sugar;
- 3 egg whites;
- glycerin 1 teaspoon;
- lemon juice 15 g.
Beat the whites for 2 minutes at reduced speed. Add juice, glycerin, and gradually powder. Continue beating until a homogeneous white mass is obtained. Leave in the cold for 1 hour, covered with cling film, so that all air bubbles disperse.
Spread the icing onto the surface of the cake through the narrowest nozzle of a pastry syringe.
Chocolate
Melted white or dark chocolate is suitable for recreating any figure, lace, the finest butterfly wings, inscriptions and hearts of any size. You can pour it over the entire cake on top or limit it to individual plots.
Decoration techniques include the following techniques:
- pouring (applying with a brush) cakes and individual bases;
- sprinkle with crumbs or small shavings;
- cutting softened tiles with a vegetable knife and forming openwork ornaments from a long curving strip;
- pouring into themed molds.
It is believed that there cannot be too much of such a product, so there is a lot of room for imagination.
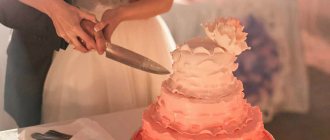
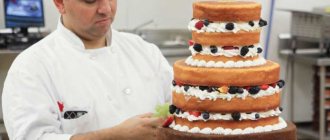
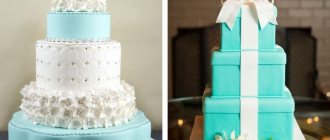
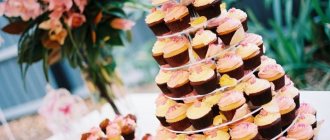
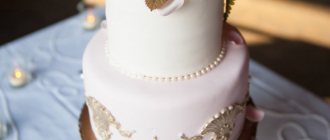
Multi-tiered wedding cake
A multi-tiered cake will be a spectacular end to a wedding celebration. The simplest version of this dish is a two-tier open sponge dessert with butter cream.
Ingredients for the smaller crust:
- eggs – 4 pcs.;
- flour – 110 g;
- sugar – 170 g;
- vanilla sugar – 1 tsp.
Ingredients for the larger crust:
- eggs – 8 pcs.;
- flour – 220 g;
- sugar – 330 g;
- vanilla sugar – 1 tsp.
Ingredients for buttercream:
- cream 30% – 700 ml;
- sugar – 115 g;
- gelatin – 12 g.
How to cook:
- Make a smaller crust. Separate the whites from the yolks. Beat the first ones with a mixer, gradually adding half the sugar until stable peaks form.
- Mix the yolks with the remaining sugar and vanilla powder and grind until white. Add sifted flour.
- Gently mix the dough with the whites.
- Bake the crust in the oven preheated to 180 degrees for 35 minutes.
- Bake the second cake using a larger pan.
- To prepare the cream, mix gelatin with cold water and let it swell. Then heat it in a water bath until it completely dissolves.
- Whisk cold cream until thick foam, gradually adding sand and introducing gelatin in a thin stream.
- Beat until the cream holds its shape.
- Cut the cakes into 2 parts. Assemble a two-tier cake and cover with cream.
- Decorate with figures of the bride and groom.
It is better to prepare biscuits in advance, a day before the celebration, but you need to assemble the cake shortly before serving. You can add walnuts or candied fruits between the cakes.
A wedding cake without mastic may not look as bright, but it won’t be so cloying.
How to beautifully decorate a wedding cake with jelly and fruit?
In this video you will learn how to decorate a cake with jelly and fruit:
Fruit compositions add freshness to a sweet dish, filling it with bright natural colors, aroma and an original combination of tastes. Transparent jelly of a delicate color helps to preserve a living drawing, fill it with depth and play of light.
The jelly mass can be used to evenly cover the top of a wedding cake or to make individual figures (letters) in molds and then lay them out on the base.
To make jelly you will need the following ingredients:
- 1 cup powdered sugar;
- 0.6 l juice;
- 1 pack of gelatin (instant).
Gelatin is soaked in 0.2 liters of juice, after swelling it must be melted in a steam bath.
Add the rest of the juice and (stirring) powder. The homogeneous mass is divided as follows: 0.5 liters are poured into molds (with or without fruit) and allowed to harden. The remainder of 0.1 liters is cooled until it begins to set and evenly spread on the top of the cake. The top is covered with frozen platinum from molds. The edges are covered with cream or cream. The cake is kept in the refrigerator for 10-12 hours and can be served.
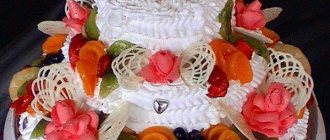
Cherries, apples and other fruits
To decorate with gifts of nature, they choose both whole fruits and artistic cuts from local or exotic fruits.
They can be stored fresh, candied or canned. The space between large specimens is often filled with brightly colored berries.
The results are excellent flavor combinations. Many fruits look beautiful when cut. The method of simply laying a fan of slices over the surface of the finished cake is suitable for oranges, apples, strawberries, mangoes, kiwis, and lemons (limes).
Thin slices can be collected into intricate flowers and vines. You can give a “varnished” effect to such a picture with a thin layer of jelly.
Candied fruits can be prepared and their arrangement worked out in advance. You need to decorate a wedding cake with berries and fruits after the product itself is completely ready.
From this video you will learn how to quickly and beautifully decorate a wedding cake:
Each wedding decor style has its own symbols and color traditions. The use of high-quality food dyes allows you to give mastic, cream or jelly almost any desired shade without changing the taste of the product. The density of decorations on the surface of the dessert is chosen based on a sense of proportion - so that the entire product looks festive, light and solemn.
Necklace or other jewelry I made this necklace specifically for MK. First I found a picture of the necklace I would be making.
Place the picture in a transparent file or plastic bag. Let me note right away that I am not going to repeat this necklace exactly, because... Small stones are scattered across the leaves of the necklace (I don’t know what to make them from yet). The leaves will be simply golden. In addition, there are 7 small stones scattered around the necklace, I decided to replace them with small pearls. I took brown mastic. It has already been verified that gold is most likely to be obtained from this color.
Kandurin Golden Spark or Golden Shine
lightly scatter on the board with a brush
Roll out thin flagella with pointed ends over the scattered kandurin
Slightly flatten them in the middle and place them directly on the picture in a transparent file
repeating the curves of the leaves.
When all the leaves are done
Let's start with the flowers. Roll out thin flagella (I put a ruler to compare the thickness of the flagella
And we lay the flagella along the flower petals, outlining their contours
Take kandurin Silver spark or Silver glitter and white mastic
pour the kandurin into a small container, roll out pearl balls from white mastic (3 large and 7 small) and roll them over the silver kandurin. We put the pearls in their places. The necklace on paper is ready.
Let it dry slightly. Those. necklace details can be made in advance. When the cake is completely ready, right down to the mastic covering, transfer the necklace to the cake. We take the second picture (we made 2 copies). Place it on the cake and carefully use a needle to mark a design on the mastic. To do this, you do not need to write out the entire leaf, but only outline its bend in the middle. And also with the rest of the necklace details. This is what happened
Carefully transfer the details of the necklace from the paper to the markings on the cake.
In those places where there should be 3 large pearls, we make dents according to the size of the pearls
Lubricate these places with vodka and glue the pearls. We do the same in those places where there should be stones (I prepared 7 small pearls instead), and glue 7 small pearls there. The necklace has been moved completely
All that remains is to make a chain for him. You can also do it in advance. Again, using kandurin, I roll out even thinner flagella and cut them into small pieces
and I roll them into small rings. This is the most difficult part of the job and requires patience. The rings are very small. You can make different chains. I'll show you two. I made one on my necklace with black pearls. I placed two rings side by side, glued a small ball on top of the vodka, also rolled in kandurin, and pressed it lightly, flattening it and gluing it to both rings, and so on... In the photo, I attached the remains of my previous chain to the necklace. Therefore, the chain is already slightly deformed. But I was too lazy to make a new one.
You can also make a chain like this. It has the same rings. I took more long flagella, slightly bent them, flattened them and connected them into vodka rings, like here, alternating the bend of the links in one direction or the other.
Edible gold in cake is an additive in the food industry that is used as a food coloring. The product has indexes E100-E199. Edible gold, obtained naturally or chemically, is used to return the natural color to heat-treated products, as well as to create an exquisite shade in finished confectionery products.
What is edible gold made from?
Food coloring with gold is absolutely safe and harmless to humans, since the metal is considered completely inert. Gold is created from a naturally mined, rich yellow precious metal. The element occurs in nature in its native form, and it is also possible to extract the product chemically. After the invention of artificial production methods, it was proven that the properties and taste of the two products are absolutely no different.
The product does not interact with environmental elements, therefore it does not collapse or deteriorate. The raw material is rolled into a thin sheet due to the unique properties of a natural chemical element:
- Plasticity and flexibility;
- Possibility of processing without damaging the natural structure;
- Absence of any interaction with the environment;
- Softness and fusibility under the influence of temperature.
The process of making edible gold is quite complex: initially, a large metal bar is prepared, which is crushed into smaller cubes. Such parts are beaten with a hammer until the pieces become flat and thin. The technological process is completely mechanized, which allows the metal to be processed evenly and achieve the same thickness. After checking for cracks, damage and scratches, the resulting records are placed in a special place for storage.
Eating gold in food is completely safe and harmless. Gold cake dye does not cause allergic reactions and has no side effects. The component is officially included in the list of European food additives. The additive is designated in the international classification by the marker E-175 and is produced in the following formats:
- Sheets;
- Motes of dust;
- Sequins;
- Powder;
- Figured elements, etc.
Edible metal as a food coloring is useful to eat occasionally, as the product promotes natural cleansing of the body, normalizes the functioning of the cardiovascular system, and also has an anti-inflammatory effect. The product is quickly released into the body and is not prone to accumulation. During the production process of a food additive, the product may contain harmful components, but manufacturers indicate the possibility of using the product in confectionery.
Edible gold: how to use?
Before using edible jewelry to decorate finished desserts or cakes, it is worth clarifying the range of dye use. Gold decor is used quite rarely, as it has a significant cost. In most cases, precious sprinkles are used to decorate the products of elite confectionery shops: pastries, sweets, pies, ice cream, and dragees. Before using edible gold, it is worth familiarizing yourself with the experience of confectionery, culinary and wine-making industries from around the world:
- The French add dye to champagne to further emphasize the noble origin of the drink;
- The British have developed a precious confetti that must be added to a glass of wine;
- In Japan, it is customary to enrich the national drink, sake, with edible metal;
- In England, cakes and pies are packaged with edible gold, which makes it possible to give the product an exclusive appearance;
- Most countries produce chocolates with edible gold wrappers. It is not customary to unwrap sweets; such treats are eaten together with a candy wrapper.
Beginners and experienced confectioners use edible gold to decorate desserts in the form of small granules, in the form of a fine powder or solution. The most convenient format of the dye is considered to be powder, since it is quite easy to add to creams, dough, mastic or liquids, and also to cover any surface. Most cooks use 24-carat sheets of precious metal.
Confectioners prefer decoration with edible gold because of its unique and exclusive appearance. Subject to following the factory instructions and manufacturer's recommendations, it is possible to create a smooth and bright surface of the decoration, which is quite popular in modern confectionery art. Edible gold has absolutely no smell or specific taste, so any influence on the properties of the finished dish is completely excluded.