Everything in a bride's wedding look should be perfect. The overall outfit consists of several elements of clothing, shoes and jewelry. The tone for the entire look is set by the dress, depending on the color and features of which the rest of the accessories are selected. The bride's handbag is an optional detail of the bride's image, but desirable. Sometimes when choosing a ready-made accessory suitable for a dress, difficulties arise: there is no product in the right color or material. Therefore, there is a need to create a handbag with your own hands.
Models of wedding clutches for the bride
Wedding handbags for the bride are presented in a huge variety of types, shades and textures. Very often, natural, artificial leather or satin are used for their manufacture. You can buy this accessory either together with a wedding dress or separately, choosing exactly the one that suits your taste best. In addition, handicraft girls are much luckier in this regard. Making a clutch for a wedding celebration is quite simple, and it will be an exclusive, unique bag
, which will become a real decoration of the whole image.
Wedding handbag in the shape of a heart
There are several main types of wedding clutch bags.
:
- Rectangular
. An excellent choice for a formal bridal look. It will look great with a sheath dress on the first wedding day, and with a stylish trouser suit on the second. The handbag can be on a chain, on a strap or without them at all. Try to choose a rectangular-shaped handbag for a wedding with minimalist design elements. Butterflies and ruffles will not suit such a strict and laconic design. By the way, clutches of this model can continue to be used to complement an evening look. - Wallet
. Ideal for a wedding ceremony in retro style. The main distinguishing feature of such handbags is the presence of a metal clasp at the very top. The model itself can be made of any material; products made from brocade and velvet look especially interesting. Rhinestones, flowers, textiles, pearls, etc. are used as decoration. - Boxes
. Interesting in appearance and very comfortable inside, this box bag will appeal to any bride. This model should be recommended for purchase by girls who have chosen dresses in the Empire or “mermaid” style to create a wedding look. - Ball
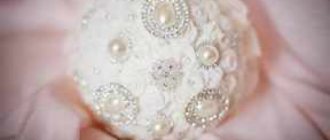
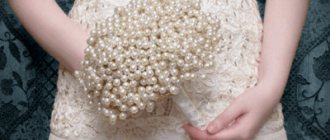
. Ideal for any bride, the ball bag looks more like a large pearl. It is hung on a girl’s shoulder using a long chain and will decorate a strict, laconic dress. - Pouch
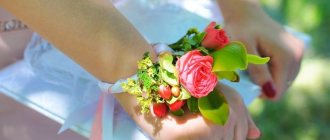
. An excellent solution for any bride. The model looks more like a small pouch-pouch, tied over with a ribbon or chain. You can wear it both on your hand and on your wrist. It will look great with a wedding dress decorated with a full skirt. Very often, brides prefer to create some kind of mix - the handbag is combined with a backup bouquet, making the main composition spherical.
Wedding bag-ball
The traditional color of the clutch bag is white
. There are many variations of shades: ivory, beige, cream, pink, etc. For a traditional white dress, stylists advise choosing a handbag in a milky shade, but also take into account the tone of other accessories - shoes, bouquet, gloves, etc.
Clutches are decorated in different ways.
Products decorated with textile floral arrangements, lace, silk, etc. look very good.
Choosing the material for the pattern and color
All accessories should match the bride's look. The reticule or cosmetic bag can be made from the same material as the dress. But there are also exceptions.
For example, a leather accessory will go well with a short outfit, but in combination with matching shoes. Do not miss the point that it is better to decorate wedding handbags for the bride with the same rhinestones or flowers as the dress. It is advisable to add a bright accessory to a modest outfit. Choose colors pastel, gold or silver. The style should be uniform and combined with earrings, necklace, veil or tiara.
You can only spend a couple of hours creating this decoration , but your image will be unique and attractive, and any mother-in-law will appreciate the handicraft. In addition, you can make other accessories for your celebration in the same style.
You need to take a piece of material that matches the dress, cut a circle out of it and collect it with a beautiful braid. If you know how to knit, then a crocheted or knitted wedding bag and decorated with a satin ribbon will be perfect.
The beaded product looks nice. An embroidered bag will be combined in an original way with the same embroidery on a dress. A heart-shaped accessory will add romance to your look. In the winter season, a clutch bag is perfect. The accessory for a bouquet looks great. In this case, even fresh flowers can decorate it.
Interesting! If you like beaded paraphernalia, look at what other jewelry you can make from it. For example, a bouquet.
Do-it-yourself master class
The bride's handbag can be made by hand. The following technologies can be used:
- buy a ready-made clutch without decorations or frills for the base and start decorating it yourself;
- sew your own handbag for the bride.
The latter option requires more effort than the first. For it you will need fabric (for example, felt), a pattern (numerous versions of which can be found on the Internet), a sewing machine, threads, a supply of needles, decorative elements and scissors. The work is carried out in three stages:
- Creating the inner and outer parts of the clutch. At this stage, the pattern is transferred to the material, and the details of the future handbag are cut out. First, the internal part is processed and prepared. A pocket and a frame for a mirror are sewn on. Then the remaining parts are created and sewn together. Afterwards, it is necessary to combine all the prepared elements into a single whole using temporary stitches.
- Decoration. This stage is characterized by adding decorative elements to the clutch. Here you can use a variety of materials and methods, giving full rein to your imagination. Everything is secured by stitching or gluing.
- Assembly. The final stage at which the final actions on the product are performed. We make a basting, connecting the internal and external parts of the product. We take into account the presence of a bend in the clutch cover. Attach the magnetic clasp. Next, all stitches are worked on a sewing machine.
Materials for sewing and decoration
We cut out the parts according to the pattern
Example of a cut blank
Bend the edge of the future pocket
We attach a part for the mirror to the inside of the valve
Sew the front side of the clutch and connect it to the side
We cut out the loops for attaching the handle. We stitch it to strengthen it.
Attach the belt loops to the inside Decorate the clutch to your liking Sew on embroidery elements Glue half beads and sew on bugles in bulk Attach buttons on the outside and inside of the clutch This is what the finished wedding handbag looks like
This small master class will allow you to create unique wedding handbags with your own hands. Such an accessory will decorate any hero of the occasion and wedding. A DIY bridal bag is a great opportunity to create an image that will meet all your personal needs. Of course, creating a clutch requires effort and time, but it all pays off in the result that comes out in the end. The pleasure from the work done will not leave any girl indifferent.
Finishing touches
Wedding troubles give a foretaste of happiness and joy. If you have time and special skills, decorate the front of the product with beautiful embroidery. A shiny lurex thread is suitable for this. You can embroider swans, connected rings, hearts and other emblems of this special day. Embroidery can also be done with beads. Use a sense of proportion. Don't go overboard with decorations. Perform them using the same technique so that it doesn’t turn out “sloppy”.
To close the bag, sew Velcro or a large button to the edges. If the wedding is going to be played in national traditions, add a national ornament to decorate your handbag. After all, many wedding patterns are not only decorative, but are also amulets. This day is so important that you want to protect every stage of it from an unkind word and glance. You will inevitably remember superstition. To be sure, you can have some proven talisman in your purse.
Video gallery
https://youtube.com/watch?v=Q0K-oE5nupY
Making a small wedding handbag with your own hands
This is another option for a small satin wedding bag. This model will look especially good with an outfit made of the same material. For work take:
- 4 pieces of fabric measuring 25x15 cm,
- thick fabric to form the frame of the bag,
- any decor,
- sewing machine,
- threads to match the material,
- tailor's and ordinary needles.
On a piece of paper, draw the shape of your future handbag.
. You can make it rectangular, square, heart-shaped or semi-oval. Outline the pattern on the fabric, make 4 identical blanks. In this case, 2 will be the front ones, the remaining 2 will be the lining. We sew the blanks for the lining together with their right sides facing each other. Thick fabric is attached to the wrong side of the front patterns and everything is sewn together on a machine.
Beautiful handbag for the bride with your own hands
The edges of the fabric are joined and a buttonhole or any other fastener is sewn in. A chain or ribbon is suitable for this. The wedding clutch is decorated with your own hands. To do this, take any jewelry that matches the style of your outfit.
With a little imagination and spending a few hours, you can make the most amazing, unique product. Decorate your handbag so that it doesn’t fade into the background
, but has become a successful addition to your outfit.
You will need:
- fabric 1 m wide, 50 cm long. It can be satin, silk, organza, usually to match the dress. If the material is transparent, it is better to take twice as much of it and sew in two layers;
- a button or clasp, which should not be massive, preferably inconspicuous;
- decorations to suit your taste: beads, beads, rhinestones, lace, etc.;
- threads, needles, ruler, compass.
When everything is prepared, you can start cutting out your future wedding handbag. There will be three parts in total: two circles with a diameter of 12 cm and a strip 15 cm wide and 55 cm long. When all the parts are prepared, you can begin the actual sewing.
1. Fold two circles with the wrong side facing out. Sew with an overlock stitch, not all the way. Without cutting the threads, turn the resulting circle inside out and close the remaining hole. Thus, we have the bottom of the future accessory.
2. Let's move on to the main part of the product. Take the prepared strip of fabric, bend it about 2 cm and secure it with a “forward needle” seam. If you are familiar with a blind stitch, it is better to use it, then the stitches will not be visible on the front side.
3. Then, using the already familiar overcast stitch, we fasten our strip on the sides. You should end up with a cylinder, which needs to be sewn to the bottom from the wrong side, making small folds.
4. Then, at a distance of 2 cm from the edge, you need to loosely gather the sides. If you gather the edges tightly, the bag will not open later. The main work has come to an end.
Now you need to sew handles, clasp and decorations to the improvised bag. Handles may be different. You can use light chains, beads, ready-made ribbon or the same fabric. There are many options for decorating wedding accessories.
Tulle and lace.
A circle with a diameter of approximately 30 cm is cut out of tulle, gathered at the edges, and the bride’s finished handbag is placed in this bag. The lace is sewn on in the form of a skirt, in one or several layers.
Embroidery.
With lurex threads you can embroider silhouettes of swans, hearts and much more on the front side.
Beads. Beads. Rhinestones.
Such decorations can be placed on the fabric in a chaotic manner, or you can depict various patterns.
Our product used handles made from the same material and beads as decoration. What your little chest will look like for the necessary things on such a significant day depends only on your imagination.
Everything in a bride's wedding look should be perfect. The overall outfit consists of several elements of clothing, shoes and jewelry. The tone for the entire look is set by the dress, depending on the color and features of which the rest of the accessories are selected. The bride's handbag is an optional detail of the bride's image, but desirable. Sometimes when choosing a ready-made accessory suitable for a dress, difficulties arise: there is no product in the right color or material. Therefore, there is a need to create a handbag with your own hands.
Handbag for the bride - luxury, beauty and style in a single design (77 photo ideas)
Today, this accessory has a rather controversial reputation. The reason for this was that the girls’ opinions on the need to use this element were divided.
Some are absolutely sure that the bride should only have a bouquet in her hands and nothing else. After all, holding anything else in your hands is extremely inconvenient. Therefore, it is more logical to ask your girlfriends to arm themselves with a cosmetic bag and a handkerchief, and give the phone to one of the relatives.
However, another category of ladies believes that wedding handbags for brides act not only as a beautiful accessory, but are also useful and irreplaceable.
Agree that it is much more convenient when all your things are at your fingertips, and in order to get the same powder compact, you do not need to call your friend over.
In addition, we should not forget that designers work hard every day to create not only beautiful, stylish accessories, but also strive to make them more practical and convenient.
According to experts, this thing not only competes with the imaginary inconvenience, but also adds more grace to the bride’s image.
Models on the market
As mentioned above, designers work tirelessly to create new models. Therefore, you can easily find on the market not only an inexpensive accessory, but also one that suits you in all respects.
Let's take a closer look at which models are most widely used and which dresses are best combined with them.
Pouch bag
People often call it a pompadour because it goes well with princess-style dresses that have a fairly full and long skirt.
It is worth noting that of all the possible models, this one is rightfully considered the most convenient. After all, thanks to the fact that it has ties instead of a handle, you can easily tie it on your hand.
Some brides prefer to wear it on their belt because their hands remain free. Most often they are made of satin and brocade.
But lately, lace and knitted handbags for weddings, which have the shape of a bag, have become especially popular.
Heart bag
Some particularly romantic people prefer to use this particular model, since it can be used to emphasize the image and emphasize femininity. These handbags are ideal for dresses that have a fitted silhouette.
Often they are specially decorated with various stones and rhinestones. Sometimes pearls are used.
Experts note that to create a successful look that includes the use of a heart bag, you should choose dresses with a minimum of jewelry.
Handbag pouch
This model belongs to a variety of pouch bags. The main difference is the pronounced elongated shape, as well as the ribbons located close to the edge.
Handbags are made only from noble fabrics, and they match dresses decorated with crinoline.
Clutch
Ideal for any long dresses and serves as an excellent addition to the look.
If you decide to purchase this particular model, we strongly recommend that you choose only those equipped with a removable strap. This will allow you to free your hands if necessary.
Clutch bag
Just a few years ago, this accessory was used only in winter. But nowadays it is widely used at summer weddings as well.
Most often, such products are equipped with an internal small pocket, which is fastened with a zipper.
They are decorated not only with lace, but with flowers. Moreover, flowers can be both natural and artificial.
Do it yourself!
It is worth noting that such accessories often have a fairly high cost. And that is why most women refuse to buy them.
But the designers are confident that if you really want to go to your own wedding with a handbag, then you don’t have to give up this idea.
After all, you can make a handbag for the bride with your own hands, keeping costs to a minimum. Plus, your design will be truly unique and will also suit your chosen look.
Don’t think that only a professional seamstress can sew such a wedding accessory yourself. Not at all!
Any girl can cope with this task.
Before you begin the sewing process, you should decide what material you will use. Remember that the material you choose must be compatible in texture and shade with the dress itself.
The most suitable fabrics in this case are silk, satin or lined guipure.
Once you decide on the fabric, stock up on the following materials: a disk, two satin ribbons of different widths, decorative elements and a piece of tulle (nylon).
From a material (satin, silk or guipure), you need to cut the bottom to the size of the disk and sew its edges so that you get a round bottom.
Next, take the same fabric and cut a strip from it about 25 centimeters wide. Its length should be equal to the circumference of the disk, taking into account the allowances necessary for folds. You need to sew the edges of this strip to make a pipe. Now all that remains is to sew these two parts together.
After this, you should step back 3 centimeters from the top and make slits in the material (vertical). A strip should be cut from nylon or tulle with the same length as the satin ribbon. However, its height should be 2 or 3 cm greater.
The bottom edge must be sewn to the bottom of the bag, and the top edge must be connected to the edge of the satin. The top material should have small holes through which you can thread your purse handle.
And now your accessory is almost ready. All that remains is to decorate it.
Pay attention to the photo of the bride's handbag, which is presented below. It depicts a homemade accessory, which was decorated with embroidery. Therefore, if you know how to embroider, you can use this decoration option.
Photo of a handbag for the bride
Source: https://svadba-sovet.ru/sumochka-dlya-nevesty/
Varieties
A beach handbag reflects the temperament and character of its owner. It should fit harmoniously into the image and be a bright addition to it. The bag will look impressive with fashionable sandals or sneakers, and the square shape will look great with a light sundress. A DIY beach bag and rug will interest practical vacationers who value comfort and try to follow fashion.
By shape
Before deciding what to make a beach bag from, it is important to develop its concept and think over its shape. In the world of beach fashion, three types of bags are recognized as the most common: square (rectangular), torba (mini-backpack), transformable
Each has its own advantages.
| Square and rectangular | Bag | Transformer |
| Ease of manufacture | Convenient form | Versatility |
| Ease of use | Creative appearance | Creative appearance |
| Capacity | Frees up your hands | Ease of use |
| Practicality | Minimum weight | Long service life |
If traditional square and rectangular shapes do not seem entirely interesting, you will have to figure out how to make a beach mat with your own hands. This accessory will amaze with its versatility and will become your favorite bright element in your look. The bag is an excellent option for long hikes, since the fastening of the handles allows you to carry it on your back and completely frees your hands.
Bag
Rectangular
Transformer
By material
The selection of material is the most important point in deciding how to sew beach bags. From hundreds of varieties of fabrics, girls should choose exactly those that will fit into the image and will correspond to current fashion trends. There are the following types of handbags depending on the chosen material:
Fabric. Most girls will always have different scraps
It is important to choose shades that match the color of the swimsuit and sew an accessory that no one else will have. In the fashion world, there are no restrictions on what you can use to make a beach bag, but it is still better to give preference to the following materials: linen, denim, burlap, nylon, vinyl, jute. Knitted
Every woman should master the art of knitting if possible, because in addition to socks and scarves, you can find fashionable patterns for making handbags from yarn. Knitted swimsuits, by the way, are also a trend for the upcoming season. Wicker. Handbags of this type are one of the most favorite ones for a beach holiday. This accessory can be complemented with a woven hat, and a stunning look is ready. Oilcloth. Products made from shiny oilcloth will always be the center of attention. You can find suitable patterns for sewing beach bags with your own hands and create an oilcloth accessory that will look great with short shorts, bright flip-flops, and sunglasses.
Knitted Oilcloth Wicker
Fabric
By color scheme
A plain, bright handbag is suitable for fashionistas who love to be the center of attention. In addition to a beach holiday, you can take it for a walk in the city and even to the office. A girl will never go wrong if she bets on the most catchy color of the accessory, but dresses in simple-cut clothes in neutral colors.
In the fashion world, floral print has never ceased to be relevant, especially for summer looks. A woman with a floral accessory will always look modern and fresh. You can bet on both large and small floral patterns.
If fashionistas do not accept bright, catchy colors, it is not necessary to apply patterns for sewing beach bags on black or white fabric. You can plunge into a nautical theme and choose a striped blue and white print. This product is in harmony with paraphernalia in the form of ropes, anchors, and boats.
Top most popular trends
What bags are in fashion in the summer of 2022:
Wicker. An ideal choice for an image with a wide-brimmed hat and a flowy light dress. Eco-friendly materials are trending: straw, bamboo, and textiles decorated with pearl embroidery. An interesting option for relaxation is a basket-shaped bag with decorations in the form of bright flowers, fruits or ribbons. More strict models now fit into business style.
Saddle. A must have for a true fashionista. The role model is an original model from Dior, a guest from the recent past, namely, from the extreme 2000s.
Hobo bag. This is a voluminous crescent-shaped accessory that can be worn over the shoulder.
Banana. This is an alternative version of the classic bag, which is traditionally attached to the belt. Nowadays it is fashionable to wear it over the shoulder, not only on the back, but also in the front. An option not only for active pastime, but also for walks, travel, parties. It is quite versatile and goes well with both a sport-chic outfit and loose items in the boho style (a mixture of hippie elements, gypsy and ethnic motifs and vintage) and casual (urban). New options are being developed for wearing on a belt. For example, a small leather suitcase with two large rivets looks very nice.
Light. For summer, light-colored handbags (both bulky and rigid) are most suitable. This color scheme is suitable for the office, and for walks in the fresh air, restaurants, and outdoor cafes. In addition, white and light colors suit the color scheme of any image and make the entire look fresher.
Shopper. This large bag, originally functional, has now been turned into an elegant and bright detail of the image. Because a true fashionista should have a wonderful handbag at hand at any time. And even going to the store turns into walking along the catwalk, because now shopping centers have become places for leisure activities. This model is usually decorated with bright patterns, such as a checkerboard print. A popular model made of transparent plastic.
Round tablet-shaped. This is a cute and unusual accessory. The shape of a ball or sphere is especially relevant now; it became a real sensation last season. Such a handbag cannot be bulky; it is very neat and elegant. Any bright print looks very appropriate on it: be it polka dots, stripes or checks.
With logos. They are depicted in a variety of variations and executed in any way: using embossing, embroidery, printing, drawing. The inscriptions are located vertically and horizontally, diagonally, intersect and transform.
Denim bag
Probably, many people have jeans in their closet that no one wears anymore, but it would be a shame to throw them away. Then there is a very interesting way to give them a second life. This will require a little time and patience. And for the summer you will have an extraordinary DIY bag made from jeans.
Cut the fabric from the jeans. Cut along the seams and cut off thick stitching.
Mark 30 cm+ for scraps, for hemming.
You can take additional fabric for insertion.
- Sew the parts with the insert. You should get two canvases measuring 28*35 cm.
- Select lining fabric.
- Sew the main two parts.
- Sew the lining.
- Make a handle from a corsage ribbon and attach it to the main part.
- Place the lining fabric into the finished product and sew the ends.
- If desired, you can sew a lock or other latch.
Rules for choosing a wedding clutch
You can plan a large celebration with many guests or a small family celebration, but the wedding bag must match the color of your shoes. There are several basic rules
:
Don’t try to make the accessory invisible; on the contrary, the bag should attract the attention of others. It can be textured, embossed, embossed or decorated with beautiful flowers and ribbons
The main thing is that it looks harmonious. Convenience is another important factor in choosing a clutch bag. It will be with you throughout the holiday, so it should be comfortable and multifunctional. It’s great if the item can be hung on your shoulder, taken in your hand or placed under your elbow. It's even better when it has many compartments and pockets for a variety of items. Think about a set of things that you need throughout the wedding celebration. This is necessary so as not to overload the clutch with unnecessary items.
DIY leather bags
Leather is one of the most interesting and durable materials for sewing bags. Therefore, I present to your attention several master classes using this material.
Bag - cat
For this simple but very cute model (somewhat reminiscent of the previous one), you will need leatherette, scissors, an awl, thread and a thick needle.
This can be worn by both a young girl and a small child.
The simplest leather bag
No, you definitely need to get one. You will need leather, scissors, a strap, tape, a marker and (optional) a special tool for cutting several holes in a row (you can get by with an awl). All you really need to do is cut out a circle, make holes, pull the ribbon through them and attach a strap. All)
Envelope
Reminds me of the processing method of a cat bag.
Chanterelle
A lovely model)) Prepare leather or thick leatherette, braid and rivets for it. You don’t have to sew the chanterelle, just glue it along the edges and hide these places under the braid.
How to crochet an accessory - diagram
Required: hook No. 2, 150 grams of fine yarn, white beads, hot glue, lining material. On thick cardboard we draw a circle measuring 16 cm. We take the threads in two folds and knit the bottom of the bag in this circle according to the pattern.
Five double crochets from one loop, 3 chain loops, threaded into the fifth of the previous row, 5 chain loops, threaded into the fifth of the previous row, then 3 chain loops and again 5 double crochets from one loop. We knit the entire row in the same way.
In the next row, after we have knitted the double crochets, we make one chain stitch between them, then fasten two chain stitches into the middle column of chain stitches in the previous row. In the third row we knit in double crochets, make two chain stitches between the stitches, and connect the fifth stitch with the next chain stitch of a different pattern.
We knit the fourth row like the first, etc. Using this pattern, knit a strip 55 cm wide and 30 cm high. Sew it together. We decorate the top of the bag with single crochets with picots. We sew the lining. We knit a cord measuring 60 cm and thread it through the finished product, departing 4 cm from the top edge.
Next, we decorate at your discretion, you can glue beads or flowers. This option involves crocheting. Wedding handbags can also be knitted with knitting needles, for this we take: white Adelia RUFF yarn, Zlatka clasp 205*75 mm and knitting needles No. 2.
We cast on 320 loops on the knitting needles, simply throwing on each free loop of the working thread. In the first row we knit the first loop, pulling the next free loop of the working thread into it, and similarly we knit all 20 loops. The result should be a row with double ruffles.
Having knitted all 25 rows, do not close the loops. We knit the second part in the same way.
Next, we take the clasp clasp, open it and attach a part to one of the doors, and a second part to the other. We pull the loops from the knitting needle into the holes of the fastener using a crochet hook. We hold the first loop on the hook, insert it into the second hole and pull the second loop through the first. We knit all the loops from the knitting needle one by one.
You will have a buttonhole stitch inside your cosmetic bag. We secure the last loop with simple threads and a needle on the wrong side. We sew the second part in the same way. We sew the parts together with a needle using a hidden seam. You should get a handbag with ruffles: both inside and outside - this gives it additional volume.
Step by step sewing process
We take a piece of satin 65 cm, a clasp, a cord 125 cm, thread, scissors, a needle. We will decorate the main part with puffs. To prevent the fabric from fraying at the edges, we scorch it with a candle, and you can overcast it.
Cut out a 6*20 strip from a sheet of paper. We make cuts along the entire strip with scissors at a distance of 1 cm. We get a template with which we will make a pattern on the fabric.
You need to leave 4 cm at the top to sew on the fastener. We mark from the middle of the material so that the pattern is uniform. You get a dotted pattern in the form of a herringbone: one branch to the left, the other to the right.
We select threads to match the color of the product. We grab the material with a 1 mm stitch, pulling the material together, securing it with a knot on the wrong side. The pattern looks like a herringbone. We collect one row, skip the second, etc. We gather the edges a little to fasten the elements together. We sew the parts, retreating 1 cm from the edge to the semicircular side parts. Sew on the lining. We insert a plastic strip inside between the base and the lining to give it shape. We fix the clasp by carefully passing the thread into each hole and securing it from the inside out.
For handles, cut thin strips in the amount of 6 pieces. We sew them from the wrong side and turn them inside out. Braid it with a pigtail. You can attach it to the product on a ring. Another option for attaching handles is to use a chain or beads.
Designer
The main thing is where and how you will wear the accessory: on the wrist, elbow, waist (in the form of a flower as an additional decoration to the outfit). In any case, the handbag should not be heavy.
Lyudmila Alentyeva
The most noticeable accessory is, of course, the handbag that goes with the wedding dress. Sewing it with your own hands, as you now know, is not very difficult and much more profitable than buying it. Choose the most unusual wedding handbags, use your imagination, and you will shine in your image!
Umbrella for a photo shoot
This accessory is most often used for photo zones. Delicate openwork paper umbrella in the Chinese style, in the shape of a heart. Any cane umbrella of the desired shape will be suitable as a base. The umbrella only needs a mechanism, so the covering should be removed. Stretch the lace over the base and secure. The handle can also be decorated.
Examples of wedding umbrellas in the photo:
Glasses for young people
Particular attention is paid to setting and decorating the table for newlyweds. It’s not difficult to make the selected glasses sophisticated and delicate with the help of tips
Try it and you will be surprised how easy it is. These elegant glasses are available to you too.
To prepare them you need to prepare:
- 2 glasses;
- paint, preferably acrylic (in this embodiment, snow-white pearlescent is used);
- small sponge;
- superglue or glue used by a manicurist;
- aerosol varnish, glossy looks better;
- gel for gluing and producing pearls;
- clay for flowers or plastic flowers;
- construction paper tape;
- rhinestones;
- contour on glass.
For ease of use and to protect the edge of the wine glass, it should be covered with tape.
Dipping the sponge into the paint, gently touch the glass from bottom to top.
This is what it looks like after painting.
Instead of the used tape, glue a new one, but a little higher than the previous one, so that the varnish completely covers the paint. Treat the surface carefully so that there are no varnish drips.
After the varnish has dried, you can proceed to the next stage. Using pearl-making gel, we frame the processed edges and the stand of the glass.
When the pearls are dry, glue ready-made flowers from polymer clay or create the ones you need yourself.
The leg is shaped in the same way.
All that remains is to add rhinestones - the masterpiece is ready.
Product options
Different materials are used for creativity. This can be not only new fabrics, threads, decorative elements, but also old things of good quality. The most popular methods of making an accessory for many years have been knitting and sewing.
Knitted
Knitted bags, according to designers, will always be popular. They come in different shapes and shades. The monochromatic, discreet color of the accessory is complemented by the pattern of the canvas and decorative design. Most often, patterns are knitted or crocheted. Features of different techniques:
- Knitting. They use mainly half-wool, acrylic yarn. The thicker the thread, the more voluminous the pattern. The shape of the bags is simple: square, rectangular. Knit with circular knitting needles or two, preferably metal ones. You can choose any pattern, even use simple garter or stocking stitch, sometimes weaving in colored threads. After completion of the work, the sides are sewn together. A fabric lining is required to maintain volume.
- Crochet. More common way. Hooks No. 2-4 are used in this work. Some models are knitted in one piece, starting from the bottom. Basically, the pattern is built from air loops, double crochets and single crochets. Different threads are used, from cotton to wool with additions. To create unusual accessories, twine, satin ribbons, and plastic strips from bags are suitable.
Knitting Knitted yarn Crochet
What you need for work
You will need: material (to match your outfit), sewing machine, scissors, beads, satin ribbon. If you choose a product with embroidery, then take floss threads. For a knitted bag - yarn of a suitable shade. All kinds of brooches and beautiful hairpins are suitable for decoration. If you want to decorate the product with flowers, they can be made from pieces of fabric or ribbons. Main types of bags for weddings:
- Clutch. Made from silk, satin and leather. Worn under the arm.
- A reticule is a large wallet with a clasp. Can be of any shape and from any material.
- rectangular pouch It can be knitted or made of fabric, tightened with lace.
- Envelope. Made of yarn, fabric, the disadvantage is that it is always in the hands.